Tutorial: Softmod to any voltage you want! [Updated] (1.3~1.6v or more)
PLEASE POST IF YOU CAN GET THIS TO WORK ON G92 OR G80 CARDS. Thanks to JustaGeek95 and Unwinder.
So far people have this working on HD4800, HD3800, 9800GX2, and GT200 cards
UPDATE 2/7/09:
For Nvidia Cards only:
An extremely easy method is here, making all other original methods unnecessary (unless you have an ATI card). Use the evga voltage tuner 1.0 together with agent god's patch, and the evga voltage tuner now works on any brand nvidia card and increases slider limitation from 1180mv to 2000mv. Remember to use GVT to set your voltage while in 3dmode (ie while atitool or furmark is running). If you set it at desktop, it sets the 2d voltage, and when you open a fullscreen 3d game, it reverts to stock voltage.
6. Justageek95's D.I.Y. method:
With the assistance of Unwinder's genius, this is the man that brought the news to all who weren't in the know
here is the correct formula:
Quote:
Originally Posted by mattkosem
the formula that is used to calculate the desired vid that it should really be:
(VID * 0.0125) + 0.45
*note: You must enter these commands from the command line or in DOS.
Quote:
Originally Posted by justageek95
DISCLAIMER: I TAKE NO RESPONSIBILITY FOR ANY DAMAGE THAT MAY HAPPEN IF YOU DO THIS!
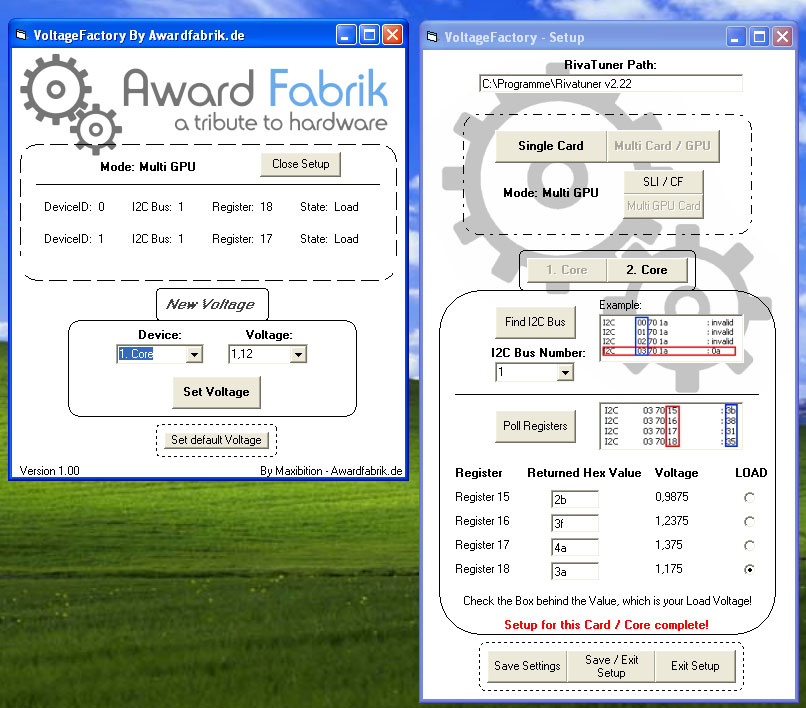
1. Find the I2C bus of your card by running the following CLI commands:
RivaTuner.exe /ri0,70,1A
RivaTuner.exe /ri1,70,1A
RivaTuner.exe /ri2,70,1A
RivaTuner.exe /ri3,70,1A
Three of these four commands will return "invalid" take note of the one that doesn't (for me it was /ri3,70,1A)
This will find the I2C bus (highlighted in red in my example)
2. Get your voltage register values
Using the I2C bus number found above, (0-3, highlighted in red) run the following CLI commands, replacing "#" with the I2C bus number.
RivaTuner.exe /ri#,70,15
RivaTuner.exe /ri#,70,16
RivaTuner.exe /ri#,70,17
RivaTuner.exe /ri#,70,18
Take note of the return value for each.
3. Convert voltage register values to actual voltage
For each of the values returned in step 2 do the following:
A. Convert the value to decimal format (the returned values are in hexidecimal)
B. Calulate actual voltage by the formula: voltage =
(VID * 0.0125) + 0.45
C. Compare the 4 resulting actual voltages to the voltage reported in 3D mode in Rivatuner hardware monitoring.
D. The closest value should be your 3D voltage (ex: for me Rivatuner showed 1.13v, I got 1.250v
E. Take note of the register that is associated with that value. (highlighted in red in step 2)
4. Calculating the voltage to use
A. Decide what voltage you want to set.
B. Find the VID for that voltage using the formula VID = (voltage - 0.450) / 0.0125
C. Convert the VID to hexadecimal
5. Setting a new voltage
You can set the voltage by writing the new VID in hexadecimal form to the register.
A. Run the CLI command: (replace # with IC2 bus number, and VID with the VID in hexadecimal form)
RivaTuner.exe /wi#,70,17,VID
The new voltage should now be set!
Example: GTX 260, desired voltage = 1.2v
1. All the commands return "invalid" except RivaTuner.exe /ri3,70,1A which returns "0A"
2. I get the following values:
RivaTuner.exe /ri3,70,15 returns 3B
RivaTuner.exe /ri3,70,16 returns 31
RivaTuner.exe /ri3,70,17 returns 36
RivaTuner.exe /ri3,70,18 returns 2F
3. Calculating the voltages of each:
Hex: Decimal: Voltage:
3B......59......1.1875v
31......49......1.0625v
36......54......1.1250v
2F......47......1.0375v
Rivatuner was reporting 1.13v in 3D mode so the third one is my 3D voltage register.
4. I wanted 1.2v so:
VID = (1.2 . 0.45) / 0.0125 = 60
60 = 3C in hexadecimal
5. I set the new voltage by running:
RivaTuner.exe" /wi3,70,17,3C
Quote:
Originally Posted by Unwinder
A few tips and tricks:
1) Once you've determined index of I2C bus containing VRM on some display adapter (e.g. I2C bus 3 on GTX 200 series), the same index can be safely used on the same display adapter model by others. Display adapters have a few I2C buses assigned for differed functions (e.g. for connecting DDC and for external devices like VRMs, thermal sensors, fan PWM controllers and for on), VRM's I2C bus is defined by PCB design so it is fixed for the same display adapter families.
2) Don't try to scan more I2C buses than the GPU actually has (there was some posting with attempt to scan buses 0-99 in hope to find VRM on G92). Each GPU architecture supports fixed number of I2C buses, e.g. G80 and newer GPUs have only 4 I2C buses, pre-G80 supports 3 buses, pre GF4 supports just 2 buses and so on.
3) I see that many users started to enable VT1103 plugin now. Please pay attention to the following info from RivaTuner's release notes and always remember about it when using this plugin:
"Please take a note that Volterra voltage regulators are rather sensitive to frequent polling and may return false data under heavy load, so it is not recommended to use VRM monitoring in daily monitoring sessions"
4) There were some questions about finalizing these new VRM settings in NVIDIA VGA BIOS. You cannot use Nibitor for that because the tool knows nothing about VRMs and works with BIOS voltage tables only, it is only allowing you to change associations between performance levels (i.e. 2D/3D modes) and 4 fixed voltages stored into VRM registers 15-18 by default. However, you can easily edit your BIOS with any hex editor to reconfigure initialization scripts writing these 4 fixed voltages to VRM during POST. It is rather simple task, taking my 65nm EVGA GeForce GTX 260 as example the following script command in VGA BIOS is configuring VT1165:
4D 80 E0 06 15 3B 16 31 17 36 18 2F 1D 55 19 01
The command uniquely identifies I2C serial byte write operation, encodes target I2C device address (E0 is 8-bit encoding of VT1165's 7-bit address 70 including read/write flag in the first bit), tells script processor how many bytes have to be written (06) and finally defines register addressed and data to be written to each register (register 15 -> 3B, register 16 -> 31 and so on).
The voltages can be different for different VGA BIOS images, so the easiest way to locate this command in any GTX200 BIOS image is to search for 4D 80 E0 byte chain.
Please read my previous comment about I2C bus indices, altering I2C bus indices is not a correct way. You should try to probe difference i2c device addresses instead. Each I2C device address is defined by developers (e.g. ADT7473 fan controller use fixed address 2E, VT11xx VRMs use fixed register 70 by default, but it can be strapped to 7x AFAIR, etc).
You must have Primarion PX3544 datasheet to know where it normally resides. I've peeked inside reference 9800 GTX BIOS to see if it is initializing any I2C devices and it does seem to write something to I2C device 6A (writes single byte 86 to register 80 of this device). It can be Primarion PX3544, but I've no strict info about it because I don't have any info on this VRM I2C interface.
hex to dec and dec to hex converters
edit: does anyone know how to get it running at rivatuner/pc startup?
Quote:
Originally Posted by auchkoenig
It working on my GTX280 too but I have a question though. The given cli only change the VID for gpu0, how do I change the VID for gpu1 since im using SLI.
I tried checking the diagnostic report. The only difference between the two GPU is one is on
$0000000003 Location : bus 2, device 0, function 0
and the other one is on
$0000000003 Location : bus 3, device 0, function 0
My guess is that i need to change the deviceid, am I correct?
Quote:
Originally Posted by Unwinder
You should apply changes to both GPU VRMs. CLI works with GPU selected in the main tab of RivaTuner. There is /sd<device_index> or /selectdevice<device_index> command allowing to change device selection via CLI. <device_index> is 0-based logical display device index, i.e. if there are 4 virtual display devices (2 heads representing independent displays for the primary GPU and 2 more heads for the secondary) then your should select the first (0) then the third (2) logical devices when applying the changes. In this example, command line for probing VRMs of both GPUs can look like:
RivaTuner.exe /sd0 /ri3,70,1a /sd2 /ri3,70,1a
Quote:
Originally Posted by Unwinder
RivaTuner's task scheduler module was designed special for such tasks. Go to <Scheduler> tab, click <Add new task> button and type in task name, e.g. "Voltage mod", select <Launch application on specified schedule> task type in %RT% macro as path (RivaTuner will expand it into fully qualified path to itself when executing) and desired I2C writec commands in the command line field then selct desired schedule type, e.g. <Run task at RivaTuner startup>.
This is NOT BIOS editing.
You may want to edit the thread title.
__________________
Many thanks to: Sue Wu, Yiwen Lin, Steven Kuo, Vivian Lien, Joe Chan, Sascha Krohn, Joe James, Amy Deng, Jack Peterson, Hank Peng, Mafalda Cogliani, Marta Piccoli, Oliver Baltuch, Steffen Eisentein
And how is that any different to what you can select with nibitor? I don't see any voltages higher than what it already offers you with a nice GUI. Note that voltage tables vary with different GFX vendors and bios revisions, I have seen GTX 260 cards with 1,13, 1,15V and 1,18V 3D voltage so far. Also min. 2D values usually vary from 1,03V to 1,06V.
Apart from the fact that you don't have to flash bios to apply, which is good, it's like 10x more complicated and time-consuming. So I'd just use nibitor
__________________ World Community Grid - come join a great team and help us fight for a better tomorrow!
--> 200 Ghz working 24/7 to kick diseases right where it hurts
Envy me already? No problem, I'll send you my power bill and you'll instantly feel better
It does set the specified voltage but it doesnt help to overclock shaders more, at least not for me. Also I have yet to check with DMM if 3D voltage actually is being set. You cannot always trust software readings
shader clocks aren't helped with more voltage, in my GTX260/280 volt modding experience, temperature is the only thing that helps those. that is why voltage increases won't be of much use to a lot of guys on air with 260s/280s, because shader clocks usually hold back core clocks. with 285s and 295s, that might be a different situation though.
i have a pair of EVGA GTX 260 216s folding in a rig right now and i played around with this method and it seems to be working nicely. i have a couple shortcuts on the desktop setup to jump between voltages which can easily be setup to run on startup. i don't have voltage read points on the cards yet, and as kiwi stated above, software voltage reading should always be confirmed; but the spikes in temperature going from 1.05v to 1.20v (according to rivatuner) sure indicates voltage is being increased.
i have a GTX 280 somewhere with read point already soldered and will throw that in a machine to do some concrete testing, but it looks to be a pretty easy way to adjust voltages on these cards in Windows. now to see how high volts will go with this method
**edit** added screenshot of results...and 100% confirmed working with a DMM **edit**
Not without manually modding the bios files, no.
Pretty nice, if that really is 1,6V to the card. Reached any new GPU clock heights to prove it's working?
__________________ World Community Grid - come join a great team and help us fight for a better tomorrow!
--> 200 Ghz working 24/7 to kick diseases right where it hurts
Envy me already? No problem, I'll send you my power bill and you'll instantly feel better
Not without manually modding the bios files, no.
Pretty nice, if that really is 1,6V to the card. Reached any new GPU clock heights to prove it's working?
i've measured with a DMM on my GTX 280...definitely 100% confirmed working
If only this would work on my crappy 4870X2... I got 29C core temp all right, now I need more juice
Wrong thread for that card tho, enjoy crazy voltages with Nvidia
__________________ World Community Grid - come join a great team and help us fight for a better tomorrow!
--> 200 Ghz working 24/7 to kick diseases right where it hurts
Envy me already? No problem, I'll send you my power bill and you'll instantly feel better
If only this would work on my crappy 4870X2... I got 29C core temp all right, now I need more juice
Wrong thread for that card tho, enjoy crazy voltages with Nvidia
It doesn't seem to work with mine. I did this:
RivaTuner.exe /sd0 /ri1,70,1a /sd2 /ri1,70,1a
returns "0A" both times
RivaTuner.exe /sd0 /ri1,70,15 /sd2 /ri1,70,15
2d hex = 45 dec
(45 * 0.0125) - 0.45 = .1125
RivaTuner.exe /sd0 /ri1,70,16 /sd2 /ri1,70,16
31 hex = 49 dec
(49 * 0.0125) - 0.45 = .1625
RivaTuner.exe /sd0 /ri1,70,17 /sd2 /ri1,70,17
39 hex = 57 dec
(57 * 0.0125) - 0.45 = .2625
RivaTuner.exe /sd0 /ri1,70,18 /sd2 /ri1,70,18
41 hex = 65 dec
(65 * 0.0125) - 0.45 = .3625
The voltage reported was 1.26, so that pointed me to #17.
So I tried to set 1.3625:
RivaTuner.exe /sd0 /wi1,70,17,41 /sd2 /wi1,70,17,41
Actually, as I look back through the post, it looks like the formula was listed incorrectly. I can see from the formula that is used to calculate the desired vid that it should really be:
(VID * 0.0125) + 0.45
That pointed me to 18 being the correct one, so I ran:
RivaTuner.exe /sd0 /wi1,70,18,4C /sd2 /wi1,70,18,4C
Boom! 1.4v!
--Matt
yup, that was what i had a problem with at first so i just tried all the different registers until i found the one that changed idle voltage and the one that changed load. then reverse engineered it to find that the equation was wrong. yours....
Voltage = (VID * 0.0125) + 0.45
is correct. good to see that the 4870X2 is working with this method as well
Heck yeah! I ran a vantage run at 860mhz a minute ago. up 200 marks :-D Gonna try for more in a bit.
So this mod doesn't seem to really do anything now that I've worked with it more. I'm able to run vantage at 880 on both cores with or without the mod, and 06 at 842 with or without. The temp doesn't change by much if at all, which really can't be correct. When I had my hardmod installed I was able to run 3dmark06 and vantage at 880 but the temps were pretty high at that clock, much higher than I'm seeing right now. It doesn't seem to be changing anything other than the voltage that I see in rivatuner and gpu-z. I'd test it with a VMM, but I've got the back plate on my card and I cbb to disassemble it right now.
Not working with my Powercolor 4870 Zerotherm,
every of these commands
RivaTuner.exe /ri0,70,1A
RivaTuner.exe /ri1,70,1A
RivaTuner.exe /ri2,70,1A
RivaTuner.exe /ri3,70,1A
return "invalid'
Not working with my Powercolor 4870 Zerotherm,
every of these commands
RivaTuner.exe /ri0,70,1A
RivaTuner.exe /ri1,70,1A
RivaTuner.exe /ri2,70,1A
RivaTuner.exe /ri3,70,1A
return "invalid'
just tried the same thing and got "invalid" for all of them on a g92 8800gs
__________________
Quote:
Originally Posted by AndreYang
Damn...Today is 11/06, but [his] bios date is 11/07........lol
This mod only works if your card is using a Volterra VT1103/VT1105/VT1165 voltage regulator. Basically the cards that have them are reference boards of the Radeon HD 3800/4800 series and the GTX 200 series. (not sure about 55nm GTX 200)
Non-reference boards for the 3800/4800 series may have different voltage regulators that will not work. And the formula listed above by mattkosem is correct, I listed it originally as voltage = (VID * 0.0125) - 0.45. Should be voltage = (VID * 0.0125) + 0.45 Guess that's what I get for posting that at 5 AM
Works great on my Ref VisionTek 4870! Too bad I didn't know about this 24h earlier, I hard modded my GPU yeterday. I increased the voltage to 1.3V with RivaTuner, and to 1.35V with my vmod.