Page 1 of 6 1234 ... LastLast
Results 1 to 25 of 132

Thread: High-Res! Update April 22nd, Rad fitting.

  1. #1
    Xtreme Member
    Join Date
    Mar 2009
    Posts
    278

    High-Res! Update May 1st Koolance P0rn.


    Sponsor

    <----Clicky!

    I would like to thank Tom @ Chilled PC for the help with everything to come over the next few months. I wouldn't go anywhere else for anything water related!!


    Hi all this is a intro to a build that iv been planning for a few months and with the first part just arrived then i thought i should start. Im into my watercooling so that will be a big part of the build.

    Heres a few pics of my past builds(Clicky):


    Anyway lets get on with it, first.

    The hardware:

    E5400.
    Gigabyte P45.
    2x2GB DDR3 or DDR2 depending on mobo choice.
    EVGA GTX285.
    Silverstone DA850.
    Samsung F1 750Gb.

    Cooled by:

    Thermochill PA120.3.
    DDC 18w with top.
    Custom roof res.
    Koolance Full cover GPU block.
    GTZ

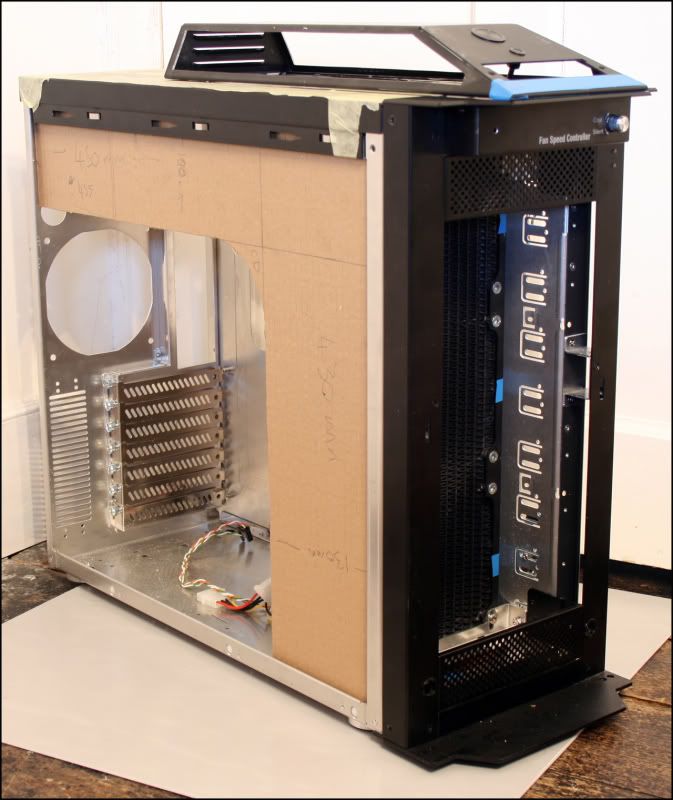
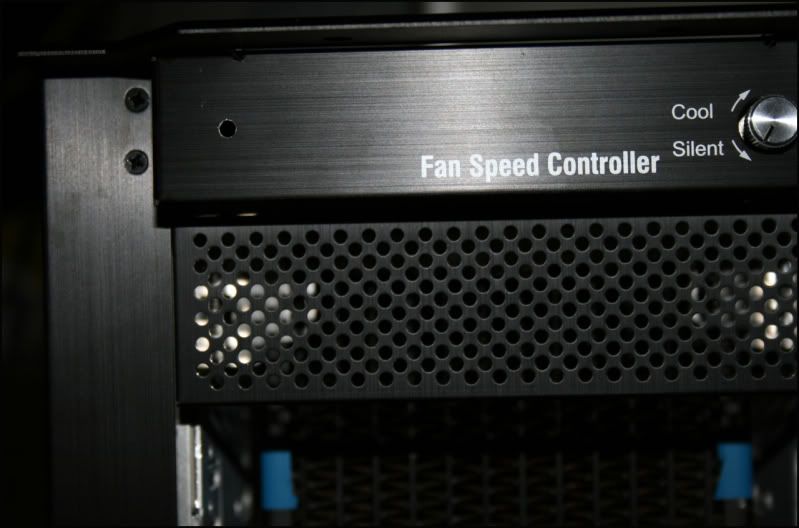
    All housed in a custom Lian-li P60 armoursuit.

    The build is taking alittle design from the Focus ST which should be apparant over the coming months so to start heres a few of the design stage ideas.


    I want to take the case away from the Chavtec 900 looks to a more slick case as Lian's should look.

    Sorry for all the finger prints and dust but as any of you know who have owned a black lian-li there a total pain to keep clean.


    Thanks Brad.
    Last edited by Brad8988; 05-01-2009 at 05:03 AM.

  2. #2
    Xtreme Member
    Join Date
    Mar 2009
    Posts
    278
    Well i dont have access to much software as im on the slowest laptop in the world so had to resort to good old pen and paper for my side panel design.


    As the case is only mid tower i thought with the stripes down the side that it would take up too much of the side of it and in turn the window would be pretty small with not been able to see too much. So to make it feel alittle bigger iv decided to run the bottom of the window to the top of the lowest strip with the strip above it running accross the window so there will be a small strip between them you can also see inside the case with. Also playing with ideas of what to have written in the strip.

    Not sure if you can make out my idea but heres a pic.


    What ya think?


    Kinda waiting on some bits and bobs to be sorted out and parts/money so thought I would make a start on the cables of my PSU ready for some braiding. I am kinda a cheapskate at the moment so used the staple technique and once i done a few i had got the hang of it and were out in no time and all labeled up to make sure they all go back in the right holes.


    Still got the 8pin atx and extend the 2 6pin PCI-E cables but wont have any braid till mid next week from Chilled-PC so just gunna do what I can till then. I could of just left it but things like this just make it look that little bit better. Also got some plans for my PSU so should all look very tidy once done.


    This would be how the roof reservoir will kinda look. The roof would be mostly cut away so the res would kinda be floating there and not touching anything metel on the main case. You will be able to see down the side and before the res as well as through the res and water into the case.


    After searching high and low for the exact color powder I wanted, Tom came to my rescue and showed me a webby yesterday. Today I have a nice bag of full gloss cornflower blue powdercoat.


    Also had some SSD hdd mounts come today and decided to mark out ready for cutting how the roof will be. Im cutting right to the rear of the case so the PSU will be seen, got plans so it matches in nicely. Got some more tools on the way so i can do this tidy.


    Cheers Brad.
    Last edited by Brad8988; 04-23-2009 at 04:50 AM.

  3. #3
    Xtreme Member
    Join Date
    Mar 2009
    Posts
    278
    Ok well as i plan on cutting the roof of my case i thought i better get a set of files. I have needed them before but alays just made do without but i bit the bullet and got a cheap set which should do the job nicely.


    Also i heard about making my your own ATX pin removal tool outa a screw driver so i had ago and it works perfect while been really really strong.


    Before.


    After.


    As my PSU is going to be on show i decided to void the warranty and strip it all down ready for paint. :duh:


    Then yesterday I spent like 12 hours braiding my 24pin atx cable. Took a stupid amount of time(Dont ask...) Anyway looks good now.


    Will Probably re do my 8pin ATX as im not happy with it and then sort out the 2 6pin PCI-E im extending.

    Did a mock up today with some spare acrylic i had laying around. The white tape represents where the bars of the old roof bulge that will hide any joints. This lot then would be mounted to the main roof that will be cut away to see down into the case through the fluid.


    This is only a mock up to get feedback from other peeps, So what ya think?

    Cheers Brad.
    Last edited by Brad8988; 04-23-2009 at 04:09 AM.

  4. #4
    Xtreme Member
    Join Date
    Mar 2009
    Posts
    278
    Doing alittle mock up today and i wanted to have the inlet and outlet on the rear of the res but its too far back and would foul the PSU. Theres a little space in the front that will just about fit my power button and the fan controller along with 2 90's into the res. The front been at such a angle should slow the water down and may even give a nice effect in the front.


    What ya think?

    Thanks to Olly k on the tips for soldering. I cant get on with a soldering tip so I use a little gas torch but the same way olly mentioned. Works a treat and really neat. Could do with one of those arm things with the little clips to hold the cables while im doing it, but a few lumps of bluetack (Green) does just as good a job. These cables arnt coming apart anytime soon.


    Cheers.
    Last edited by Brad8988; 04-23-2009 at 04:11 AM.

  5. #5
    Xtreme Member
    Join Date
    Mar 2009
    Posts
    278
    Update 22nd April.


    Well finally got some parts today so have done alittle bit. First i got a used PA120.3 of the MM for a bargain price of £33inc and and it already has riv nutz fitted which i prefer. It will be painted with the case prolly but for now just testing.


    Also managed to source some rad backets to fit the lian-li drive bays.


    As you can see the bolts i had laying around are far too long for holding the brackets so will need modding.


    Iv screwed some nuts on before cutting for helping cut the thread back on after.


    All cut they screw down nicely.


    Last edited by Brad8988; 04-23-2009 at 04:14 AM.

  6. #6
    Xtreme Member
    Join Date
    Mar 2009
    Posts
    278
    Continued...

    As you can see the rad bracket hits the built in fan controller of the P60 so will need further modding.


    Marked up.


    Once cut fits nicely around the controllers PCB.


    Cheers Brad.
    Last edited by Brad8988; 04-23-2009 at 04:24 AM.

  7. #7
    Xtreme Member
    Join Date
    Aug 2008
    Location
    England
    Posts
    234
    Very Nice

    btw how did you hold the screws in place while grinding away on them ?

    Ninja
    Computer Worklog (Scratch Build)- [Great Heights]

    "Peace Is About Having A Bigger Stick Than The Other Guy"

  8. #8
    Xtreme Member
    Join Date
    Mar 2009
    Posts
    278
    Fingers lol.

  9. #9
    Xtreme Addict
    Join Date
    Aug 2005
    Location
    Washington
    Posts
    1,319
    Quote Originally Posted by Brad8988 View Post
    Fingers lol.
    Yep, I have done this before. Just as a warning to anyone wanting to do this, the screws get very hot. I have thread mark burns on my fingers to prove it.

  10. #10
    Xtreme Member
    Join Date
    Jun 2007
    Location
    Bloomington, IN
    Posts
    208
    Not to detract from your work but the watermark would look a lot better if it wasn't in the middle of your pictures and so huge.

  11. #11
    Xtreme Member
    Join Date
    Mar 2009
    Posts
    278
    Advice taken On the watermark!

  12. #12
    (o.O)
    Join Date
    Jun 2008
    Location
    Ohio
    Posts
    1,285
    Quote Originally Posted by rocket733 View Post
    Not to detract from your work but the watermark would look a lot better if it wasn't in the middle of your pictures and so huge.
    +1

    i skipped most of your work log because of it, to be honest. i couldn't even read the watermark anyway and it was bothering my eyes.

    looks good otherwise.
    Intel Core 2 Quad Q9450 Yorkfield @ 3.2GHz | Asus P5Q Deluxe mobo | 2x OCZ Reaper HPC 4GB (2 x 2GB) DDR2 1066 (PC2 8500) | Sapphire 4870x2 | Western Digital VelociRaptor 300GB 10k RPM | Intel 120GB SSD | Western Digital Caviar SE16 640GB 7200 RPM | Hitachi 2TB 7200 RPM | PCP&C 750W Power Supply |Cooler Master HAF932 | Windows 7 64-bit | Dell ULTRASHARP 2408WFP 24-inch Widescreen Flat Panel Monitor

    Join Us in the XS World Community Grid Forum & Help Fight Cancer and Other Diseases

  13. #13
    Xtreme Member
    Join Date
    Mar 2009
    Posts
    278
    maybe its my screen then as to me its hardly visible. Will sort em out tomorrow if i got some spare time.

  14. #14
    Registered User
    Join Date
    Mar 2008
    Posts
    56
    Nice build, awaiting more pics

  15. #15
    Xtreme Member
    Join Date
    Mar 2009
    Posts
    278
    All pics sorted.

  16. #16
    Xtreme Member
    Join Date
    Mar 2009
    Posts
    278
    Update 23rd April.


    Rad fitted.


    Im covering all the drive bays with plexi so this is a template outa cardboard before cutting the real thing.


    Also Just fitting my new power button as the old one was in the roof thats been cut away for the res.


    Once marked out i pilot drilled the hole with a small 3mm metal bit.


    This bit is a nasty thing. Kinda overcut but will be ok, once it got dug in it was taking off like 2mm with each turn. Cut like a knife through butter.


    Once done.


    Cheers again.
    Last edited by Brad8988; 05-01-2009 at 03:53 PM.

  17. #17
    Xtreme Addict
    Join Date
    Mar 2005
    Posts
    1,122
    Very nice build man, really diggin the way you are doing the res.... Makes me like this case now....
    X299X Aorus Master
    I9 10920x
    32gb Crucial Ballistix DDR4-4000
    EVGA 2070 Super x2
    Samsung 960 EVO 500GB
    4 512gb Silicon Power NVME
    4 480 Adata SSD
    2 1tb HGST 7200rpm 2.5 drives
    X-Fi Titanium
    1200 watt Lepa
    Custom water-cooled View 51TG


  18. #18
    Xtreme Member
    Join Date
    Mar 2009
    Posts
    278
    Tbh i wasnt a fan of the case due to the blue lights in the front and funny roof screaming chav... But after helping a dude build his first rig in one i had a idea that it would look nice in white. Anyway a few months later one popped up cheap so here we are lol. Iv got a other project running along side which i may post up which i wanna get done and sold before i crack on with this.

  19. #19
    Xtreme Member
    Join Date
    Aug 2008
    Location
    England
    Posts
    234
    Looking good mate keep it up

    Ninja
    Computer Worklog (Scratch Build)- [Great Heights]

    "Peace Is About Having A Bigger Stick Than The Other Guy"

  20. #20
    Xtreme Member
    Join Date
    Nov 2008
    Posts
    103
    You're going well

  21. #21
    Xtreme Member
    Join Date
    Mar 2009
    Posts
    278
    Update 1st May.


    Well some nice parts just arrived from Chilledpc.


    As the mobo im thinking of getting has multi colored slots and tbh they look crap on the blue and white mobo so got a set of slot protectors which should hide some of the nastiness.


    And will let the rest of the pics speak for themselves.


    The EK blocks iv used in the past come no where close to the finish of Koolance.


    Anyway now i got my braid its time to finish the PSU. :drool:


    Cheers.
    Last edited by Brad8988; 05-01-2009 at 03:50 PM.

  22. #22
    Registered User
    Join Date
    Sep 2008
    Posts
    78
    Can't see any pics because Photobucket says you've exceeded bandwidth

  23. #23
    Registered User
    Join Date
    Feb 2009
    Posts
    34
    same can't see any of the picture
    Bandwidth Exceeded

  24. #24
    Xtreme Member
    Join Date
    Mar 2009
    Posts
    278
    I know i just hit my 25Gb bandwidth limit for the month. Gotta wait till the 7th.... I may make another account to go on with as i could be hitting 25Gb limit each month with the current pics as its just down to peeps viewing them?

  25. #25
    Registered User
    Join Date
    Apr 2008
    Location
    Brazil
    Posts
    58
    Quote Originally Posted by TOM-UK View Post
    same can't see any of the picture
    Bandwidth Exceeded
    same here :/

Page 1 of 6 1234 ... LastLast

Bookmarks

Bookmarks

Posting Permissions

  • You may not post new threads
  • You may not post replies
  • You may not post attachments
  • You may not edit your posts
  •