

dualbrain, Beautiful colors


dualbrain, Beautiful colors


Awesome Nils.
Is it best to push the sleeve all the way up to the connector, then shrink the heatshrink so it covers a little bit of the metal ATX pin (So it ends up going inside the connector?)
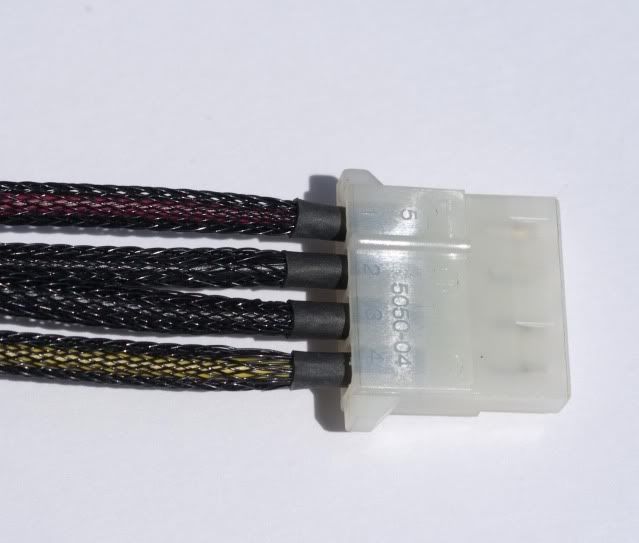
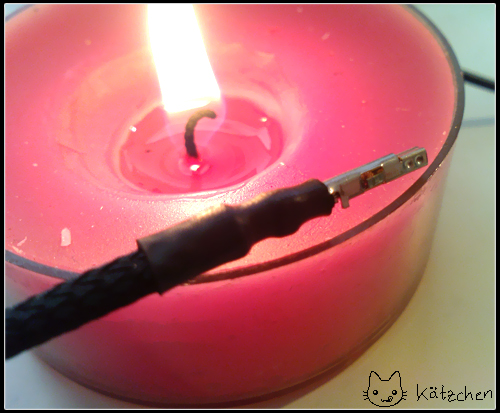
It's best to shrink onto the pin very far (just until the two little blades stick out) This way it's impossible for the shrink to slide and perfect tension is guaranteed. Of course it just works with very thin heatshrink. The perfect optic is just a side-effect. The anti-slide is the true benefit. Shazza showed how to do it. I just have one picture from a girl (Kätzchen) here in Germany (interesting that the girls were the ones who documented it
But remember to let the heatshrink cool down before you put the cable back into the connector.
I have a question regarding this method when the heatshrink is over the candle/flame are you rotating the sleeved/heatshrink over the flame?Originally Posted by dualbrain

Thanks
I have 3 PSU to sleeve by SundayI need all the help I can get...
CPU: Intel Core i7-4770K 4.8GHz
MOBO: GIGABYTE GA-G1.Sniper M5 MATX 1150
MEMORY: G.SKILL Trident X 8GB 2400MHz 9-11-11-31 1T
GPU: 2 x eVGA GTX 780 SC
SOUND KRK Rokit 5 Limited Edition White Studio Monitors
SSD: 4 x Samsung 128GB Pro's Raid 0
PSU: SeaSonic Platinum 1000W
COOLING: 2 x Alphacool NexXxoS UT60 Full Copper 420mm 6 x Swiftech Helix 140mm Fans
CASE: Lian Li PC-C32B TECH STATION MOD build log coming soon
MONITOR: ASUS VG278HE Black 27" 149Hz
O.S: Windows 7 Pro x64
Do one side with "air to shrink to air to shrink to air ..." movement so it doesn't heat up tooooo much. See how it shrinks. Then change the side and do the same. Give it some breaks in between so it doesn't get too hot. The last thing you do is shrinking at the transition to the sleeve. There you need to be even more careful, because melted sleeve looks like poo. Experiment and find the right intervalls. Don't just hold it into the fire ... move through it. Never keep standing in the flame.
I just know how to work with my materials, so I can't guarantee how it works with all the other stuff out there. Some might even start to burn
Last edited by dualbrain; 08-20-2009 at 04:18 PM.
There are small tabs on the connectors, lift it up a little and you should be able to pull the wires out.
Thanks every little info helps I tried to sleeve with a HEATGUN and it basically did what you said above too much heat and made it uneven. I will try this tonight and show my result on Friday...
CPU: Intel Core i7-4770K 4.8GHz
MOBO: GIGABYTE GA-G1.Sniper M5 MATX 1150
MEMORY: G.SKILL Trident X 8GB 2400MHz 9-11-11-31 1T
GPU: 2 x eVGA GTX 780 SC
SOUND KRK Rokit 5 Limited Edition White Studio Monitors
SSD: 4 x Samsung 128GB Pro's Raid 0
PSU: SeaSonic Platinum 1000W
COOLING: 2 x Alphacool NexXxoS UT60 Full Copper 420mm 6 x Swiftech Helix 140mm Fans
CASE: Lian Li PC-C32B TECH STATION MOD build log coming soon
MONITOR: ASUS VG278HE Black 27" 149Hz
O.S: Windows 7 Pro x64

after i cut the sleeving, how can i get it to melt the ends nicely so they don't curl over and leave bulges once i do the heatshrink?
i tried a heatgun to shrink the heatshrink and ended up melting the wires...on the low setting
XS WCG Rules: #1: don't pull fart_plume's finger #2: Dave aka Movieman, don't give him your phone number if you like your hearing
XS WCG Note: There are 2 sets of points, WCG and Boinc. WCG = 7x Boinc
Project: Dark Matter (<- link) - Asus Maximus II Formula, Intel X3330 3.4ghz @1.32v under load, corsair ddr2 1066 8gigs, evga gtx260 core 216, pc p&c 750W, EK Supreme HF Nickel, iandh 175 res, Swiftech MCP355, Black Ice GTX G2 240, Lian Li v1200b
silverstone tj07 build log
I use a lighter instead of a candle but the movement is basically the same: Flick the flame back and forth quickly across the shrink, then turn, then repeat. Black sleeve is more forgiving. Other colors may darken in fire, heatgun should be used for that.
I use a pen torch. It burns if your not careful but once you get the hang of it, works like a champ!
Core i7 920 D0 @ 4833.55Mhz~EVGA "Classified" E760~XFX HD5870~6GB G.Skill Perfect Storm DDR3 2000~Corsair HX1000~2x WD Velociraptor 150GB RAID 0~WD Cavier Black 1TB~Custom Danger Den Water Box Plus~Windows 7 x64 RTM~Dell 2407WFP
H20! CPU Loop: MCP-655~Swiftech MCR-220~HEATKILLER® 3.0 LT GPU Loop: MCP-655~XSPC RS240~EK FC5870 Plexi+Nickel

Okay well I decided to start sleeving today after I got my stuff in and have run into a serious problem... I bought 1/8th" sleeving and 1/8th" heat shrink and there is absolutely no way that this heat shrink will go over the sleeving.. I also bought 3/8th" sleeving and heat shrink and my heat shrink slides right over it (snugly) but the 1/8th inch heat shrink fits INSIDE of my sleeving... What the hell is going on?!

lol
that 1/8" heatshrink will indeed fit inside the 1/8" sleeving
they are supposed to shrink in a ratio, so you probably need 1/4" heatshrink if it's 2:1, or better yet, get a 3:1 so it can fit OUTSIDE of the sleeving
Sooo I should have bought 1/4" heat shrink instead of 1/8th"
I use 1/4" and 1/4" shrink and sleeve...I've even (barely) managed to squeeze 1/8" shrink over 1/4" sleeving...that heatshrink almost looks like it's already been shrunk
Current System:
eVGA 680i SLi "A2" P30 BIOS
intel Core 2 Quad Q6600 (currently at stock)
OCZ ReaperX 4GB DDR2 1000 (running at DDR2 800 Speeds with cas4)
320GB Seagate 7200.10
XFX 8800GT XXX 512MB (stock clocks)
auzentech X-Fi Prelude
PC Power and Cooling Silencer 750 Quad Copper
Win XP Pro
Dust Anyone?... Heres a weeks worth of dust on my test bench sleeving
Non photoshopped straight from camera.

Very nice! Can you pull the sleeve tighter any more? To eliminate that tiny bit of red
Thats as tight as it goes
hehe, nice work Bentleya!
3-pin fan cable - right?
If so: Fantastic job with the SMALL sleeve
Thanks Dangals for the how to. I am building my first WCed Case and I am also modding my first case in the same time, and this guide made me want to sleeve the PSU.
However, I have been banging my head for two days when I came to remove the ATX plug pins. I have tried the staple trick to remove them, but I never managed to remove even one: either I was using a small staple two soft and it was bending when I tried to stick inside before it reaches the small ridge, or I was using a thicker and stronger stapler but there was not enough space to slide it on both side of the pin.
I haven't tried to buy a removal tool though. This is because I stay in Malaysia and first, it is not easy to come by, and second it cost almost the equivalent of 20$ here. It is not a problem by itself but knowing me, I would have broken a dozen of them before I finish to sleeve the whole PSU
So I think I found a very easy (and very cheap
Below is how I proceed (click on the pictures for higher resolution)
1) I bought a 1$ precision screwdrivers set as below:
2) Using the smallest flat head screwdriver (1mm), I slide it on one side of the pin I want to remove, the flat head being parallel to the side it is very easy to go in between the pin and the edge:
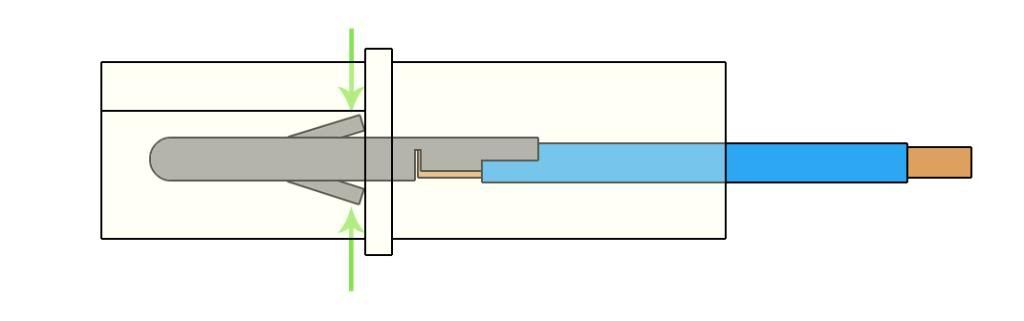
3) I insert firmly the screwdriver inside until I feel I reached the ridge (at the level of the green arrow in the diagram below). Be careful, it is possible to cut through the ridge with the screwdriver if too much force is applied. Afterward, the pin may not hold very well because the ridge has been cut. To avoid that, you can mark on the screwdriver how far you should go before to stick it inside.
a) check how far you should go
b) stick the screwdriver until you reach the ridge inside the plug (you will feel more resistance once reached)
Don't go further than the green arrow in the diagram below:
4) With a pair of pliers, grab the screwdriver, turn 180 degrees and then remove the screwdriver.
EDIT: Actually after more training, I don't even need the pair of pliers. It doesn't need much force so turning the screwdriver by hand works too.
5) Repeat steps 2 to 4 for the other side of the pin.
6) Just pull on the wire the other side and it will come off with no resistance at all.
What happens is when turning the screwdriver, the flat head will pry on the "fins" (not sure how you call the small bit pointed by the green arrow in the diagram above) and put it back into place. Then there is nothing to stop the pin to slide out:
Once the sleeving job is done, just reuse your screwdriver to bend the "fins" of each pin as below:
Then slide the pin back in, and it will be back into place and it will hold firmly to the plug.
I don't know if I am the only one having problem with either the staple trick or the removal tool. But when I tried the staple solution, it was very frustrating and I wanted to send everything fly through the window after 10 min of struggle. With this solution, the sleeving is a real joy
I hope it helps others which also have problem with the staple / removal tool
Last edited by r4st4m4n; 08-25-2009 at 08:50 AM.
Q6600@3.6 GHz / GA-X48-DQ6
2x2GB Kingston HyperX DDR2-800
Asus HD 5870
Corsair TX-850
WD Velociraptor 150GB / WD Green power 500GB
Water Cooling: EK res 250 > Swiftec MCP655 > Swiftec MCR320 > EK-FC5870 > HeatKiller 3.0 LT
Thx man....I for one happens to be the minority who has problem with the staple method
As my husband is the artistic one in the family, I thought I would try to get him into doing a bit of sleeving for me
I gave him a couple of old PSU's to practice on, he pretty quickly got the pin removal down, but a couple of problems have arisen.
We have the blue handled molex crimper, he has found it fine for replacing molex pins, but cannot get it to work with the atx ones, says he cannot get it to tighten enough.
What is the best way to cut the heatshrink and get it all identical lengths?
I had some of the PPC sleeving, so gave him some to 'play' with, here's his 1st ever attempt, which I don't think is too shoddy!
i7 975 EVGA X58 Classified 6Gb Corsair Dominator GT 2 x EVGA 285 FTW 2x 300Gb Velociraptor in RAID 0 WD Black 500Gb
WC loop 1: HK 3.0 Fesser 360 BP VREG BP NB D5 pump
loop 2: 2 x EVGA HC's Fesser 240 D5 pump

Honestly after using all the types of tools, a single staple deftly placed and pushed in firmly is BY FAR the best tool for removing these pins.
My favorite now is the two pin (ones with the round tops) method followed closely by the staple method.
Core i7 920 D0 @ 4833.55Mhz~EVGA "Classified" E760~XFX HD5870~6GB G.Skill Perfect Storm DDR3 2000~Corsair HX1000~2x WD Velociraptor 150GB RAID 0~WD Cavier Black 1TB~Custom Danger Den Water Box Plus~Windows 7 x64 RTM~Dell 2407WFP
H20! CPU Loop: MCP-655~Swiftech MCR-220~HEATKILLER® 3.0 LT GPU Loop: MCP-655~XSPC RS240~EK FC5870 Plexi+Nickel
 Posting Permissions


 Reply With Quote


Bookmarks