

Nice work Jedda.. Keep the pictures coming


Nice work Jedda.. Keep the pictures coming
Intel Core i7-2600K---> Koolance 370
3 X EVGA 480 GTX SC's Watercooled--> Koolance VID-NX480 blocks, HWLabs GTX 480, Liang D5 Vario
Koolance RP-45X2 Reservoir
Corsair Obsidian 800D
Gigabyte GA-Z68X-UD7-B3 MB
SILVERSTONE ST1500 1500W PSU
16G CORSAIR DOMINATOR-GT (4 x 4GB) PC3 12800
2 X Kingston HyperX SH100S3B/120G SATA 3 in RAID 0
1 X WD Caviar Black 1TB
Dell 3007 WFP-HC
Z-5500's
Windows 7 64bit
Looks great! Can't wait to see more.
Originally Posted by Jedda

My first exploding cut off wheel went right up my shirt sleeve.
"What's that burning smell?It's ME!!!" Next time it'll be a jig saw for me too lol.

very nice
wow this is an awesome build jedda... keep it coming!
Nikon User
Nikon D200 (Gone =( )/D300
Nikkor 18-105mm(Gone) // Nikkor 50mm 1.8 // Nikkor 55-200VR(Gone)
Tokina 12-24 // Tamron 90mm //
Manfrotto & Benro Legs // Benro Ballhead.
Current Lust = 80-200 Or 70-200VR1 <--Pending
No more computer parts for me... Well for now until I
really REALLY need to upgrade.
Good one, Cathar!
Ducati makes beauties.
Kinda novelty bikes...
Excellent idea and nice work so far
Will be following your progress with interest. Keep those pics coming.

Pretty cool work.. i really liked it..
Sound: Asus Essense ST | Wharfedale Diamond 9.1 | Norge 2060 Stereo amp | Wharfedale SW150 sub (coming soon)
Camera Gear: Canon 6D | Canon 500D | Canon 17-40L | Canon 24-105L | Canon 50mm f1.4 | Canon 85mm f1.8 | Rokinon 14mm f2.8 | Sigma 10-20EX HSM | Benro A3580F + Vanguard SBH250 | Bag full of filters and stuff
looks like u found a nice little niche for the mcubed...the fan will be able to cool it at the same time....

Way to go Jedda! Looking good so far!
MM Extended U2-UFO CYO (Duality front, Standard back, Horizontal Mobo brace) Anodized Black || eVGA X58 || Intel i7 920 || 6 GB Corsair Dominator PC3-12800|| eVGA 295GTX || Asus Xonar Essence STX || VisionTek 650 TV Tuner || 1 300GB WD Velociraptor || 1TB WD's Black Ed. || LG 22X DVD-Writer || Lite-On 20x DVD-Writer || Corsair CMPSU-1000HX PSU
CPU Loop: DDC-2 w/ XSPC Reservoir Top -> Swiftech GTZ -> Thermochill PA120.3 (Push: 3 Scythe S-Flex G)
GPU Loop: DDC-2 w/ XSPC Reservoir Top -> (Koolance VID-NX295 FC block) ->Thermochill PA120.3 (Push: 3 Scythe S-Flex G)
Chipset Loop: DDC-2 w/ XSPC Reservoir Top -> Alphacool Silentstar Dual HD waterblock enclosure -> Bitspower Black Freezer eVGA x58 MOSFET-> Bitspower Black Freezer eVGA x58 NB -> Thermochill PA120.2 (Pull: 2 Scythe S-Flex G)
2 x Dell 2408FPW LCD || Logitech Z-5500 Digital 5.1 || Logitech G9 Mouse || Logitech G15 LCD Keyboard || Logitech Quickcam Ultravision || Sennheiser Headphones
stop teasing us jedda! updates!
Nikon User
Nikon D200 (Gone =( )/D300
Nikkor 18-105mm(Gone) // Nikkor 50mm 1.8 // Nikkor 55-200VR(Gone)
Tokina 12-24 // Tamron 90mm //
Manfrotto & Benro Legs // Benro Ballhead.
Current Lust = 80-200 Or 70-200VR1 <--Pending
No more computer parts for me... Well for now until I
really REALLY need to upgrade.
+1
*starts chanting*
Pictures..Pictures..Pictures..Pictures..Pictures.. Pictures..
I've been OS for a fortnight and thus slack with the updates.
Thanks for the kind words and interest.
With this last bit of soldering, I'm done with sleeving and soldering. So it's all putting components into place after this last connection.
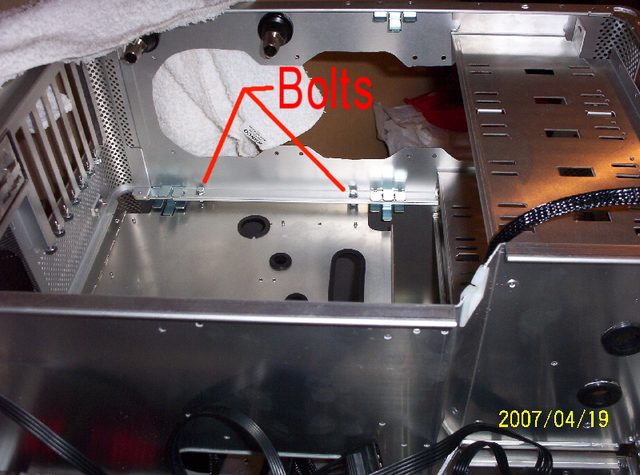
Bolted the two sections together. Nuts and bolts all round with two straps underneath, using the axle points, for a little extra strength. I agreed with the suggestions earlier that some strapping would help.
Now I'm back, we should get a straight go at tossing it all together. So I'll be back with some decent pix of progress asap.
yay, it's back. almost thought you had left us
very nice jedda, after all the months talking about bolting together 2 same cases you have finally made it a reality... almost...
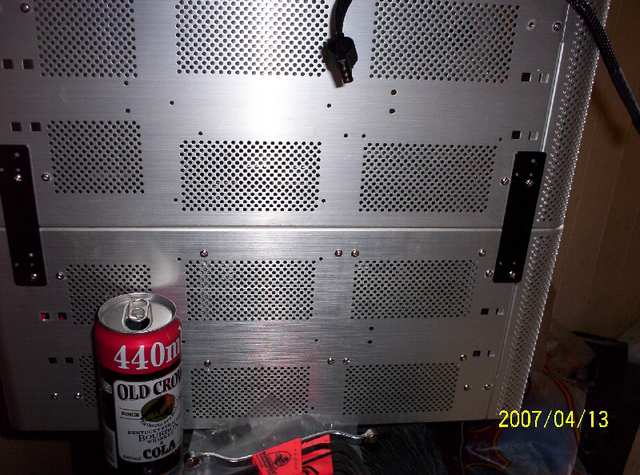
more strapping underneath...
*another suggestion, tip over the case (future twin) ala horizon case...*
regarding flying cutoff wheel, just last week there was news article about worker here using grinder 4inch "inferior" cutoff wheel broke apart and flew to his face, making for 1 bloody death...
Last edited by septim; 09-18-2007 at 03:52 AM.
Urgh...
I got tired of constantly changing those cutoff wheels, so decided to use the reinforced fibreglass ones (426). A bit more costly, but they don't break and fly off - they just wear down and still do a nice job of cutting aluminium
yea updates!! more more!
Nikon User
Nikon D200 (Gone =( )/D300
Nikkor 18-105mm(Gone) // Nikkor 50mm 1.8 // Nikkor 55-200VR(Gone)
Tokina 12-24 // Tamron 90mm //
Manfrotto & Benro Legs // Benro Ballhead.
Current Lust = 80-200 Or 70-200VR1 <--Pending
No more computer parts for me... Well for now until I
really REALLY need to upgrade.
Yeah, the straps in the pic are temporary untill the full width pair are finished. All sixteen axle mounting points will be used by them.
So much of the work I've done will be hidden. Very little wiring should show in the end. Still at least I'll know it's all colour matched etc even if nobody else ever sees that. lol
Made a two pin plug for the psu lead for leak testing today.Talk about anal!
Sorting the extra case LCDs to be indicator LCDs for the BigNg and DVD drive.
build in side panel LCD? hehehe
One LCD in front and the two extra LEDs is the final layout.
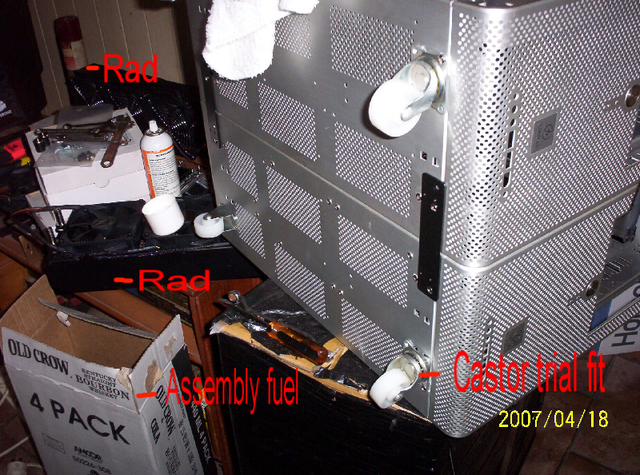
Waiting for my floor straps which will also mount the wheels. So did a trial fit of the casters to see how they went and am fairly happy with them.
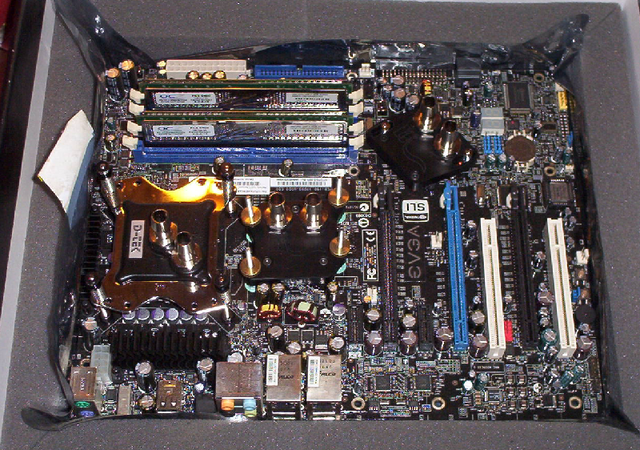
Motherboard is in and I'll post some pix of that tomorrow.
Here's the blocks and RAM in place. I've another two sticks to take it to 4GB but will add them later.
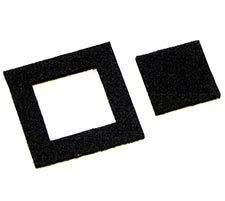
I used rubber squares on the chipset and they helped with stability for the two pin MCP block a lot. Got them from PerfPC.
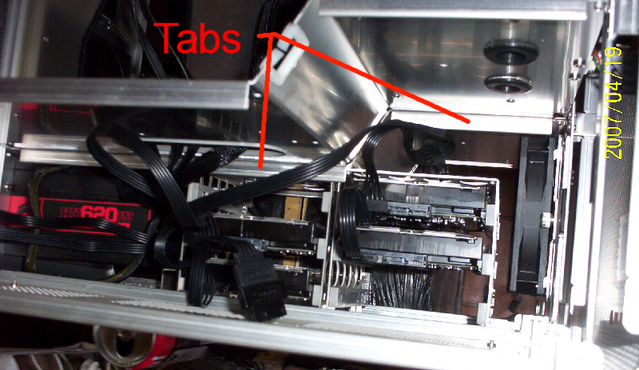
Put the raid drives in and turned them around so all their wiring will be concealed.
Ran into a small prob with two tabs that run along that side. The drives protrude further, reversed, and one tab blocks the upper slot. The other slightly gets in the way of my M-cube wiring. I can get away with having them like this but may bend them up before I'm done. We'll see.
Am a bit frustrated atm, as my doc insists I spend at least 14 hours a day with my base over apex. So I can't just finish it all off in one go.
Still, each day I make progress in my allowed time. Wont be long now, until it's running again.
Last edited by Jedda; 09-22-2007 at 01:57 AM.
looking very nice jedda looking 4ward for some more update's
Last edited by disruptfam; 09-22-2007 at 02:01 AM.
that mobo sure looks good....
how i wish there was an all-in-one store here in the philippines...
That it just awesome! I have to admit I love what I am seeing at the moment, keep up the good work and attention to detail, and you will definately have one killer case (not to mention the hardware and cooling inside)
One quick question. How did you know how far down you had/had to tap before hitting the core?
The tap bites initially and turns with resistance as it cuts thread. Once the thread is through that resistance eases and you feel the tap run free as it's turning like a screw, no longer cutting.
With the normal size and shape tap you still have quite a bit of clearance at that point, three or four complete rotations.
Thanks for the interest. Although you know guys are looking at it, it's the comments that motivate me to post all the pix and detail.
I'm really happy with how the idea is working out. Normally at this stage in a build things are getting tight for room and routing tube, leads etc. This is where it's paying off big time. Am finding wire management a doddle.
Heaps of room with good options, despite two PA120.3 rads in there!
Missed posting this detail of the case join nuts n bolts. These are spaced along three sides with the straps on the floor and are doing the job well.
I used existing side panel mounting holes for most but had to drill a couple extra for strength.
 Posting Permissions


 Reply With Quote
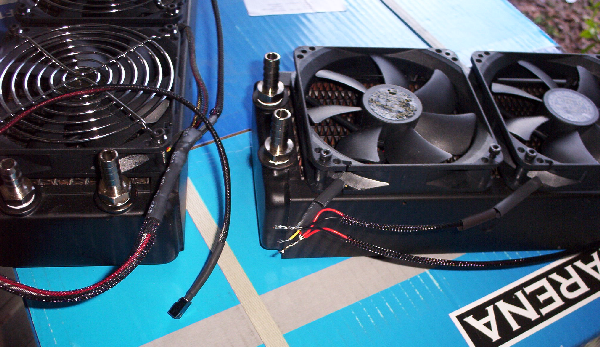


Bookmarks