

Looking great voigts, nice planning
Family support is the best thing to have when doing lots of work on difficult projects


Looking great voigts, nice planning
Family support is the best thing to have when doing lots of work on difficult projects
What wire did you use, where did you get it, and how do you like the insulation on it ?Originally Posted by voigts

I am currently looking for some black 18 AWG with non-obtrusive printing on it, that doesn't feel super stiff. All of the stuff I have found is plenum rated or otherwise just doesn't feel very flexible or nice to use.
I had bought some 18 gauge from the local hardware store, but I didn't like it at all in that the insulation was way too bulky. I looked at both Home Depot and Lowe's, but neither of them carry 18 gauge braided wire. So I stopped by a local electronics supply store that carries all kinds of terminals, electronic, and networking supplies. They had 100' rolls of black 18 gauge for only $13. The insulation is far more manageable, and the flexibility is very good. I am very pleased with it.
Latest Project Log: Project Quintessence
1935 Zenith Radio Scratch Build

Amazing work dude. Keep it up I have enjoyed watching this one.
~ Little Slice of Heaven ~
Lian Li PC-A05NB w/ Gentle Typhoons
Core i7 860 @ 3gHz w/ Thor's Hammer
eVGA P55 SLI
8GB RAM
Gigabyte 7970
Corsair HX850
OZC Vertex3 SSD 240GB
~~~~~~~~~~~~
Wiring
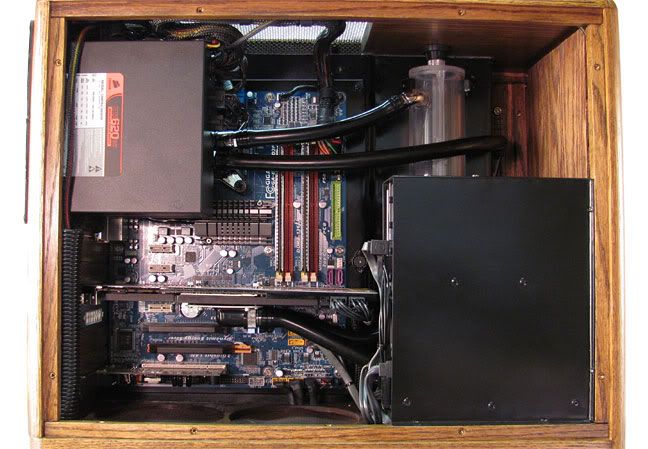
I have done a lot of work on the wiring to get it as neat and tidied up as possible. The answer to this was to run all or the wiring through the floor of the case and under it in the space beneath. I got well acquainted with the continuity setting on my multimeter making the PCI-E cables. I just ran the wires where I wanted and used the continuity setting to make sure which wire was which on each end. I used the PCI-E cable that came with the PSU to make sure I got the connections in the correct places on each end. I have got to get a good pair of crimpers as putting on the PCI-E pins was a pain.
Pumps Rheostat
I put the pumps on a 25w rheostat I already had so that I can turn the voltage down a bit on them to quiet them down. I made a little box out of 1/8" smoked acrylic, and mounted it to 2 pci bracket screws. It was easier to place it here near the PSU than near the pumps. I just had to loop the ground wire on the line feeding the pumps to the rheostat. It works like a charm.
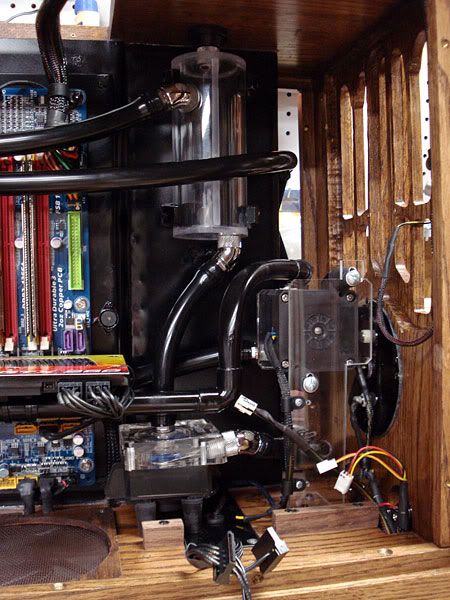
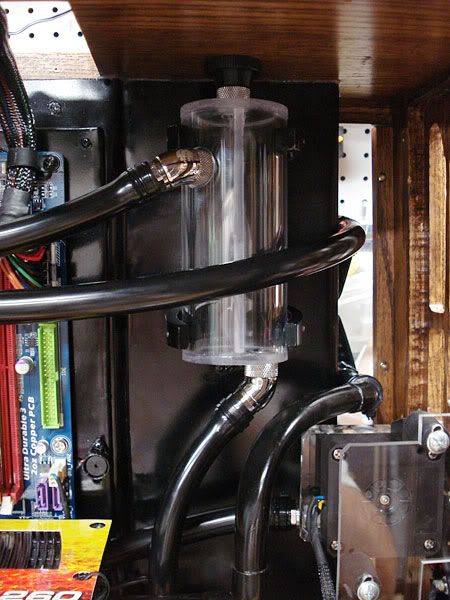
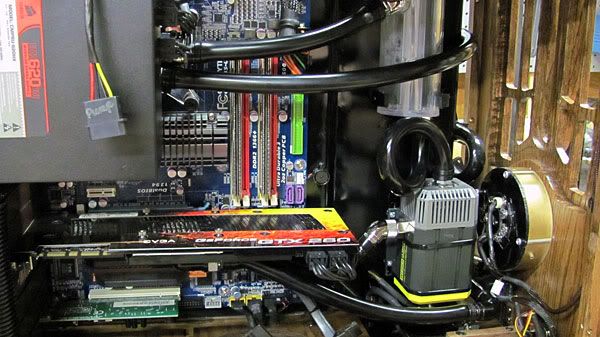
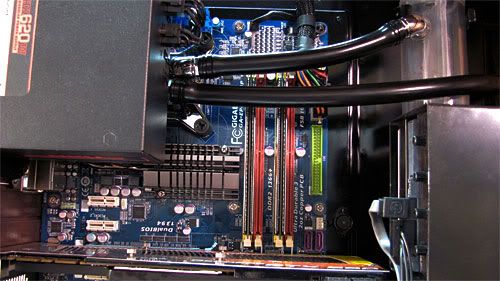
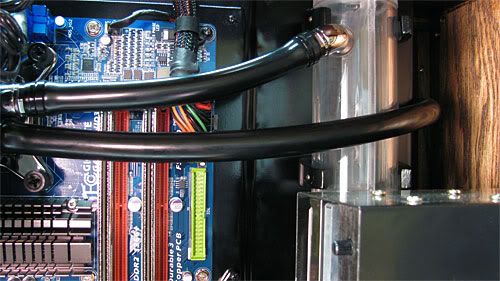
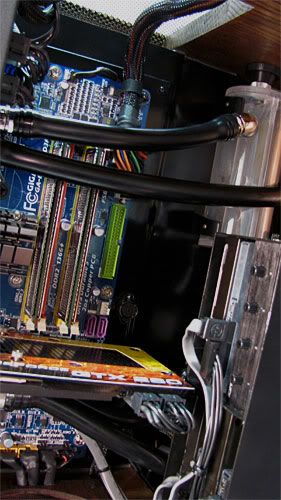
Pumps and Tubing in Place
Here are a few interior shots of the pumps and tubing before installing the hard drives mount box so you can get a sense of how the tubing is running. I changed my previous drain idea and was able to go with my original idea after getting the wiring all hidden. A 1/4" line branches off from the line going from the bottom pump to the bottom rad barb and goes through the floor of the case. It makes draining very easy as I just have to hang the front end of the case off and pull the plug in order to drain.
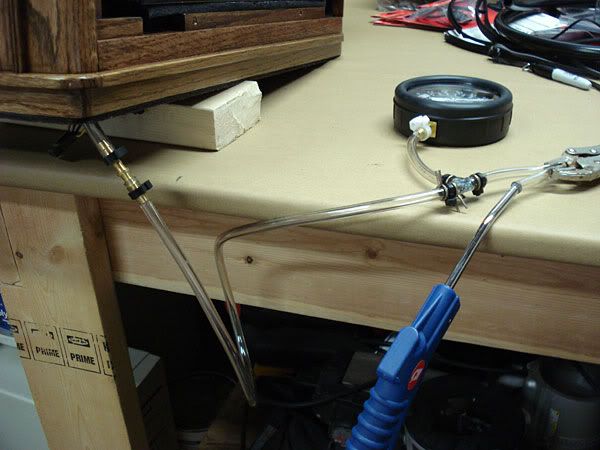
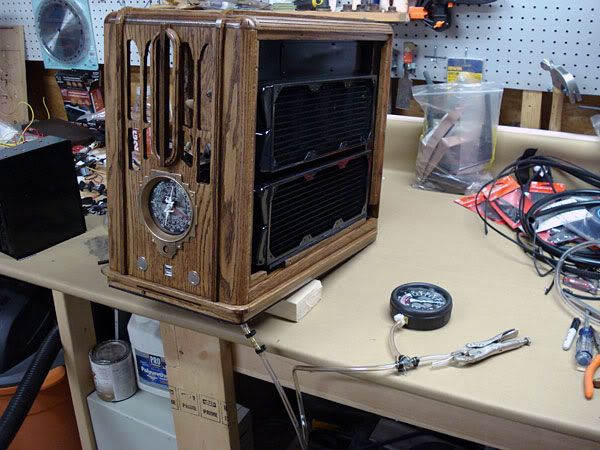
Leaktesting with Air Pressure
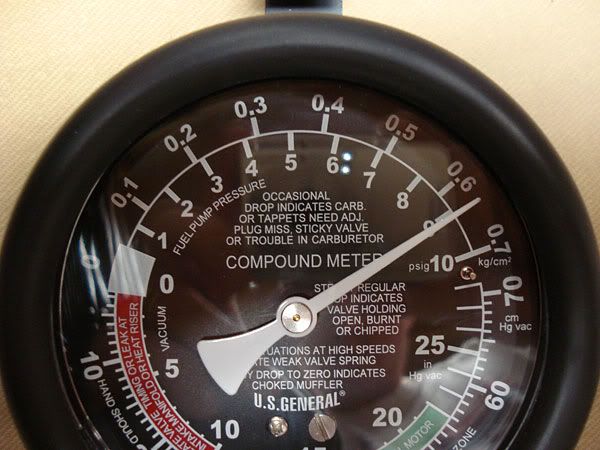
I became convinced and am still so that leaktesting with air pressure is a much better way to leaktest than the water fill and pray method. I use a simple $13 vacuum gauge that I got a Harbor Freight tools for this as it has a large gauge area for 0-10psi. I have a small air compressor, but a simple bicycle pump could be used to do the same thing. I attach the line from the compressor hose blow handle going through the vacuum gauge to the drain. I then pump it up to about 9psi which is easily 2-3 times the pressure in the coolant loop, clamp off the pump line, and give it some time. The smallest leak will easily show up on the dial and its usually very easy to hear the hiss of a leak.
Here is a pic of the dial when I initially pumped it up.
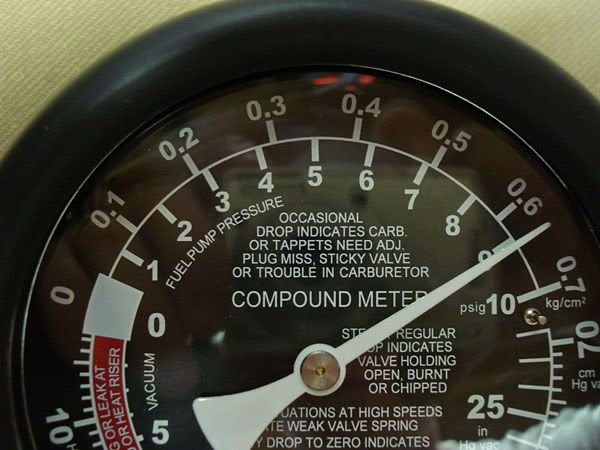
Here is the same dial 3 1/2 hours later. It didn't budge one itty bit.
As I mentioned, I am convinced this is the far better way to leaktest.
1. If there should be a leak, which has happened to me before, there is no clean up or getting anything wet. You just fix the problem. No draining, drying, etc- too easy.
2. Leaktesting with water in a system which is at room temp doesn't have the same pressure as a loop that is warmed up. I can pump the loop up to 9-10psi thereby introducing 2-3 times the pressure the loop will experience when running.
3. It can be easy to miss a small seeping leak as can happen easily at a barb or such with water, while with air, the tiniest little leak will show up on the gauge. You know 100% if you have a leak or not. A very small seeping leak however can be a bit hard to pinpoint with air, but usually you can hear the hiss from the air escaping. At least there is no guesswork, paper towels, etc.
4. Its not expensive to leaktest. A $13 gauge, a bit of hose, a fitting or two, and a pump are all that is needed. Of course I use a compressor since I already have one, but a bicycle pump, a simple Schrader valve, or ball pump fitting can be used to do this. A <$10 trip the hardware store can net you whatever fittings you may need.
We'll spend $1000+ on watercooling and computer parts, but rely on the fill and pray method to leaktest, or not leaktest at all. It just doesn't make sense to me.
The system is put together and up and running. I've got a few minor things to do. I've got a bit of lighting to add to the front dial, and I've got the attach the knobs. Hopefully this weekend I'll get these items done, clean up my shop, and see if I can setup to try to take some decent pics with my mediocre camera. I got cheap off of Ebay a 10'x10' white muslin backdrop. I also got PVC and fabric to make stand up diffusers to use with my halogen lights. Hopefully this will net a better photo shoot than on my last case. I had a horrible time shooting it. One of these days I need to invest in a real camera.
A funny note on this case. The deal my wife made with me when I started making my own cases was that they had to fit inside of the computer compartment area of our oak rolltop computer desk. When my wife got a look at this case with it all put together, she suggested rearranging things in our desk area so that the computer can be put outside of the desk and be easily seen.
Last edited by voigts; 08-27-2009 at 04:28 AM.
Latest Project Log: Project Quintessence
1935 Zenith Radio Scratch Build
You finally succeeded in creating a computer case that even your wife labels as "furniture"!
Great job!!!
.
Opteron 180 @ 2.8 GHz || A8N32-SLI || 2x 1Gb Corsair 3500LL Pro || 7900 GTX || Tt 680W PurePower
MCP655 > Storm > MCW60 > 3/4" T-line > MCP655 > Storm (Opty 165) > 2-302 HC w/2x 140CFM Deltas
Latest Toy: 940BE || M3A32-MVP || Corsair TwinX2048-6400C4D || OCZ Stealth 600W
Well, I've got a temporary hold on getting the lighting finished on the front dial. The LED boards I got are way too dim to do any good. So I went and ordered some ultra-bright yellow LEDs from Ebay, which have to ship from Hong Kong. I'm pretty much stuck waiting for them to get the lighting done and take pics.
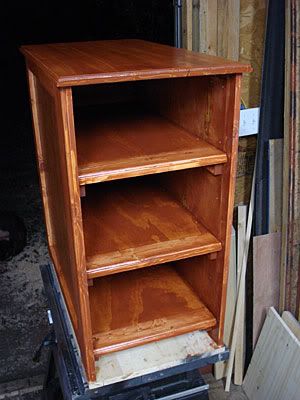
Meanwhile, I'm working on a shelf cabinet to put the case onto to be able to rearrange my desk area. I am following my wife's suggestion to make a way to get the case out of the computer desk itself and into the open.
Latest Project Log: Project Quintessence
1935 Zenith Radio Scratch Build
This is not a computer, this is a pice of REALLY good looking furniture I wouldent mind having in my living room!
Very, VERY nice work. I love the design and your eye for detail. Stunning!
Keep up the excellent work!
Loonym...You are missed.
The element of one
Breathe me in
Breathe me in
I disbelieve in separation. I close my eyes to see you.
This is for you, everything I am. This is for you, take it from me.
I, I disbelieve separation. I close my eyes
there's no escaping me
This is for you, everything I am. This is for you, take it from me.
In your heart in your soul. I perceive rejuvenation
Breathe me in. I am forever. Deep within I am eternal.
I will return to you. I am with you always. I will never turn away from you.
Hi Voigts, Thank for the "Reservoir- Making One and a Guide".
Very much appreciated, your quite the master crarftsman.
Love the work your doing mate!
Thanks. It's a good thing for me then that you live on the other side of the pond. At least I don't have to worry about you tracking me down to consider "adding" my case to your living room!
Thanks. I'm glad the reservoir guide proved helpful to you. I've never found anything online that tells you how you can go about making one. I had to figure it out purely the hard way. My way is only one way, but it is a way that can be done inexpensively and yet reliably. I novel at the guys that have equipment to cut channels for o-rings and such, but I have found that when properly done, solvent welded acrylic reservoirs hold up indefinitely.
My LEDs didn't come in before I had to leave to go out of town this weekend for a couple of weeks. I have to wait until i get back home to finish the lighting on the dial and take final pics. I'm also going to rearrange my desk area to neaten it up quite a bit and be able to place my system in a more visible location than stuffed in a desk computer compartment.
Latest Project Log: Project Quintessence
1935 Zenith Radio Scratch Build
that's a very interesting way of doing a leaktest, great idea voigts
great looking system btw.
Changing My Computer Setup
I just started again making some changes and finally completely finishing my case. I was most of the way there, but had a few things I wanted to fix before putting up pics, and I decided to make a few changes as well. Also, the Xclio 200mm fan that I had bought for the side panel quit working, and they don't reply to emails and have no place on their website for an RMA, so I need to replace the side fan.
About 2 months ago, I decided to change the way that my computer space is set up. My wife likes this computer so much that she suggested putting in outside of the desk so that it is more visible. I have found that having the computer inside of the computer desk compartment is a royal pain when it comes to wiring. The wiring behind and under my desk going to/from my computer and stuff was a dusty mess of spaghetti, and was laying all over the carpet behind the desk. Trying to make any changes was a royal pain. Our desk is an oak rolltop, so it weighs a ton and isn't easy to move.
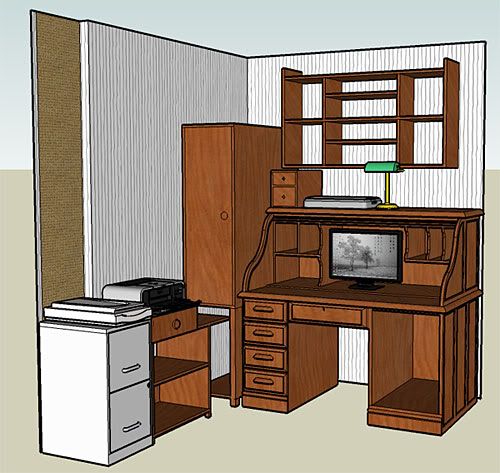
I used Sketchup to draw out my desk area to consider different possibilities. Our house isn't that large, so I'm pretty much stuck with the area that I have in our living room. I had built a storage cabinet a couple of years ago that sat to the left of my desk. This is the way my layout looks in Sketchup.
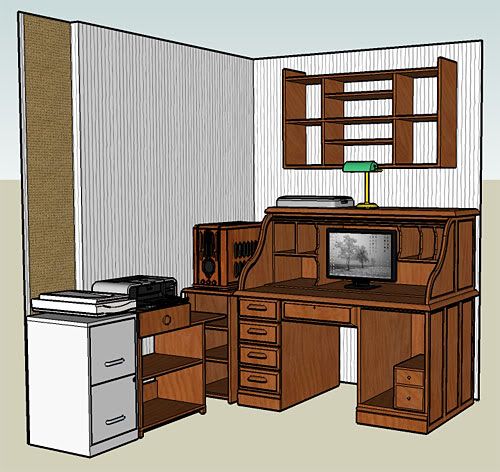
The best way that I decided to get the case out of the desk was to build a new shelf, move the cabinet into our spare room, and put the computer to the left of the desk.
However, in order to move the cabinet into our little storage room, I had to build a large shelf unit to organize it and get stuff out of the floor. So I spent about 2 ½ weeks building a large 5 shelf storage unit and rearranging everything in our storage room which allowed me to get the cabinet in there. The room needed some help anyway so this was a good time to do it. Once I got the spare room done, I moved the cabinet into it and built a shelf unit/stand for the computer to sit on.
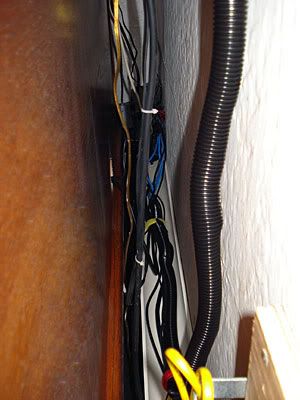
I also moved the rolltop desk out a bit, and competely rearranged the wiring behind the desk to go along with moving the computer. I didn't want everything stuck on the carpet again where I can't get to it. I took a piece of 3” PVC drain pipe I had left over, cut it lengthwise in half, and mounted one half to the wall. This way I have all of my wiring running on top of the PVC behind my desk so it is now easy to access, neat, and can be vacuumed.
This is behind my desk now.
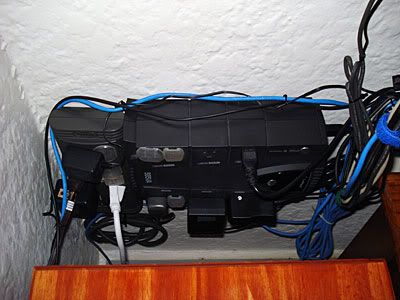
This is my UPS and surge protector that now are mounted on the wall behind the computer shelf/stand.
This setup is such an improvement in wiring neatness and accessibility.
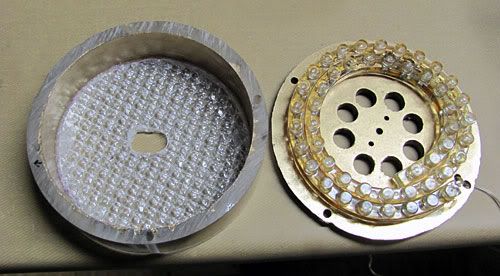
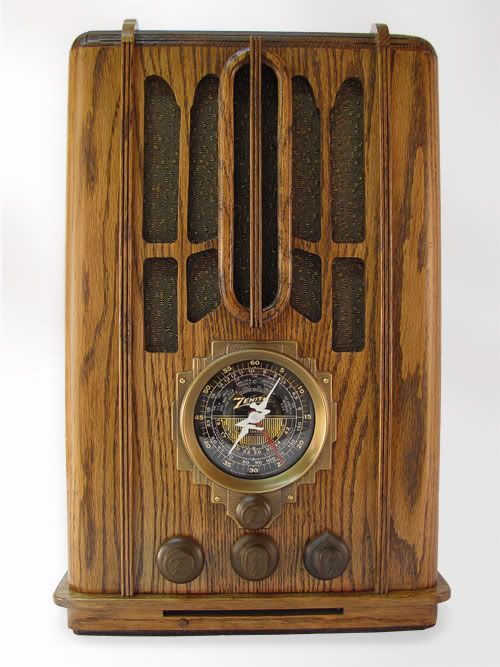
Front Dial Lighting
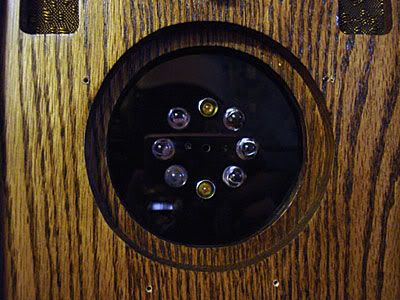
One problem that I wanted to fix was the lighting of the front dial. I had bought and wired up six 10mm yellow leds for the front dial. They are mounted in a piece of smoked acrylic attached to that back of the dial area.
There were two problems however. The LEDs simply weren't bright enough, and the light from them wasn't diffused and made 6 spots on the dial. I ordered a 48 LED flexible light string from Ebay. I used a piece of 4” acylic tubing cut 1” deep, and cut two layers of fluorescent light diffusers to mount to the front inside of the cut tubing. I took the smoked acrylic LED mount, mounted it to the tube, and painted the inside of both gold to help deflect light forward through the dial. I used RTV silicone to attach the LED light strip to the other LED lights mount.
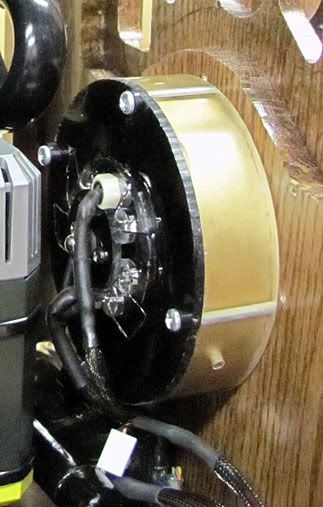
Here is a quick pic of how the lighting worked out.
I am very pleased with the way it looks. The dial now is completely illuminated evenly.
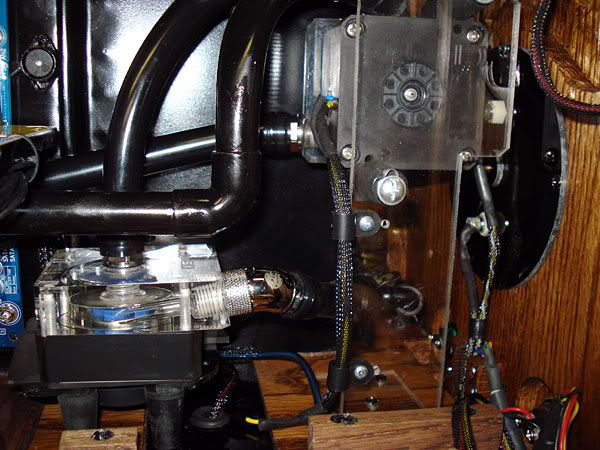
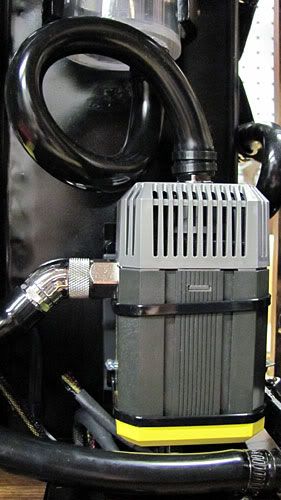
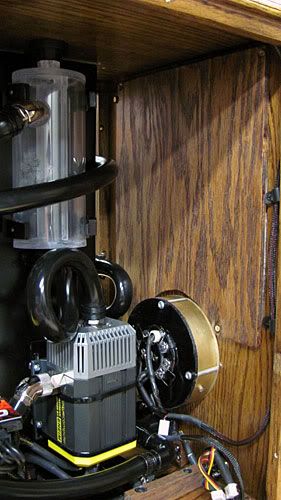
Pump Changes
Moving the computer however up to where it is 2' from my head exacerbates the noise of having two pumps running. I wasn't really that pleased with the computer when it was sitting down inside of the desk, but having it up near my head made things much worse. I got into watercooling in the first place for quiet/performance. I have looked at the Aquastream XT before as it is said to be a very, very quiet pump everywhere I read, but have never wanted to shell out $150 for one. I found a deal however on a new unused XT Ultra on Hardforum for only $105 shipped including a soggy sandwich and G1/4” adapters, so I bought it.
The only way I could figure to mount the pump is vertically, so I made a stand/mount out of sheet metal for it. I put the rubber foam from the soggy sandwich under it and behind it. I couldn't fit the entire soggy sandwich, so hopefully the foam alone will do the trick to isolate vibrations. If it doesn't, I may opt for some Petras gel stuff.
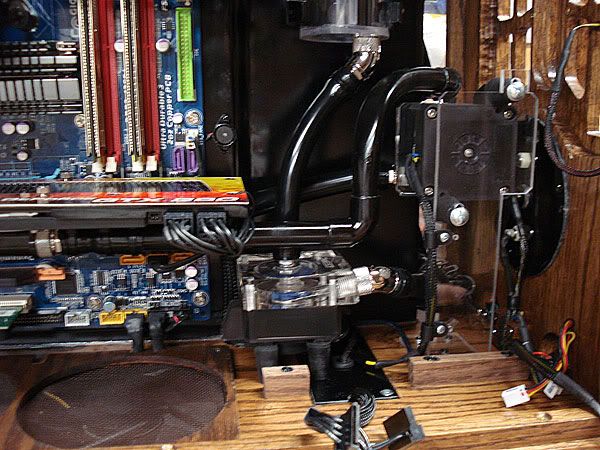
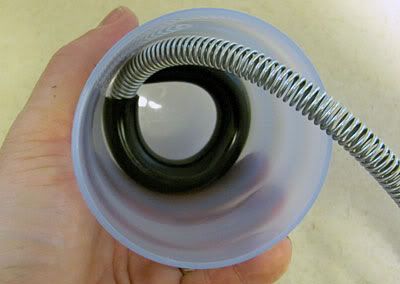
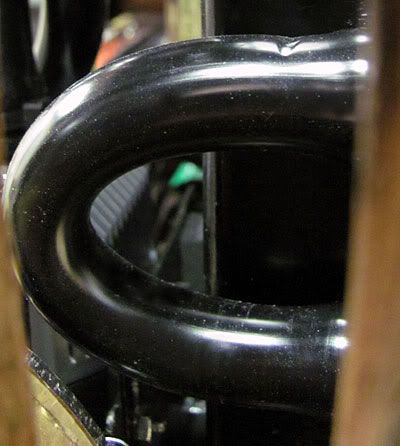
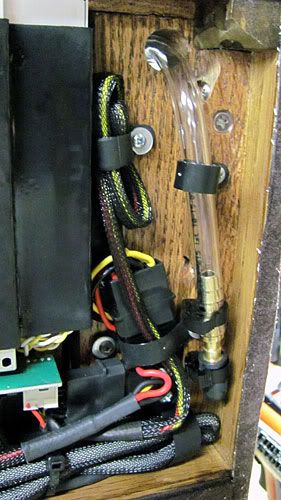
Forming Tubing
You may have noticed the nice tight loop going from the res to the pump with no kinks. There is a trick I recently picked up here on XS. I can't find the thread now, but the idea is one of the handiest I've come across in years of watercooling. I used this several times in redoing the lower part of this loop, and it works great.
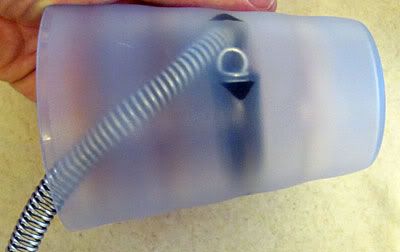
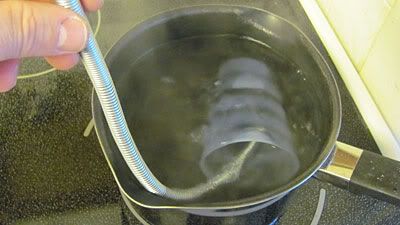
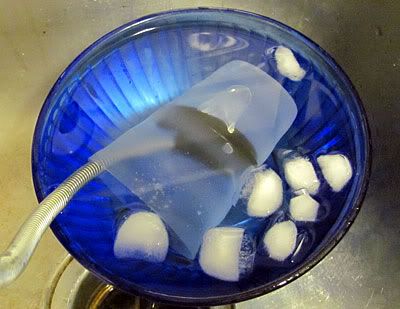
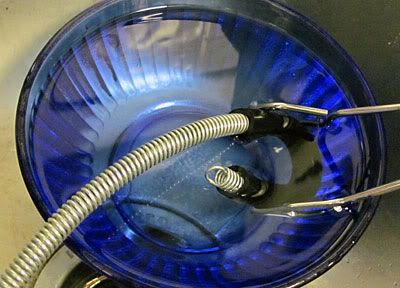
If you want to form tubing for tight bends or any bends, you can shape it the way you want, and then immerse it in boiling water and then in ice water several times. I found a spring for $3 at a local ACE hardware that fits perfectly inside of the 7/16” id tubing to keep it from kinking while forming.
For the loop in the pic above, I put the tubing into a plastic cup like this, immersed it in boiling water for a minute or two, then ice water, and repeated the process a few times.
Once heated and cooled like this a few times, the tubing holds it shape.
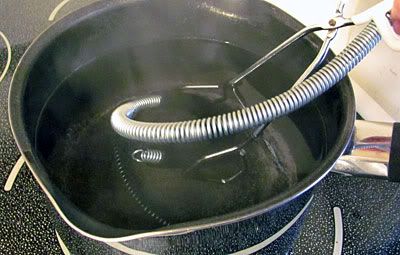
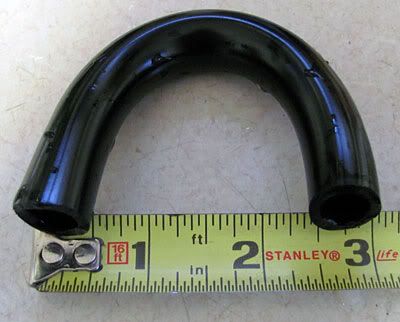
I have a very tight spot where one radiator feeds the other radiator. The space measured from the outside (not the inside) between the barbs is only 2 1/4” (about 57mm). The inside space between the barbs is only about 1 1/4”. Tubing would normally kink in a bend this tight. Since the piece of tubing was very short, and the bend had to be so tight, I simply used a pair of tongs to hold the tubing while forming.
The tubing formed so that just sitting the outside was only 3” apart. I had no kinking problems putting it at 2 1/4” apart.
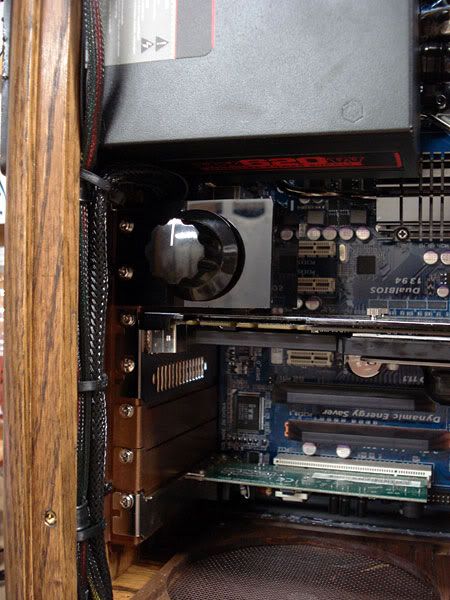
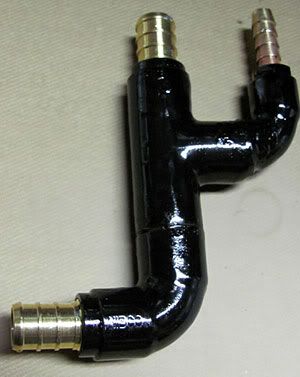
Drain Fitting
I soldered together a fitting for the drain. This fitting was a pain in that in order to save space, I used an insert to go from 1/2” to 3/8” copper, and soldered in a 1/4” barb to 1/8”NPT fitting to be able to attach the drain tubing to. I had to go really work to get the barb fitting soldered in, and had to go back and resolder the 1/2” to 3/8” joint as it didn't completely seal the first time. Thankfully the resolder worked. I pressure tested it at 25psi with the air compressor to make sure it didn't leak.
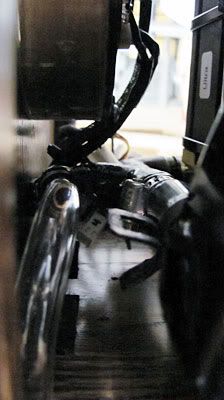
The fitting is on the line going from the GPU to the bottom of the case around the base of the pump. Here is a pic without the hard drive cage installed so you can see the routing.
The 1/4” tube branches off, goes through the floor of the case, and has a length under the case capped off with a 1/4” barb and a rubber auto vacuum cap.
This is going to work really nice in that to drain all I have to do is take the drain line loose and it hangs about 4 inches down under the case. I can just put the front part of the case off of a countertop and drain away.
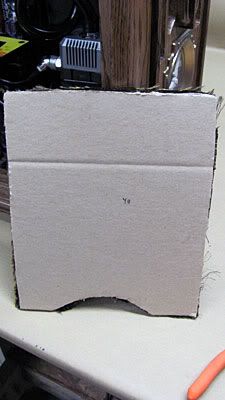
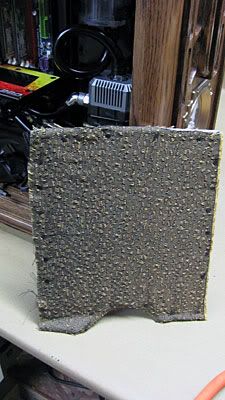
Front Grille Cloth
I made a change to the way the grille cloth is mounted. Having the front grill open allowed any sounds to come out of the front of the case, and I don't really need the cloth for any airflow. So instead of having the cloth mounted to a frame, I mounted it to several layers of cardboard, and make a solid wood piece to fit behind it. This should help redirect any sound, and also should make the cloth last indefinitely.
I'm leaktesting with air pressure as I write this. I've got to mount a new 140mm Yate Loon to the case side to replace the Xclio piece of crap fan, and hope to get some final pics up shortly. I bought a large white backdrop, and just got a new Canon SX120 that takes way better pictures than my old lousy Sony camera. So hopefully I can take some decent pics.
Last edited by voigts; 11-19-2009 at 02:48 AM.
Latest Project Log: Project Quintessence
1935 Zenith Radio Scratch Build
Massive update
Also curious to see how you like the new pump in the long run. I'm one of those fortunate ones who can't hear the DDC pump, but I know it can drive you crazy if you have a noise that bothers you.
Love the new look of the front with the knobs and new dial lighting!
Those are good instructions for bending tubing. I like that method a lot better then some I've seen and I'm sure I'll be using it on my new build (sometime in the next few months).
I also like the PVC idea for organizing wiring. I've get a spaghetti mess myself and that just might solve it. Should work well for corralling the stereo wires as well! How did you attach it to the wall?
As always a job well done - Thanks for sharing ...!
.
Opteron 180 @ 2.8 GHz || A8N32-SLI || 2x 1Gb Corsair 3500LL Pro || 7900 GTX || Tt 680W PurePower
MCP655 > Storm > MCW60 > 3/4" T-line > MCP655 > Storm (Opty 165) > 2-302 HC w/2x 140CFM Deltas
Latest Toy: 940BE || M3A32-MVP || Corsair TwinX2048-6400C4D || OCZ Stealth 600W
unreal, love how well those leds worked with the dial.
~ Core i7 920 @ 4.00 ~ Gigabyte EX58-Extreme ~ Patriot Viper Series DDR3 6GB 1600 ~ Gigabyte GTX 260 SLi ~ Swiftech Apogee XT ~
Thank you. I know when my wife is the one suggesting to get the case out in the open that I have scored with this case. She wants me to put it even more in plain sight like where the filing cabinet is, but I don't want it so close to a doorway as i am concerned that it will get hit while carrying in something as that doorway goes between our living and dining rooms and is the main traffic avenue in our house.
I'm kind of ticky when it comes to high pitched sounds, which is a sound that even the DDC emits. i honestly think i am kind of sensitive to higher pitches. I just took a hearing test for the military, and according to the person giving the test, anything rating at least a 20 is considered normal hearing. I only had one 20, but in the two highest ranges, I scored a 5. The DDC is a very quiet pump so its probably just me. If I hadn't of found such a good deal on the XT Ultra, I would probably have just gone down to one pump and tried to cushion it even more. However since I ran across such a good deal, I want to give the XT a try. I have been looking at it for a while and have wanted to get one. I have a pretty non-restrictive loop, so I don't think flow will be a problem. I took room ambient temps and stock and OC temps, so I'm going to compare them before/after to see if there is any difference.
I also want to break down eventually and buy Gentle Typhoons for the rads to quiet them down even more. The quieter, the better as far as I am concerned so long as i don't have to sacrifice good performance. I don't care about having the ultimate overclocked uber under temp setup, I'm just for a very quiet, stable 24x7 type overclocked setup.
I saw a thread here some months ago that i can't seem find via search that had this idea, and I kept it in the back on my mind. It really works well.
As for the PVC, I simply drilled two countersunk holes and used drywall screws. My house is the old plaster with backerboard behind it, so a drywall screw holds well enough for something lite like this. I used several of those velcro straps to hold the cables together so that they stay on the PVC channel.
We just changed over from DSL to fiber optic (talk about fast!- I'm getting about 25mbit download and 15mbit upload speeds), and it was so nice to be able to easily access the corner and change wiring as needed neatly.
I was going to finish leaktesting today and try to take pics, but the cheap vinyl 3/16" tubing isn't making a good seal on my t fitting that goes to my vacuum gauge. I had to run out and get some better rubber vacuum line from the auto parts store. That and my daughter had two friends over last night and was being stupid and managed to destroy the acrylic panel on the back storm door. I spent all afternoon working on replacing the panel and fixing the door so that the back of our house wouldn't be freezing. At least I'm not going to have to do all of the leaf raking as she is going to be doing a lot of it for me. I figure it took me in all about 4 1/2 hours + $25 to fix the door, so she has about 6 hours worth of work coming her way.
I was very disappointed when I first put in the six 10mm LEDs to find that they didn't diffuse at all and didn't light up the dial well at all. I did one of those Ebay Hong Kong shipped deals on that LED flexible light string, and that really was what I needed. It has 48 LEDs on it. With the spacer and diffusers, it really gives the look that I was after. There is no way that I'm going to be able to get it as bright as the original radio did with actual bulbs, but the LEDs do the trick. I was tickled pink when I got them installed and powered them up. It looks so much better.
Last edited by voigts; 11-18-2009 at 10:27 PM.
Latest Project Log: Project Quintessence
1935 Zenith Radio Scratch Build
Congratulations Voigts on another outstanding update/guide.
I was right about you, you are a master craftsman, and I admire your work ethic.
The new LEDs on that dial look heaps better and you know when your wife wants to show off your handy work then you know you have done a dam good job.
Well done there mate.
I'm highly skeptical about the "master" part, but thank you nonetheless. I spent hours today setting up and taking final pics today. I've got to work them all through Photoshop. The front dial sitting next to me looks exactly the way that I originally intended, and I am very, very pleased with it.
Latest Project Log: Project Quintessence
1935 Zenith Radio Scratch Build
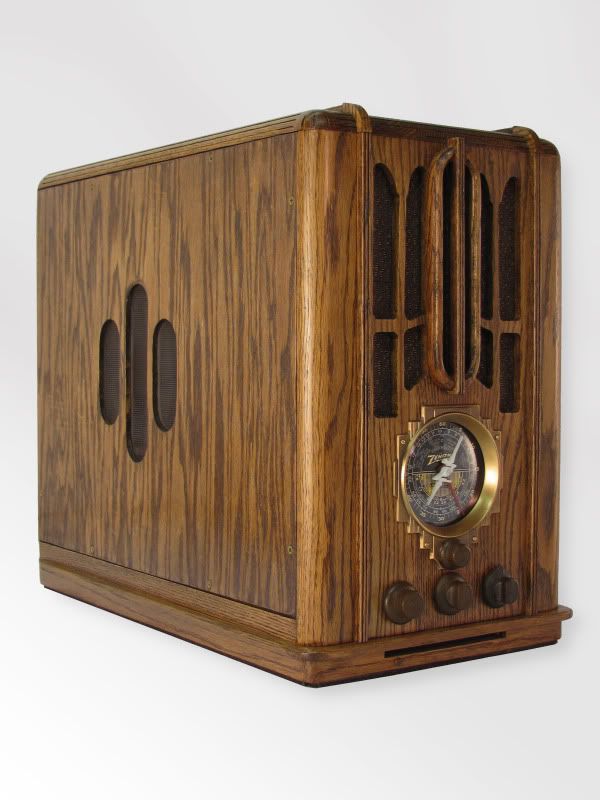
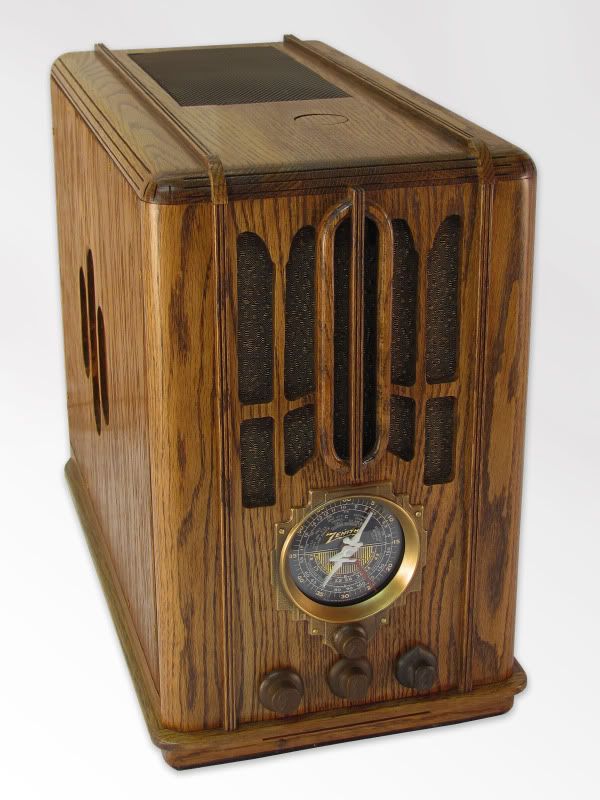
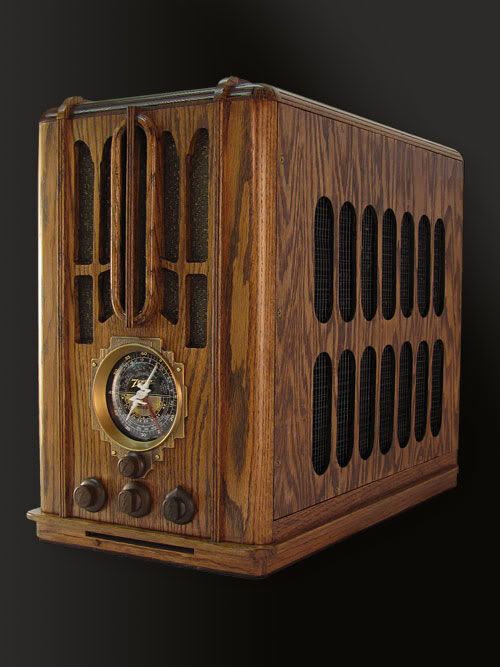
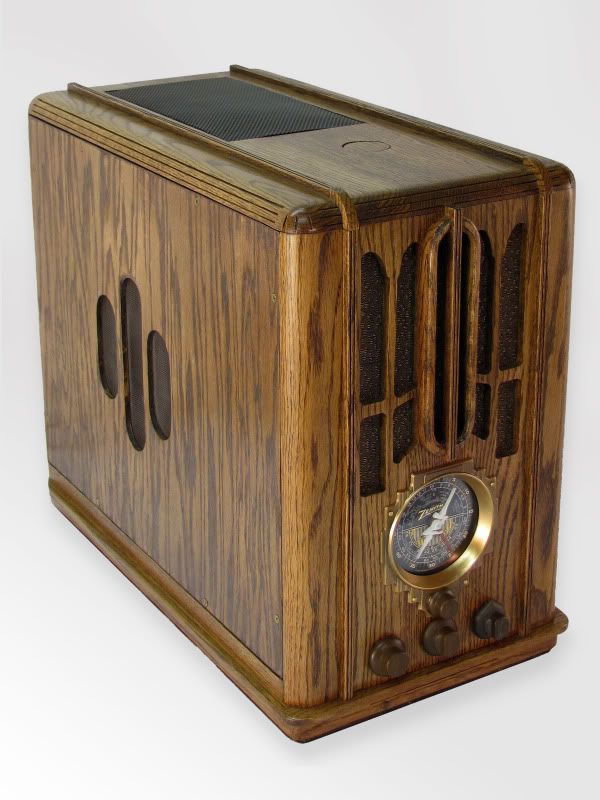
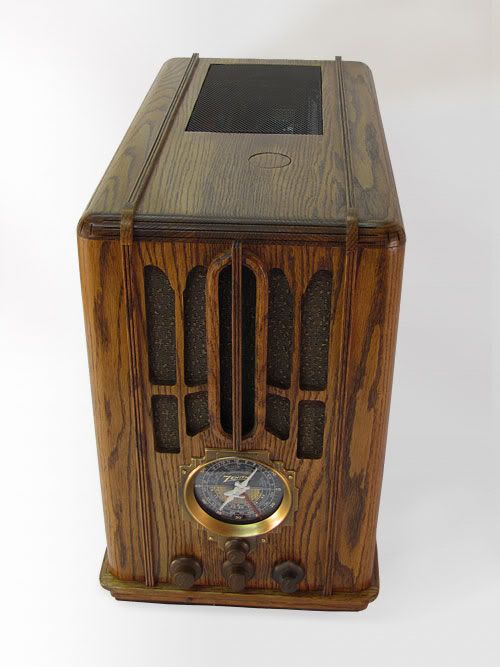
Completed Pics
I'm not satisfied with the internal shots due to the lighting, and may retake those. This is after a lot of work in Photoshop this week.

Last edited by voigts; 11-28-2009 at 11:55 PM.
Latest Project Log: Project Quintessence
1935 Zenith Radio Scratch Build
Magnificient work.
You can see the love that went into this and that says it all.
I used to do custom casework and people said I was too picky and would never make money at it but when you send out a piece a little bit of yourself goes with it and you want it perfect.
You attained that.
Crunch with us, the XS WCG team
The XS WCG team needs your support.
A good project with good goals.
Come join us,get that warm fuzzy feeling that you've done something good for mankind.
It's truely beautiful!
You must be very proud of your work!
I would like a worldwide convention that avoids following aspects of life:
Politics without principle;
pleasure without conscience;
wealth without work;
knowledge without character;
business without morality;
science without humanity;
and worship without sacrifice.
Because as Mahatma Mohandas K. Ghandi said, those are the things that will destroy us.
Looks amazing voigts, very impressed.
Have you found the Aquastream XT pump to be quiet enough for your liking?
Thanks. You are right about the TLC that went into this. It is both a blessing and a curse to be a perfectionist. While everyone else sees the nice stuff, you see the flaws. But all in all this case turned out very well.
I wouldn't mind building stuff for people, but it wouldn't be a money making venture to be sure given the time and money involved to make something like this. I've easily got $350 if not more in just materials. I spent about $120 just on the eschutcheon, dial, dial glass, knobs, and grille fabric. It would be the well-to-do person indeed who would be willing to pay what you would have to charge to make something like this. This kind of thing to me is just something i enjoy doing. It sure is cheaper however than old cars, boats, jet skis, gun collections, etc., none of which I have.
This pump really is more to my liking. My wife and daughter even noticed the difference right away. Sound wise, it is definitely even quieter than one MCP350. I like the sound quality better in that the pitch is gives out is not nearly as high pitched as the MCP350. As far as flow goes, I would say judging from the flow in the res that there isn't quite as much flow as one MCP350, but I don't have a flow meter to give exact numbers, and on this loop I was previously using dual MCP350s undervolted on a rheostat.
I also did a before and after to see if the Aquastream effects my temps or not. I took ambient room temps with an infrared thermometer. The ambient temps before and after the XT were about .4c from each other (22.8c and 22.4c). With both MCP350 pumps undervolted a bit, at idle I got 36c, and with Intel Test Burn running on high running 4.25ghz @ 1.3625v (500fsb) on an E8500, load temps didn't go past 56c. With the XT, I am getting the exact same temps both at idle and under load with the same OC. So even though I am sure the XT has less flow than the 2 MCP350 pumps, and probably less flow than one MCP350 would, the net result on my setup is no measurable effect on temps and no effect on OC. This is with the XT running itself at 74.4hz.
I also ordered some Petras gel stuff to put under the pump since I think it will do an even better job at isolating vibrations than the somewhat thin foam that I currently have under it. But all in all I am very pleased with it and think I will be sticking with this pump. I would have had a hard time paying the $170 or so for the Ultra with adapters, soggy sandwich thing, and shipping new, but since I got it all for $105 new shipped, I'm very pleased. If I hadn't of found that deal, i wouldn't have worried about getting the Ultra as the standard would be good enough for me since I don't really care about the internal temp sensor and the fan control.
Last edited by voigts; 11-29-2009 at 07:57 AM.
Latest Project Log: Project Quintessence
1935 Zenith Radio Scratch Build
Epic
~ Core i7 920 @ 4.00 ~ Gigabyte EX58-Extreme ~ Patriot Viper Series DDR3 6GB 1600 ~ Gigabyte GTX 260 SLi ~ Swiftech Apogee XT ~
Nice rig man, you should be very proud of what you have there. I could imagine seeing this in real life, it must be awe inspiring!
Current: AMD Threadripper 1950X @ 4.2GHz / EK Supremacy/ 360 EK Rad, EK-DBAY D5 PWM, 32GB G.Skill 3000MHz DDR4, AMD Vega 64 Wave, Samsung nVME SSDs
Prior Build: Core i7 7700K @ 4.9GHz / Apogee XT/120.2 Magicool rad, 16GB G.Skill 3000MHz DDR4, AMD Saphire rx580 8GB, Samsung 850 Pro SSD
Intel 4.5GHz LinX Stable Club
Crunch with us, the XS WCG team

 Posting Permissions


 Reply With Quote
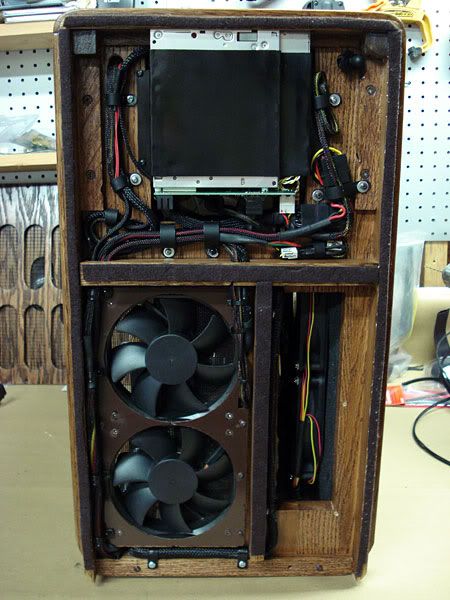


Bookmarks