Page 1 of 2 12 LastLast
Results 1 to 25 of 28

Thread: Build Log: CPINTS Cool Practical IKIKUINTHENUTZized NAVIG Tech Station

  1. #1
    Xtreme Member
    Join Date
    Dec 2006
    Location
    Californa
    Posts
    407

    Post Build Log: CPINTS Cool Practical IKIKUINTHENUTZized NAVIG Tech Station


    I introduce a brand new modification project presented to you by IKIKUINTHENUTZ with the famous and elusive Navig Tech Station handmade by Navig himself with design aided by Thideras!

    Now let me let you know the little history about Navig Tech Stations how this particular station was transferred to my ownership and why I am modifying this hand built wonder.

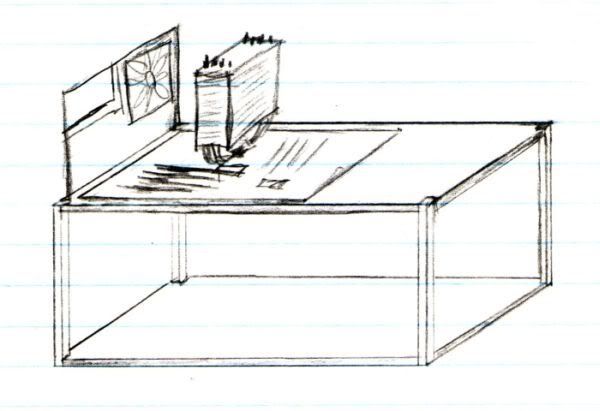
    Back in 2007 a little wonder named Navig on OCF & Abit forums (now dead) was creating something called, Navig's AWESOME DIY station. He created a thread to record his progress http://www.ocforums.com/showthread.php?t=528477 and began building his little monsters.


    The project was simple, to create a better tech station that was easy to work in and cost less than the competition. Long story short the project was successful and he begin taking orders for his made stations.

    Link to where he sells it. You need to be OCF member and have 100+ posts to view it.
    http://www.ocforums.com/showthread.p...ighlight=NAVIG

    One month after the success of the first station. A little OCF member named Thideras posted on 12-30-07 to request Navig himself to build a station to exactly to his specifications. Navig obliged and a custom design was created just for Thideras.

    Details of this transaction is located in this link but to view you must be a member of OCF and must have 100+ posts to see this thread
    http://www.ocforums.com/showthread.php?t=541522

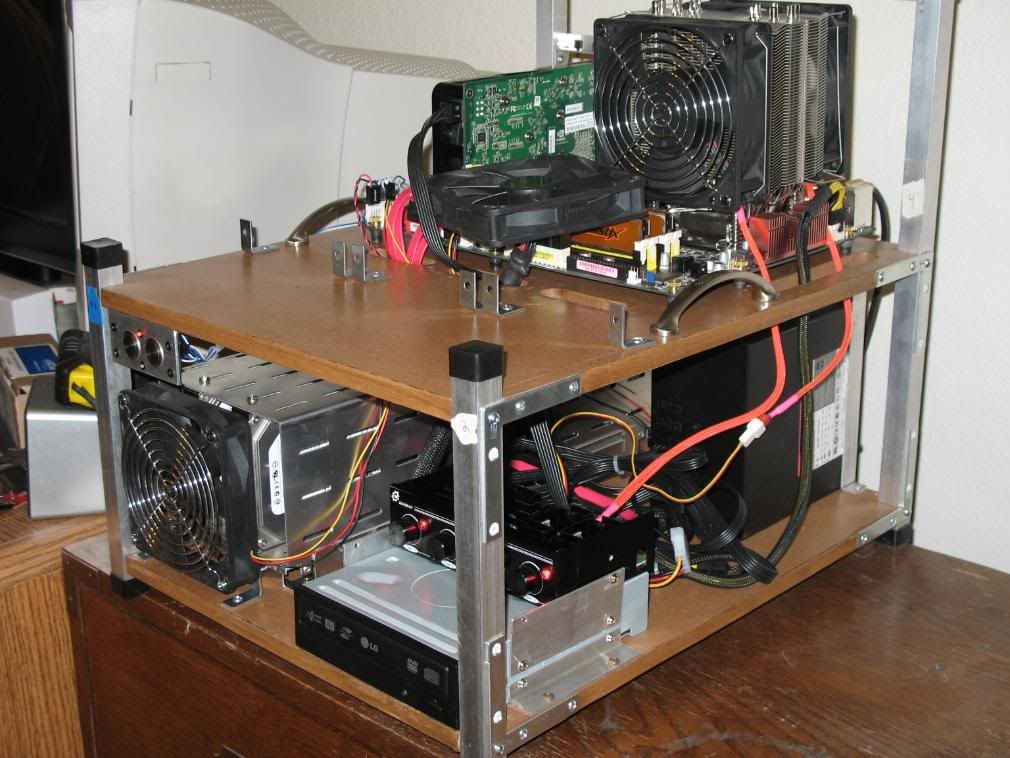
    An image of Thideras using the station


    In 06-19-2008 Thideras was selling this hand made wonder. I, IKIKUINTHENUTZ did not hesitate jumping on to the deal. Ownership of the station was transferred.

    I used the station for my work, testing products, a temporary parts holding before transfers, overclocking. Day by day I hated the station not because of the usefulness and functionality, in three simple words, it was ugly.

    Honestly I am a picky ass bastard when it comes to looks. Being a Lian li OEM case owner or my love for those shiny Thermalright rip off heat sinks and my awe for those nice practical (acceptable for everyday use) case projects other people posts, this fella I had no love for, I abused the poor thing without care because I just didn't like how it looks. The ugliness became so much, six months ago I dismantled the bastard and stowed it away in my closet.

    In may I finished my HTPC project (http://www.xtremesystems.org/forums/...postcount=5001 , http://www.xtremesystems.org/forums/...postcount=5026). Soon after I was cleaning my closet, I found this little monster dismantled. I forgotten about it but I remember why I took it apart, it was ugly. I didn't want to throw it away but to store it into the garage. Later I went into the garage and found black and white spray paint my dad doesn't use anymore. It begins.

    While painting the parts without much care, I thought to myself, " hey these screws are fugly" I went online to mcmasterscarr.com and order a tons loads of button cap screws of lots of sizes to replace the zinc coated fellas with stainless steel socket button caps. It looked very nice but soon after I was done. Fun money ran out and I halted the project completely.


    Until a few weeks ago with my funds rejuvenated I was pondering if I wanted to continual this project or just stow it again. Thankfully the new XS member whuzabi inspired me with his white murder mod. http://www.xtremesystems.org/forums/...d.php?t=225829

    Me and whuzabi talked and we shared ideas. Long story short, the chat made me decided I'm going to put some major effort into this into something worth while!

    I found some old paint used long ago when my room was being painting. I also went to a Local Ace hardware store and got some spray polyurethane stuff (I might exchange it for the brush on type).


    I sanded off the old ugly spray paint I used and decided to use rollers to paint the wood in order to put the most amount of effort into it. First is primer. I'll keep you guys updated, enjoy. I have some plans to help me get this aided and done.


    Current Sponsors:
    NAVIG

    Legal Disclaimer:
    I Andy (aka IKIKUINTHENUTZ) is not the original concept owner of this bench station. All concepts sans alterations by me are owned and created by Ivan (aka NAVIG). All images and work may not be reproduced without consent from me or Navig.
    Last edited by IKIKUINTHENUTZ; 07-04-2009 at 01:45 AM.
    Work and School, Work and School, oi!

  2. #2
    Xtreme Member
    Join Date
    Dec 2006
    Location
    Californa
    Posts
    407
    Clean, Primer, Sand, Clean, primer, Sand, Clean, Prime, Sand, Sand 60 grit, Sand 150 grit so far Im almost to a even flat sexy surface


    then I look to the sides


    Clean, Prime, awaiting sanding
    Last edited by IKIKUINTHENUTZ; 07-06-2009 at 08:10 PM.
    Work and School, Work and School, oi!

  3. #3
    Xtreme Addict
    Join Date
    May 2007
    Location
    New York City
    Posts
    2,065
    lol @ your legal disclaimer...
    too short bro... too short...

    what kind of wood did they use on this? seems like ply? if it was MDF, then your surfaces would be nicer and cleaner...
    ever consider replacing the wood panels with plexi? seems your aluminum structure is sound enough...

    if sticking with wood, get yourself an electric sander... go with heavier grit and get those surfaces flat BEFORE you clean,prime,sand... that process is for when you are ready for final coat...
    "The ultimate measure of a man is not where he stands in moments of comfort and convenience, but where he stands in times challenge and controversy."
    Dr. Martin Luther King Jr.

    DIY: Self Clinching Nuts

    Canon EOS 7D | Tokina 12-24mm f/4 | Canon EF 24-105 f/4 L | Canon EF 70-200 f/2.8 L IS Mk II | Canon EF 35mm f/1.4 L | Canon EF 400mm f/5.6 L | Canon EF 100-400mm f/4-5.6 L

  4. #4
    Xtreme Member
    Join Date
    Dec 2006
    Location
    Californa
    Posts
    407
    Quote Originally Posted by kinghong1970 View Post
    lol @ your legal disclaimer...
    too short bro... too short...

    what kind of wood did they use on this? seems like ply? if it was MDF, then your surfaces would be nicer and cleaner...
    ever consider replacing the wood panels with plexi? seems your aluminum structure is sound enough...

    if sticking with wood, get yourself an electric sander... go with heavier grit and get those surfaces flat BEFORE you clean,prime,sand... that process is for when you are ready for final coat...
    Hehe that was the intended purpose of that disclaimer doohickey, a joke

    It's MDF and I would thought so too but I had to use a brush and I learned that I am very ill experienced with brush, I should have stick to smooth fine rollers

    I thought of replacing it with pexi but I really don't wanna spend any more time when I already put so much time into just painting the damn wood.

    I never worked with wood before and Yes I learned all of that the HARD way but now the darn thing has 8 layers of primer (no kidding) so right now my focus is to just even out the primer as much as possible with finer grit sand paper.

    What made matters a bit worst is that I used water based primer, not oil. MDF and water put together puffs it up in some parts

    Anyways I went out and bought some small finest smooth rollers to see how it would work. Now I wished I used the in the first place instead of brush/plain rollers. ><
    Last edited by IKIKUINTHENUTZ; 07-06-2009 at 04:03 PM.
    Work and School, Work and School, oi!

  5. #5
    Xtreme Member
    Join Date
    Jan 2009
    Location
    Chandler, Arizona
    Posts
    193
    I never worked with wood before and Yes I learned all of that the HARD way but now the darn thing has 8 layers of primer (no kidding) so right now my focus is to just even out the primer as much as possible with finer grit sand paper.
    8 layers is crazy, you could coat the ceiling of the sistine chapel with 8 layers. I know you've put time into painting the wood, if you want to keep wood, get some better stuff. That wood is very grainy, unless you've sanded it down much more. Good luck with the project.
    -trekie86

    Antec 900 Black
    Rosewill 600W RP600V2-S-SL
    Gigabyte EP45-UD3P Rev 1.0
    Intel E8500 @ 3.8 GHz
    2 x 2 GB GSkill PC6400
    EVGA Geforce GTX 260 Core 216 SSC 55nm
    EVGA 8800GTS PhysX
    640 GB WD HDD 7200 RPM


    Quote Originally Posted by dengyong View Post
    Started life as a FTW and ended up as a WTF.

  6. #6
    Xtreme Member
    Join Date
    Dec 2006
    Location
    Californa
    Posts
    407
    Update on primer guys

    I'm almost freaking there!


    220 grit


    But the sanding kept going and going and I couldnt get lower in some parts which got me completely confused, so I decided I'm just gonna put the last darn coat on to fill those itty bity dimples (to the left of the screw holes).


    After this, NO MORE FREAKING PRIMER. Sand, clean, and then SEMI-gloss paint!
    Last edited by IKIKUINTHENUTZ; 07-07-2009 at 10:09 PM.
    Work and School, Work and School, oi!

  7. #7
    Xtreme Addict
    Join Date
    May 2007
    Location
    New York City
    Posts
    2,065
    much better than your first try...
    yea, i guess it is MDF... jsut seems so grainiy... maybe the primer was very thick?

    can't do much about the "orange skin" effect when you're using a roller... except some elbow grease and sanding block... but seriously, just coat that with paint and be done with it...
    or you can put a very THICK layer of clear polyurethane on it... let the texture show inside a clear shell?

    ha ha ha... lemme stop...
    "The ultimate measure of a man is not where he stands in moments of comfort and convenience, but where he stands in times challenge and controversy."
    Dr. Martin Luther King Jr.

    DIY: Self Clinching Nuts

    Canon EOS 7D | Tokina 12-24mm f/4 | Canon EF 24-105 f/4 L | Canon EF 70-200 f/2.8 L IS Mk II | Canon EF 35mm f/1.4 L | Canon EF 400mm f/5.6 L | Canon EF 100-400mm f/4-5.6 L

  8. #8
    Xtreme Member
    Join Date
    Dec 2006
    Location
    Californa
    Posts
    407
    Final Primer sanding done, I didn't have time to get to paint but it will be done very soon


    I got too curious in my own nature and I decided to rub Computer printer paper (92) to see what it can do


    Holy crap! printer paper is a good polish
    Work and School, Work and School, oi!

  9. #9
    Xtreme Member
    Join Date
    Dec 2006
    Location
    Californa
    Posts
    407

    I decided to keep some texture because without texture, it's boring

    Now here is a close up and what your seeing is the surface with water based wood finish for a hard shell for protection. Acrylic Primer, Acrylic Latex paint, then Acrylic finish

    now the next thing on my agenda is a complete redo of the metal bar paint


    As you can see the paint is chipping away, flaky and just plain bad and peeling.


    These are going my aides (the good kind) and both are advertised to be best on aluminum. Only missing is mineral spirits but she's too busy stripping
    Work and School, Work and School, oi!

  10. #10
    Xtreme Member
    Join Date
    Jan 2009
    Location
    Chandler, Arizona
    Posts
    193
    Who knew printer paper doubbled as a buffer? Looking much better.
    -trekie86

    Antec 900 Black
    Rosewill 600W RP600V2-S-SL
    Gigabyte EP45-UD3P Rev 1.0
    Intel E8500 @ 3.8 GHz
    2 x 2 GB GSkill PC6400
    EVGA Geforce GTX 260 Core 216 SSC 55nm
    EVGA 8800GTS PhysX
    640 GB WD HDD 7200 RPM


    Quote Originally Posted by dengyong View Post
    Started life as a FTW and ended up as a WTF.

  11. #11
    Xtreme Member
    Join Date
    May 2009
    Location
    Austria
    Posts
    286
    zeah great. u done it

    well done get this thing rollin

  12. #12
    Xtreme Member
    Join Date
    May 2009
    Location
    Richmond, BC
    Posts
    112
    I like your weapon of choice to attack a paintjob. Nice black and white tone there.
    SCHOOL PC
    CPU = i7 920 D0
    GPU = 2x GTX285 SLI
    Mobo = Asus P6T X58
    HDD = 3x 30GB Vertex SSD RAID0
    RAM =3 x 2GB Dominators1600
    CPU Block = Apogee GTZ
    GPU Block = 2x HEATKILLER® GPU-X² GTX285
    NB Block = Bits Power BLACK FREEZER///EK-Mosfet ASUS X58 KIT
    Case = MM U2UFO
    PSU = Corsair HX1000W

    GAMING PC
    CPU = I7 940
    GPU = 2x GTX 295
    Mobo = X58 Classified
    HDD = 3x 30GB Gskill SSD RAID0
    RAM =3x2GB Dominator GT
    CPU Block = Heatkiller 3.0
    GPU Block = Koolance VIDNX295
    NB Block = EK Acetal Full Coverage
    Case = SS TJ07
    PSU = Corsair HX1000W

  13. #13
    Xtreme Member
    Join Date
    Dec 2006
    Location
    Californa
    Posts
    407
    I think it's time for a update

    When the wood dried up, I went ahead and got some case handle from P-PCs to replace the weird cabinet drawer style that Navig originally used in favor for these beefy ones

    http://www.performance-pcs.com/catal...ducts_id=23828


    After I got them in the mail, I didn't hesitate opening them up for installing only to find that my MDF is so thick that the stock screws didn't work. I went down to the local hardware store and got me some Black oxide replacements that were longer.


    So far it looks great!


    However I was a bit worry that the wood was too weak to hold what I had in plan for this build so I decided to put some 19-25 lb watermelon from Costco (yes it was big).

    Long story short, more weight and it would not last at all.

    Again a trip to the hardware store but this time I got myself some metal bars and I cut it to size accordingly to where the case handles are bolted.


    More to come later for this portion.

    Now you might be wondering what am I exactly trying to put on this? Well I think this next part would be enough to let you know.

    I scored a Nice deal on a Thermochill PA 120.3 for $50 local. So cheap because it had rust on it according to the guy but I figured "hey it's a radiator there wont be anything else than brass and copper" after I got it, wow it did have a little bit rust here and there but it didn't mind me.

    I pulled out the acetone and started to clean off the rusty parts and old ugly paint on it.


    then I learned it had steel sides which explained the rust. Why did Thermochill use steel sides?...


    Roughed the sides, tape, then nice ole Primer


    Now after the primer comes the the part where I paint it and I used epoxy Black.

    Nice and all I loved it


    Until it falls down and all that spray was for nothing....
    Seriously it fell down and the whole paint job was RUINED

    I went into my garage and pull out my trusty Jasco


    I get mad every time I look at this image, in one streak of that stripper and it bitterly chewed all that hard work away, including primer.


    That's not all, my so called Anti solvent gloves weren't so anti solvent (thanks Stanly). During the process I felt my left hand was BURNING. One look at the left hand glove and it was slowly becoming gooey. In panic because of the poison label on the Jasco, I ran to the trash bin chucked both gloves away and left my hand in running cold water for 20 min until it stopped burning.

    What a crappy day

    well not really, at least the new handle bars looks sweet but right now I'm tempted as hell to buy a brand new radiator like the Danger Den Black Ice SR1 and call it done for that portion.

    Now you maybe wondering what's going on with those metal bars. I'm thinking of powdercoating them but first I have to finalize the metal I am using for added structure support before I spend a lot of money for the service.

    mumble mumble *maybe Cyber Druid's service* mumble Mumble
    Work and School, Work and School, oi!

  14. #14
    Xtreme Member
    Join Date
    Jan 2009
    Location
    Chandler, Arizona
    Posts
    193
    then I learned it had steel sides which explained the rust. Why did Thermochill use steel sides?...
    Or why didn't they at least use stainless steal? Seems like a cheap manufacturing design to keep costs down.
    -trekie86

    Antec 900 Black
    Rosewill 600W RP600V2-S-SL
    Gigabyte EP45-UD3P Rev 1.0
    Intel E8500 @ 3.8 GHz
    2 x 2 GB GSkill PC6400
    EVGA Geforce GTX 260 Core 216 SSC 55nm
    EVGA 8800GTS PhysX
    640 GB WD HDD 7200 RPM


    Quote Originally Posted by dengyong View Post
    Started life as a FTW and ended up as a WTF.

  15. #15
    Xtreme Member
    Join Date
    May 2009
    Location
    Austria
    Posts
    286
    gogogogo looks great i want morrrrreeeeeeee

  16. #16
    Registered User
    Join Date
    May 2009
    Location
    Screwston, Texas
    Posts
    64
    This is a pretty neat little build you've got going. In the end, the effort you are putting into it now will definitely pay off. P.S. What are those spacer on the motherboard tray and how are they attached?
    "We are the music makers. We are the dreamers of the dreams."

  17. #17
    Xtreme Member
    Join Date
    Dec 2006
    Location
    Californa
    Posts
    407
    New update

    First off I have learned that the radiator I have bought is a used HE 120.3, NOT a used PA 120.3, sorry for the confusion.

    I have sent all metallic pieces of the station to get powder coated by CyberDruid of OCN (http://www.overclock.net/cyberdruidpc/) along with other services I have purchased from him that I will get into details in the future.

    Along with the shipment of metal, I have sent him the 6 radiator brackets along with the package. Again, I'll elaborate what have been done once it comes back.

    Now lets get to the interesting parts shall we?

    Navig had recently came back from his epic vacation and had redone his workshop. In short, me and him talked and he have done me a huge favor.
    He hand handmade a brand new hard drive set up for my station that is already incorporated into his newer designs. However my station was based on the older design and did not have such feature and used a traditional HD cage.

    This image here shows what will be coming in the mail for me and I can't wait until I get my hands on it to install it!


    Now you maybe wondering what happened to the radiator. Well I decided to be super wasteful and lazy that I dunk the whole thing into the gel stripper chemical I had (yes this time I bought expensive nitrite gloves!) and simply jet it with high pressure water from the garden hose to rinse it after 30 mins.

    Holy crap it took off the paint on the fins too without adding damage.


    Since there wasn't paint on the fins, I sprayed it with some white enamel on to it both sides. It looks a bit quirky thanks to the bent fins but no biggie.


    I taped up a big portion and on one side of the radiator I put some bondo on and sand the whole section down to make it nice and smooth with 220 grit wet


    after painting it


    Learning the mistake of rushing it last time, I decided to take my time and slowly work one side a day then taping it up to work on the next.

    Here is the finished product with epoxy paint as exterior. I wish the fins weren't bent but at least I'm doing some recycling. Plus I rather do all this on a radiator I got for only $55 vs those new Thermochills that go for $120


    Not only that I got some hard to find fans in the mail recently. Teehee.


    Their so adorable, it even got teeth
    Work and School, Work and School, oi!

  18. #18
    Xtreme Addict
    Join Date
    May 2007
    Location
    New York City
    Posts
    2,065
    um... what rad is that?
    i'd like to say TC... but it's got way too many FPI for a PA120.3... and where's your fan mount screws on the rad?
    "The ultimate measure of a man is not where he stands in moments of comfort and convenience, but where he stands in times challenge and controversy."
    Dr. Martin Luther King Jr.

    DIY: Self Clinching Nuts

    Canon EOS 7D | Tokina 12-24mm f/4 | Canon EF 24-105 f/4 L | Canon EF 70-200 f/2.8 L IS Mk II | Canon EF 35mm f/1.4 L | Canon EF 400mm f/5.6 L | Canon EF 100-400mm f/4-5.6 L

  19. #19
    Xtreme Member
    Join Date
    Sep 2008
    Location
    Rolla, MO
    Posts
    123
    Smooth paint job

  20. #20
    Xtreme Member
    Join Date
    Dec 2006
    Location
    Californa
    Posts
    407
    Quote Originally Posted by kinghong1970 View Post
    um... what rad is that?
    i'd like to say TC... but it's got way too many FPI for a PA120.3... and where's your fan mount screws on the rad?
    Quote Originally Posted by IKIKUINTHENUTZ View Post
    First off I have learned that the radiator I have bought is a used HE 120.3, NOT a used PA 120.3, sorry for the confusion.

    blah blah blah....

    Along with the shipment of metal, I have sent him the 6 radiator brackets along with the package. Again, I'll elaborate what have been done once it comes back.

    blah blah blah...
    forgot to put "fan" in front of "bracket", I sent the fan brackets to Cyber druid for some alteration work.

    Radiator is discontinued Thermochill HE 120.3 and the brackets are separate pieces
    Work and School, Work and School, oi!

  21. #21
    Xtreme Addict
    Join Date
    May 2007
    Location
    New York City
    Posts
    2,065
    lol... thanks... i guess it helps to read sometime...
    "The ultimate measure of a man is not where he stands in moments of comfort and convenience, but where he stands in times challenge and controversy."
    Dr. Martin Luther King Jr.

    DIY: Self Clinching Nuts

    Canon EOS 7D | Tokina 12-24mm f/4 | Canon EF 24-105 f/4 L | Canon EF 70-200 f/2.8 L IS Mk II | Canon EF 35mm f/1.4 L | Canon EF 400mm f/5.6 L | Canon EF 100-400mm f/4-5.6 L

  22. #22
    Xtreme Member
    Join Date
    Dec 2006
    Location
    Californa
    Posts
    407
    Well look what came into my door step today!


    of course I jumped to work right away, Navig was even nice enough to write me instructions on how to install it.

    it was really easy, just screw in the screw and nut with the threaded insert and simply screw it out. but for an extra bite I added wood glue for good safety measure


    Next is just placing everything on it, so far so good


    Also Navig had included black thumbscrews, wasn't feeling for black screws so I got my stainless steel thick thumb screws.

    Work and School, Work and School, oi!

  23. #23
    Xtreme Enthusiast
    Join Date
    Dec 2004
    Location
    Chico, CA
    Posts
    749
    Hey whatsup!

    I've been off the radar for a bit as you know. Moved from Boston to California, new job and all that craziness put my modding pursuits well, frankly, into a bunch of very large boxes.

    But as ikiku can attest, the shop is open and stuff is being built once again.

    Great project ikiku. I don't enjoy painting, so typically my projects just get sealed with some wb polyurethane. Ikiku's done a great job on painting, and that ain't so easy!

    Anything else you need for the project, just let me know!

    navig

  24. #24
    Registered User
    Join Date
    Jan 2009
    Location
    █♣█
    Posts
    51
    That looks pretty cool, what type of screws did you use for the mobo if you dont mind me asking?
    Black Knight <°))))><™

    My System: Case: Corsair Obsidian 800D, Cpu: Intel Core i7 970, Motherboard: Asus Rampage III Formula, GPU: Evga GTX 580 SLI, Memory: 6GB 2000Mhz Corsair Dominator GT, Hard Drive: Intel X25-M 160GB - WD 4TB Storage, PSU: Corsair AX1200W, CPU Heatsink: Custom H2O, Sound Card: Asus Xonar Essence STX, Display: Samsung 24" 2493HM, Speakers: Logitech Z-5500, OS: Windows 7 Ultimate

  25. #25
    Xtreme Member
    Join Date
    Dec 2006
    Location
    Californa
    Posts
    407

    Big ass update 1 of 2

    WOOHOO!!!

    I got my order back from Cyberdruidpc along with newly purchased items for this project.

    Tee I'm getting too giddy here, it's ready to be assembled! Too bad I got new complications but I'll explain that later.

    First thing first.

    While the parts of the tech station was sent to Cyberdruid of OCN for some powder coating and other services. I ordered a few items from various stores and bought some items from classifieds in many different forums.

    Here's a quick made up collage of the stuff I bought in the first batch of items.

    First batch


    Starting from the top left:
    Lamptron - Vandal Resistant Illuminated Switch, White ring and white dot
    http://www.lamptron.com/product.php?p_id=4 got them at P-Pcs. Looks nice, construction is strong, love the gold plated connectors in the back, heavy, feels like quality.

    Bitspower - Bitspower Premium G1/4" High Flow 1/2" Fitting
    Amazing enough they don't have the product listed on their official site, got them from classifies from XS. Love the finish on it, almost like stainless steel look with exception of a mirror finish from the nickle, good deal I got these for considering them being brand new, strong construction.

    Rustoleum - Hammer black
    http://www.rustoleum.com/CBGProduct.asp?pid=180 got it at ACE. Only plan to use as touch up or small items.

    Parts Express - 1:3 heat shrink
    Got them at Parts express. Cheapest price I can find 1:3 ratio heat shrink.

    Mcmastercarr - Thumb knurl knob hex Stainless steel
    Got them at Mcmastercarr. Knurl knobs Navig used are round and brass, I'm replacing them with hard to find expensive ass hex Stainless steel ones. I paid too much for them!

    Mcmastercarr - 6/32 screw thingy with some neoprene ring
    Wrong item #...sigh....

    Promaster - Packaging foam
    packing foam from my tripod gear, I got ideas for this foam... hehe

    Some brand - Stainless steel pop rivets
    From mcmastercarr. Tested the product out showed in the image above on some random Lian Li HD cage, very nice

    Cream of the crop: ViperJohn - ViperJohn's Viperfang VII
    From Viperjohn himself, the last block he will ever make of this series. Freshly assembled, fully tested, Full copper base, Derlin top, DD fittings (might replace them)

    2nd batch of items


    All of these are ordered from Coolerguys. Somewhat hard to find parts but it matters that I got them.

    Lamptron - Flex light pro in white
    It comes with 3m adhesive pre-applied, nice sheen, easy to bend, lummes is nice, not too bright.

    Logisys - White CCFL
    White CCFL, like pretty much most other CCFL lights in market. Going to spray paint the transformer to black on it soon.

    Nexus - Air Beam
    Somewhat hard to find. Going to use them on radiator fans to help with pressure. A piece of cut plastic, would have been cool if it was made of metal but that would make it even more expensive. May spray paint it.

    A bit tired right now, got class tomorrow, posting Cyberdruid's shipment tomorrow
    Work and School, Work and School, oi!

Page 1 of 2 12 LastLast

Bookmarks

Bookmarks

Posting Permissions

  • You may not post new threads
  • You may not post replies
  • You may not post attachments
  • You may not edit your posts
  •