

The fluid isn't as pale as I thought!


The fluid isn't as pale as I thought!
Signatures make my posts look huge... but I'm not humble enough to completely remove my signature, so I kept this note explaining it.
Hmm, I don't know Scott, this is what appears to be nano fluid after a couple of months. It seems pretty pale. Either that or it's very dirty distilled waterOriginally Posted by rjkoneill

.
Little expense had been spared to create the impression that no expense had been spared. - Hitchhiker's GuideMondays:It's better to ask dumb questions now, than to look stupid later
correct - however it was nanofluid added to a loop where the blocks had not been cleaned.
for the rebuild i stripped and cleaned as much of the loop as i could
will take a pic next week and see how it is holding up.
the its hard to tell the quality and cooling capability of the fluid when i just added a fermi to the loop. its not exactly the coolest card ever
got a beast of a clock on it though
26.5K in vantage compared to the 30k i got with 5870 crossfire
≠ 4770K - R9 290X Crossfire
www.overclockers.co.uk
are those painted white tubes?
this is one of my favourites!!
love what you did there, man!
doctor pepper's desk
EVGA P55 FTW | i5 650 @ 4GHz | 4Gb Corsair Dominator DDR3-1600 XMS3 | XFX 4870 1Gb | Corsair X32 | Samsung SpinPoint F1 - 320Go | Fractal Design Newton R2 650W | Samsung P2450H | Microsoft Laser Desktop 7000 | JBL Spyro Black
AirCooling: Prolimatech Mega Shadow | Xigmatek Bifrost | Fractal Design SATA Cluster Box | Fractal Design 2x120mm, 2x140mm and 1x92mm
Cosmos-S
Foxconn BloodRage Rev1.1 Bios P07 | i7 920 D0 @ 4,629GHz max & 4,3GHz stable | 6Gb Corsair Dominator DDR3-1600 | XFX 5870 | Sonar X-Fi | Intel X25-M 80 Go PostVille | Samsung SpinPoint F1 - 1To | Corsair HX620W | CoolerMaster Cosmos S | Samsung T240 | Logitech MX-5500 & Z-2300
Watercooling: Laing DDC + plexi top and tank | CPU - HK 1366 rev 3.0 LT | GPU - EK Water Blocks EK FC5870 V2 - Acétal Nickel | MB - Foxconn's original | HDD - HK SilentStar HD-Single rev 2.0 | radiator - 3x120mm | tubing - High Flex 10/16mm | red PrimoChill ICE coolant


why did you downgrade to 4890's 275>=4890. instead of 5xxx/4xx series
wow. awsome coolant. what is it? it looks like chilled water
nice work
Intel Core i5 3570k 4.4GHz | Noctua NH-D14 | MSI Z77A-GD55 | Gigabyte GV-N1070G1 GAMING-8GD | Crucial Ballistix Tactical LP 4x4GB DDR3 1600MHz CL8-8-8-24 1,35V | X-Fi Titanium Fatal1ty Pro | EVGA SuperNOVA 750 G2 | 26" LCD SAMSUNG T260 | ColerMaster HAF X | Windows 10 Home Premium 64-bit CZ | > My new PC http://www.youtube.com/watch?v=V3iSpTVMhLA
no they are white XSPC 7/16th, the photogaphy makes them look really bright, i guess it was just the lighting.
thanks man, my photography isnt up to the same standard as a lot of the logs on here, i have a keen eye for it but the equipment is a little lacking
sony 10mp point and shoot camera and the light tent from work
i sold the 285s because they were non reference. i couldnt get waterblocks for them.
so i sold them and had the choice between a 295 and 4890 crossfire, i chose the 4890s which was a big mistake.
i sold the 4890s and got a single 5870 which was ok but a bit lacking in horsepower for some newer games. so i got a second 5870 [not learning from my first bad crossfire experience] and got worse performance in all but one of my games.
so i sold both my 5870 cards and got a 480
the 480 does 920mhz under water and performs brilliantly. check out these benchmarks i did...
the 480 is giving me the most consistant framerates out of all the gpu configs i have ran. i am finally happy with my graphics and will be leaving it as it is for a while.
it looks so much better, the photos make it look wierd. it is NanoFluid by FluidXP. it is quite expensive but i only got it becase of the way it looks.
thanks for the kind comments
≠ 4770K - R9 290X Crossfire
www.overclockers.co.uk
it does not look weird, it looks awesome
awesome work mate, may i ask what was the difference between v1 of the ek pump to the new one???
Another thing I find funny is AMD/Intel would snipe any of our Moms on a grocery run if it meant good quarterly results, and you are forever whining about what feser did?
looks good.
how do you find xspc tubings? I currently looking for good color tubings.
new toys
before...
after...
≠ 4770K - R9 290X Crossfire
www.overclockers.co.uk
you mean the res?
i found that the v1 without the vortex plate didnt work too well with the d5
the v2 has the tubes inside which stop vortex and it looks pretty cool too
its a lot wider than the v1
i did want some murdermod res holders but since they have been having trouble on their site, i just decided to get a new res.
the bend radius is ok, not as good as tygon but still pretty good.
≠ 4770K - R9 290X Crossfire
www.overclockers.co.uk
reviewing my work i must admit my photography is rather fail.
i am a computer tech and not a photographer. i wouldnt know how to work a good camera if my life depended on it.
my current shots are taken with a Sony DSC-W110 which is a very basic point and shoot but serves me well.
i have been reading a few beginners photography forums recently and gained the following knowledge:
1. my camera sucks
2. i need a tripod
3. still images should be taken using a timer
so accounting for all of these three facts i have done my best to make the photography in this update at least half decent.
i took on board the advice in points 2 and 3 and got a tripod and sorted the timer out. the results are much better. my camera still sucks.
onwards with the updates.
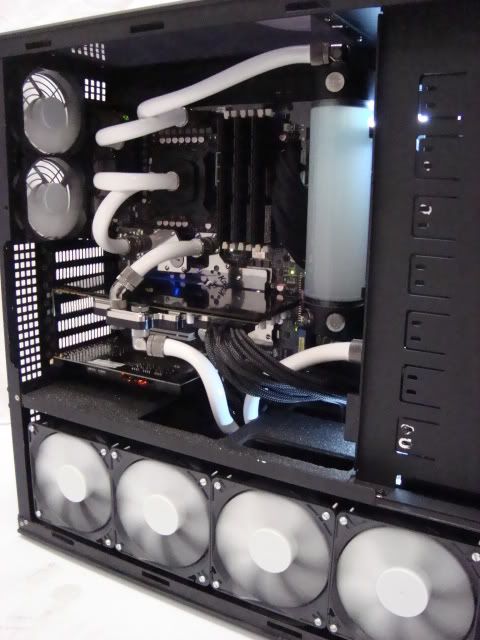
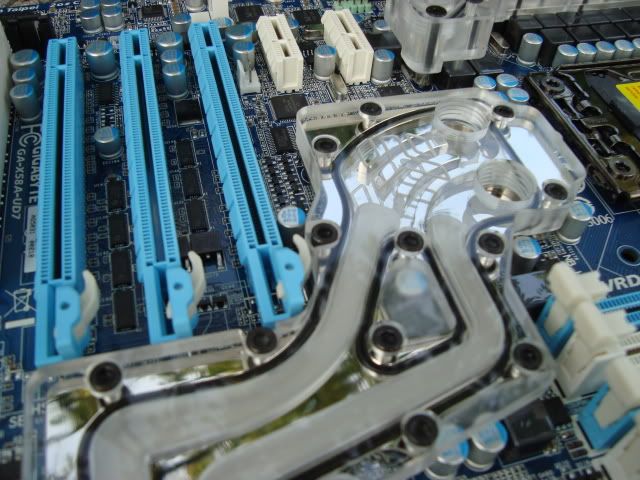
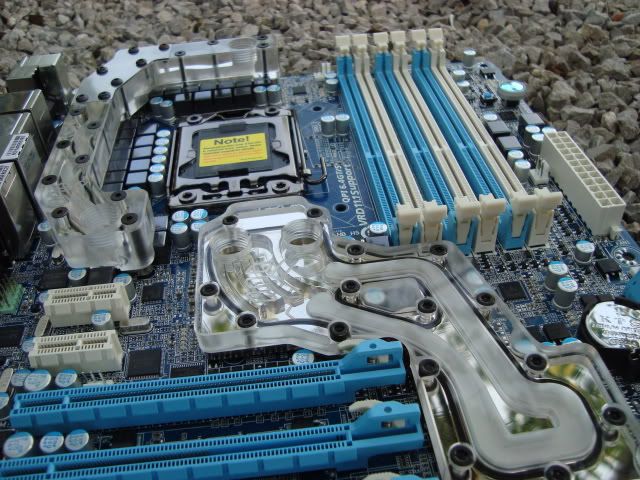
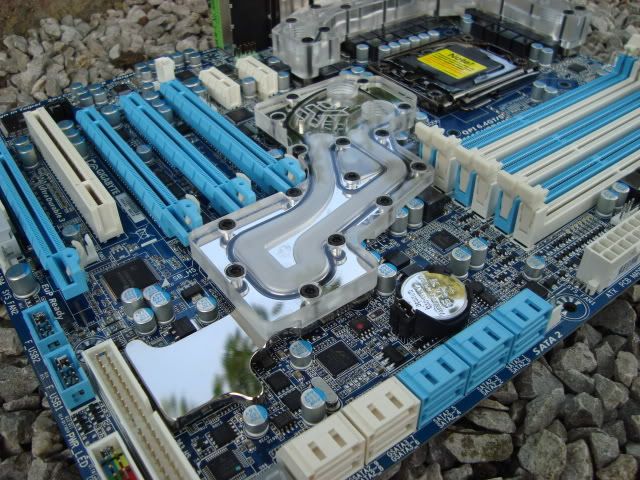
some more in depth shots of the fantastic Gigabyte UD7 with EK Nickel Plexi full cover blocks.
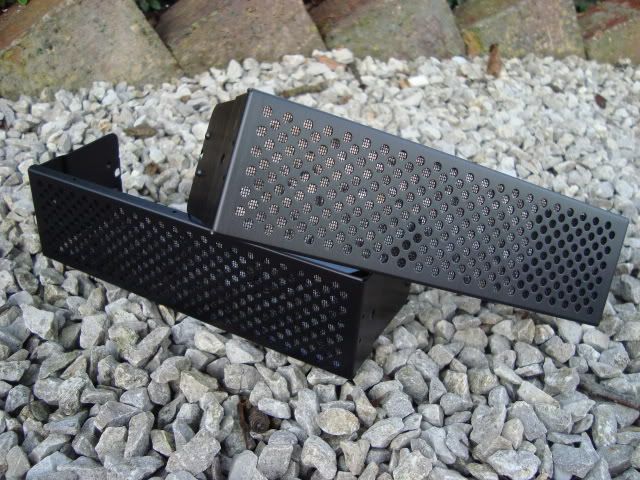
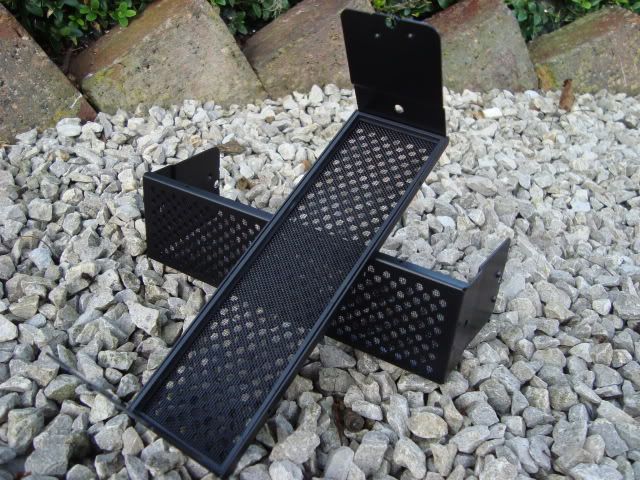
then the front of my case will be filled with these vented bezels from Lian Li, they have dust filters in them but i may remove them.
behind the vented bezels will be my dual radiator. I wanted more active cooling in the loop and this will be ran in series after the Quad thermochill to keep that fermi under control. the rad will be mounted in the front using the lian li mounting kit that i had from an old build and a white P clip to keep things nice and tidy
then there is this beautiful piece of work. which will be stealth mounted to the board using the coolit backplate and m3 hex screws from earlier on in the build.
i am going to be upgrading my memory to a higher performance part and did want to run a Mips memory cooler. i emailled them directly asking for their dominator cooler with a nickel backplate and a plexi top. but they said that they weren't willing to work with plexi, so that idea has to be scrapped. i may go for some nickel plated extended dominator fins to match all the shiny blocks.
at the moment i am stuck between blue coolant and clear coolant. give your opinions on this if you feel you can input
my partner in crime NathWraith has been fantastic in ordering me my parts.[thats why OcUK stock that cpu block unsurprisingly] we have some clear tygon tubing on its way to us too which i will be modding by removing the tygon logos. this will provide superior flexability as well as preventing bacterial growth. should be here next week meaning i will be able to get started on what will be the final rebuild of this system.
≠ 4770K - R9 290X Crossfire
www.overclockers.co.uk
familiar situation
and there is one more option for rad mounts
http://www.sidewindercomputers.com/underadbr.html
which you don't need to paint
and one question i have,
how did you make this beading round and what did you buy for it?
Intel Xeon W3520 4200MHz HT
Foxconn Bloodrage
3x2Gb Patriot Viper II DDR3-1600 6-6-6-16
MSI GTX480 M2D15 850/1700/2000
Samsung F1 1TB
Corsair TX950W
Stacker 832 w/ Dual Loop Watercooling aka *Bong Build*
NEC 2690WUXi
Loop 1: Laing DDC1-T -> Watercool HK 3.0 LT -> Thermochill PA120.3 -> Bloodrage NB -> EK Res 150
Loop 2: Laing DDC1-T -> EK-FC GTX480 -> Thermochill PA120.2 -> EK Res 150
*New* CM 690 II Advanced Watercooled
*Coming soon* Stacker 832 Rebirth!
haha, yes, i did consider going dual loop to stop the 480 heating up my other stuff
the beading is from Chilled PC in the UK its fairly easy to just bend into shape
≠ 4770K - R9 290X Crossfire
www.overclockers.co.uk
great work
Q9550 E0 @3.8 - zalman CNPS9700 NT - GA-EP45-UD3R rev 1.1 - OCZ Reaper 2x2GB DDR2 1066
GTX 285 SSC - Thermaltake Toughpower 850W - Samsung 2220WM 22" LCD - win7 x64
the second rad is coming
i was in the loop before but now i is being actively cooled!
≠ 4770K - R9 290X Crossfire
www.overclockers.co.uk
I can't find this stuff in Chilled PC, what part do you mean?
Intel Xeon W3520 4200MHz HT
Foxconn Bloodrage
3x2Gb Patriot Viper II DDR3-1600 6-6-6-16
MSI GTX480 M2D15 850/1700/2000
Samsung F1 1TB
Corsair TX950W
Stacker 832 w/ Dual Loop Watercooling aka *Bong Build*
NEC 2690WUXi
Loop 1: Laing DDC1-T -> Watercool HK 3.0 LT -> Thermochill PA120.3 -> Bloodrage NB -> EK Res 150
Loop 2: Laing DDC1-T -> EK-FC GTX480 -> Thermochill PA120.2 -> EK Res 150
*New* CM 690 II Advanced Watercooled
*Coming soon* Stacker 832 Rebirth!
hi guys, small update here
been doing a bit of preperation for the switcharound on my case.
I'm beginning to accept that the murdermod panel is never going to materialise.
their website hasn't changed for ages so im just going to leave it off the build.
this rebuild will be the last change to the TJ07 before I start looking at another project.
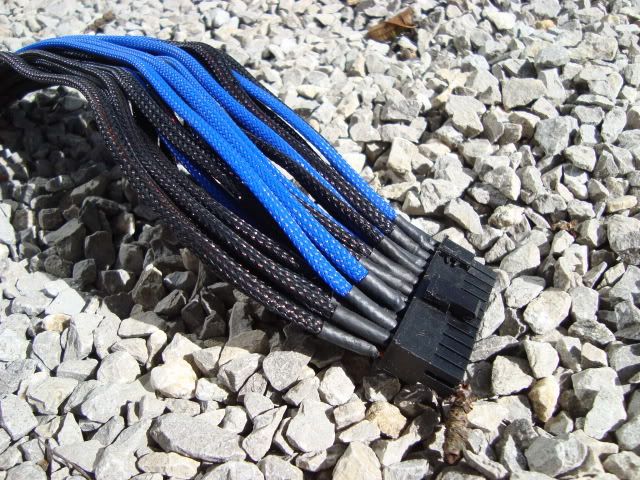
first of all, I have spent the last week braiding stuff up again to match the new board/colour schemes.
still considering rebraiding everything as the heatshrinks from the last effort look a little poor.
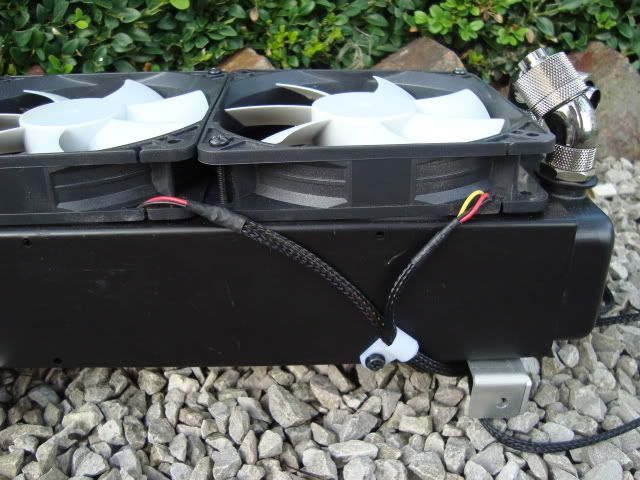
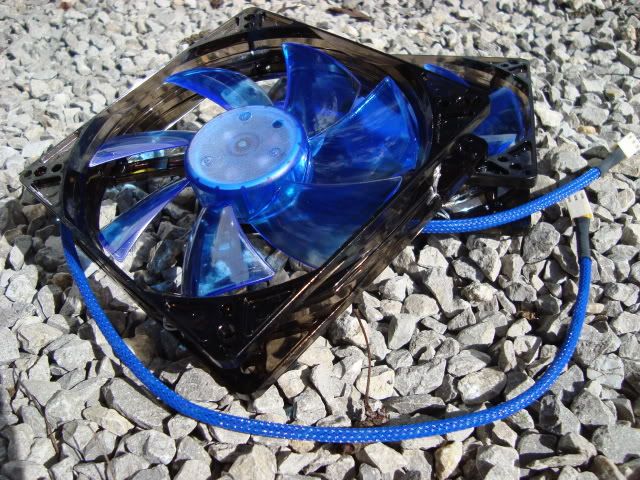
the fans i will be using throughout the case have been braided too.
Xigmatek XLF Blueline 120mm.
there will be a total of six fans in the case plus the psu fan which is quiet anyway. still considering which fan controller to go for.
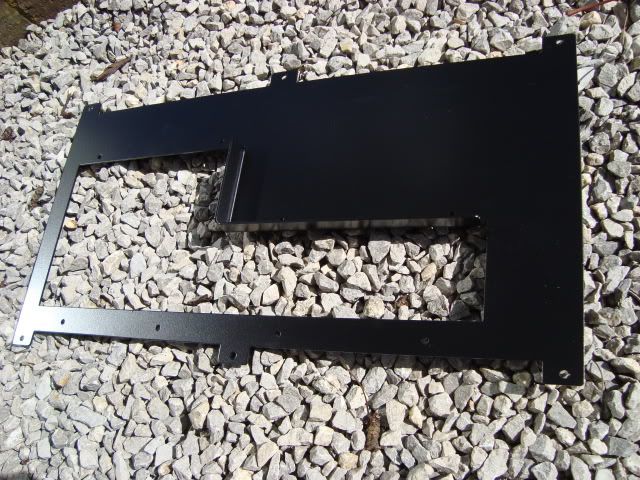
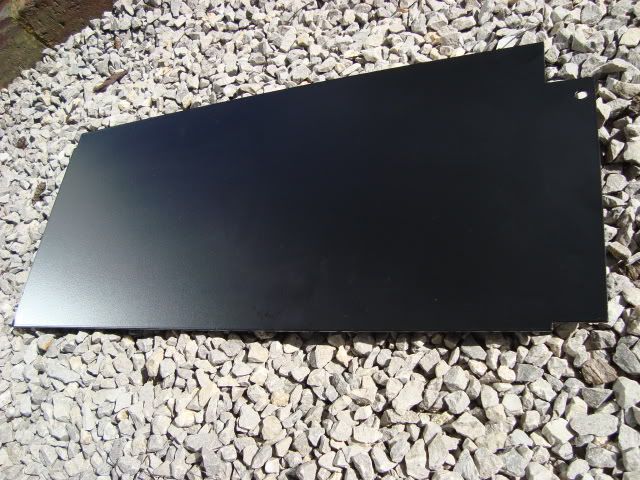
my custom pieces arrived within the week from Chilled PC, very impressed with the quality, hope they fit better than the custom top window, which totally didn't fit at all .
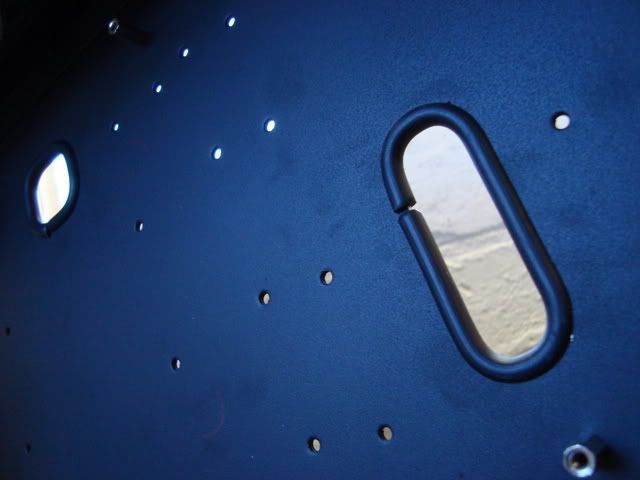
fanless rear panel, powdercoated satin black
plain midplate pwdercoated satin black
I also managed to get my hands on some 7/16 Tygon for the build.
just need to find some free time to put it all together!
Last edited by rjkoneill; 09-12-2010 at 06:22 AM.
≠ 4770K - R9 290X Crossfire
www.overclockers.co.uk
hi rioja
its THIS stuff here. hope that helps
≠ 4770K - R9 290X Crossfire
www.overclockers.co.uk
The past few weeks I have spent hours trawling the internet to find a fan controller.
whilst the prospect of spending £100+ on a smart controller such as the fantastic Aquaero or Tbalancer was quite appealing, the fact that neither of them look particularly great or match anything in my current build is a bit offputting.
whilst the lure of a usb interface and smart cooling options would suit my new '6 fans only' setup, it is not ideal from an aesthetics point of view.
i went back to the idea of an analoge fan controller as it was the simplest idea.
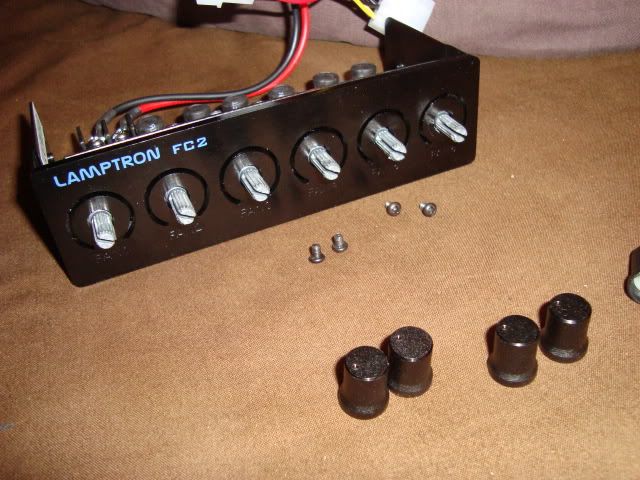
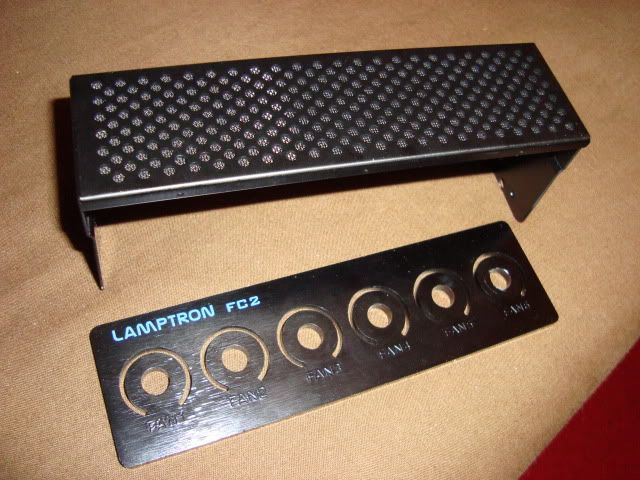
i used to have the old plain ZALMAN ZM MFC1 Plus controller and it worked well but i noticed Ace Modder managed to get some of the Lamptron models in at work
Lamptron Fan Controllers
these are regarded as a great brand specific to fan controllers so i thought i would try one.
everyone who knows me or has read one of my build logs knows that i hate flash lights and that subtle is the key.
i went for the Lamptron FC2 - this is the cheapest in our range but only by a few pounds. the reason it is close to the next model up [the FC5] is because the FC2 sacrifices led screens and all that rubbish for raw power
the FC2 is a rheobus controller that is capable of 45w per channel
this means you can run Delta fans on it. not that i will, but the capability is there. the controller is well made and whilst it is supposed to cause some fans to hum when they are at really low speeds [from what i have read in reviews], i have only used decent fans with it so far and had no issues whatsoever.
the cool addition to this controller is that every channel can be switched off which my previous controller [ZALMAN ZM MFC1 Plus] was incapable of.
this means that i can switch off my 240 radiators fans and run my system off a 480 radiator on low speed if i want. the flexability is there which is what i wanted.
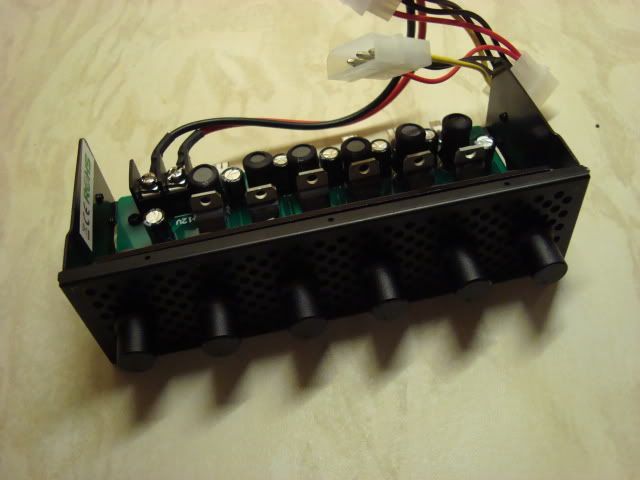
however. whilst the controller itself is a very well made piece of kit, the reason i went for this controller was for its features. i wanted to make the controller fit into my build and heres how i did it...
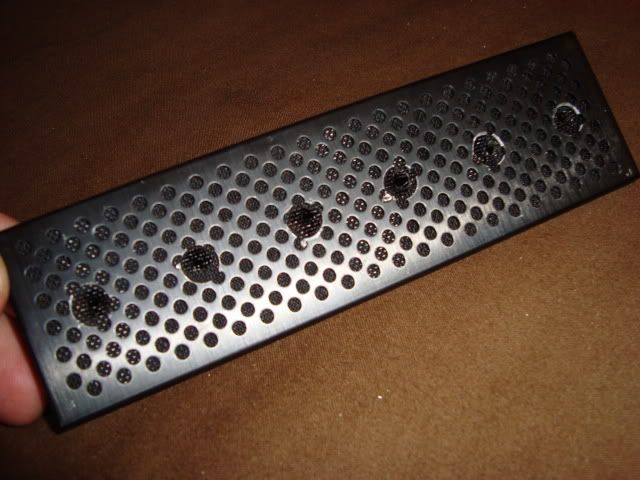
first i took the controller apart, this was fairly easy as i had to remove 4 screws and pull the knobs off the controller.
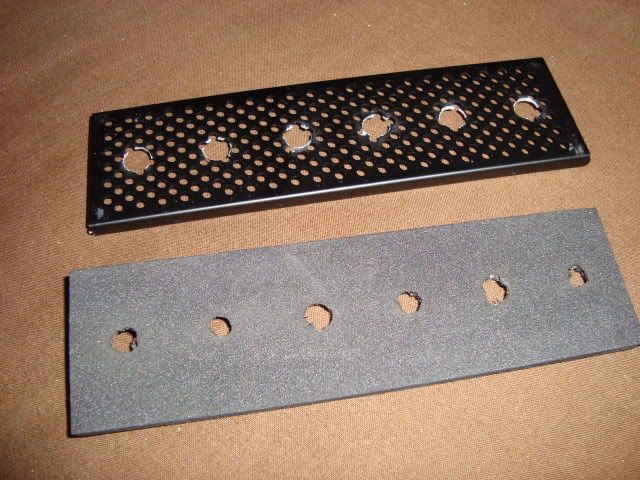
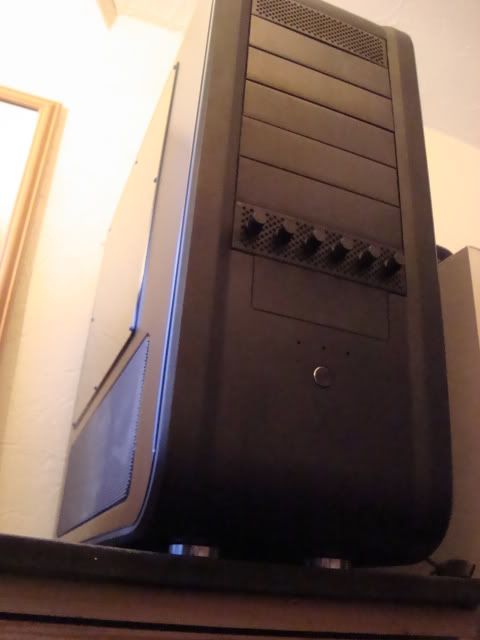
after removing the face plate from the controller, i prepared the bezel that i would be using for the mod. in this case, a vented bezel from lian li. the entire front of my TJ07 will soon be filled with these bezels so it will make the controller blend in really well.
i used the dremel to cut off the tabs on the side to be left with a front plate that resembled the stock one that lamptron fitted. i used the lamptron plate to create small drill holes in the bezel for each knob on the controller. i then used a larger drill bit to widen the holes. i wanted to keep the original face plate in good condition as this mod is totally reversable which means you can customise the controller then put it back to stock if you ever sell the controller on.
the lamptron controller has a row of LEDs that light up the area around each knob on the controller. LEDs are not required for me as subtle is the key, if you do this with a blank face plate then they will be covered anyway.
i found some foam that comes in the bezels of the antec 902 at work which i thought would do the trick. but i guess you could cut your own. the foam helped to bulk out the bezel to the same depth as the solid stock face plate on the controller so it is fairly required. [i can get these foam strips easily so message my trust if you need one] i poked holed through with scissors to match the bezel.
the bezels i am using have a mesh dust filter behind them so i put this inbetween the foam so that you couldnt see it through the little holes. it makes it look a little more stealth and it blends in with the other bezels that way.
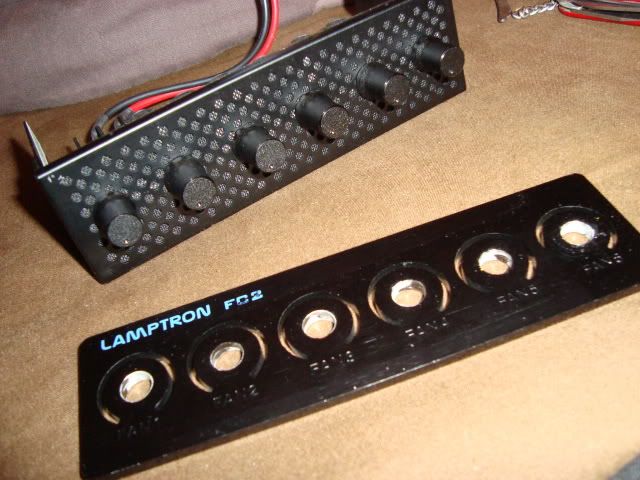
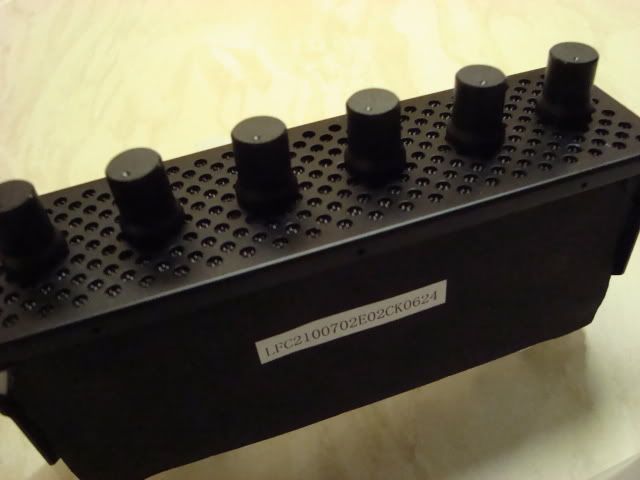
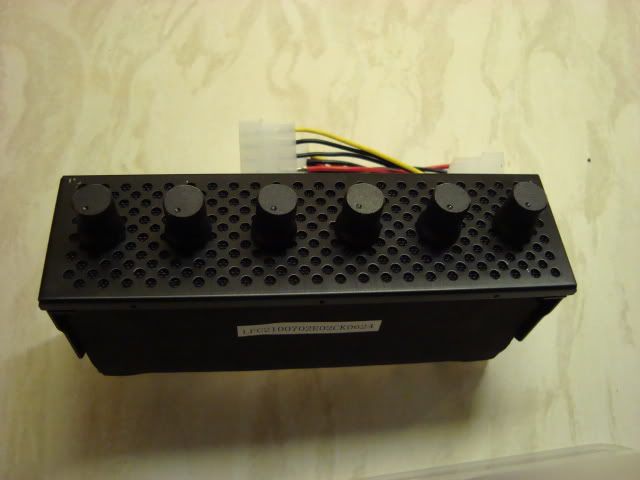
after putting all three layers together then it is ready to go straight on to the controller and have the dials replaced. the pressure of the controller dials keeps the new face plate in shape.
I think it is a case of 'Mission Accomplished'
this mod took me 15 minutes, cost £25 and is fully reversable. give it a go, if you are looking for a new fan controller but are looking for something to match your case, this may be it.
"before you mention that i scratched the top left corner of the bezel, i know i did, i dropped it because i am clumsy. a new bezel has been made and it has been replaced already
≠ 4770K - R9 290X Crossfire
www.overclockers.co.uk
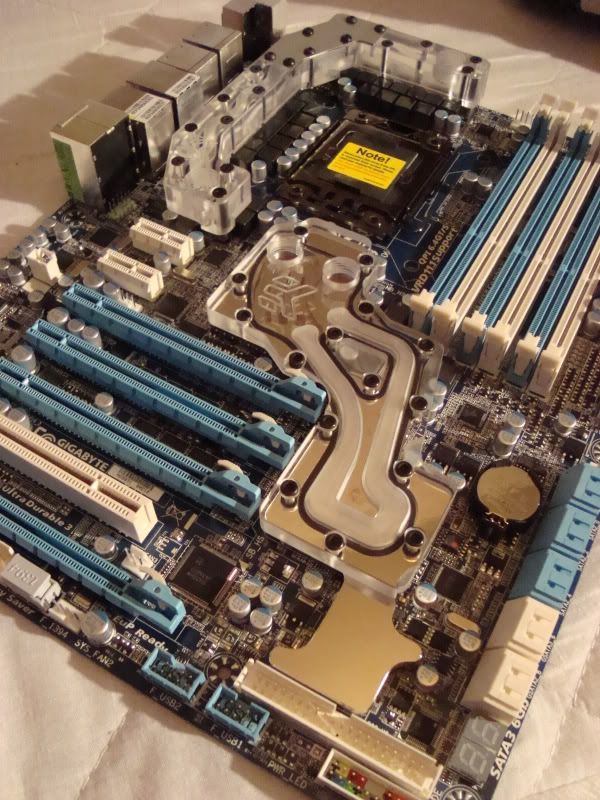
Heres a small guide about how I am mounting my block.
the EK supreme series has all come with the same standard mounting hardware for as long as I can remember.
this series of springs and nuts works well but is a bit unsightly.
moving on, i obtained a backplate for 1366 from a damaged CoolIT domino at work. now some 1366 coolers have suitable backplates [megahalem and venom spring to mind]
the Watercool 1366 backplate from the heatkiller range would work too but that uses M4 screws [im going to use M3 as it fits the backplate i will be using]
the backplate is run of the mill but it contains its own screw threads on the mounting holes, ideal for my requirements.
it fits to the back of the board [i used a small piece of double sided tape to hold it in place]
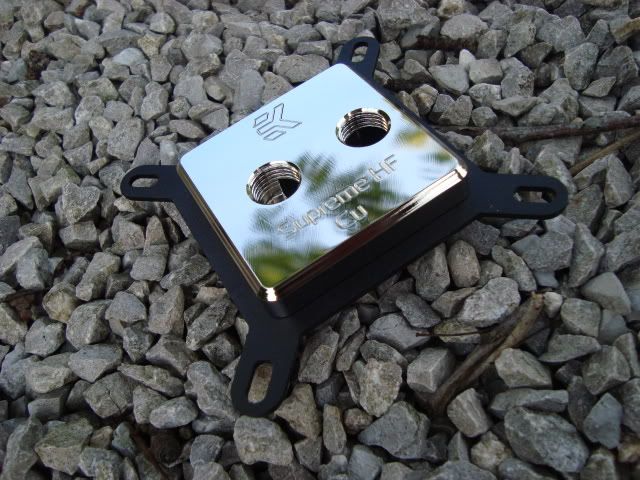
decided to remove the stock black mounting plate from my Supreme HF and replace it with the new Nickel Plated one from EK
its so shiny, its essentially the same as looking at the sun.
then using the screws you mount the block into place.
[i used M3 X30 here as an example but have ordered some stainless button head screws of the same size] i will probably be using some small washers to protect the mounting plate a bit. more pics when i have the screws i will use in the final build.
and heres what the blocks on the board are going to look like

≠ 4770K - R9 290X Crossfire
www.overclockers.co.uk
≠ 4770K - R9 290X Crossfire
www.overclockers.co.uk


 Reply With Quote
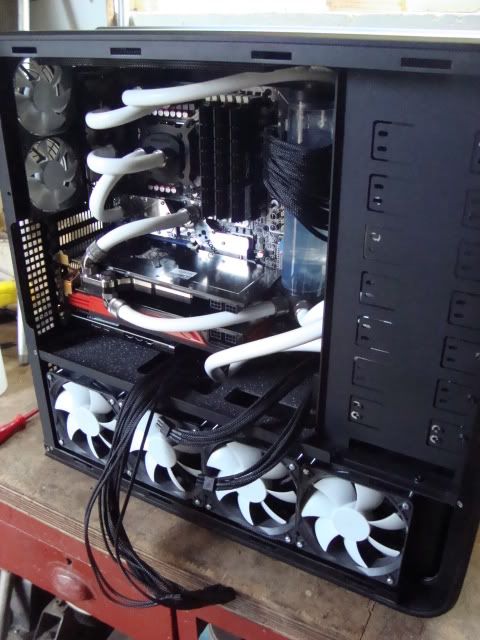


Bookmarks