

Great Looking Case your Going for. Cant Wait too See more of this Build !!!!


Great Looking Case your Going for. Cant Wait too See more of this Build !!!!
8" x 8' storage shed. Got way too much stuff in the garage and the new 45" snow blower made things even more cramped, so it and a few other things are moving to the shed. Just need to finish the trim, doors, roof and ramp. A few more days of dry mid 50+ weather and I'll be good to start.Originally Posted by voigts


Circles SucQ!
If your annoyed by sigs telling you to put things in your sig, then put this in your sig
Bribery won't work on me...just say NO to AT!!!
Enjoying watching the way you plan out your build, voigts. Good Luck getting the deck finished - makes me appreciate the abundance of sunshine we have.
Stuff sure does have a way of accumulating. On top of the porch, I still haven't finished my 16' x 18' shop/storage building. It still needs siding and the soffits to be trimmed out. My workshop is out there, but I just have the OSB board with Lowe's waterproofing wrap around it so its pretty ugly. I'll tell you what. When you get yours finished, you are more than welcome to give me a hand at mine!
I appreciate that. I probably am too much of a planner when it comes to these things. My dad lives in southeast Florida, and unfortunately I have to say that I really do hate Florida. That is the only place at 41 where I am called "young man" by 70 year old women wearing skin tight spandex. Yuck.
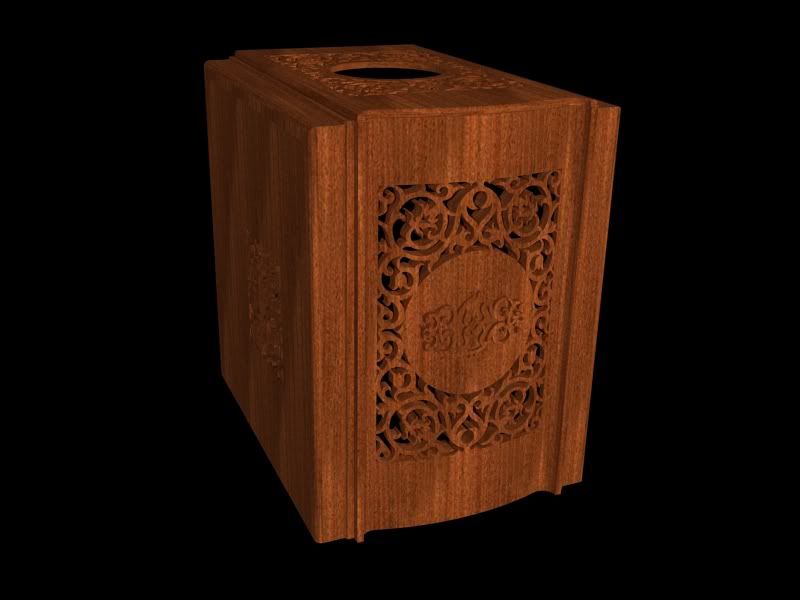
I need some ideas here. The more I look at the round center in the middle of the front, the less I like it. I am trying to brainstorm to see if there is any kind of design that I can put in that circular area. I am even thinking of something carved/Dremeled into a relief instead of cut out with the scroll saw. I have been spending hours searching for ideas but am not coming up with a whole lot. I've considered a fancy fleur de lys, but am not completely sold on that either. Any ideas?
Latest Project Log: Project Quintessence
1935 Zenith Radio Scratch Build
A mirror.
That design reminds me of a Victorian styled dresser, so a mirror came to mind.
Thanks for the invite but no, after I'm done with the shed, I re-side the garage, after that...a new fence, after that...I'm sure something else will be added to the list (it always is).

Circles SucQ!
If your annoyed by sigs telling you to put things in your sig, then put this in your sig
Bribery won't work on me...just say NO to AT!!!
I know the feeling. There is always something else that needs doing.
Latest Project Log: Project Quintessence
1935 Zenith Radio Scratch Build
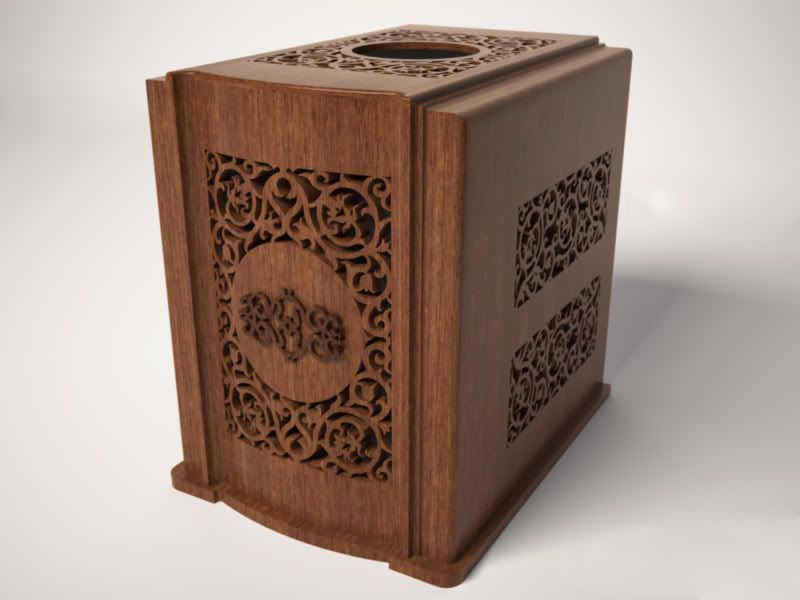
I have been endlessly messing around with the look for the front and side moldings. Ever have something just nag at you? Well, the front and side moldings have been nagging at me. I just keep looking at the case and know it needs something. What do you folks think about this alteration?
Latest Project Log: Project Quintessence
1935 Zenith Radio Scratch Build
It needs some old copper accents, eg. like gauge/clock(?) in your avatar pic
What you see in my avatar is an actual original brass radio bezel. I'm not making this one to be modeled after a radio, so I don't see adding anything like this there.
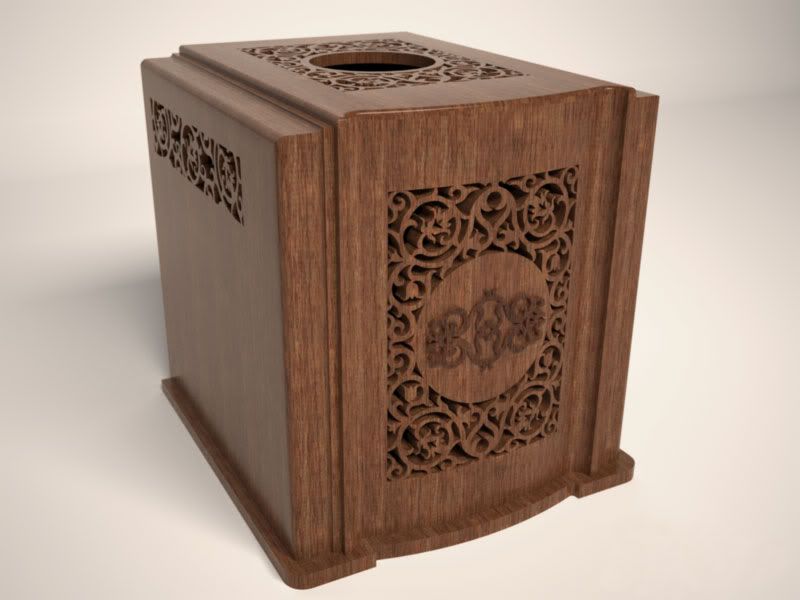
I started messing with a renderer recommended to me on another forum called Indigo/Skindigo. The trial version works great with only a size limitation of .7mp, which is more than enough. It also leaved a logo on the bottom right, which is no problem. Being a newb at this rendering thing, I have to say that the initial results I've gotten with this blow away Kerkythea, and I find it to a whole easier to use. I also was given the suggestion for making a light studio setup in Sketchup which works fantastic, and was much better than what I was trying to do in Kerkythea.
Spotswood suggested that I try adding a base, so I've given that a go also.
Feedback?
Latest Project Log: Project Quintessence
1935 Zenith Radio Scratch Build
Well Spotswood's suggestion for a base seems to be a winner. 2 out of 3 of my personal design consultants really like it, and all of the feedback I've gotten has been for it.
I did a little more work trying to figure out this rendering thing. I got the cashew wood material from the Indigo site and used it instead of the Sketchup wood material. Pretty sweet.
Latest Project Log: Project Quintessence
1935 Zenith Radio Scratch Build
I do like the version with the base.
That cashew wood looks fantastic ... I think you're getting the hang of this rendering stuff.
I must agree. The version with the base does looks great, as do the renders.
At first glance I thought you had finished the case already.
I'm trying. But I barely am scratching the surface when it comes to rendering. I tried a render of the internals and it came out lousy.
Thanks. I really am impressed with this Indigo/Skindigo. It makes me look like I almost know what I am doing...
Latest Project Log: Project Quintessence
1935 Zenith Radio Scratch Build
I started building this case finally, so its time for an update. However, after much deliberation, I've gone back to the dark side of the force and am building this instead as an air-cooled case, not watercooled. So, I guess this will have to get moved over to the computer case section. I figured I'd post an update here so that Waterlogged doesn't come and hunt me down.
Latest Project Log: Project Quintessence
1935 Zenith Radio Scratch Build
The Build Begins
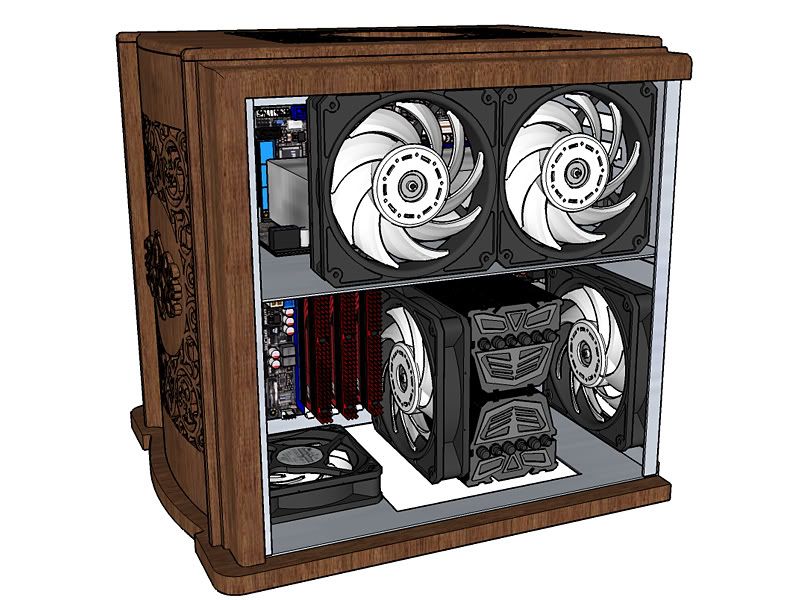
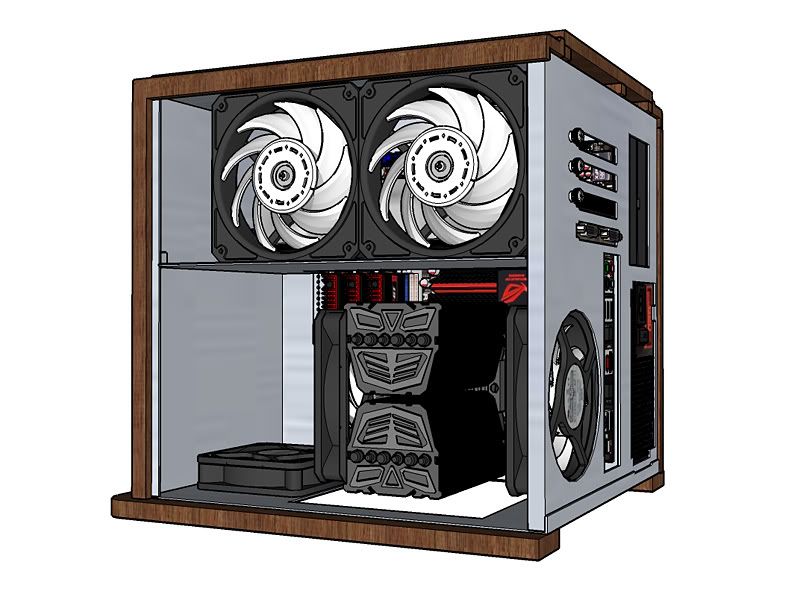
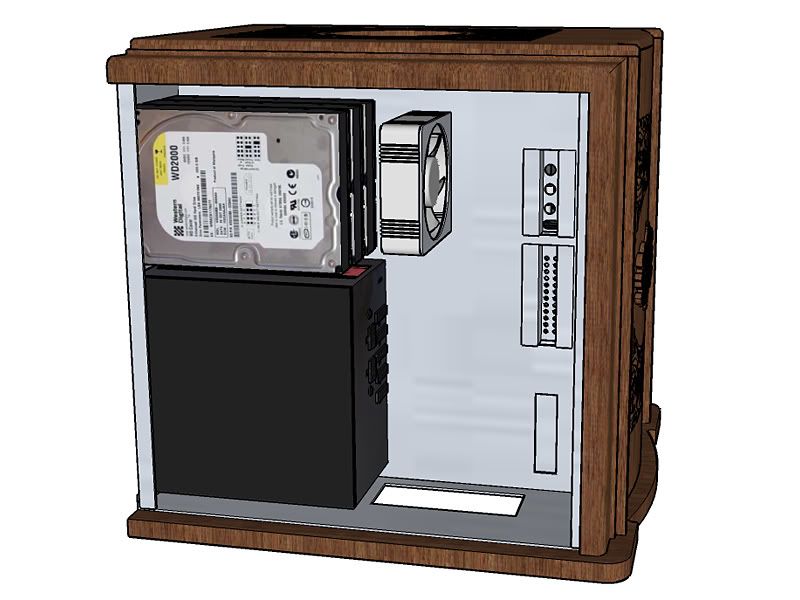
I've officially started on this project, so its time to start updating this log. I really wrestled over whether or not to go with air cooling on this one, or stick with water. I've been water cooling now for 6 years. I started into water cooling mainly for silence more than performance as I'm a 24x7 overclocker and not a bench-marker. I also hardly do any gaming anymore, so I'm not looking to upgrade my GPU anytime very soon. I plan on sticking with my GTX260. Now that some good GPU air coolers have finally come out, I decided that I'm going to give air a chance again. I designed this case completely with two different versions, one for water that I rendered in the posts earlier, and one for air (actually two different air models). I finally settled on this design as I think it gives me the most compact design I can come up with that also should allow for good airflow and easy wire management.
I bought a Promilatech Megashadow for the CPU, and an MK-13 for the GPU (I've still got the 3 MCR220 rads, and once I'm done with this project, if I am pleased with the result and noise level, I'll end up selling them. Since I already paid for them, I figure I will keep them in case I decide that I'm not happy with the air cooling and result). If I am going to go air, I am going to go high end.
Plans
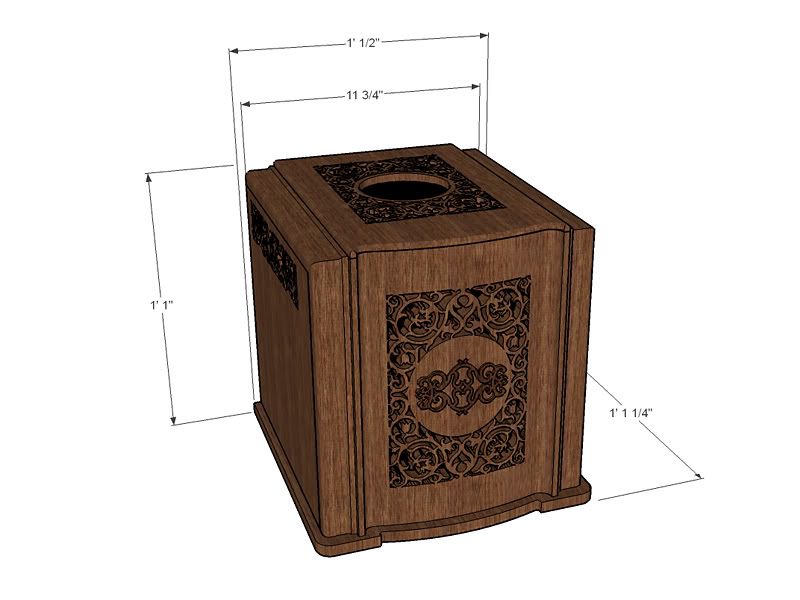
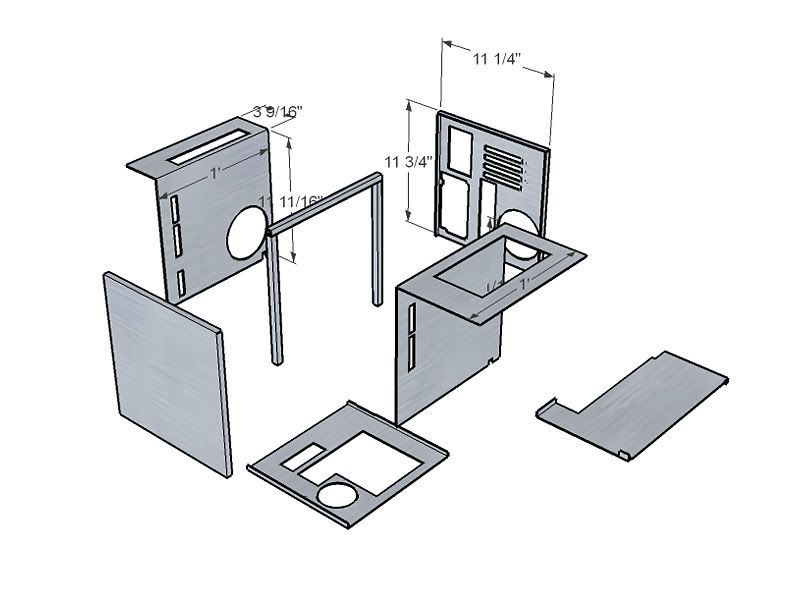
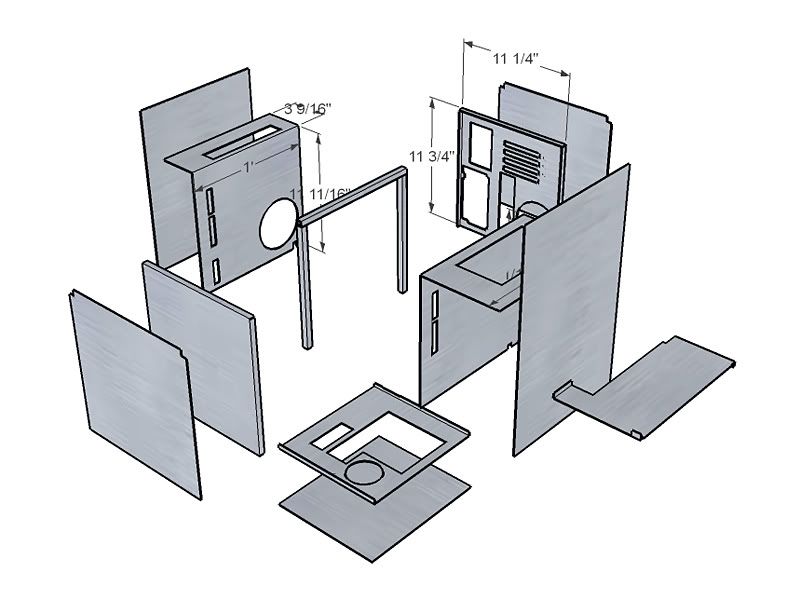
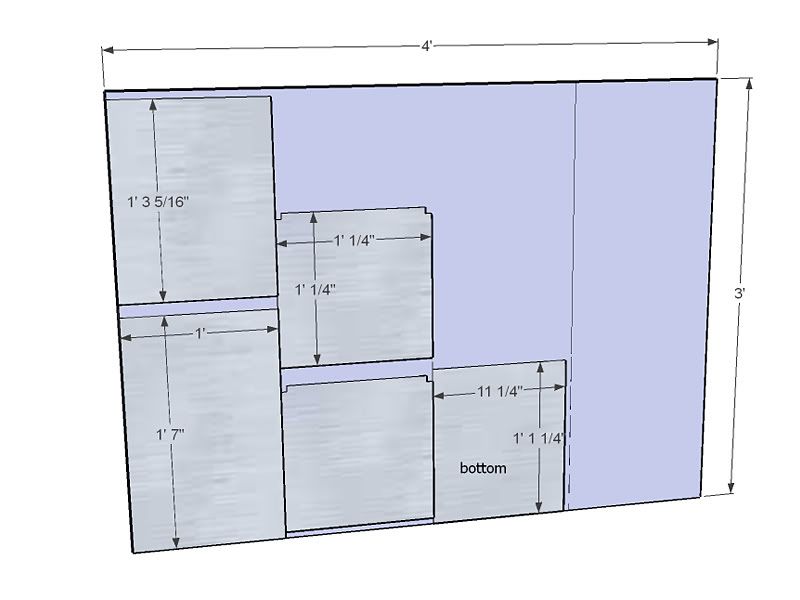
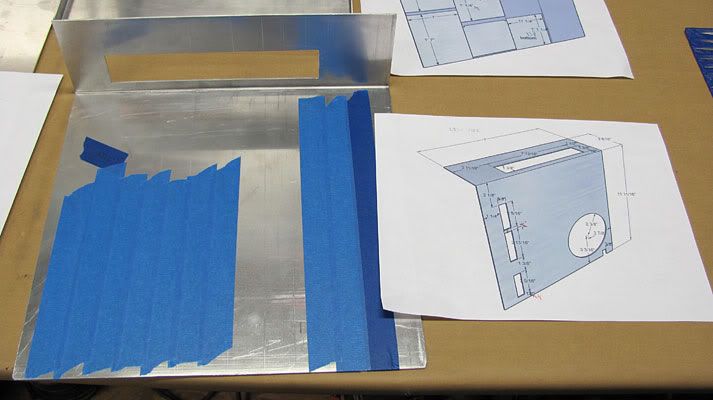
As is my usual method, I plan everything down to the nth detail, and print out plans from the Sketchup design. I admire the guys that just pull this stuff out of their heads on the fly, but that isn't me. I like doing the design work first and then building based off of my designs. Once I design everything the way I want it, I take each piece and make dimension plans, and then print off the dimensions for each piece. I did an expanded view of the metal base for the case, and then drew out each piece in flat dimensions so that I would know what to cut out of my 3' x 4'-16 gauge (about 1.3mm) aluminum sheet. This sheet plus another smaller 1' x 2' piece of 12 gauge only cost me $40 cash at a local sheet metal shop. I found a powdercoater online in Florida that is very reasonable on his rates. I plan on having the aluminum powder coated probably in matte black. I would like to do that aluminum in a bronze color or the like, but I don't think he works in any colors like that.
Main Panels Started
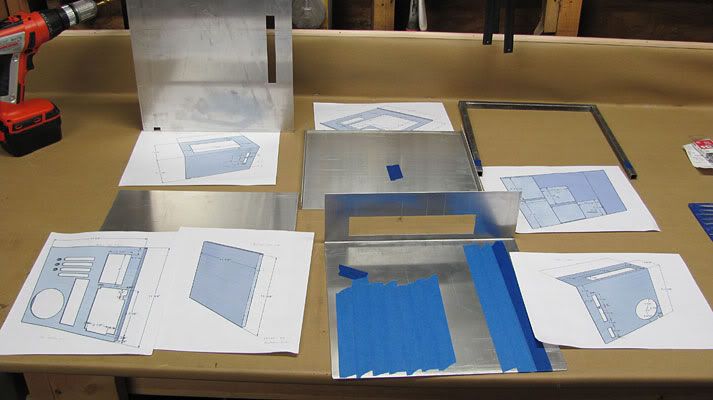
I started cutting the main panels out per my plan printouts.
I found as I've seen others suggest that painters tape works very nicely when cutting out holes. I am using my scroll saw, Dremel in places, and a great set of small files to make the cutouts.
Center Support and Spacer
This is the center support for the inside panels. It also gives a space behing the MB tray for air intake for the PSU, and room to run wiring. I used 1/2 16 gauge square tube as that is what is readily available. I cut my pieces, and used JB Weld to join them together. I could have had a friend weld them, but I don't really need a lot of strength here, and welding can make a real mess.
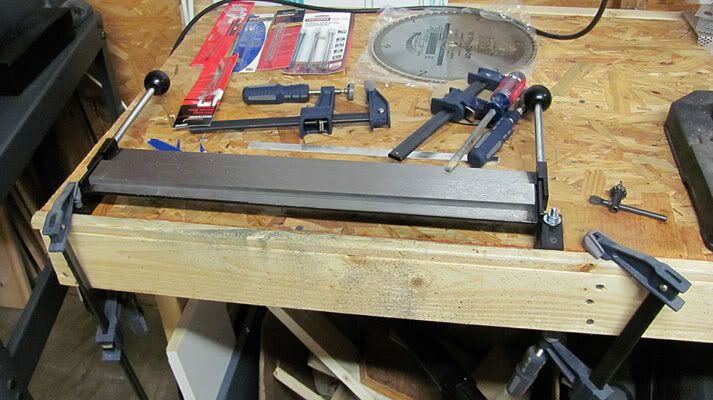
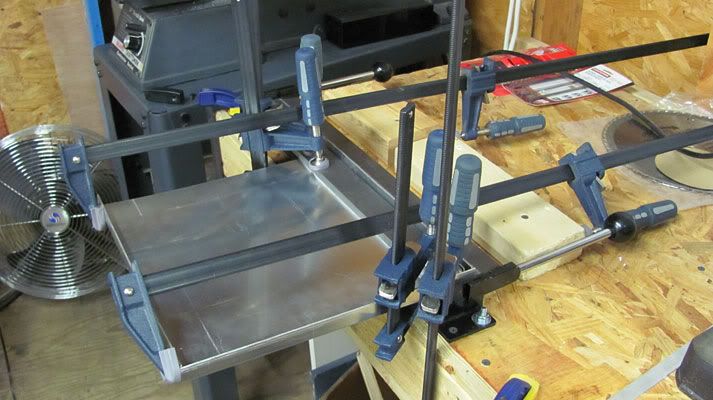
Bending Aluminum
I wish I had access to a professional metal bender, but with some work and a lot of clamps, my $30 Harbor Freight made in China special metal brake got the job done. The biggest problem with this brake is that when you are bending end folds, the metal wants to slide back out of the brake. Using two 3' clamps against the tray and a screwed down 2x4 did the trick to keep the metal from sliding back while bending.
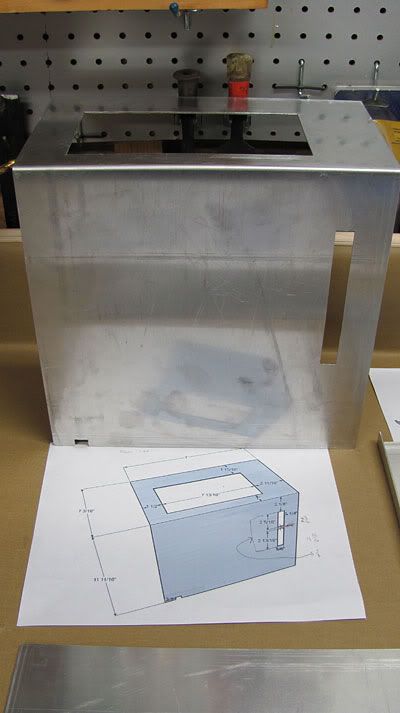
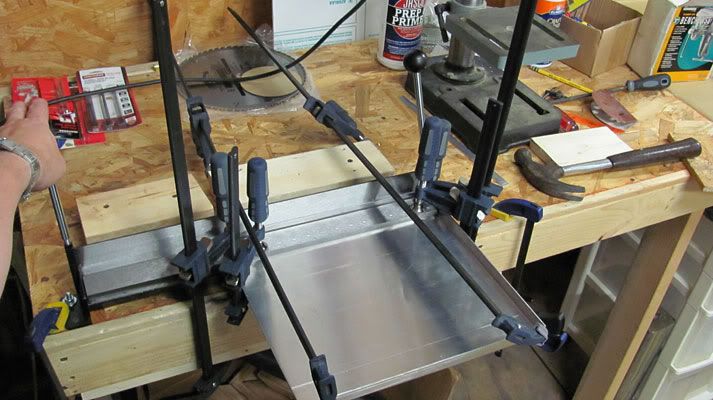
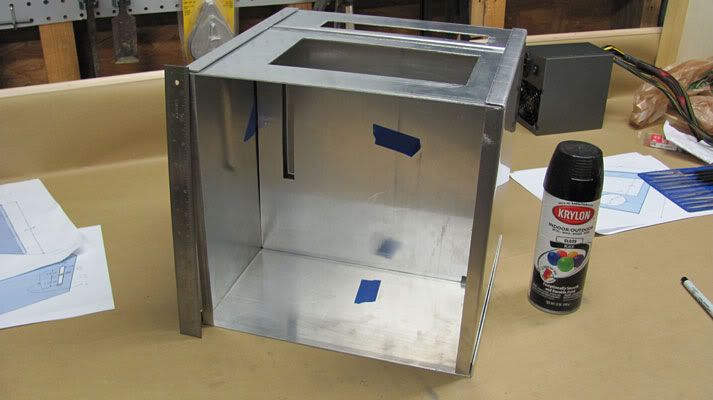
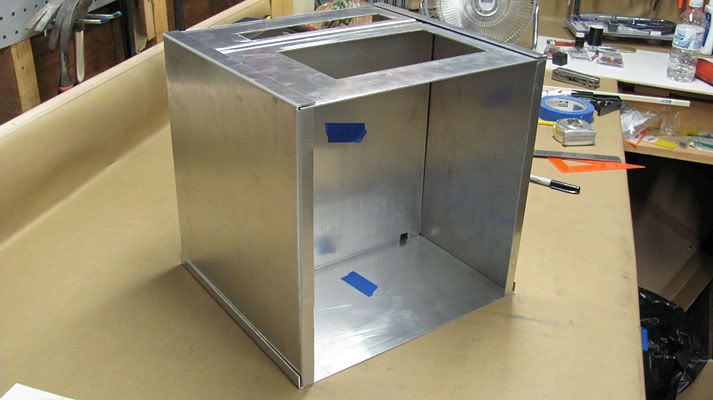
Here is a rough fit of the pieces so far. I put a 1' ruler and a paint can to give you some size perspective.
My next step is to drill and countersink holes to screw the MB panel and other panel to the center support. I then will cut out the holes in the bottom panel, and then work on the back panel. That is going to be a bit of a chore.
Thanks for stopping by.
Latest Project Log: Project Quintessence
1935 Zenith Radio Scratch Build
It saddens me to see this won't be a LC build voigts.I'll keep and eye on it as long as it's still here and occasionally pop in after it's been moved. Either way, I look forward to the finished product, because in your capable hands, it's going to be a quality work of art.
Circles SucQ!
If your annoyed by sigs telling you to put things in your sig, then put this in your sig
Bribery won't work on me...just say NO to AT!!!
Glad to see you are starting the project (the building phase) - I know you've spent hours on the details.
Please keep the updates coming - while you are going air cooling now, who knows? You might change your mind down the road. And, since there isn't a dedicated worklog section in the air cooling area, I think this is a good place for us to keep tabs on your wonderful project!

Haha, that build is going to look godly with that Megahalems in there
Signatures make my posts look huge... but I'm not humble enough to completely remove my signature, so I kept this note explaining it.
Thanks. I've spent a good bit of money in the last 6 months or so getting some really nice tools that I've been needing. I can't believe how much of a difference having a real table saw now makes. It cuts and handles so incredibly smooth and accurately.
Thanks Waterlogged. I really did wrestle about giving air a chance again, but I am going to see what happens. I'm not sure that I live up to your "work of art" description, but I do give it a try.
I may go back to air down the road, but I want to give this a try and see how it goes. If I can get silence with a good enough overclock, the air might win. One of the many factors that pushed me into trying air again is that in order to make a compact case to my criteria, air cooling affords for a much, much better wiring management solution than using water. I also think based on the reviews I am reading that the Megashadow and MK-13 will do what I need more quietly than even my current setup. I'm not planning on selling off my watercooling gear though at this point.
Actually, I got the Megashadow instead as I really like the black nickel plated look of it better than the Megahalem. I hope it all looks good!
Latest Project Log: Project Quintessence
1935 Zenith Radio Scratch Build
Even better
Signatures make my posts look huge... but I'm not humble enough to completely remove my signature, so I kept this note explaining it.
Perfect work, voigts! But we already expect that
Awesome to see an update from you, Gary!
As they say, Rome wasn't built in a day so its understandable that it takes time to build a rig with your high standard of detail and pursuit of perfection.
It's a pleasure to watch you work.
So if you take a while to deliver, that just means a longer, pleasureable experience for me.
I'm selfish like that.
As if you have room to talk! How long have you already been working on your latest?
Thanks for the kind words.
Come to think of it though, this must be why your current build is taking a while, right? Its either your own high standards and pursuit of perfection, or your selfishness in keeping it all to yourself. Or maybe you can't keep away from the pirate's rum long enough to get anything done...
Latest Project Log: Project Quintessence
1935 Zenith Radio Scratch Build
 Posting Permissions


 Reply With Quote


Bookmarks