Page 1 of 2 12 LastLast
Results 1 to 25 of 34

Thread: My Motherboard Insulation Guide

  1. #1
    Xtreme Enthusiast
    Join Date
    Sep 2005
    Location
    Christchurch New Zealand
    Posts
    633

    My Motherboard Insulation Guide

    Everybody insulates slightly different to the next person.
    Thought I would add my worth.

    First I will explain why we need to insulate, then how it is done properly.

    Just like when you take a can of drink out of the fridge and introduce it to atmospheric temperature and humidity, condensation will form on the outside of the can. This happens because vaporized water in the air condenses into liquid water on the cold surface.
    Here is a chart that shows when moisture will condense at a given temperature and humidity.


    We have to protect our gear from the worst case humidity scenario. Here in NZ we very rarely see 90-95% relative humidity, but in that situation you can see on the chart that condensation will form on a surface about 3°C less than the ambient air temperature. Therefore I recommend anybody planning on going Sub ambient cooling will need to insulate their beloved hardware.

    The secret to a condensation free insulation job, is to have a completely air tight seal over every piece that will get cold. If air can get in, then so can moisture. Under the freezing point condensation will freeze and not be a problem, it is when that frost thaws and turns into water that it will possibly short something out.

    Tools we are going to need are as follows:
    Sharp Knife.
    Small flat head screwdriver.
    Cutting board.
    Pen.

    And materials:
    Closed cell insulation in varies sizes.
    Liquid electrical tape or nail polish.
    Thermal compound (preferably Arctic Céramique).
    Dielectric grease.
    Piece of paper.
    Toothpicks.

    Now there are several steps involved in insulating, this is how I do it. Everybody does it slightly different though.
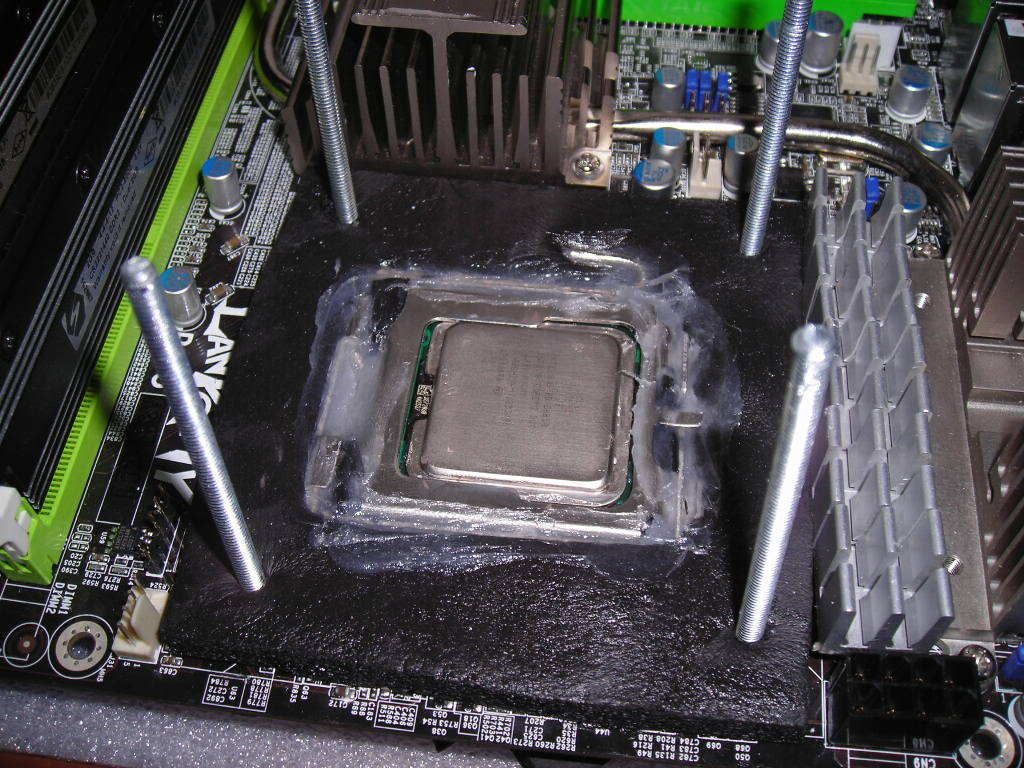
    First of all we need to seal off the socket area so if we do end up with any condensation, we don't end up with water in direct contact with any electrical parts. Electricity and water do not go well together.
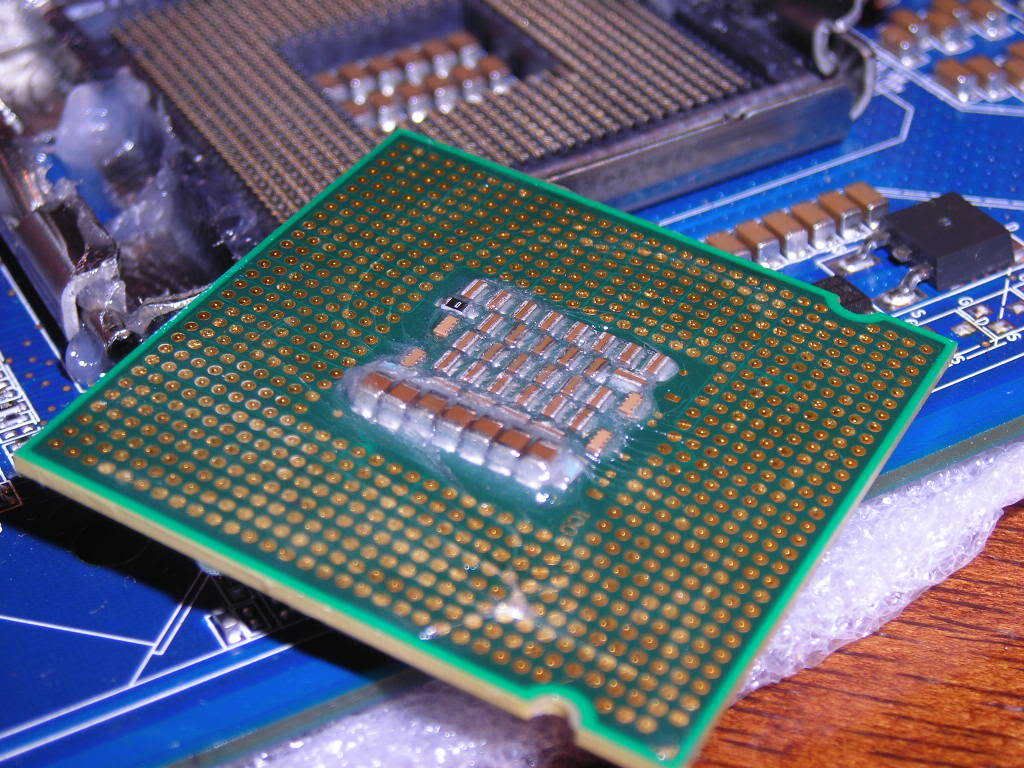
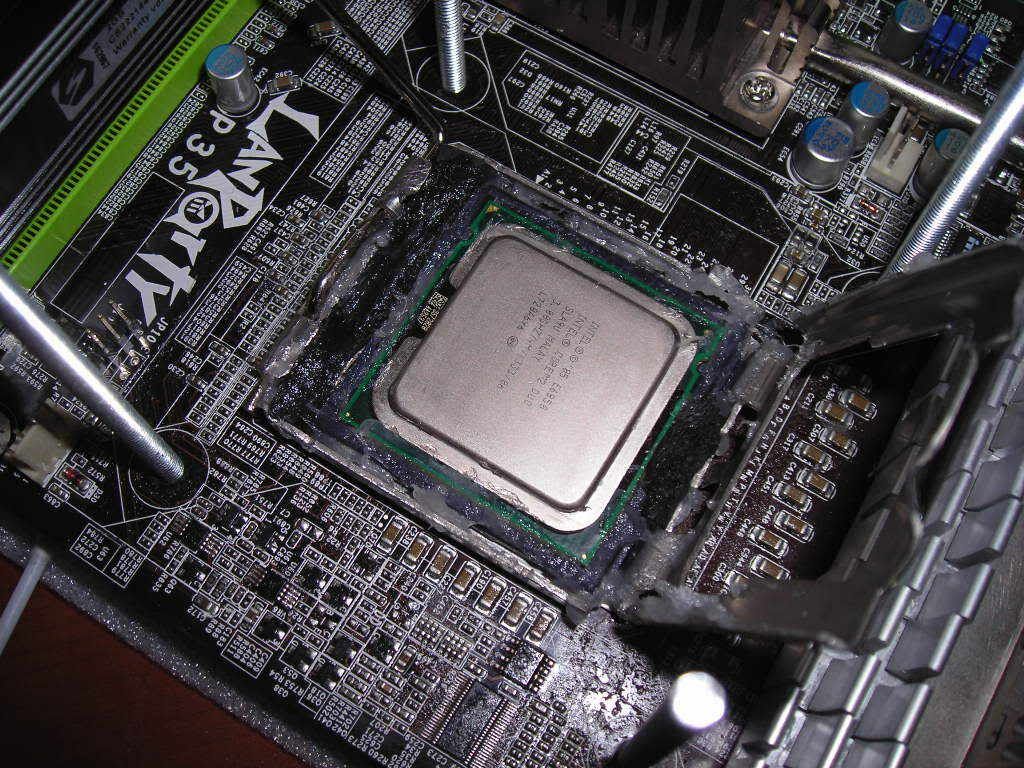
    I do this by applying liquid electrical tape around the socket area.


    I use liquid electrical tape because it is just as good at insulating as anything else and is very easy to remove. But it is more expensive than nail polish. 118ml tin from Jaycar for a little over $20.
    Alternatively you can use nail polish or conformal coating.
    With Liquid electrical tape or nail polish, be very careful not to drip anything in the socket itself, or else it is most likely going to be a dead motherboard. It is not a bad idea leaving the CPU or CPU cover in the socket.
    If the brush is too big to get into those little gaps, use a toothpick to apply a couple of drops at a time.


    Conformal coating is usually sprayed on so extra care is needed to mask up the socket and every other connecting on the board. I.e. rear plugs, header pins, bios battery, jumpers, power connections peripheral slots etc.
    Several coats may be required to get a nice thick layer isolating everything around the socket. Leave approximately 10 minutes between coats, and a day after the final coat.
    Also coat the back side of the board directly behind the socket like so.


    Once dry we can start on cutting our closed cell insulation to fit snug.
    Cut a rectangle piece of 6mm closed cell insulation to fit between all the major components around the socket. In this example the ram slots, Northbridge, PWM Heat sink and the top edge of the motherboard.


    Trace that piece of insulation onto a piece of white paper, cut it out and place on the motherboard in position.


    Holding the paper firmly in position, press down around all the components to make an impression on the paper of the bits that need cutting around.


    Outline the impression with a pen.
    The insulation has quite a bit of squish in it so we want to make our cut outs slightly smaller than the component.


    Cut these bits out with a sharp knife and place over the socket to make sure it will fit.
    Quote Originally Posted by kayl View Post
    the ethylene in NZ is colder
    Quote Originally Posted by DetroitAC View Post
    When in doubt about an unknown substance, I taste it just in case it's pie.
    Quote Originally Posted by Pete View Post
    Would you be willing to piss over the mona lisa?

  2. #2
    Xtreme Enthusiast
    Join Date
    Sep 2005
    Location
    Christchurch New Zealand
    Posts
    633
    Trace our paper template onto our piece of 6mm insulation and cut out with a sharp knife. I use a brand new blade every time I cut a new gasket, a blunt blade is no good as it will just tear the insulation.


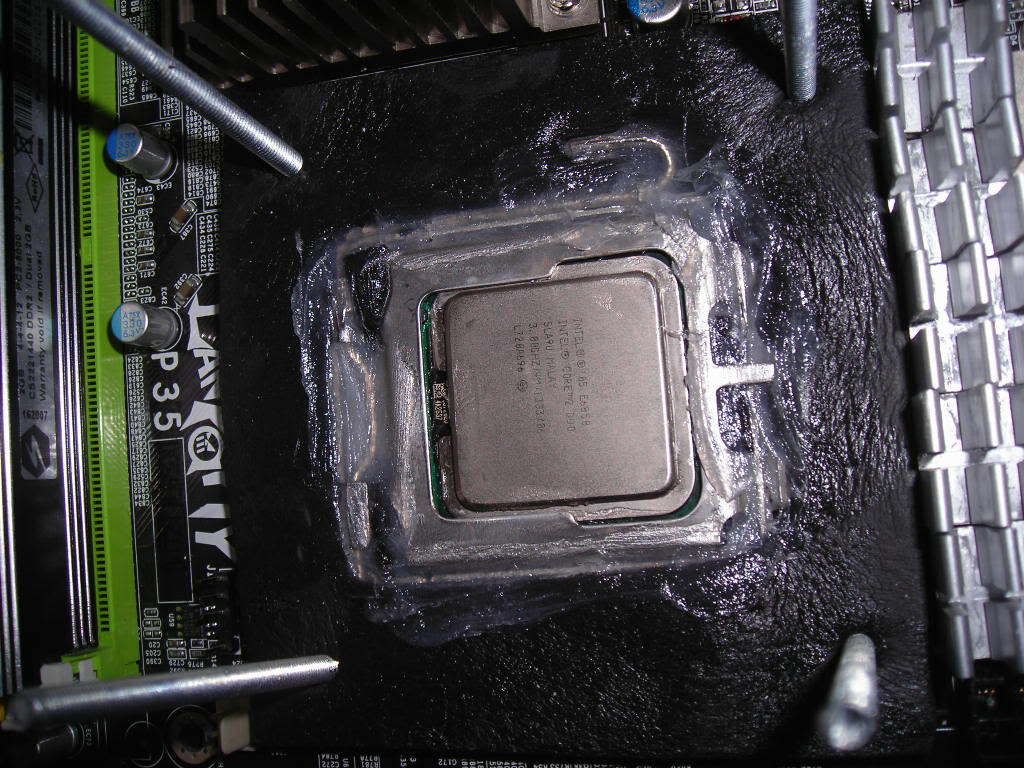
    This piece of insulation is often called a gasket, because it is sealing off the socket area from air. It can be a bit tricky to get in. Practice makes perfect. Use a small flathead screwdriver to push it into the gaps. If it has been cut out properly it should squeeze into all the gaps nice and firm. Careful not to tear the insulation, or it may not seal properly.


    Before the next layer of insulation (which will cover the socket lever), for an extra precaution of shorting out your CPU, it is common to use a dielectric grease in the socket. With a good sealing gasket, dielectric grease is not needed, but i recommend first timers to use it as an extra precaution. Vaseline is a common alternative, but I am unsure as to the long term effects of petroleum based jelly on the motherboard.
    With ZIF sockets, grease can be applied with your finger, pushing it into the socket , 775 sockets are best applied with a syringe.
    FYI, dielectric means "non conductive"

    Now we need another template, this time an outline of the IHS or CPU core for those without heat spreaders.


    This time we want the insulation cut slightly bigger than the IHS or CPU core as we don't want any insulation to get between the IHS and evap, pot or block bolting down to it. This piece of is cut out of a piece of 3mm thick closed cell insulation to bring the height of the gasket approximately 1-2mm above the height of the IHS.


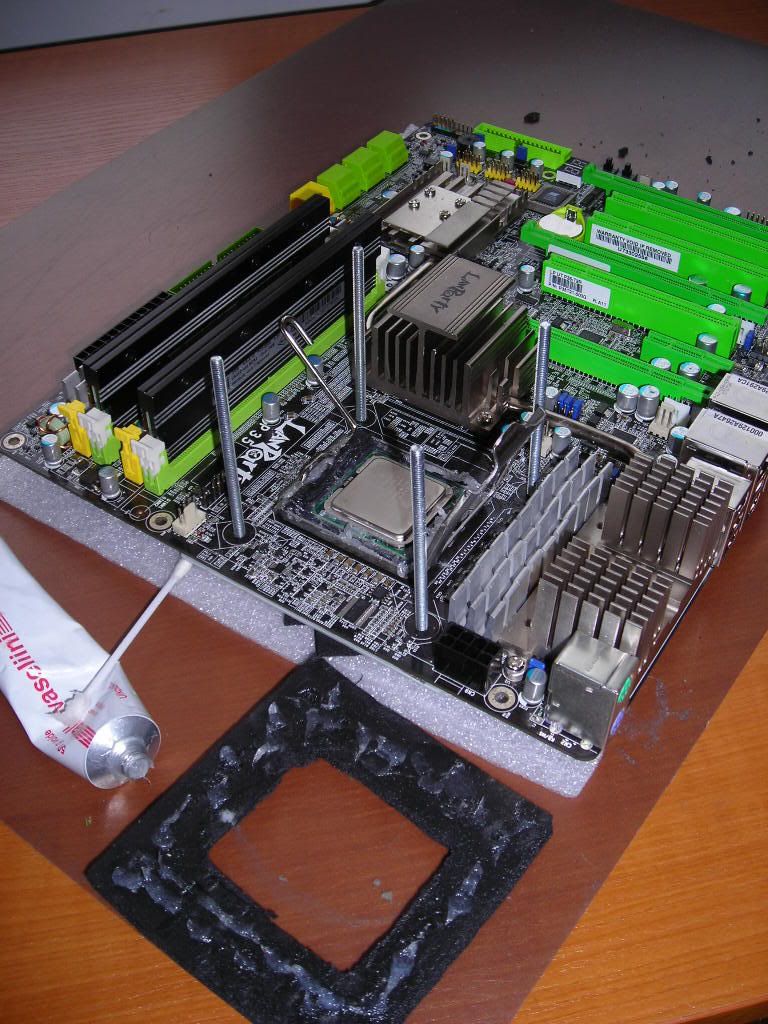
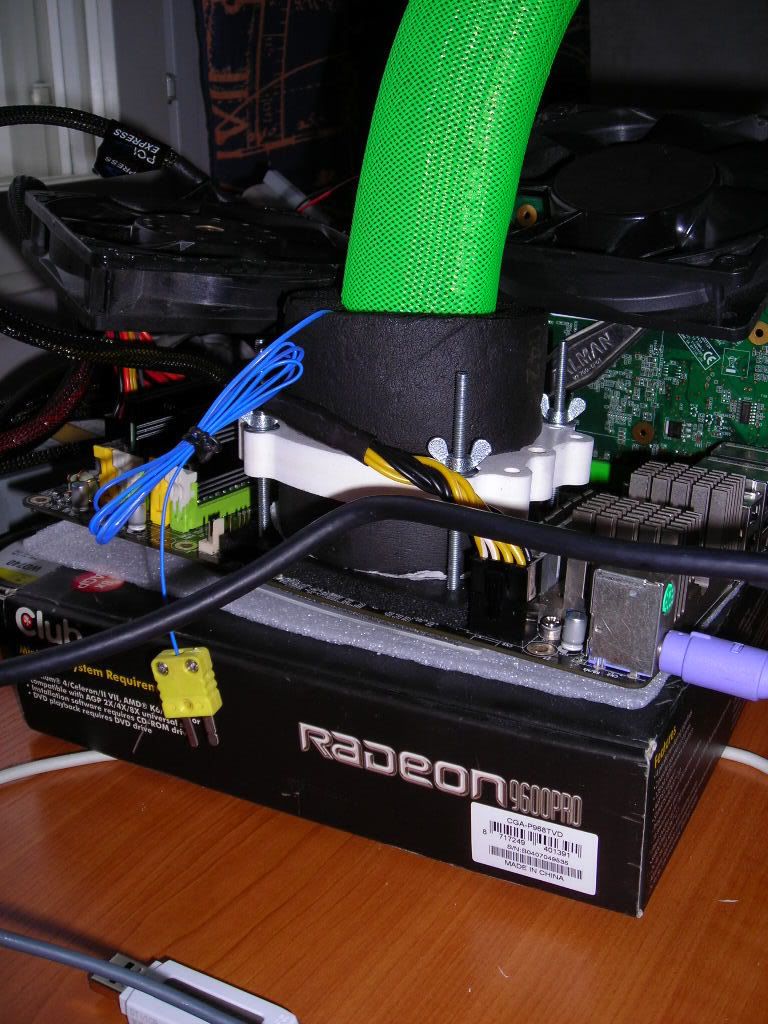
    Push the mounting bolts through the back side of the board and through the insulation while holding the front side firmly in place.
    Now the rear insulation and backing plate can be attached.
    I use another piece of 6mm insulation directly on the board with the backing plate clamping it in place.


    Now we are ready for our cooling device to bolt down.


    Recommended thermal compound is Arctic Céramique, it works better than AS5 under negative temperatures and is also an electrical insulator.
    Up to this point, this is more than sufficient for a SS unit or temp down to about -50°C.
    For Dry Ice and LN2, I use a piece of 16mm insulation to further insulate the back side of the board. I cut it slightly bigger than the size of the board and the board sits on it for the duration of the benching session.
    Using the second template, cut a paper towel and place that down over the second layer gasket before your pot goes on. This will help soak up any ice that thaws out later on.

    I hope this helps some people and we see more people pushing their hardware to the extremes.
    I'd like to keep this thread clean and on topic.
    Spammers will be punished!
    Quote Originally Posted by kayl View Post
    the ethylene in NZ is colder
    Quote Originally Posted by DetroitAC View Post
    When in doubt about an unknown substance, I taste it just in case it's pie.
    Quote Originally Posted by Pete View Post
    Would you be willing to piss over the mona lisa?

  3. #3
    Xtreme Enthusiast
    Join Date
    Sep 2005
    Location
    Christchurch New Zealand
    Posts
    633
    Reserved for further information.
    Quote Originally Posted by kayl View Post
    the ethylene in NZ is colder
    Quote Originally Posted by DetroitAC View Post
    When in doubt about an unknown substance, I taste it just in case it's pie.
    Quote Originally Posted by Pete View Post
    Would you be willing to piss over the mona lisa?

  4. #4
    -100C Club Member
    Join Date
    Feb 2004
    Location
    australia
    Posts
    3,766
    nice work mate

  5. #5
    Xtreme Member
    Join Date
    Oct 2006
    Location
    B/EH, Germany
    Posts
    219
    Very well written, that's a great guide!
    German Phase Change Builder - Drop me a PM!

  6. #6
    Xtreme Enthusiast
    Join Date
    May 2005
    Location
    St.-Petersburg, Russia
    Posts
    506
    Backplate with an aperture on the middle - very bad idea, it is possible to damage a MB


  7. #7
    Xtreme Enthusiast
    Join Date
    May 2005
    Location
    St.-Petersburg, Russia
    Posts
    506


    +


    +


  8. #8
    Xtreme Guru
    Join Date
    Jun 2006
    Location
    Finland, joensuu
    Posts
    3,527
    good guide {.bLanK} GoD...personally i dont ever use nail polish on the mobo at all.. dielectric grease or white vaseline has worked just fine for me so far.. there is no need to so since i dont use my 2stager 24/7.. only in short 4-8h benching sessions..

    some pics:


    at the very top i use some toilet paper to suck the moisture, works very well.
    Evga X58 sli under cascade
    http://www.xtremesystems.org/forums/...d.php?t=219788
    Evga X58 Sli ultimate overclocking/ overview/ discussion thread
    http://www.xtremesystems.org/forums/...d.php?t=221082


    proud owner of E8600 Q822A435

  9. #9
    Xtreme Enthusiast
    Join Date
    Mar 2005
    Location
    North West London
    Posts
    776
    Good guide, thanks.

  10. #10
    Xtreme Member
    Join Date
    Mar 2007
    Location
    Tripoli, Greece; Toronto, Canada
    Posts
    137
    one thing i want to try with that liquid electrical tape is to use those artist syringes with the fine tip to get into the smaller areas

    a plus is that it's also precise

  11. #11
    Xtreme Enthusiast
    Join Date
    Sep 2005
    Location
    Christchurch New Zealand
    Posts
    633
    Quote Originally Posted by Nordling View Post
    Backplate with an aperture on the middle - very bad idea, it is possible to damage a MB
    Please explain how a square hole in the back plate is going to damage a motherboard?
    I have used this design backplate for over a year now with no problems.
    Not to mention the fact is was designed and built by a very reputable person from this forum and distributed probably hundreds around the globe.
    Just received another one in the post today of the latest design, still has a square hole.
    Some motherboards have capacitors on the back side of the cpu socket that he has allowed for. A flat back plate would possibly crush a cap on the back side if clamped down too tight.

    I am open to discussion and input in this thread, but just throwing up pics of a ghetto DIce setup with no description or input is not helpful nordling!

    Solarfall, much more helpful, grease is fine and I have been known to use it, I just hate the cleaning up part, it's a mongrel to get off.
    Quote Originally Posted by kayl View Post
    the ethylene in NZ is colder
    Quote Originally Posted by DetroitAC View Post
    When in doubt about an unknown substance, I taste it just in case it's pie.
    Quote Originally Posted by Pete View Post
    Would you be willing to piss over the mona lisa?

  12. #12
    -100C Club Member
    Join Date
    Feb 2004
    Location
    australia
    Posts
    3,766
    Quote Originally Posted by Nordling View Post
    Backplate with an aperture on the middle - very bad idea, it is possible to damage a MB
    I dont see how, yet to hear any accidents from ppl i know.
    love the wooden hold down very professional


    When i insulate i only ever use the insulation gaskets no need for grease if socket is air tight
    Last edited by kayl; 02-13-2008 at 10:26 PM.

  13. #13
    Xtreme Enthusiast
    Join Date
    Mar 2007
    Posts
    585
    Nice job {.bLanK} GoD, Thanks.

  14. #14
    Xtreme Member
    Join Date
    Jun 2007
    Location
    Germany
    Posts
    137
    Very nice guide!
    Really helpful to me, because I'm gonna mount my cold_ice singlestage soon.

  15. #15
    Xtreme Addict
    Join Date
    Aug 2007
    Location
    Cumming, IA
    Posts
    1,011
    Nice tip with the toilet paper, it's very absorbent and super cheap! (at least compared to shop towels.

    nice guide, especially useful considering all the recent posts asking about this.


    XBOX Gamertag:Fujimitsu - I'm lonely, be my friend!

  16. #16
    -100C Club Member
    Join Date
    Feb 2004
    Location
    australia
    Posts
    3,766
    I got a DVD for installing this sort of stuff from start to finish including mounting systems into tower cases, i should really get around to putting it on youtube hey
    Last edited by kayl; 02-14-2008 at 09:55 PM.

  17. #17
    Xtreme Legend
    Join Date
    Mar 2005
    Location
    Australia
    Posts
    17,242
    Quote Originally Posted by kayl View Post
    I got a DVD for install this sort of stuff from start to finish including mounting systems into tower cases, i should really get around to putting it on youtube hey
    i was going to say that this guide resembles your DVD

    i do like the extra steps he takes

    i myself like using blutac around the socket and fill all gaps. what it also does it "seal the socket" on top and i use a small amount of either bluetac or seal string around the socket >> jam it in some more with a screwdriver >> and then put the gasket on top

    luckily i've not killed any boards so far

    btw i use one of kayls backplates with a square opening on the back without any dramas at all
    Team.AU
    Got tube?
    GIGABYTE Australia
    Need a GIGABYTE bios or support?


  18. #18
    Xtreme Member
    Join Date
    Mar 2007
    Location
    Tripoli, Greece; Toronto, Canada
    Posts
    137
    Quote Originally Posted by dinos22 View Post
    i myself like using blutac around the socket and fill all gaps. what it also does it "seal the socket" on top and i use a small amount of either bluetac or seal string around the socket >> jam it in some more with a screwdriver >> and then put the gasket on top
    that bluetac stuff is great, easy to come off and doesn't leave a residue

  19. #19
    Xtreme Enthusiast
    Join Date
    Mar 2006
    Location
    Hastings, England
    Posts
    825
    Quote Originally Posted by kayl View Post
    I got a DVD for installing this sort of stuff from start to finish including mounting systems into tower cases, i should really get around to putting it on youtube hey
    that would be good mate
    Quote Originally Posted by jayhall0315 View Post
    If you are really extreme, you never let informed facts or the scientific method hold you back from your journey to the wrong answer


  20. #20
    Xtreme Enthusiast
    Join Date
    Mar 2007
    Posts
    585
    Throw it up there kayl You know it would be useful to alot of people including myself.

  21. #21
    I accept cash
    Join Date
    May 2007
    Location
    Earthquake Zone, New Zealand
    Posts
    400
    Great guide {.bLanK} GoD

    I've seen you use that back-plate a number of times, seems to work perfectly to me, not sure what Nordling's issue is with it

  22. #22
    Xtreme Addict
    Join Date
    Aug 2006
    Location
    The Netherlands, Friesland
    Posts
    2,244
    Good guide, sticky?
    >i5-3570K
    >Asrock Z77E-ITX Wifi
    >Asus GTX 670 Mini
    >Cooltek Coolcube Black
    >CM Silent Pro M700
    >Crucial M4 128Gb Msata
    >Cooler Master Seidon 120M
    Hell yes its a mini-ITX gaming rig!

  23. #23
    -100C Club Member
    Join Date
    Feb 2004
    Location
    australia
    Posts
    3,766
    Quote Originally Posted by gosmeyer View Post
    Throw it up there kayl You know it would be useful to alot of people including myself.
    Believe me I have tried in the past, just had to figure out how. It went for too long to put on youtube, but you can download it from here now, 50mb file but its a fast connection, thanxs eva2000

    http://teamau.i4memory.com/kayl/kayl install.divx
    Last edited by kayl; 02-19-2008 at 05:08 PM.

  24. #24
    Xtreme Addict
    Join Date
    Aug 2007
    Location
    Cumming, IA
    Posts
    1,011
    your links broken

    just copy and paste and it works, but figured I'd save you the hassle.


    XBOX Gamertag:Fujimitsu - I'm lonely, be my friend!

  25. #25
    Xtreme Member
    Join Date
    Jun 2007
    Location
    Germany
    Posts
    137
    @kayl

    What is that thin layer of insulation you puton top of the first layer?
    (13:28 minutes)

Page 1 of 2 12 LastLast

Bookmarks

Bookmarks

Posting Permissions

  • You may not post new threads
  • You may not post replies
  • You may not post attachments
  • You may not edit your posts
  •