


I bought an Antec 900 case for three reasons. I liked the styling, I liked the cooling, and I liked the price (it was on sale at CompUSA). I have slightly modded a few cases in the past to increase the fan size from 80mm to 120mm so know how to use a dremel, and planned from the beginning to mod the case. I know that there is another review (link) that is pretty negative on this case, but wanted to put forth an alternate opinion. It is possible (and not that difficult) to get a clean install in this case.
I planned to use the space behind the motherboard tray to hide wires. With some measuring I found that there was just enough room for most of the power supply cables. The adjacent area (on the back side of the drive bays) is deeper. I estimated (after looking at the case) that I could cable tie everything down so it would lay flat, and get the back panel of the case installed, but figured it would be tight.
STAGE 1 – DREMEL THE HOLES
I cut a number of holes in the motherboard tray after some measuring.
Holes and reasons (clockwise from upper left):
- 4 pin power connector on MB
- IDE and Molex power cables for DVD drives
- IDE connector on MB, PCI-E power cable
- SATA data cables, front panel cables (switch, USB, etc.)
- Power supply cables
- Factory cutout, unused
- Rear fan, SATA from J Micron
Here is a view of the back of the case (the area next to the drive bay is deeper)..
Notice two more holes. They are for passing through the power / data cables for the hard disks (more on this later).
There is one more hole, that I forgot to take a picture of. It is a slot just big enough for the led/power/reset, USB, Firewire, audio cables from the front panel. It is accessible from the top. The dremel wouldn't fit so I used a drill , chisel, and file. Here is a picture of the cables running into the back of the case to give you an idea of the positioning. BTW, I had to lengthen the front panel cable to reach the motherboard. The USB cable BARELY reached, and the firewire / audio cable are currently unattached (and probably too short).
Rear of case with cable ties installed. I used large holes so that I could put in new ones should I have to remove something!
I used a ton of cable ties so that I could flatten the wires on the rear.
STAGE 2 – DRIVE CAGE MODS
In order to get the clean appearance I wanted, I needed to mount the drives in the opposite direction as designed. I had to drill extra holes in the drive cages (in the picture below, note that the one cage has the extra holes while the other one is stock. I was able to use one of the stock holes.
The next step was to get the wires through.
This is a pretty good picture that was the result of some effort. I used a modular SATA Power connector and took off the connectors (more on this later). Routing was done in two steps. First the wires were run into the cage, and then the wires were fed through the case and the cage slid into place. What you see here is the final test to show this would really work. The drive cages CAN be removed from the case.
As I was doing this mod I realized that someone may have thought of this approach – there were little cutouts and holes in all the right places. If my SATA cables had been smaller, I would have gotten by without the hole in the case (notice the smaller rectangular cutouts).
Here it is from the case back.
Now it was time to mount the drives and plug them up.
Notice the bottom one isn’t plugged in! The right angle plug is too tall! Crap, where is the dremel?! I used a tiny little cutting bit and cut out a piece of the connector.
Putting the SATA power plugs back on was pretty easy. The are several plug styles, these are the easiest to remove and reapply.
Here I am reapplying the SATA power cables. I spaced them out at the right distance.
Here is the fully wired drive cage.
By the way, these right angle plugs are pretty important. Otherwise the drive might have to be pushed into the case a bit further to keep it from hitting the fan.
Here it is from the side with the fan installed on the front.
This is a pretty good shot of the extra drive holes. Notice the half moon cutout on the bottom. That hole was very helpful in coaxing the wires into the cage. Under the wires at the edge of the groove is a cutout necessary to slide this into the case. It was probably big enough but I used a nibbling tool to make it deeper (no picture).
Here is a picture after the drive cage is installed showing the cable bundle coming through to the back of the case.
STAGE 3 - INSTALLATION
Partially installed (power supply and misc cables)
Most of the wires are run in this picture. It’s a little hard to see, but all the power cables go through the large hole to the rear of the MB tray, except main power. The flat IDE cable (upper right) ran through this relatively small hole and folded nicely to come up in the center cutout. The floppy cable was an afterthought, but it folded and went down the same hole. (If ever I need a floppy, I can just remove the back panel and hook it up easily.) Notice the 4 pin power in the upper left, and the other cables run through the holes. The Enermax has nice long cables!
Here is a picture with the MB and lower drive cage installed.
Here is the rear of the case. The picture looks cleaner than I remember it seemed when doing it. The thickest part was dead center, around the black IDE cable tie. I was a little worried that the back of the case would have to be heavily smushed to get the rear panel installed, but it didn’t. It fit perfect, with zero buldge.
I never have to look at that!
Under the drive cages – here I keep the main power cable taught and installed a speaker (not standard).
Nice shot of the drives - 3x320G (bottom) + 750G (top)
RESULT
Here is the final result. Notice that the stock VGA cooler has been replaced with a HR-03 cooler, and the soundcard has been installed.
Panel removed:
Fan wiring in panel:
Panel Installed:
This picture really doesn't do it justice. I may try to take it outside and take the picture without flash. It looks very clean.
FINAL IMPRESSIONS
Computer cases are very personal decisions. Everyone’s priorities are different. Some people want absolute quiet, some people want radical styling, and some people want excellent cooling, or some combination of these and others. For me, this case was perfect. It could certainly have been easier if Antec had thought more about mounting the drives backwards and provided access to the area behind the tray without cutting. But with a little creativity and effort, I’m very happy with the result.
EDIT: I forgot to mention the cooling performance. My prior case (I'll post some pictures later on) had 4 120mm (100cfm each), and 1 92mm fan (not including PSU) and is a full tower with (what I thought) very good air flow. The Antec 900 dropped the temps 5C-6C (measured with TAT) off my E6600 core temps at load. This was much more than expected.
I’d give the case an 8/10.


 Reply With Quote
 If it goes on sale at Fry's with a rebate it could be a killer deal.
 Last time I tried modding a case I ruined it so I left mine stock. Looks like the 900 is indeed a very good case choice is you are willing to mod it for easy wiring. Once again, good job!


 Saaya yupp, I agree
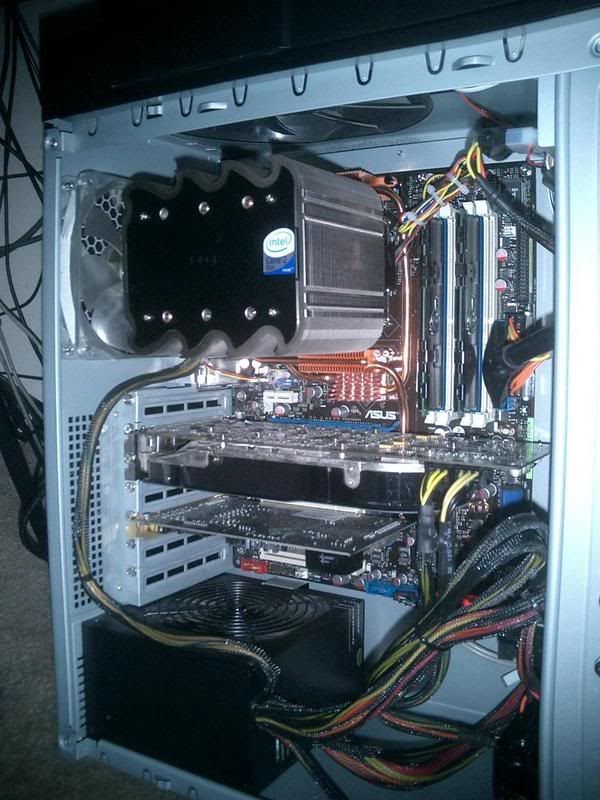


Bookmarks