Page 2 of 5 FirstFirst 12345 LastLast
Results 26 to 50 of 105

Thread: Koolance RP452X2 bleeding - impossible!

  1. #26
    Xtreme X.I.P.
    Join Date
    Jun 2007
    Location
    Bend, Oregon
    Posts
    5,693
    I think you could make that complex loop work, but you would need it to be removable so you can physically tip and shake the radiator with the barbs pointing upward. Having the ability to tip and shake the reservoir would also help getting it filled, but it sounds like the bubble is stuck at the radiator plenum.

    It would be helpful to see actual pictures of your problem..

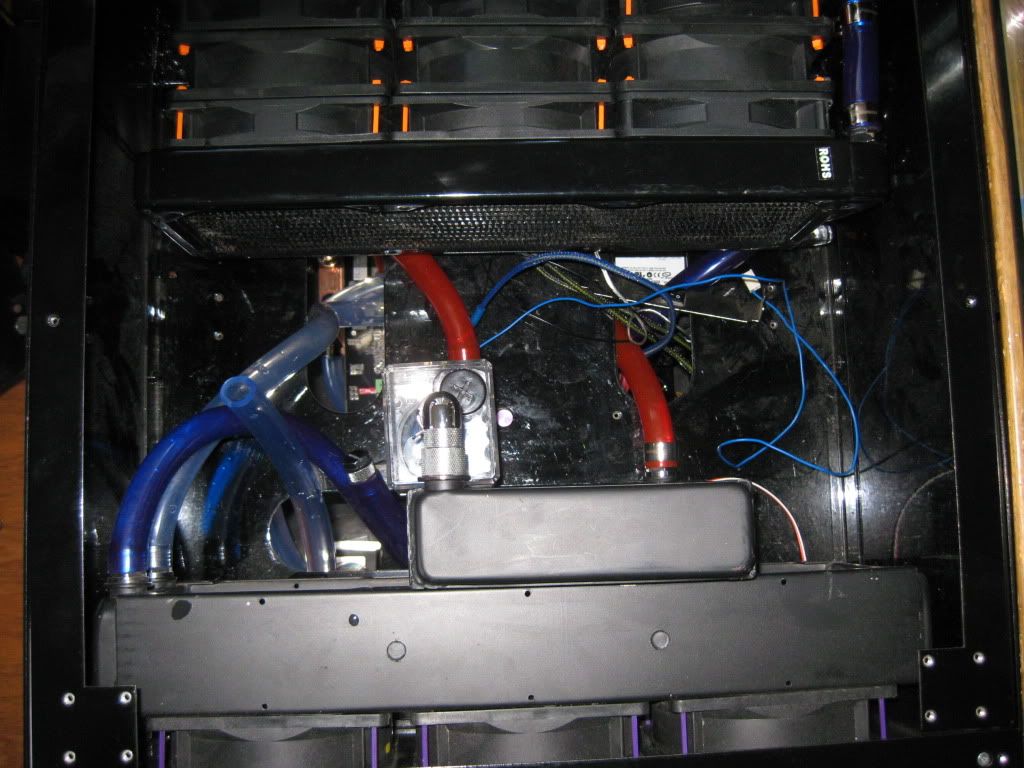
    Plenum chambers have a large x-sectional area which lowers velocities at that point.

    24v will not help the 655 where it's likely operating for you, only the strong model really benefits from higher volts. I've only found very minor gains at very low restriction (past 1.5gpm)with the vario using 24v. You've got a lot of restriction and likely hovering in the 1 GPM area, so extra volts will do nothing worthwhile.

    Second pump in series would probabaly help, but lots of bleeding guides I've read have the same recommendation about bleeding the parts outside of the case to prevent issues like this. Second pump would net around a 30% flow and velocity gain, but it's not guaranteed to fix the setup problem.

    If the bubble is stuck in one spot and the pump is silent without any air caught in there, this is a combination of rad setup and lower flow rate problem.

    You can either work on the setup to make it removable for bleeding, be willing to toss the case around as needed, or "try" a second pump in series and hope flow is high enough to flush the air.

    I would lean toward making it removable...that's just general good bleeding practice and should solve the inverted rad plenum problem you have.
    Last edited by Martinm210; 03-26-2011 at 07:19 AM.

  2. #27
    Xtreme Member
    Join Date
    Oct 2009
    Posts
    447
    Hello,

    I was actually thinking about having a second pump for a second loop, as opposed to having two in series. This would allow me to simplify the tube routing and would mean I could water cool a more powerful VGA in the future without affecting the CPU's temperature.

    I think you could make that complex loop work, but you would need it to be removable so you can physically tip and shake the radiator with the barbs pointing upward. Having the ability to tip and shake the reservoir would also help getting it filled, but it sounds like the bubble is stuck at the radiator plenum.
    That's the problem, the space is so tight I really doubt I could make that work. The radiator in the HDD bay was fine, the tubing was so long I could simply remove it, place it on the floor, and loads of air floated right up to the reservoir. But the other two would be a nightmare.

    It would be helpful to see actual pictures of your problem..
    Sorry, will get one ASAP. 
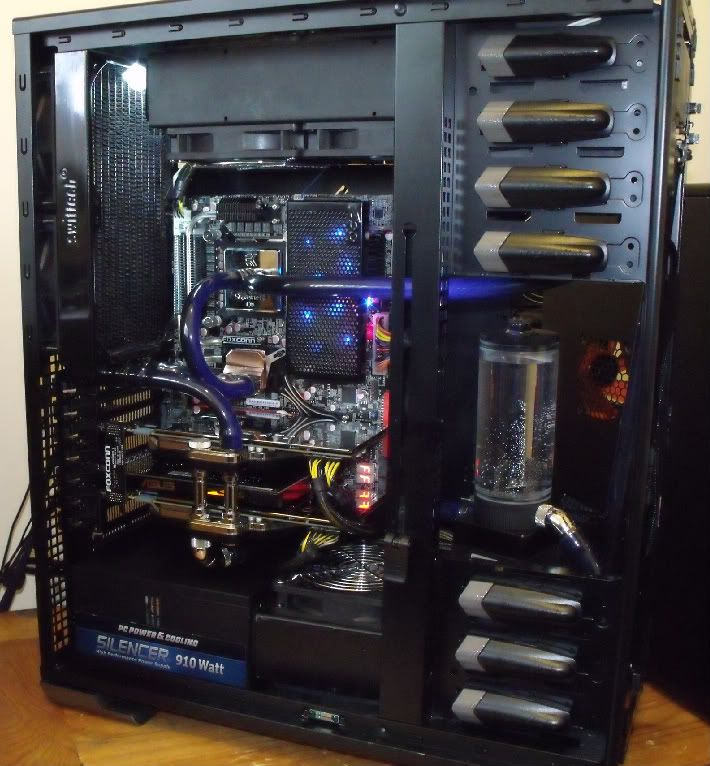
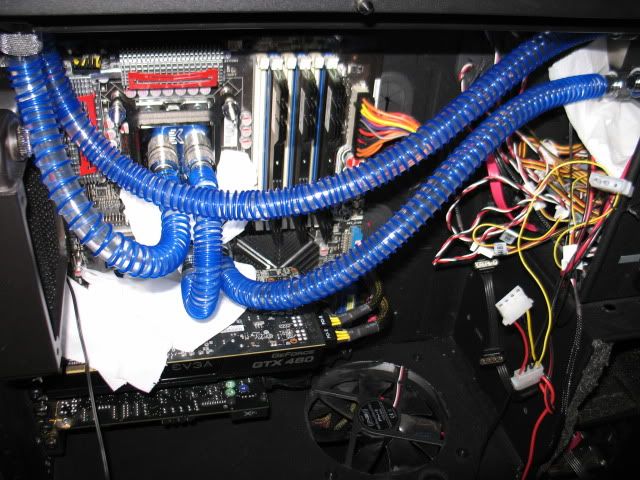
The bubble is in the rear 120mm radiator, in the inlet chamber.

    24v will not help the 655 where it's likely operating for you, only the strong model really benefits from higher volts. I've only found very minor gains at very low restriction (past 1.5gpm)with the vario using 24v. You've got a lot of restriction and likely hovering in the 1 GPM area, so extra volts will do nothing worthwhile.
    Does that mean the "strong" model is actually physically different in its construction? I thought both were totally identical, considering both have the same acceptable voltage range. I simply assumed the strong model would come with some sort of a transformer as part of the package to allow it to be hooked up to the standard 12V lines in a PC.

  3. #28
    Xtreme Guru
    Join Date
    Dec 2009
    Location
    Latvia, Riga
    Posts
    3,972
    Odai: imho it's just "programming" of pump's controller firmware, to allow D5 strong spin up faster then Vario. Usual marketing trick to diversify several products from one. Just like not vario D5 on fixed 4th speed or 18W vs 10W DDCs (easy mod from-to in older versions of later proves that).

  4. #29
    Xtreme X.I.P.
    Join Date
    Jun 2007
    Location
    Bend, Oregon
    Posts
    5,693
    You might consider some quick disconnects to allow removal and bleeding outside of the loop?

    No, they are very different in voltage performances. They might look similar, but they are not.


    I just wouldn't suggest the strong model with aftermarket tops. One sample I have is very touchy about vibration at higher speeds. It does fine with the stock top, but has some vibration with aftermarket tops...not sure why....probably sample variance with impeller balance.

    But anyhow, 24V won't help you on the vario...sorry
    Last edited by Martinm210; 03-26-2011 at 10:11 AM.

  5. #30
    Chasing After Diety
    Join Date
    Jan 2007
    Location
    Absolutely Speachless :O
    Posts
    11,930
    i am gonna get both res's soon.

    The D5 and the DDC.

    Lets see if i can make things a bit easier once i see how they really work.
    Nadeshiko: i7 990 12GB DDR3 eVGA Classified *In Testing... Jealous? *
    Miyuki: W3580 6GB DDR3 P6T-Dlx
    Lind: Dual Gainestown 3.07
    Sammy: Dual Yonah Sossoman cheerleader. *Sammy-> Lind.*

    [12:37] skinnee: quit helping me procrastinate block reviews, you asshat. :p
    [12:38] Naekuh: i love watching u get the firing squad on XS
    Its my fault.. and no im not sorry about it either.

  6. #31
    Xtremely Mediocre
    Join Date
    May 2008
    Location
    Warsaw, Poland
    Posts
    88
    They get progressively easier to bleed once you figure out how to do it properly. Due to some testing I had to do (the GTX 570 overheating thread), I've been doing a lot of draining/refilling over the past few weeks. Granted, the loop I've been draining is only made up of a PA 120.2 and two to three EK GTX 5XX fullcovers, but I'm down from 24 hours when I first installed the res to around 6 hours now. I don't even keep the case on its back any more (other than to prime the pump at the beginning), but fill the res through the front port via a funnel connected to a tube and then to some rotary fittings so it's easy to keep upright depending on how I'm tilting the case. Once the flow's stable, I'll leave some fluid in the funnel (so that the res is always close to full) and let everything cycle, occasionally tilting the case back and forth and to the sides.
    i950 @ 4Ghz on Apogee XT and Feser X-Changer 360 (Loop 1)
    EVGA X58 Classified (E760) on EK Waterblocks Fullcover (Loop 1)
    6Gb Corsair Dominator
    GTX 570 3-way SLI on EK Waterblocks via EK serial bridge and Thermochill PA 120.2, EK Coolstream XTC 140.1 & Coolgate 120.1 (Loop 2)
    2 x MCP 655 via EK Dual Loop Top
    Enermax Revolution 85+ 1250W PSU

  7. #32
    Xtreme Member
    Join Date
    Oct 2009
    Posts
    447
    Thanks for all the responses guys.

    With regards to a second pump, is this the kind of thing I should be after?

    http://www.candccentral.co.uk/alphac...e-edition.html

  8. #33
    Xtreme Member
    Join Date
    Mar 2011
    Posts
    179
    That looks like a d5 without the housing or impeller

  9. #34
    Technician
    Join Date
    Jun 2002
    Location
    Merseyside, UK
    Posts
    2,661
    Yup that'll do.


    You need to "walk" the air bubbles out in a complex loop by manhandling the case with the pump off dude. Imagine your loop as one of those maze things with a ball bearing in - ball bearing represents the bubble. Walk a bubble out, fill res to the brim and seal - keep repeating until no more air. Start with the farthest part in the loop from the res. I've done my fair share of complex loops and hit the same issue as you, it generally happens when you have a lot of runs forcing air bubbles against gravity into blocks/rads at low flow.

    It helps if you manually prefill each part of the loop as you build it and use 1/4" stoppers in the tube as you go. You can tilt as you build to keep the air at the highest point. Vastly reduces bleed problems in complex loops.

    Dont forget most rads have some pass through flow between the inlet and outlet - you dont need to tilt the air out around the rad flow path.


    Having said all that 1 in 3 refills sees me crippled for a week afterwards with a bad back!

  10. #35
    Xtreme Member
    Join Date
    Oct 2009
    Posts
    447
    Thanks, placed an order.

    The lower price makes it a lot easier to stomach.

    Having said all that 1 in 3 refills sees me crippled for a week afterwards with a bad back!


    I couldn't move my arm for a while after filling my loop the first time. A 700D filled to the brim with crap isn't exactly light...

  11. #36
    Technician
    Join Date
    Jun 2002
    Location
    Merseyside, UK
    Posts
    2,661
    And I shall call her "Backache in a box" . PA120.2 + PA120.3 + MCR220 etc and a full tower steel case. Still, go big or go home eh?

    Last edited by PiLsY; 03-28-2011 at 06:01 AM.

  12. #37
    Chasing After Diety
    Join Date
    Jan 2007
    Location
    Absolutely Speachless :O
    Posts
    11,930
    Quote Originally Posted by PiLsY View Post
    And I shall call her "Backache in a box" . PA120.2 + PA120.3 + MCR220 etc and a full tower steel case. Still, go big or go home eh?

    oh i can one up that :P


    its called 2 x MCR320 + PA120.3 + PA160.. Do i need to go home? :P


    This is my build's motto:
    "umm god dammit i need to rebuild but i get discouraged once looking at all the parts sprawled on the ground build."
    It fits all in this box:


    Last edited by NaeKuh; 03-28-2011 at 10:06 AM.
    Nadeshiko: i7 990 12GB DDR3 eVGA Classified *In Testing... Jealous? *
    Miyuki: W3580 6GB DDR3 P6T-Dlx
    Lind: Dual Gainestown 3.07
    Sammy: Dual Yonah Sossoman cheerleader. *Sammy-> Lind.*

    [12:37] skinnee: quit helping me procrastinate block reviews, you asshat. :p
    [12:38] Naekuh: i love watching u get the firing squad on XS
    Its my fault.. and no im not sorry about it either.

  13. #38
    Xtreme Enthusiast
    Join Date
    Mar 2009
    Location
    Toronto ON
    Posts
    907
    Damm now he gets the jenga crown as well .....pull one rad out they all come tumbling down ?

    Sent from my X10a using Tapatalk
    MagisD
    ____________________________
    Lurker, Dreamer, Planner, Noob


    6 Quad rads 1 case Maybe I went a little overboard....Overkill Cube

  14. #39
    Technician
    Join Date
    Jun 2002
    Location
    Merseyside, UK
    Posts
    2,661
    I hope those wheels have brakes...

  15. #40
    Xtreme Addict
    Join Date
    Jan 2007
    Location
    Michigan
    Posts
    1,785
    Quote Originally Posted by Odai View Post
    I had a feeling something would go wrong with this loop.

    My luck has been dreadful this time round.

    The pump does seem totally primed. It sounds like it used to when the loop is totally bled, except for the odd whoosh of bubbles and the much higher vibration due to the res mounting system.

    I really can't get the loop any simpler. I tried almost every single possible combination of components (some simply weren't possible due to tight bends), and this is the best I could do.
    I wouldn't beat yourself up too much. We all started somewhere! Just give it time and patience. Then come back to the problem and try to sort it out again. I personally like to put a T line above the pump intake. That way any bubble zooming around in there will go up to the fillport and not down to the pump.
    Current: AMD Threadripper 1950X @ 4.2GHz / EK Supremacy/ 360 EK Rad, EK-DBAY D5 PWM, 32GB G.Skill 3000MHz DDR4, AMD Vega 64 Wave, Samsung nVME SSDs
    Prior Build: Core i7 7700K @ 4.9GHz / Apogee XT/120.2 Magicool rad, 16GB G.Skill 3000MHz DDR4, AMD Saphire rx580 8GB, Samsung 850 Pro SSD

    Intel 4.5GHz LinX Stable Club

    Crunch with us, the XS WCG team

  16. #41
    I am Xtreme
    Join Date
    Jun 2007
    Location
    Imperial Palace, UDE of Pitatopia
    Posts
    8,396
    Quote Originally Posted by PiLsY View Post
    You need to "walk" the air bubbles out in a complex loop by manhandling the case with the pump off dude. Imagine your loop as one of those maze things with a ball bearing in - ball bearing represents the bubble. Walk a bubble out, fill res to the brim and seal - keep repeating until no more air.
    I'm surprised it took until post #34 for this to be mentioned. This is the best way to bleed IMO. Just start tilting the case in whatever direction you need to to chase the bubbles to the res (just like the ball bearing in the maze). You'll see some pop up that you didn't know about (but wait to get them), concentrate on 1 bubble at a time.

    Remember that air rises and will put up one hell of a fight to do so depending on it's size. It's best to run a loop with this in mind to make things easier when bleeding. When looping a case on it's side, it's best to use the lower ports as inlets and the same goes for when the case is standing up as well. This way you only have 2 directions to move the case in when you get to bleeding.
    Circles SucQ!

    If your annoyed by sigs telling you to put things in your sig, then put this in your sig

    Bribery won't work on me...just say NO to AT!!!

  17. #42
    Xtreme Guru
    Join Date
    Dec 2009
    Location
    Latvia, Riga
    Posts
    3,972
    Waterlogged: problem is, it's not so easy to tilt case when it has became something as monstrous as Naekuh's

  18. #43
    I am Xtreme
    Join Date
    Jun 2007
    Location
    Imperial Palace, UDE of Pitatopia
    Posts
    8,396
    Quote Originally Posted by churchy View Post
    Waterlogged: problem is, it's not so easy to tilt case when it has became something as monstrous as Naekuh's
    I know, that's why I only do SFF type builds now. Even then, some can be a real pain (NZXT Rogue for ex.). Still, if your willing to build such a monstrous case, you should be aware of (and accept) the reality that this is going to have to be done in order to properly bleed the loop. You can't always expect brute pump power to get the job done, because it doesn't always work. Proper loop setup from the start will minimize how much you have to move the case.
    Circles SucQ!

    If your annoyed by sigs telling you to put things in your sig, then put this in your sig

    Bribery won't work on me...just say NO to AT!!!

  19. #44
    Xtreme Member
    Join Date
    Oct 2009
    Posts
    447
    OK, I've received the second pump and have started to re-build. I've got the CPU/NB loop up and running:


    It was miles easier to fill and bleed. It is still bleeding after about 12 hours total, I'll keep at it. At first, I simply ran the pump at the highest setting from a 12V source (the flow rate was noticably higher), until the water became "frothy" with the bubbles. I couldn't hear water sloshing about in the radiator so I assumed all the big bubbles had gone. So I put it all the way back to the lowest pump setting, and since then, I've just kept increasing the pump setting until I can hear bubbles again, then leave it until the sound goes away, then repeat.

    I also followed the advice written in this thread, and it helped things along a bit. Thanks!

    I have to do some GPU testing on air first, then I will setup a GPU loop.
    Last edited by Odai; 04-03-2011 at 01:35 PM.

  20. #45
    Xtreme Member
    Join Date
    Oct 2009
    Posts
    447
    OK... More problems, what a surprise.

    The flow boost only seems to have made a minor difference.

    If I leave the loop running for about 10 minutes, I don't hear any air bubbles (maybe the odd click every now and then as a bubble zooms round the case). However, when the pump is first switched on, I can hear it pulling a bit of air and I get air bubble sounds for 10 minutes. The tank (P1) is almost totally full. Both ports are submerged.

    Also, even though I can see no bubbles, the water is sloshing about inside the radiator if I turn it in certain directions.

    I've tried orienting the case in every possible way, can't get the air to leave the radiator. I also had it so that the radiator was basically at the bottom, with the case tilted so that the inlet/outlet were higher up (which always got rid of the bubbles before). No luck though, nothing leaves the radiator. Totally clueless as to what to do now. I thought I'd post here again out of desperation.

    One thing is for sure, for my next build, I'm dumping this case for a setup where I will have the radiator external, so that the reservoir is highest again.

    My god, I'm unlucky.

  21. #46
    Technician
    Join Date
    Jun 2002
    Location
    Merseyside, UK
    Posts
    2,661
    Checked the pump is sealed properly against the oring? Could be sucking in air that way once the speed gets high enough.

    Walk the air out your rad and back into your res. Dead easy with that loop.

  22. #47
    Chasing After Diety
    Join Date
    Jan 2007
    Location
    Absolutely Speachless :O
    Posts
    11,930
    Quote Originally Posted by Odai View Post
    No luck though, nothing leaves the radiator. Totally clueless as to what to do now. I thought I'd post here again out of desperation.

    One thing is for sure, for my next build, I'm dumping this case for a setup where I will have the radiator external, so that the reservoir is highest again.

    My god, I'm unlucky.
    Its cuz air gets into that right pump, and wont purge.

    I am seeing the problem all u guys are complaining about, and currently working on a fix.

    As i said.. i need some time to "play" with it.
    Wish i got these guys sooner.
    Nadeshiko: i7 990 12GB DDR3 eVGA Classified *In Testing... Jealous? *
    Miyuki: W3580 6GB DDR3 P6T-Dlx
    Lind: Dual Gainestown 3.07
    Sammy: Dual Yonah Sossoman cheerleader. *Sammy-> Lind.*

    [12:37] skinnee: quit helping me procrastinate block reviews, you asshat. :p
    [12:38] Naekuh: i love watching u get the firing squad on XS
    Its my fault.. and no im not sorry about it either.

  23. #48
    Xtreme Member
    Join Date
    Oct 2009
    Posts
    447
    Walk the air out your rad and back into your res. Dead easy with that loop.
    That's the problem though, there's absolutely nothing coming out of the radiator.

    Its cuz air gets into that right pump, and wont purge.
    How? There's no air in the pump inlet holes (in the actual tank). And the sound mysteriously disappears after a while.

  24. #49
    Chasing After Diety
    Join Date
    Jan 2007
    Location
    Absolutely Speachless :O
    Posts
    11,930
    Quote Originally Posted by Odai View Post
    That's the problem though, there's absolutely nothing coming out of the radiator.


    How? There's no air in the pump inlet holes (in the actual tank). And the sound mysteriously disappears after a while.
    i have no idea how its doing it.

    But i can tell you, air is getting into the right side pump and WONT PURGE.

    That is why u need to remove that divider, then you wont have a problem with purge... you only have a problem with bleed.

    The Tline takes care of the bleed.

    That is why i said ur not going to like the solution, but it works, and will bleed in about 10 min.

    You will need to fill the res in 2 spots.. the T and at the left corner inlet.
    Nadeshiko: i7 990 12GB DDR3 eVGA Classified *In Testing... Jealous? *
    Miyuki: W3580 6GB DDR3 P6T-Dlx
    Lind: Dual Gainestown 3.07
    Sammy: Dual Yonah Sossoman cheerleader. *Sammy-> Lind.*

    [12:37] skinnee: quit helping me procrastinate block reviews, you asshat. :p
    [12:38] Naekuh: i love watching u get the firing squad on XS
    Its my fault.. and no im not sorry about it either.

  25. #50
    Xtreme Member
    Join Date
    Oct 2009
    Posts
    447
    I think I might wait for more input before I try that.

    Although, it won't solve the issue with the bubbles in the radiator. No idea why they're sticking in there. Nothing I try is getting them out.

    Never had this trouble before with a roof mounted radiator, clueless as to what is happening here.

    I guess I could try using the bleed screw on the end of the radiator, what do you think?

Page 2 of 5 FirstFirst 12345 LastLast

Bookmarks

Bookmarks

Posting Permissions

  • You may not post new threads
  • You may not post replies
  • You may not post attachments
  • You may not edit your posts
  •