MMM
Page 6 of 18 FirstFirst ... 345678916 ... LastLast
Results 126 to 150 of 449

Thread: **** PHINIX NANO TOWER **** Smallest and most powerful mITX rig !!!

  1. #126
    Xtreme Member
    Join Date
    Dec 2008
    Location
    Scotland, Glasgow
    Posts
    436
    Quote Originally Posted by kgtiger View Post
    I think the first one "with cut out rectangle and fit it with small eye mesh, like silverstone TJ07 case top, flash, no screws" would be excellent mate.
    If you could paint the fan blades yellow that would look perfect!
    To me at least.
    Yeah, that sounds cool. I may go with this one actually...

    OK, so that panels will be the design I'm gonna make. Well, I may add some small changes, like add holes for USB ports and audio out on the left side fo the left panel. Also power button needs a place so it may end up on the left panel. Still don't know where I'm going to install fan controller. Thing is with this small design there is no space outside for those items...

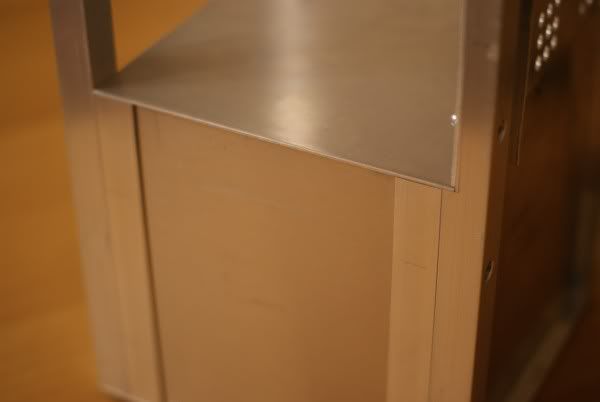
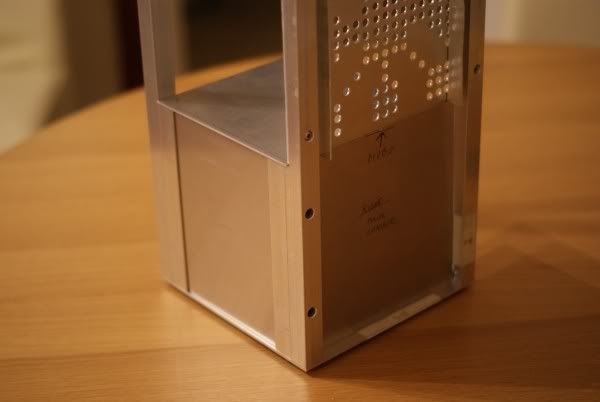
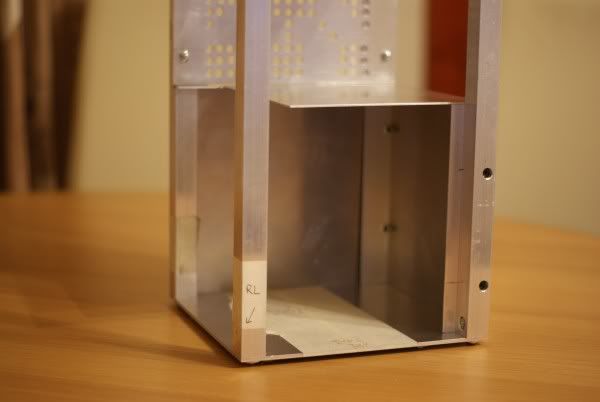
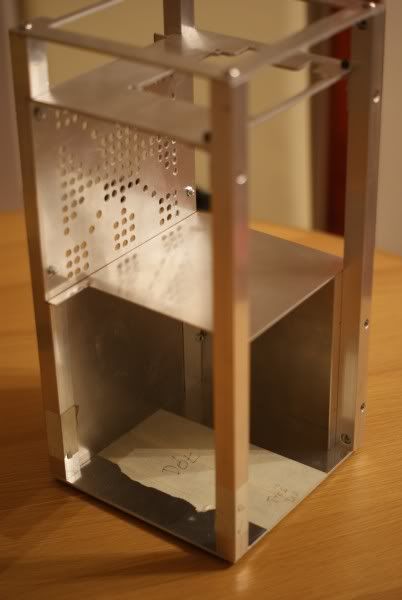
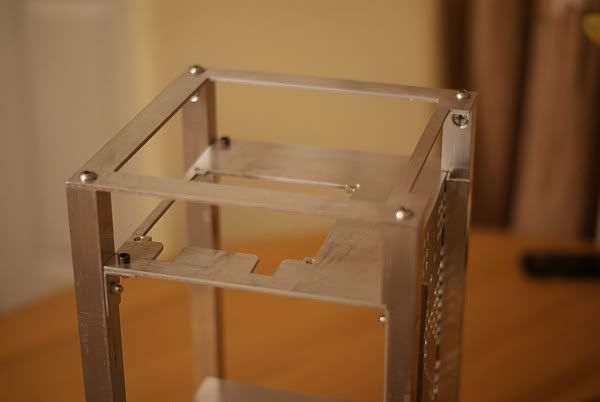
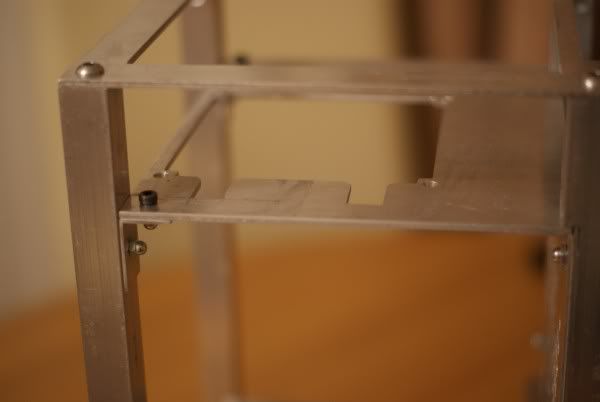
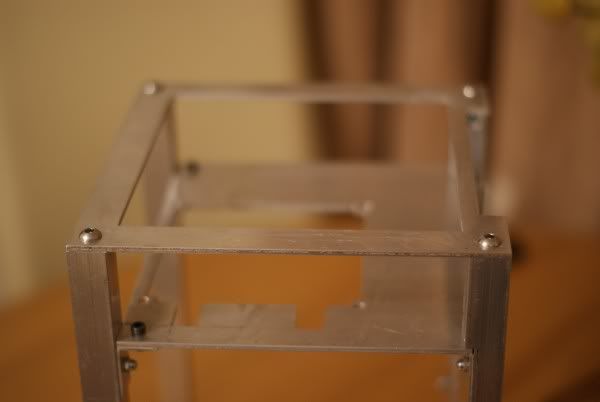
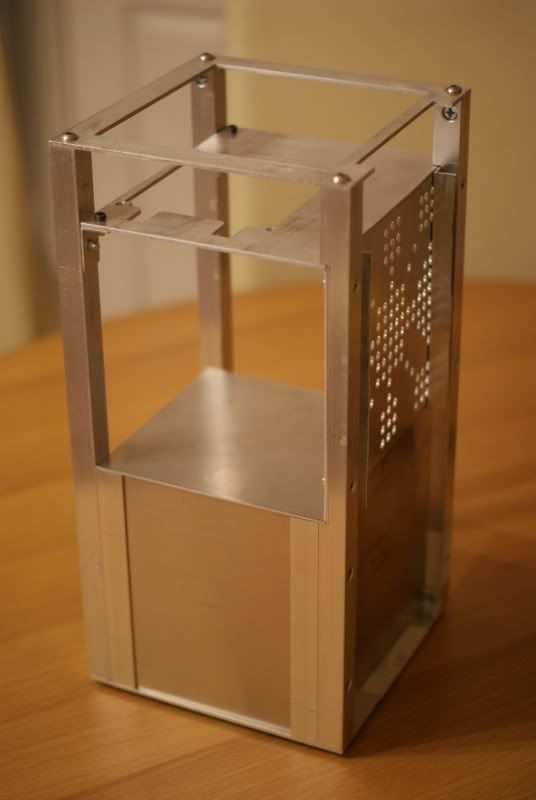
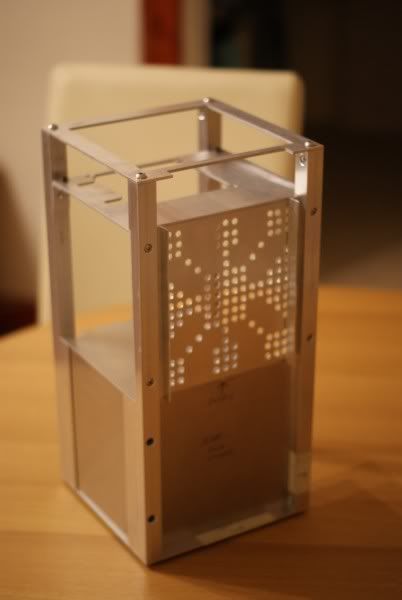
    I worked a bit last weekend, I cut the bottom part of the mobo tray to make space for power chamber front panel right under the mobo. Also I cut out that square in top panel for fan exaust and access to cables in I/O mobo panel. Trimmed those L shape alu prifiles that were installed under mobo tray - there were sticking out a bit to the front of the case priventing front panel installation, so had to trim them both about 5mm. Another thing was cut small holes for H50 barbs - I cut out fan hole in middle panel but left it without holes for pre-installed H50 babrs and tubing Now its ready for that radiator installation. Yep, I think that was all. Also bought another 20x30mm L shape profile - I will use it to mount power chamber. I know all thos wrods won't exactly show what I did, but didn't have time to make photos of those parts. Will do it tomorrow.

    Now, guys - I bought today a small tapping kit, but this time it is different, not like the one I had. Old one was pain to use cause threading bit was unstable and I failed all my attempts.
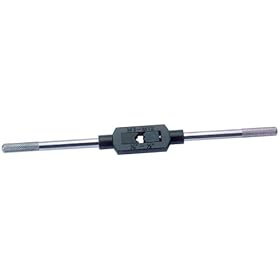
    This time I bought different kind - the one that looks like Draper one.
    Old one is like this:


    New one is exactly like this kit:


    Now, please give me all tips, instructions and kind of ideas how to tap aluminium. Please help me out here cause I need to tap main alu rods to mount outside panels. This is the only way I can mount them, cause when the whole hardware will be installed I won't have access to internal sides of those rods, so cannot use regular nuts etc...
    Please share your wisdow.. how to thread holes. I will be using M4 screws, so what size of drill bit I need to use to drill holes for that tapper bit, how to do it right?
    Last time I tried with old kit I basically ruined the thread somehow.. ripped it off and ended up with clean holes
    rig ::: i5 2500K :: GTX780 :: 250GB + 128GB 840 PRO :: Gigabyte Z77 mATX :: 4GB Ballistix :: Hazro 27" :::
    input devices ::: Topre Realforce 45g TKL :: QFR w/browns :: Zowie EC2 Evo :::
    modding ::: ?PHINIX CUBE? ::: "PHINIX NANO TOWER" ::: "PHINIX AURORA" ::: "PHINIX CHIMERA" :::
    star citizen :::
    ARBITER: Origin Jumpworks 325A LTI

  2. #127
    Xtreme Enthusiast
    Join Date
    Jul 2009
    Location
    Perth Australia
    Posts
    651
    Hay Mike, rather than give you a long winded story on the whole-how-to thing works. I did a little google for "how to tap a hole".
    This is a link to a video that I feel will help you out, watch all of it, however it's the last bit that shows the tapping of threads in aluminium.
    http://www.wonderhowto.com/how-to/vi...-metal-164034/

    This is a link to drill bit size/tap sizes and has M4 listed in it, however you will need to have a look at your bolt to see if it is a fine or cause thread.
    I feel a cause thread is be better in aluminium as the aluminium is soft and easier to strip.
    http://www.custompartnet.com/tap-size-chart

    Chances are there may not have been anything wrong with the last tap set you had.
    Aluminium is really soft and if your trying to cut a fine thread, then you do need to take your time
    and apply a fair amount of pressure or the tap will not bit in and will just spin.
    Once you get it going remember to back it off when it starts to get tight.

    Try drilling and tapping the size hole you need first on a scrap off cut of the extruded rod first, as all extruded aluminium is a bit different/harder to normal plate aluminium.
    Once you have your technique down pat, then you will be right to have a go on your outstanding little case.

    Have fun mate and let us know how you go, hay.

  3. #128
    Xtreme Member
    Join Date
    Dec 2008
    Location
    Scotland, Glasgow
    Posts
    436
    Thanks mate! I will try that!
    Old kit was faulty cause it was losing grip on tap drill bit after first turn. It was using itself too fast, kinda soft metal or sth..
    New one looks promising

    Looks like for my M4 screws I will need to drill 3-3,3mm hole and then tap it. I will have to tap 4 holes for each panel, so that gives me 16 holes of pain!
    Last edited by phinix_mike; 02-02-2010 at 03:05 AM.
    rig ::: i5 2500K :: GTX780 :: 250GB + 128GB 840 PRO :: Gigabyte Z77 mATX :: 4GB Ballistix :: Hazro 27" :::
    input devices ::: Topre Realforce 45g TKL :: QFR w/browns :: Zowie EC2 Evo :::
    modding ::: ?PHINIX CUBE? ::: "PHINIX NANO TOWER" ::: "PHINIX AURORA" ::: "PHINIX CHIMERA" :::
    star citizen :::
    ARBITER: Origin Jumpworks 325A LTI

  4. #129
    Registered User
    Join Date
    Dec 2009
    Location
    Lausanne, Switzerland.
    Posts
    20
    Quote Originally Posted by phinix_mike View Post
    Thanks mate! I will try that!
    Old kit was faulty cause it was losing grip on tap drill bit after first turn. It was using itself too fast, kinda soft metal or sth..
    New one looks promising

    Looks like for my M4 screws I will need to drill 3-3,3mm hole and then tap it. I will have to tap 4 holes for each panel, so that gives me 16 holes of pain!
    You just need to know one thing, you need to drill a hole that is 0.8 times the size of your tapping M4 -> 3.2mm but, if you want to preserve your tapping tool as they could break very easily, i'd recommand to drill 3.3 or 3.4.

  5. #130
    Xtreme Member
    Join Date
    Dec 2008
    Location
    Scotland, Glasgow
    Posts
    436
    Quote Originally Posted by hazilo View Post
    You just need to know one thing, you need to drill a hole that is 0.8 times the size of your tapping M4 -> 3.2mm but, if you want to preserve your tapping tool as they could break very easily, i'd recommand to drill 3.3 or 3.4.
    Thanks. I actually have 3.2mm drill bit, but haven't seen 3.3 or 3.4..
    Last edited by phinix_mike; 02-02-2010 at 03:24 AM.
    rig ::: i5 2500K :: GTX780 :: 250GB + 128GB 840 PRO :: Gigabyte Z77 mATX :: 4GB Ballistix :: Hazro 27" :::
    input devices ::: Topre Realforce 45g TKL :: QFR w/browns :: Zowie EC2 Evo :::
    modding ::: ?PHINIX CUBE? ::: "PHINIX NANO TOWER" ::: "PHINIX AURORA" ::: "PHINIX CHIMERA" :::
    star citizen :::
    ARBITER: Origin Jumpworks 325A LTI

  6. #131
    Xtreme Member
    Join Date
    Dec 2008
    Location
    Scotland, Glasgow
    Posts
    436
    Hmm.. I just found this - look slike pretty cool gadget - I could plug two SSDs and use only one SATA port on mobo, that would give me one more SATA!

    rig ::: i5 2500K :: GTX780 :: 250GB + 128GB 840 PRO :: Gigabyte Z77 mATX :: 4GB Ballistix :: Hazro 27" :::
    input devices ::: Topre Realforce 45g TKL :: QFR w/browns :: Zowie EC2 Evo :::
    modding ::: ?PHINIX CUBE? ::: "PHINIX NANO TOWER" ::: "PHINIX AURORA" ::: "PHINIX CHIMERA" :::
    star citizen :::
    ARBITER: Origin Jumpworks 325A LTI

  7. #132
    I am Xtreme
    Join Date
    Jun 2007
    Location
    Imperial Palace, UDE of Pitatopia
    Posts
    8,396
    You keep saying M4 screws but you need to make sure the thread pitch as well to choose the proper drill size. Going too small will cause the tap to strip out the threads as you tap or break the tap, going to big and the threads are worse than sloppy seconds if they cut at all.

    Quote Originally Posted by phinix_mike View Post
    Hmm.. I just found this - look slike pretty cool gadget - I could plug two SSDs and use only one SATA port on mobo, that would give me one more SATA!

    That looks like it converts an old IDE 2.5" drive to SATA. It'd still be 1 drive per SATA connector.
    Circles SucQ!

    If your annoyed by sigs telling you to put things in your sig, then put this in your sig

    Bribery won't work on me...just say NO to AT!!!

  8. #133
    Xtreme Member
    Join Date
    Dec 2008
    Location
    Scotland, Glasgow
    Posts
    436
    Now.. time for UPDATE !!!!!!!!!!!!!!!!! YAY!!!

    Maybe not much, but it took me a lot of work and time to do those small things...

    First of all, power chamber. I made 3 of 4 panels for this thing. Also made two main L shape profiles which will be holding left panel (one below the left window).
    On the photo below you can see this left panel. Its not attached yet, it will be mounted to those two L profiles on both sides with rivets. You can see those profiles inside as well. These are already mounted - I drilled small holes for M4 screws and bigger, 8mm holes in them to the middle of the alu rod to hide screw heads. Each L shape profile is attached with two screws. It is steady as rock
    On some of the photos you may notice that I also "trimmed" those L shape profiles behind the mobo tray - they are only trimmed, not filed or sanded yet, so they look ugly, but I had to leave them for now cause wanted to make that power cahmber panels. They will be finished this weekened.


    Here's one of the sides - you can see I used black head cap screws I got from Bill to mount them.


    On photo below you can see front panel which is just put there, its not attached yet. I need to fabricate some L shape profiles for it on the bottom.
    Also what I did and what can be seen here is I cut out that rectangle bit from the mobo tray in order to fit this power chamber panel below it. Idea of all thos panels is to hide all cables and mess and make it look all clean and tidy. Power chamber will contain the PSU and water pump.


    And here you see top panel for the chamber. You can see it won't cover the whole bottom of the case, cause I need space for graphic card on one of the sides.... But, to route it to through the whole case I left small "tongue" on the left so it gets in that small space below mobo tray (its 8mm wide, but very important to keep the whole structure steady).


    Better look on the top panel... from the top


    Now, two other BIG things I made lately: top panel has now huge square hole in it!
    Yep, that will be necessery for H50 fan exhaust and access to cables plugged to the mobo
    Of course you also can see that small, 13mm deep gap on the front - that is for dvd that will go up to the main top acrylic panel...


    Last, but not least - my favourite - I finished the hole for H50 cooler - you can see the fan hole is cut out. The beauty part are those small holes for tubing.. I love them I actually filed those sharp corners, so tubing won't be even scratched during the mounting...


    So, that would be it for now. I'm leaving you with two last shots of my little beauty

    Last edited by phinix_mike; 02-04-2010 at 03:05 PM.
    rig ::: i5 2500K :: GTX780 :: 250GB + 128GB 840 PRO :: Gigabyte Z77 mATX :: 4GB Ballistix :: Hazro 27" :::
    input devices ::: Topre Realforce 45g TKL :: QFR w/browns :: Zowie EC2 Evo :::
    modding ::: ?PHINIX CUBE? ::: "PHINIX NANO TOWER" ::: "PHINIX AURORA" ::: "PHINIX CHIMERA" :::
    star citizen :::
    ARBITER: Origin Jumpworks 325A LTI

  9. #134
    Xtreme Enthusiast
    Join Date
    Jul 2009
    Location
    Perth Australia
    Posts
    651
    Well done Mike, your "little beauty" is all coming together now, excellent work mate.

  10. #135
    Xtreme Enthusiast
    Join Date
    Aug 2006
    Location
    North Carolina, USA
    Posts
    839
    Phinix---I'm liking what I see here. You have a good eye for design and detail, and your color scheme is a breath of fresh air. Keep it up.

  11. #136
    Xtreme Member
    Join Date
    Dec 2008
    Location
    Scotland, Glasgow
    Posts
    436
    Quote Originally Posted by kgtiger View Post
    Well done Mike, your "little beauty" is all coming together now, excellent work mate.
    Thanks man! Glad you like it

    Quote Originally Posted by Xion X2 View Post
    Phinix---I'm liking what I see here. You have a good eye for design and detail, and your color scheme is a breath of fresh air. Keep it up.
    Thank you for a kind words!
    I chose those color, cause during the whole watercooling era I've seen a lot of acid green builds, which was the first popular color scheme, then all black&blue, black&red, then some new white, but didn't see much yellow. There are some orange&black builds too, but rich yellow is not that popular. I only hope it will come up nice
    rig ::: i5 2500K :: GTX780 :: 250GB + 128GB 840 PRO :: Gigabyte Z77 mATX :: 4GB Ballistix :: Hazro 27" :::
    input devices ::: Topre Realforce 45g TKL :: QFR w/browns :: Zowie EC2 Evo :::
    modding ::: ?PHINIX CUBE? ::: "PHINIX NANO TOWER" ::: "PHINIX AURORA" ::: "PHINIX CHIMERA" :::
    star citizen :::
    ARBITER: Origin Jumpworks 325A LTI

  12. #137
    Xtreme Addict
    Join Date
    Feb 2008
    Location
    Russia
    Posts
    1,910
    Like it very much dude excellent work

    Intel Q9650 @500x9MHz/1,3V
    Asus Maximus II Formula @Performance Level=7
    OCZ OCZ2B1200LV4GK 4x2GB @1200MHz/5-5-5-15/1,8V
    OCZ SSD Vertex 3 120Gb
    Seagate RAID0 2x ST1000DM003
    XFX HD7970 3GB @1111MHz
    Thermaltake Xaser VI BWS
    Seasonic Platinum SS-1000XP
    M-Audio Audiophile 192
    LG W2486L
    Liquid Cooling System :
    ThermoChill PA120.3 + Coolgate 4x120
    Swiftech Apogee XT, Swiftech MCW-NBMAX Northbridge
    Watercool HeatKiller GPU-X3 79X0 Ni-Bl + HeatKiller GPU Backplate 79X0
    Laing 12V DDC-1Plus with XSPC Laing DDC Reservoir Top
    3x Scythe S-FLEX "F", 4x Scythe Gentle Typhoon "15", Scythe Kaze Master Ace 5,25''

    Apple MacBook Pro 17` Early 2011:
    CPU: Sandy Bridge Intel Core i7 2720QM
    RAM: Crucial 2x4GB DDR3 1333
    SSD: Samsung 840 Pro 256 GB SSD
    HDD: ADATA Nobility NH13 1GB White
    OS: Mac OS X Mavericks

  13. #138
    Xtreme Member
    Join Date
    Dec 2008
    Location
    Scotland, Glasgow
    Posts
    436
    Quote Originally Posted by WaterFlex View Post
    Like it very much dude excellent work
    Thanks!

    Here's the right panel design, updated. I didn't like that small piece sticking out at the bottom part, so cut that out. Now, this is the final version, which will be fabricated.

    rig ::: i5 2500K :: GTX780 :: 250GB + 128GB 840 PRO :: Gigabyte Z77 mATX :: 4GB Ballistix :: Hazro 27" :::
    input devices ::: Topre Realforce 45g TKL :: QFR w/browns :: Zowie EC2 Evo :::
    modding ::: ?PHINIX CUBE? ::: "PHINIX NANO TOWER" ::: "PHINIX AURORA" ::: "PHINIX CHIMERA" :::
    star citizen :::
    ARBITER: Origin Jumpworks 325A LTI

  14. #139
    Xtreme Enthusiast
    Join Date
    Aug 2006
    Location
    North Carolina, USA
    Posts
    839
    Quote Originally Posted by phinix_mike View Post
    Thanks!

    Here's the right panel design, updated. I didn't like that small piece sticking out at the bottom part, so cut that out. Now, this is the final version, which will be fabricated.

    Excellent! Looking forward to seeing this fabricated. A unique design that you have there.

  15. #140
    Xtreme Enthusiast
    Join Date
    Jan 2009
    Location
    Moscow, Russia
    Posts
    685
    awesome! pretty much balanced and doesn't look too artificial
    Worklog: Project Black Copper
    Lian Li PC-P80 | Thermochill PA140.3 | Noiseblocker fans | mdpc-x stuff

  16. #141
    Xtreme Member
    Join Date
    Dec 2008
    Location
    Scotland, Glasgow
    Posts
    436
    Thank you guys!
    rig ::: i5 2500K :: GTX780 :: 250GB + 128GB 840 PRO :: Gigabyte Z77 mATX :: 4GB Ballistix :: Hazro 27" :::
    input devices ::: Topre Realforce 45g TKL :: QFR w/browns :: Zowie EC2 Evo :::
    modding ::: ?PHINIX CUBE? ::: "PHINIX NANO TOWER" ::: "PHINIX AURORA" ::: "PHINIX CHIMERA" :::
    star citizen :::
    ARBITER: Origin Jumpworks 325A LTI

  17. #142
    Xtreme Member
    Join Date
    Dec 2008
    Location
    Scotland, Glasgow
    Posts
    436
    I have been playing with top panel design today, this is what I got right now.
    Just a small teaser

    Last edited by phinix_mike; 02-10-2010 at 08:24 AM.
    rig ::: i5 2500K :: GTX780 :: 250GB + 128GB 840 PRO :: Gigabyte Z77 mATX :: 4GB Ballistix :: Hazro 27" :::
    input devices ::: Topre Realforce 45g TKL :: QFR w/browns :: Zowie EC2 Evo :::
    modding ::: ?PHINIX CUBE? ::: "PHINIX NANO TOWER" ::: "PHINIX AURORA" ::: "PHINIX CHIMERA" :::
    star citizen :::
    ARBITER: Origin Jumpworks 325A LTI

  18. #143
    Xtreme Enthusiast
    Join Date
    Jul 2009
    Location
    Perth Australia
    Posts
    651
    Looks good Mick.
    I know the middle will be cut out but what about the rest?
    Just a tad hard to know what will stay and what will go.
    Any chance of a render, just so we can get a beter idea of what this will look like?

  19. #144
    Xtreme Member
    Join Date
    Dec 2008
    Location
    Scotland, Glasgow
    Posts
    436
    Quote Originally Posted by kgtiger View Post
    Looks good Mick.
    I know the middle will be cut out but what about the rest?
    Just a tad hard to know what will stay and what will go.
    Any chance of a render, just so we can get a beter idea of what this will look like?
    Sure, I'll show render as soon as I finish it. That was just a teaser
    rig ::: i5 2500K :: GTX780 :: 250GB + 128GB 840 PRO :: Gigabyte Z77 mATX :: 4GB Ballistix :: Hazro 27" :::
    input devices ::: Topre Realforce 45g TKL :: QFR w/browns :: Zowie EC2 Evo :::
    modding ::: ?PHINIX CUBE? ::: "PHINIX NANO TOWER" ::: "PHINIX AURORA" ::: "PHINIX CHIMERA" :::
    star citizen :::
    ARBITER: Origin Jumpworks 325A LTI

  20. #145
    Xtreme Member
    Join Date
    Dec 2008
    Location
    Scotland, Glasgow
    Posts
    436
    Here's a small render of that, easier to see what is what

    rig ::: i5 2500K :: GTX780 :: 250GB + 128GB 840 PRO :: Gigabyte Z77 mATX :: 4GB Ballistix :: Hazro 27" :::
    input devices ::: Topre Realforce 45g TKL :: QFR w/browns :: Zowie EC2 Evo :::
    modding ::: ?PHINIX CUBE? ::: "PHINIX NANO TOWER" ::: "PHINIX AURORA" ::: "PHINIX CHIMERA" :::
    star citizen :::
    ARBITER: Origin Jumpworks 325A LTI

  21. #146
    Xtreme Member
    Join Date
    Dec 2008
    Location
    Scotland, Glasgow
    Posts
    436
    Here's the latest sketchup of it, on top of the Tower. Looks ok, I'm sure it will look beautiful in real life with yellow ring switch, yellow leds lighting it up from the inside through that mesh in the middle...
    Sketches always look a bit sintetic, fat for me... But its still useful to see it before you actually cut it out from material

    rig ::: i5 2500K :: GTX780 :: 250GB + 128GB 840 PRO :: Gigabyte Z77 mATX :: 4GB Ballistix :: Hazro 27" :::
    input devices ::: Topre Realforce 45g TKL :: QFR w/browns :: Zowie EC2 Evo :::
    modding ::: ?PHINIX CUBE? ::: "PHINIX NANO TOWER" ::: "PHINIX AURORA" ::: "PHINIX CHIMERA" :::
    star citizen :::
    ARBITER: Origin Jumpworks 325A LTI

  22. #147
    Moderator
    Join Date
    Aug 2007
    Location
    Back and forth between Florida and Maine
    Posts
    4,097
    Enjoying watching your progress, Mike

  23. #148
    Xtreme Enthusiast
    Join Date
    Jul 2009
    Location
    Perth Australia
    Posts
    651
    Thanks for the render Mick, but now I have more questions.
    What colour will the perspex be on top?
    Ok, so the inside square will be cut out and replaced with mesh, that right hay?
    Now the inner middle section and the other smaller section towards the front, will that be made of ali, like how the sides are?
    So that you can see the yellow light comeing out from the sides, right?

    Yeah I know, I ask a lot of questions hay.
    Ok so I am just being nosiy.

    Looks good mate.

  24. #149
    Xtreme Member
    Join Date
    Dec 2008
    Location
    Scotland, Glasgow
    Posts
    436
    Quote Originally Posted by shazza View Post
    Enjoying watching your progress, Mike
    Thanks Shazza!

    Quote Originally Posted by kgtiger View Post
    Thanks for the render Mick, but now I have more questions.
    What colour will the perspex be on top?
    Ok, so the inside square will be cut out and replaced with mesh, that right hay?
    Now the inner middle section and the other smaller section towards the front, will that be made of ali, like how the sides are?
    So that you can see the yellow light comeing out from the sides, right?

    Yeah I know, I ask a lot of questions hay.
    Ok so I am just being nosiy.

    Looks good mate.
    Perspex is clear now, but I will paint it matt black.
    Yep, center hole is for mesh. All those pieces will be made of aluminium 1.5mm sheet. There will be some yellow leds under the top panel but it will be seen only through the mesh.

    Guys, how about this top panel design? Its more like side panels, with those asimetrical window holes...
    I'm hasitating


    rig ::: i5 2500K :: GTX780 :: 250GB + 128GB 840 PRO :: Gigabyte Z77 mATX :: 4GB Ballistix :: Hazro 27" :::
    input devices ::: Topre Realforce 45g TKL :: QFR w/browns :: Zowie EC2 Evo :::
    modding ::: ?PHINIX CUBE? ::: "PHINIX NANO TOWER" ::: "PHINIX AURORA" ::: "PHINIX CHIMERA" :::
    star citizen :::
    ARBITER: Origin Jumpworks 325A LTI

  25. #150
    Xtreme Addict
    Join Date
    Nov 2009
    Location
    Netherlands
    Posts
    1,884
    Tbh I think symmetrical would match the top better, although this design also looks great

Page 6 of 18 FirstFirst ... 345678916 ... LastLast

Bookmarks

Bookmarks

Posting Permissions

  • You may not post new threads
  • You may not post replies
  • You may not post attachments
  • You may not edit your posts
  •