

After some looking around I finally found one...


After some looking around I finally found one...
Nice! Now your ready for some overclocking
Core i7 Gaming Machine
CPU: Intel Core i7 920 D0 (Batch: 3849B310) - 4Ghz @ 1.28v HT/Turbo On
Mobo: ASUS Rampage II Extreme
RAM: Corsair Dominator DDR3-1600 6GB
GPU: 2xBFG Tech GTX 295 in SLI
PSU: Corsair HX1000w Modular
HDD1: WD VelociRaptor 300gb - OS/Apps/Games
HDD2: Seagate 1.5TB Baracuda - Storage
Cooler: Prolimatech Megahalems + 2 Enermax Magma Push/Pull
Case: Cooler Master ATCS 840 Black
Indeed !Originally Posted by PsYcHoNo0b727

And thanks for the help on that
No problem... Im looking forward to seeing how the build turns out cuz I am planning a water cooling set up for my computer which is very similar to yours.
Core i7 Gaming Machine
CPU: Intel Core i7 920 D0 (Batch: 3849B310) - 4Ghz @ 1.28v HT/Turbo On
Mobo: ASUS Rampage II Extreme
RAM: Corsair Dominator DDR3-1600 6GB
GPU: 2xBFG Tech GTX 295 in SLI
PSU: Corsair HX1000w Modular
HDD1: WD VelociRaptor 300gb - OS/Apps/Games
HDD2: Seagate 1.5TB Baracuda - Storage
Cooler: Prolimatech Megahalems + 2 Enermax Magma Push/Pull
Case: Cooler Master ATCS 840 Black
Omg I laughed for real at the QC on the installed stock heatsink. Wow that IS terrible.
indeed ASUS did a terrible job their, leaving the protection film on... lucky I was LC the MB...
So I finally finish the PSU sleeving. This took forever
Not to bad i guess for a first sleeving job
I will take some better photos tomorrow at day light (those where done late. had to push 800iso...)
WOW that full white sleeving looks great! Thats the MDCP sleeving right? Did you use any type of masking or electrical tape to cover the original wire color too cuz I saw someone had a problem w/ the white sleeving still showing slight tint from the wire.
Core i7 Gaming Machine
CPU: Intel Core i7 920 D0 (Batch: 3849B310) - 4Ghz @ 1.28v HT/Turbo On
Mobo: ASUS Rampage II Extreme
RAM: Corsair Dominator DDR3-1600 6GB
GPU: 2xBFG Tech GTX 295 in SLI
PSU: Corsair HX1000w Modular
HDD1: WD VelociRaptor 300gb - OS/Apps/Games
HDD2: Seagate 1.5TB Baracuda - Storage
Cooler: Prolimatech Megahalems + 2 Enermax Magma Push/Pull
Case: Cooler Master ATCS 840 Black
Thanks
Yes MDPC-X sleeve. I used Nils technique and made them really tight, but color of the cable made variation in the white sleeve anyways. So i used white electrical tape on every cable
took much time do do. But the result is really nice
Some better quality photo of the PSU sleeved.
I quick spray on the sound card.
Working out how to place the 2 rez/pump. Am don't like it so much for the moment. Can't figure a good way to put them both...
I also started making a plexi plat to adapt the radiator on the fan. I need to get some tools from work on Monday to finish it. Hopefully it will look good.

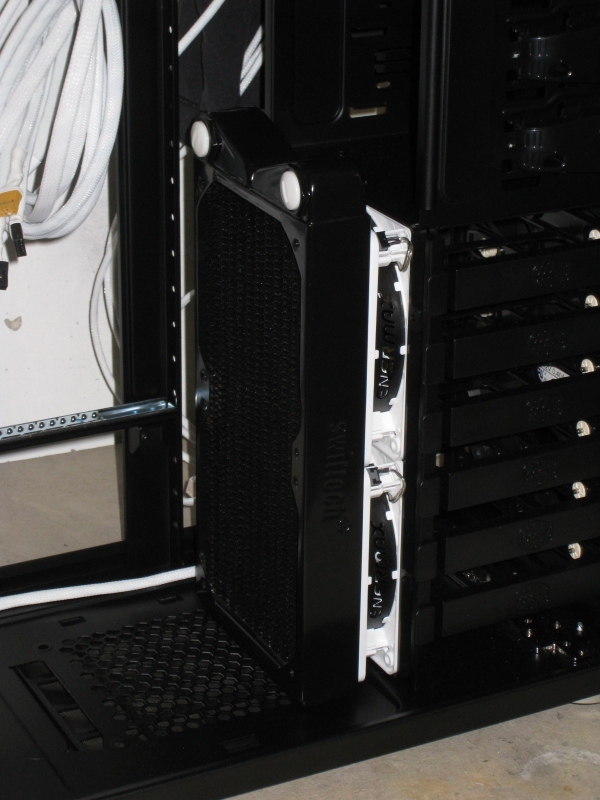
So i have a dilemma... I really don't like the way the 120.2 rad look in the case like this.
It clog up the whole case and make the 2 rez/pump hard to fit in.
So i have 3 choice I can think of:
1. Go with only loop
2. Get a single rad at the bottom
3. Cut 2 of the drive cage and place the rad a bottom.
I need some help taking a decision
Personally I would go with option 3, that is what I will probably be doing when I do a dual loop in my computer. The radiator right there makes the system look too cluttered if you ask me.
Core i7 Gaming Machine
CPU: Intel Core i7 920 D0 (Batch: 3849B310) - 4Ghz @ 1.28v HT/Turbo On
Mobo: ASUS Rampage II Extreme
RAM: Corsair Dominator DDR3-1600 6GB
GPU: 2xBFG Tech GTX 295 in SLI
PSU: Corsair HX1000w Modular
HDD1: WD VelociRaptor 300gb - OS/Apps/Games
HDD2: Seagate 1.5TB Baracuda - Storage
Cooler: Prolimatech Megahalems + 2 Enermax Magma Push/Pull
Case: Cooler Master ATCS 840 Black
I agree, stick it in the bottom
"We are the music makers. We are the dreamers of the dreams."
Amazing sleeve job. Good work.
With your original plan, is the second rad going to go on the top?
I think if you can move the pump that's against the mobo tray closer to the board, and get a 90 or 45 degree fitting in there, that it will work out fine.
From the pictures, the only thing that looks really "cluttered" is the wires. I know of course that this is just a test-fit, but that's why I have faith in your layout!
Hi, thanks for your answers.
Yes the 120.3 rad is already at the top of the case.
For the wire, nothing is done on that photo, its just a test fit for the rad and rez/pump.
I guess, I will just cut up the disk cage and fit it down their. Unless I remove the whole disk cage and relocate my drive in the DVD bay ?
Ced, can you show the paint that you used for the internal & the sound card ?
I think asus just do a terrible job full stop
I made the mistake of buying an asus gtx280-never buying asus again.
I used some local DIY car shop paint. It's Matt black (if that how its says in English ?)
I wanted to get the EVGA Classified, but the price here in France is just absurd... 430€ (that 630$)
I almost went with the EVGA Classified but I decided to go w/ the RIIE and I never looked back. I have used both EVGA and ASUS boards and they compare very similar. You may have just gotten unlucky with your board have the plastic on there but people from EVGA have problems as well... unfortunately no company is perfect when it comes to quality control lol.
Anyway, the Classified is a board for raw overclocking power and the RIIE is a board that has a lot more OC options and from my experience using it, is VERY easy to overclock. I got a stable 4Ghz OC with HT/Turbon on in about 10 minutes on air.
Core i7 Gaming Machine
CPU: Intel Core i7 920 D0 (Batch: 3849B310) - 4Ghz @ 1.28v HT/Turbo On
Mobo: ASUS Rampage II Extreme
RAM: Corsair Dominator DDR3-1600 6GB
GPU: 2xBFG Tech GTX 295 in SLI
PSU: Corsair HX1000w Modular
HDD1: WD VelociRaptor 300gb - OS/Apps/Games
HDD2: Seagate 1.5TB Baracuda - Storage
Cooler: Prolimatech Megahalems + 2 Enermax Magma Push/Pull
Case: Cooler Master ATCS 840 Black
Well, I had previously own the Striker II Formula, End up dead as it was overheating over 70°C on the SB (no OC)
I also have a Striker II Extreme, which went back to RMA almost 2 months ago (still waiting) due to a fail BIOS update... (using Asus Update)
So i hope I won't regret buying Asus again. But it they fail me with this one, Am never looking back.
Hahah sounds like me when I deal with verizon's blackberrys. I went throught 8 of them in the past 3 months.
Core i7 Gaming Machine
CPU: Intel Core i7 920 D0 (Batch: 3849B310) - 4Ghz @ 1.28v HT/Turbo On
Mobo: ASUS Rampage II Extreme
RAM: Corsair Dominator DDR3-1600 6GB
GPU: 2xBFG Tech GTX 295 in SLI
PSU: Corsair HX1000w Modular
HDD1: WD VelociRaptor 300gb - OS/Apps/Games
HDD2: Seagate 1.5TB Baracuda - Storage
Cooler: Prolimatech Megahalems + 2 Enermax Magma Push/Pull
Case: Cooler Master ATCS 840 Black
Why don't you place your res/pump config at the upper hole, next to MB power connector? If i had this case, all 3 options would be "wasting it's potential". I think, that double rad fits perfectly there and give you an opportunity to have nice and clean rig inside. If you want do have more space inside - go with radbox outside - everything else is compromise, in my personal opinion.
ASUS P5E Deluxe X48 | C2Q Q9550@testing[Fuzion v2+MCR320+MCP655] | G.Skill 4x2GB F2-8800CL5D-4GBPQ@testing | Sapphire 4870X2@ testing | 150GB WD VelociRaptor + 2xWD6400AAKS | Chieftec CFT-850-14C | Iiyama E2403WS | Razer DeathAdder | CM CosmosS Black
I always thought that having more than one of those huge tubular res's above a pump required way too much space. Is there a way you can put either of them in the drive bays or above the rad near the drive bays? That, or, if you're willing to scrap the res's altogether and get two fillports. Or scrap EVERYTHING and go for a typhoon 3 and one pump. I forget if you had two coolant ideas in mind or if you have different tube colors. I too would have put the 120.2 rad EXACTLY where you did.
I have tryed this, but first, it make the top filing port of the rez not usable (without taking out he rez/pump) and make fitting the rad troublesome. Having both the pump Inlet/outlet under the level of the video card did not look good to me.
I am still planning on putting both the rez/pump next to each other, and they will go next to the motherbord tray. But I want to keep the top filling port fonctional.
I pick those up, because I wanted to have visible, otherwise i would of went with a Typhoon 3 style (but i ear it does not fit well in this case). I am using 2 color tubing, black and white and i wanted to make a 2 circuit for this rig (I had 1 loop in my old system, so i wanted i step up)
I do wanted to keep that rad in this place, but i really did not like the way the barbs for the rad end-up in the middle of the case like this.
I have already cut up the case last night, so now its done
Thanks all for the comment
 Posting Permissions


 Reply With Quote




Bookmarks