

Nice project going on, but I think a solid cut (rectangle?) on the side will be more blend-in with the case.


Nice project going on


Come on man, i know u have updates for us


Alright so I have a bit of an update on how this is going. It's not dead by any means as I'm sure a lot of you have thought. Anyway, I cut a new divider to go in the cases that goes from the bottom all the way to the top which will seperate all the HDDs, optical drive, and radiators from the rest of the case. It also gives me more room to mount my reservoirs and just will give a much cleaner look. I also cut a front panel that will go from the bottom of the case to just under the optical drive and I need to find a place to cut vent holes in it because... well... the air from the radiators kinda needs to go somewhere. I ALSO was able to make my 5.25 to 2.5" rack which takes up the two 5.25" bays that the two original HDDs took up but now can fit 11 2.5" drives. The plans are right now to go with 5 500GB drives in raid 5 which will give me 2TB of space (and take up all my SATAII slots on the mobo with the optical drive) and then hopefully down the road get 4 SSDs and a RAID card. I'm going to get back home tomorrow so I can take some pics of all the pieces fitting in the case to give you an idea. They aren't painted yet (cut them from some metal shelving I stole from my school) but I will do that after I cut all the mounts anyway.
BUT WAIT, THERE'S MORE (if you call with in the next five minutes we'll DOUBLE your offer)
I've been working non stop the last few days so I have some $$$ to get this project back on it's feet again and tomorrow I'm putting it in the bank on the way back to my house and then ordering the parts when I get there. Anyway, here's what I'm getting. The idea is to get the whole front of the case done so I can start getting components and completing loops next.
x3 EK Res 150
x2 MCP 655
20' White tube
x7 90deg fitting
x6 1/2" Grommet
50' Sleeving
10' Heatshrink
x1 Dimmer (for all fans)
x1 Sound dampening material
x2 70mm fans (to get air moving through the HDDs)
Anyway that's the plan. I'm ordering from 4 or 5 different sites so I hope with s&h it will all be under $500 It might be cheaper to order from fewer sights even if the product is a bit more just to cut down on shipping costs. Anyway, I should have stuff coming in by the end of the week or early next so I'll keep you all posted. I'll put up some pics tomorrow too of the metal I've cut when I get home oh AND of my new mobo that I got.
Current Build: Virtual Cosmos
Cosmos II | Aquaero 6 XT | SuperNova 1000 T2 | EK-CoolStream SE 360, XE 240, CE 140, WE 180
sincerely, i hope it's not rude .. but i think ur wiring is extremely dangerous!Originally Posted by Elusid

those wires clipped in the middle of the PSU is very dangerous as it the heatsink could melt the wires under heavy load causing short circuit .... i hope you realise the potential risk (very risky) of hazzard of a fire
I'm not too worried about it. I've run it like that for a month or so before I took everything apart again and I checked all the wires, no sign of melting at all. I'll check it again after I've got everything put together and running again but I don't think it'll cause problems. Worse comes to worse I just route them a different way through the PSU. I could make two bunches and run them over the top sides and put the fan on the outside of the PSU again, won't be a huge deal. Just got home by the way and will take pics in a sec, still unpacking.
So I was able to compress all the parts to just buying from performance-PCs and it saved me a LOT of money. Every part that I bought through them instead of somewhere else was less or equal to the other site I would get it from except for the bitspower fittings, those were $3 more each... So those should be here at the end of the week or the beginning of next. Alright off to take some pics of the new parts I made for the case.3 x EK-Multioption RES 150 Rev 2 (EK-RES-150) = $128.85
Fitting Size 1/2" Barb for 1/2" ID tube
Reservoir Accessory Add EK-ANTI-Cyclon
20 x Feser Tube Active UV Hose - 3/8" ID (1/2"OD) Anti-Kink Tubing - White / UV Blue (FESER-3812-UVWH) = $55.00
2 x Swiftech MCP655™ Series 12 VDC Water Pumps (MCP655) = $129.90
Water Pump Without speed controller (part # MCP655-B)
50 x 0.125 (1/8") PET Cable Sleeving (PET1/8) = $14.50
Sleeve Color Black
10 x Heatshrink 1/8 Inch (HEATSHRINK18) = $8.90
Heatshrink Color Black
2 x Delta 70 X 70 X 15mm PWM Case Fan - Sleeved (AFB0712HHB) = $19.90
Sleeve Color Black
Heatshrink Color Black
1 x Noise Pax Sound Dampening Material (NOISEPAX) = $12.95
10 x PVC Rubber Grommets 0.50" I.D. Hole (GROMMETS-5) = $1.90
7 x Bitspower G 1/4" Silver Shiny Rotary Angle Fitting - 1/2" (BP-LRI) = $90.65
1 x Sunbeam PCI Slot Fan Controller (SB-FANCONTROL) = $7.95
------------------------------------------------------
Sub-Total: $470.50
United Parcel Service (1 x 23.40lbs) (Ground): $23.78
Total: $494.28
Last edited by Elusid; 06-22-2009 at 01:42 PM.
Current Build: Virtual Cosmos
Cosmos II | Aquaero 6 XT | SuperNova 1000 T2 | EK-CoolStream SE 360, XE 240, CE 140, WE 180
Alright image update now
So this is my new mobo installed. I got the AsRock one because it was cheap, i7, had the PCI slots I needed for wifi/possible sound card and also had extra PCIx slots for a RAID card. Plus it matched my white/blue theme well enough.
Alright so on to the parts I cut and made, first off, the front. It fits perfectly now I just need to get the vents cut out of it and figure out a way to mount it. My thought was weld some L brackets onto it because I don't want bolts going through.
I cut a new inside wall so that it looks MUCH cleaner then it did before and adds more space for me to mount my EK150's. Now all the wires will be hidden from the HDDs and optical
And finally, the HDD bay I made. Here are the basic components
Two random laptop drives I had sitting around to test with
Presto! Actually turned out quite nice and there's enough room for the cables to fit in as well as the two 70MM fans for airflow. I just need to cut a hole in the side of the drive bay to feed things through
Alright well next update will be once I get my parts in that I just ordered.
Current Build: Virtual Cosmos
Cosmos II | Aquaero 6 XT | SuperNova 1000 T2 | EK-CoolStream SE 360, XE 240, CE 140, WE 180
UPDATE!... (finally)
ok so I got a shipment of parts yesterday so I spent the morning putting them together and... well I'll just show you
The parts
So this is the basic layout of the reservoirs I've had in mind for the last several freaking months but have been too broke to do anything about it until now
Pumps mounted to the wall like I want them. I was going to have them lower so they sit on the floor of the case but that only left about 1" between the outlet and my PSU which wasn't nearly enough for the tubing so I raised them up so the tube will go just above the PSU.
brackets mounted
What it looks like with everything mounted onto it
Closer look at the reservoir setup
Side view
Test fit into the case, pump view
Well that's it for today. I drilled the mounting holes to keep the wall in place and also put the bitspower (or w/e) fittings on my radiators. I need to get some flat black spraypaint to spray it and then I can mount it in there and connect all the tubes between the pumps, reservoirs, and radiators. I'll do that in a couple days though because I have work but there will be more updates very soon. Oh and I have the stuff to do my sleeving as well which will be a pain in the ass but worth it. Thoughts?
Current Build: Virtual Cosmos
Cosmos II | Aquaero 6 XT | SuperNova 1000 T2 | EK-CoolStream SE 360, XE 240, CE 140, WE 180
Nice to see this..
I need to see more, please keep going!!!
iMac 24''
BNDMOD @ Cruz Alta (Cba.) Argentina
awesome work elusid. that res and pump wall looks amazing.
btw, how thick is the wall (aluminum i assume)? thanks
Thanks
Oh funny story about the wall it self. I cut it from some cheap metal shelving units that were at my school but it's steel and my guess would be 1/16" thick... maybe thinner... anyway I work the next two days but after that I should have more time to work on this. In the mean time any suggestions or comments would be great.
Oh and btw if anyone is looking at making 2.5" HDD racks and wants to get fans for the 70MM ones are PERFECT! The two that I got are EXACTLY the height of the HDDs and two of them fit just right side to side in a 5.25" bay. Ugh that reminds me I need to cut out the side of the bay to fit the (up to) 11 sets of SATA data/power cables from the HDDs... and figure out how to mount it... and where to get my front cover cut and how to mount THAT. Wow there's still a lot to do on this rig and that's just with the parts that I have right now. Anyway keep watching.
Current Build: Virtual Cosmos
Cosmos II | Aquaero 6 XT | SuperNova 1000 T2 | EK-CoolStream SE 360, XE 240, CE 140, WE 180
Awesome res/pump plate.
Thanks =) Hopefully I'll get a chance to work on it tomorrow. I don't have anything else planned so I should have almost the whole day. wooooo
Current Build: Virtual Cosmos
Cosmos II | Aquaero 6 XT | SuperNova 1000 T2 | EK-CoolStream SE 360, XE 240, CE 140, WE 180
This is actually amazing, If only the 1200 were say about 6" longer I would mod it. Its our HTPC and its barely off. Need more airflow and such.
SCHOOL PC
CPU = i7 920 D0
GPU = 2x GTX285 SLI
Mobo = Asus P6T X58
HDD = 3x 30GB Vertex SSD RAID0
RAM =3 x 2GB Dominators1600
CPU Block = Apogee GTZ
GPU Block = 2x HEATKILLER® GPU-X² GTX285
NB Block = Bits Power BLACK FREEZER///EK-Mosfet ASUS X58 KIT
Case = MM U2UFO
PSU = Corsair HX1000W
GAMING PC
CPU = I7 940
GPU = 2x GTX 295
Mobo = X58 Classified
HDD = 3x 30GB Gskill SSD RAID0
RAM =3x2GB Dominator GT
CPU Block = Heatkiller 3.0
GPU Block = Koolance VIDNX295
NB Block = EK Acetal Full Coverage
Case = SS TJ07
PSU = Corsair HX1000W
Why thank you =) Yeah I wish there was about another 3" between the end of the mobo and where the drive bay starts because right now I can't even fit my reservoirs between the end of the vid card and the wall which is why I placed them higher up.
EDIT: Just ordered my CPU and half my RAM so I can at least get it up and running =) I'll hopefully make more money this week too so I can get my CPU block and possibly the rest of my ram and heatsinks for them.
Last edited by Elusid; 07-07-2009 at 11:19 AM.
Current Build: Virtual Cosmos
Cosmos II | Aquaero 6 XT | SuperNova 1000 T2 | EK-CoolStream SE 360, XE 240, CE 140, WE 180
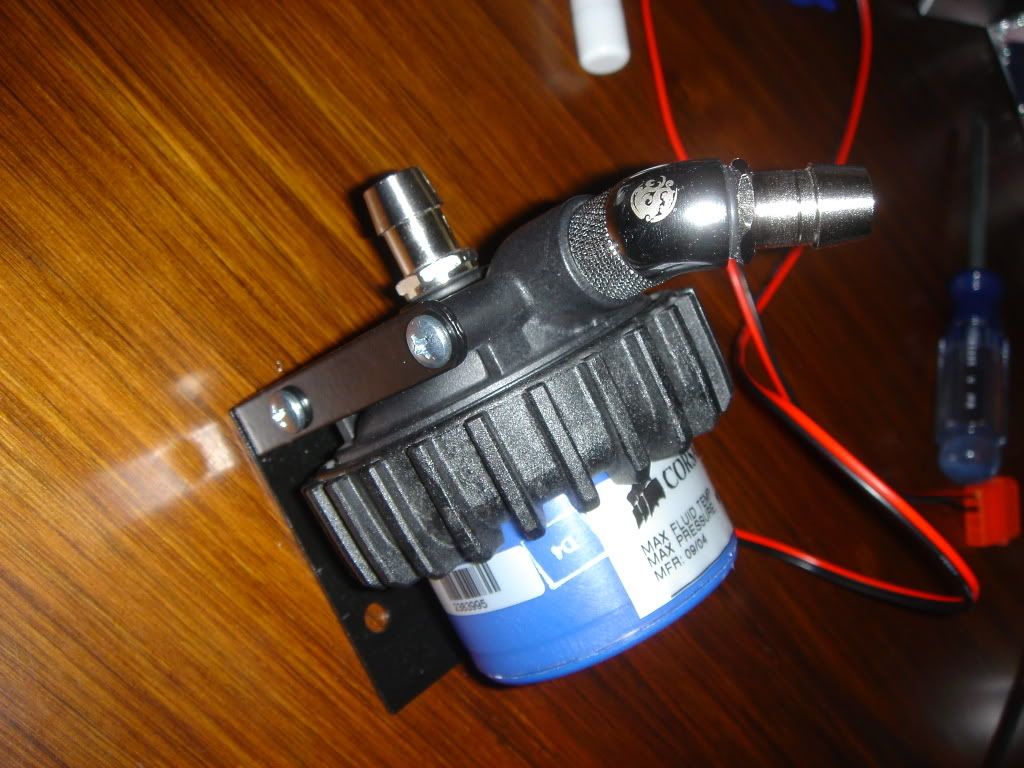
are you going to mod the pumps at all? i really like the setup but every time i look at a d4/d5 i can't help but think about how ugly of a pump they are (I say this as a d4 user
any thoughts on prettying them up? and really, fantastic work!
Intel Core 2 Quad Q9450 Yorkfield @ 3.2GHz | Asus P5Q Deluxe mobo | 2x OCZ Reaper HPC 4GB (2 x 2GB) DDR2 1066 (PC2 8500) | Sapphire 4870x2 | Western Digital VelociRaptor 300GB 10k RPM | Intel 120GB SSD | Western Digital Caviar SE16 640GB 7200 RPM | Hitachi 2TB 7200 RPM | PCP&C 750W Power Supply |Cooler Master HAF932 | Windows 7 64-bit | Dell ULTRASHARP 2408WFP 24-inch Widescreen Flat Panel Monitor
Join Us in the XS World Community Grid Forum & Help Fight Cancer and Other Diseases
I haven't really thought about it other than removing the stickers and sleeving the cables. It might look cool if I painted the screw on ring thing white to sort of go with the black/white theme. Idk do you have any thoughts? I don't really want to buy anything for them unless they sell some rings that don't have those massive grooves in them, it would also make the pump smaller which would be nice.
EDIT: oh and I just walked to the hardware store and back and bought two cans of flat black so now I need to take apart that wall and paint it =) I'm honestly just doing everything I can to avoid sleeving my cables. I tried to do one and it's a pain in the ass and will take hours haha.
Last edited by Elusid; 07-07-2009 at 12:25 PM.
Current Build: Virtual Cosmos
Cosmos II | Aquaero 6 XT | SuperNova 1000 T2 | EK-CoolStream SE 360, XE 240, CE 140, WE 180
Wowzers, looking good!
"We are the music makers. We are the dreamers of the dreams."
i did this with my top:
the cast barbs are cut off and drilled & tapped for a G1/4 fitting. other than that... i've seen a "bling" kit but I don't actually like it very much. painting the casing is a good idea too, I may do that with mine since the blue makes it look ghetto
Intel Core 2 Quad Q9450 Yorkfield @ 3.2GHz | Asus P5Q Deluxe mobo | 2x OCZ Reaper HPC 4GB (2 x 2GB) DDR2 1066 (PC2 8500) | Sapphire 4870x2 | Western Digital VelociRaptor 300GB 10k RPM | Intel 120GB SSD | Western Digital Caviar SE16 640GB 7200 RPM | Hitachi 2TB 7200 RPM | PCP&C 750W Power Supply |Cooler Master HAF932 | Windows 7 64-bit | Dell ULTRASHARP 2408WFP 24-inch Widescreen Flat Panel Monitor
Yeah I thought about tapping the ends but that's just too much work and I don't need to do it with mine. I've looked at the bling kit and it doesn't change the only part of the pump you can really see with my case so it's not worth it... and it's fugly anyway. I just put my first layer of black paint on the wall by the way and I also sleeved 4 out of my bazillion cables. I'll take pics when I get that wall installed.
Current Build: Virtual Cosmos
Cosmos II | Aquaero 6 XT | SuperNova 1000 T2 | EK-CoolStream SE 360, XE 240, CE 140, WE 180
MOVE FASTER!! maybe i'll come over and help u sleeve some of those cables if im bored enough.
Alright here we go, another update.
So the wall is painted black, installed, and I'm starting to hook up the tubing in the front area.
I cut off the RPM sensor, sleeved the wires, and fed them through the wall.
Now I just need to install the other radiator and do the same thing to the other side.
Radiators and pump all tubed in front, view of the inside to get an idea how it looks and the routing.
HDD bay still fits fine.
The next step to this process... mother
Mobo installed. I also just went ahead and flipped the MCR220 back around so the barbs face into the case. I'll just move my GPU down to the next slot.
Testing the look with the lights
Well the next step is to solder the 24pin main mobo connector to the back of the mobo... That 3rd reservoir sits so close to the plug that there is no way in hell I'll be able to plug it in so if I want to keep everything looking how it is now (and I do) I need to bust out the soldering iron. No biggy though, I've done several solder projects and the solder points on the back are freaking massive so it'll be cake. However that's another day I think...
Current Build: Virtual Cosmos
Cosmos II | Aquaero 6 XT | SuperNova 1000 T2 | EK-CoolStream SE 360, XE 240, CE 140, WE 180
DOPE!! u think u put small enough tubing on big enough barbs??
Lol at the wireing its a mother to sort out isn't it :p
Custom modding ideas you got there, did you spray the HDD cage black aswell?
My Computer
Parts:
CPU: Q9450 @ 3.6Ghz(OC'd)1800Mhz FSB
Mobo: EVGA 780i
GPU: HD 5870 (I have two but only got one in at the moment)
PSU: 1000w Corsair
Ram: 4GB Corsair dominator DDR2 1066Mhz
Soundcard: Asus Xonar D2
Monitor: Samsumg 226BW 22" and secondary 17" LCD
Speakers: logitech Z5400
Case: Tj07 fully sleeved wires
Water cooling:
Loop 1: Mobo NB & Mofset with Zalman resorator
Loop 2: CPU (Ek supreme) with MCP 355 XSPC acrylic top 360 & 240 mm rad
A bit about me
My Worklog
LOL the size of your fittings are like x2 of the tubing. I like your color scheme and I am still subbed xD
SCHOOL PC
CPU = i7 920 D0
GPU = 2x GTX285 SLI
Mobo = Asus P6T X58
HDD = 3x 30GB Vertex SSD RAID0
RAM =3 x 2GB Dominators1600
CPU Block = Apogee GTZ
GPU Block = 2x HEATKILLER® GPU-X² GTX285
NB Block = Bits Power BLACK FREEZER///EK-Mosfet ASUS X58 KIT
Case = MM U2UFO
PSU = Corsair HX1000W
GAMING PC
CPU = I7 940
GPU = 2x GTX 295
Mobo = X58 Classified
HDD = 3x 30GB Gskill SSD RAID0
RAM =3x2GB Dominator GT
CPU Block = Heatkiller 3.0
GPU Block = Koolance VIDNX295
NB Block = EK Acetal Full Coverage
Case = SS TJ07
PSU = Corsair HX1000W
Haha yeah it was ato get them on. I had to boil it in water and then stretch it open with a pair of pliers. It's actually the same ID as the tubing I had on my 1/2" barbs before (3/8") it's just the tubing is about 1/3 as thick as my clear stuff I used to have so it looks like it bulges a lot more. Meh, it looks fine to me and it keeps me from needing to use any kind of clamps which was the idea.
I'm still not done with the HDD cadge really. I need to drill mounting holes for it and then I'll paint it black. I start work again tomorrow for the next month so hopefully I'll be able to get my HDDs here sort of soon.
Current Build: Virtual Cosmos
Cosmos II | Aquaero 6 XT | SuperNova 1000 T2 | EK-CoolStream SE 360, XE 240, CE 140, WE 180
 Posting Permissions


 Reply With Quote


Bookmarks