

Ubuntu 9.04 is out now. I've downloaded it, gonna try it out soon.


![[XC] serlv is offline](images/statusicon/user-offline.png)
Ubuntu 9.04 is out now. I've downloaded it, gonna try it out soon.
Crunching to Crush Cancer
Somebody, Stop Me!
It runs faster than Ubuntu 8.10 , but still is slower than Fedora or Suse.
Thanks Jaco,Originally Posted by Jaco

it is all workig fine now. Just need to find out how to run without a videocad installed ( pc just dosn't boot, vnc is set-up and working with card in it. )
Some machines just won't boot without a vid card and that's all there is to it, others just keep on truckin' and seem to not care at all. I think it depends on the BIOS but I don't really know.
[SIGPIC][/SIGPIC]
I am downloading Ubuntu 9.04 for my sossaman rig's right now-very excited will finally get these baby's up and running. I have onboard video for these but once I have them crunching video it will be of no concern as these babies are dedicated crunchers; so once there set up that is that
Ok so I am getting ready to install Linux on my systems- and downloaded 9.04. I unzipped the file and within are a few folders- my ?? question is what are the necessary ones that I need to install the OS. Thanks

Didnt you download it as an ISO? maybe you have extracted the files from the ISO image?
If so just burn the image to disk and you're right to go!
I see the ISO linux in the file up above- so that must be the 1 I need to put on disk. Thank you
No worries!
WinRar opens everything nowadays right! As well as associating itself with all kinds of files making it look like a zip file!
Ok maybe I confused myself-so I should just put the original file I downloaded from the Ubuntu website on disk; which is the one on the bottom left of the pic above. I had justunzipped it when I got it and everything plus the file itself I had put into a folder on my desktop.

Here's simple how-to:
1. DL the ISO image which you want.
2. Don't open it/unzip it anywhere.
3. DL & Install Imgburn
4. Open Imgburn
5. Press "Write image file to disc"
6. Select the ISO file which you just DLd in imgburn (Little folder icon with zooming lens in it.)
7. Then burn and you're done
You use IRC and Crunch in Xs WCG team? Join #xs.wcg @ Quakenet
Ze gear:[22:53:09] [@Jaco-XS] i'm gonna overclock this damn box!
Main rig: W3520 + 12GB ddr3 + Gigabyte X58A-UD3R rev2.0! + HD7970 + HD6350 DMS59 + HX520 + 2x X25-E 32gig R0 + Bunch of HDDs.
ESXI: Dell C6100 XS23-TY3 Node - 1x L5630 + 24GB ECC REG + Brocade 1020 10GbE
ZFS Server: Supermicro 826E1 + Supermicro X8DAH+-F + 1x L5630 + 24GB ECC REG + 10x 3TB HDDs + Brocade 1020 10GbE
Lappy!: Lenovo Thinkpad W500: T9600 + 8GB + FireGL v5700 + 128GB Samsung 830 + 320GB 2.5" in ze dvd slot + 1920x1200 @ 15.4"
Thank you sOlid that did the trick
Well after succesfully running my firt ubuntu cruncher for over a month now I have builded my second one. ( I7 920@3.9 ) Installing went without a problem but now the following.
- The pc is connected thru wireless so every reboot it will requir for the password of the network or atleast some stupid keyring bull I do not want to act up.
So how to disable / remove the keyring and let the pc auto connect. ( tried searching the inet but didn't find anything clear enough for me to understand)
- Second problem/issue the pc doesn't want to install new packages anymore. I downloaded gkrellm to monitor but at install is loads some stuff and then says E: could not find package ...........
What could be wrong I did not change anything I can recall.
- As third I let Boinc manager auto start at startup but for some stupid reason at startup it doesn't start boinc so nothing is happening. Now if I shutdown boincmanager and start it again after the pc is done booting completly it wil work just fine and starts boinc also.
And again what could this be?
You don't want to start the boinc manager at boot time, you should be starting the boinc client (using the run_client script). As for the missing package, try changing the server you are downloading from (it's a setting in the 'software sources' menu). I have no idea about the stupid wireless thing, I'm sorry. I gave up on mine and went for a crawl under the house to run a cable instead.
[SIGPIC][/SIGPIC]
Tnx for the reply. Found out WICD is a great alternative for network manager and will auto connect without all the prompting.
Trying the run-cleint script thingy now.
About the package installation what server and how to change it?
Last edited by Ramaistro; 06-02-2009 at 03:43 AM.
Click through (in English) System > Administration > Software Sources >enter your password > click the tab "Ubuntu Software" then in the middle of the window there is a menu titled "Download from:" followed by the name of the current server. Click that and you will be able to choose either your current server or the Main Server. Pick the other one and then let it reload the package lists.
[SIGPIC][/SIGPIC]
Well I did that and got all errors smacked at me that there were problems downloading from some links. It seems like some links I had added when I was trying to following a how to install for gkrellm as that wasn't working.
B.t.w. boinc runs fine now starting that cript instead of the manager.
Ok my I7 is up and running for a few days now and i'm allready disappointed. It seems to score about 25% lower then my other I7 on Vista 64bit. My pc at home is @ 3.8 and my new one is @ 3.9 What could this be ?
So I finally got my Sammy up and running and did get BOINC up, but I was not able to get it running at boot up. Regardless once I got over the Wall of Noob with Ubuntu and installing software/programs its nice to get this baby up!!
Since this is an Ubuntu ?? I thought I would post here, though it's on my Sossaman rig. I got 4 gb of ram and it seems to be reading only 3.4 . This is and was my very first install of Linux on a new machine, once it seemed to be working Ok ehough I loaded Boinc up on it just want to get the kinks out and have it running efficiently. Also while I am at it are there any temps programs out? shoot I am running 9.04


Sounds like you got the 32 bit version of Ubuntu. It shows all 6 gigs of my setup with 64 bit.
Server: Core I3 530 , 4GB of dd3 1066, GIGABYTE H55M-UD2H, Highpoint Rocketraid 3510 and Areca ARC-1220 with a few arrays totaling 11TB of storage
Wifes: Phenom 2 940, 4gb of ddr2 1066, 785g mb, PNY 8800 gt, Hitachi 2tb, Coolermaster Cosmos, 2x 22" monitors Windows 7 Pro 64
HTPC/Gamer: Core I-7 920 @ 3.8, 6gb of ddr3 1600, Gigabyte X58-UD5, MSI GTX 480, Intel 80 GB SSD, SuperTalent 120 GB SSD, Thermaltake DH-103, Windows 7 64 bit 52" JVC(Supporting cast of Jamo speakers and Cambridge Audio Azur 640r receiver)
Mine: 4x AMD 8356, 16 GB of ddr2 533 ecc, Tyan Thunder S4985G3NR, EVGA GTX 275 FTW, Intel 40 gb SSD, Ubuntu 10.04, Klipsch Promedia 2.1, 27" LG monitor
Ica only use 32-bit because of the type of system the Sossaman's are
Thanks for the easy How-to guide. I have it working very nice!
I should also point out that this guide works great for installing Ubuntu on a USB disk, just select the USB disk when doing the "Guided, use the whole disk" part. Then on this screen, click "Advanced" and choose to install GRUB on the USB (usually something like sdb1) rather than HDD:
While this does technically put the swap partition on the USB drive, on my E7200 with 2Gb RAM, Linux doesn't use ANY of the Swap partition, and barely 1/4 of the RAM, so I'm not worried about constant swap read/writes destroying the USB drive.
Monitoring and Overclocking with Ubuntu
So you've followed s0lid's excellent guide so far, and you have your shiny new Ubuntu machine up and crunching. However now you want to be able to check on the PC without having to have a screen/keyboard attached to it, and most importantly you want to keep an eye on temps and be able to overclock. That's where this little guide comes in.
First:
Setting up Remote Desktop
OK, first things first, you are most likely going to want to set a static IP to your machine, if you haven't done so already. Static IP addresses make it much easier for configuring things like remote desktop, since the IP of the machine won't change when the PC and/or router restarts.
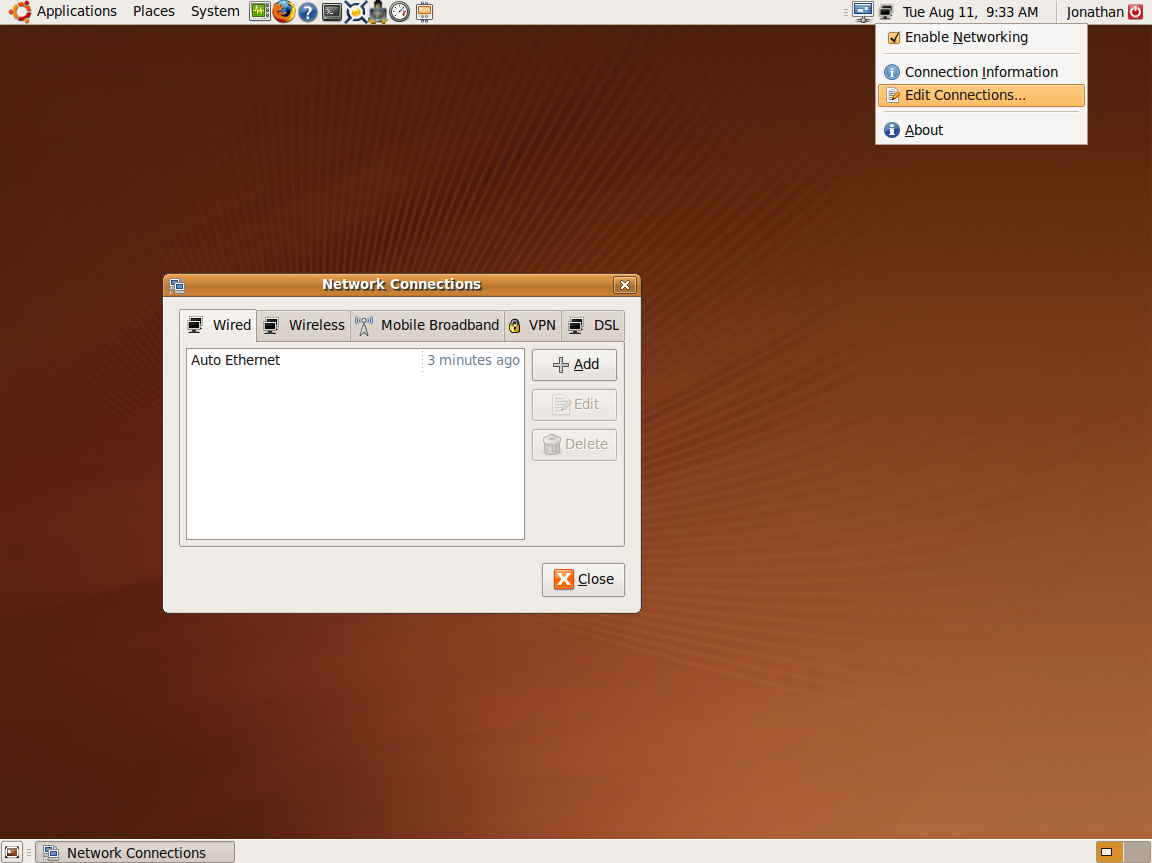
To do this, find the network icon in the top-right, right-click on it and click "Edit Connections", which should bring up a screen like this:
Click on "Auto Ethernet" (or whatever your connection may be called), then click "Edit". Click the "IPv4 Settings" tab and select "Manual" from the method drop-down menu.
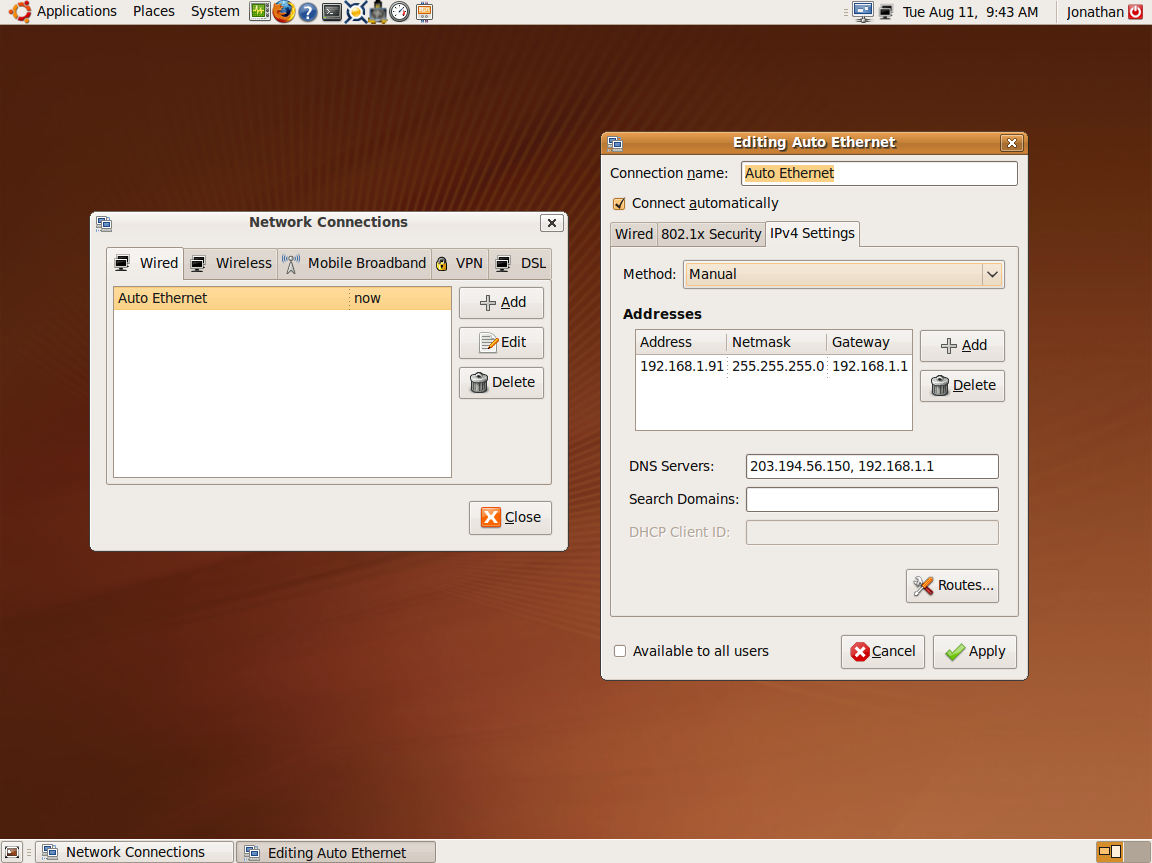
Now you'll need to enter in the desired IP address, netmask and default gateway. The IP address will depend on how your network is configured, although in most cases it will be something like 192.168.1.xxx (where xxx is between 1 and 255). I suggest starting from a high-ish number (eg 80 or higher) so that the router's DHCP still has plenty of IPs for automatic assignment. Netmask is usually 255.255.255.0, although that might be different depending on your network setup. Gateway is the IP of your modem, usually something like 192.168.1.1 or 10.0.0.1.
Once you've done that, enter the IP for your router (and any alternate IPs it may have) in the "DNS Servers" box, and you'll wind up with something that looks a little like this:
Click "Apply" and then close the "Network Connections" window. To check it is configured properly, right-click the Network icon again, untick "Enable Networking", and then tick it again. If all is well, you should have net connection again, and the "Connection Information" window (again found by right-clicking the Network icon) should show the correct IP Address and Primary/Secondary DNS's.
Right, so that's your static IP set up. Now lets get some kind of remote desktop happening.
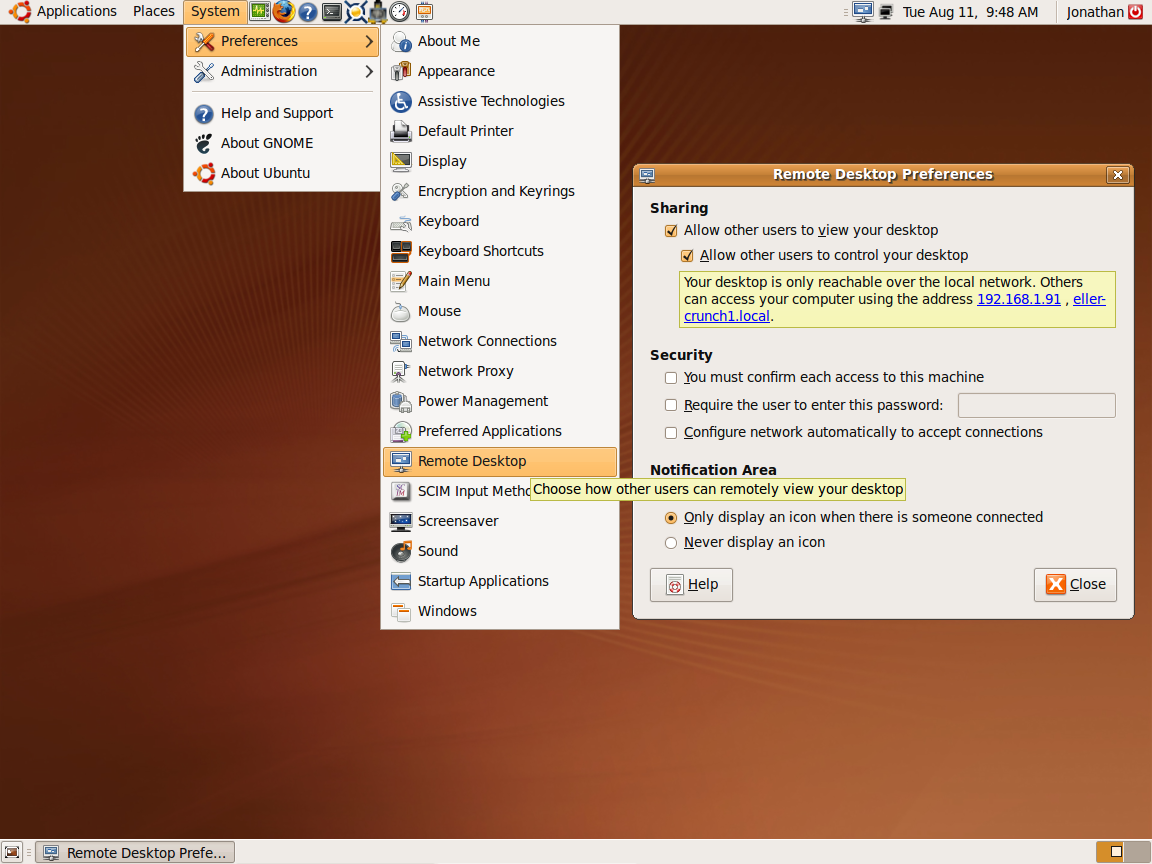
To do that, click: System > Preferences > Remote Desktop, like thus (although you most likely won't have boxes ticked):
Just a random note, with this window, unlike a lot of other settings windows, changes are applied immediately upon ticking/unticking a box instead of waiting for Apply/Cancel, so if you're running this headless, make sure you don't untick "Allow other users to view your desktop" or "allow other users to control your desktop" while using a VNC program, otherwise you may find yourself locked out like I did
So now, you want to tick "Allow other users to view your desktop", "allow other users to control your desktop", and make sure that "You must confirm each access to this machine" is UNticked. Password is optional (Remote Desktop will only accept connections from the local network by default, AFAIK), depending on how much you trust other users of your local network. You should wind up with a screen that looks like the above.
What this does is enable Ubuntu's built in VNC program, so you are obviously going to need a program to connect to a VNC server. I personally use UltraVNC which has a really nice little stand-alone VNC Viewer.
To double check everything is working, use your VNC program of choice to try connecting to the Ubuntu machine. I use the IP Address (hence setting a static IP), since I have isses connecting to hostnames on a mixed Windows/Linux network. If it works, contgratulations! If it doesn't, you'll need to re-check your network settings.
Temperature monitoring
So we're accessing this machine remotely and it's crunching 24/7. But there is a heat-wave coming, or you're wanting to OC a bit, and you want to be able to check temperatures. Luckily, Linux has you covered. Open up a terminal window, and enter the following:
enter your root password and answer "y" to any prompts.Code:sudo apt-get install lm-sensors gkrellm
This installs the lm-sensors package (one of the most common, and really the only, temp sensor package in Ubuntu) and the GNU Krell Monitors, a nice little sidebar-like program that reads lm-sensors.
If you have any problems installing by the terminal, you can install them via the Synaptics Package Manager. Click System > Administration > Synaptics Package Manager, search for the 2 packages ("lm-sensors" and "gkrellm"), mark them for install and then click "apply".
Now you have them installed, you need to configure lm-sensors. In a terminal window, enter:
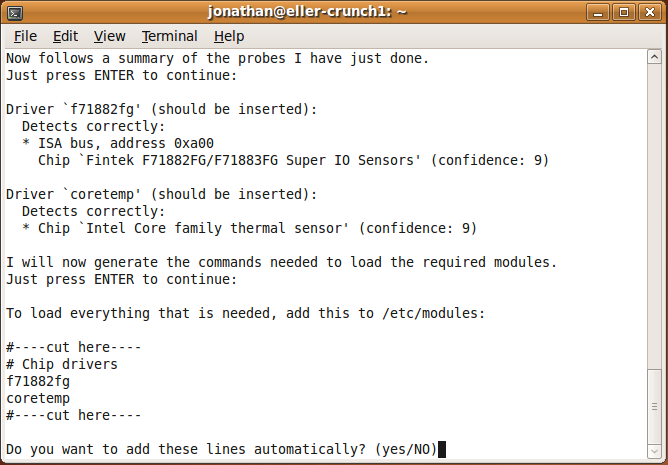
It will now ask you a bunch of prompts as to if it should scan or load certain things, you will want to enter "Yes" to all of them. Once it has finished scanning, it will give you a summary and ask you to press Enter a couple of times to continue. Do so. You'll end up with a terminal that looks a little like this:Code:sudo sensors-detect
Pay attention to the stuff between the two "#----cut here----", these are the sensors that have been detected on your motherboard. They will vary from board-to-board, although all of them should have at least "coretemp" in common. Enter "yes" for the last prompt, and you've finished sensors-detect.
Now all that does is detect what sensors are available, it doesn't actually install the modules required to read them (despite what it might say about editing /etc/modules), you'll need to enter each one manually using:
For example, on my MSI P35 Neo2-FR, sensors-detect found "f71882fg" and "coretemp", so I entered:Code:sudo modprobe [module name]
Once you've done that, check that lm-sensors is working, by typingCode:sudo modprobe f71882fg sudo modprobe coretemp
into a terminal. You should end up with something that looks a little like:Code:sensors
Of course the actual output will vary a lot depending on what sensors your motherboard has, but you can at least see the temps for each core, vCore and System (usually the Northbridge, but YMMV). As you can see, not all the voltage readings are entirely trustworthy, depending on what sensors you have and what your board can monitor. You'll need to figure out what can be believed and what can be ignored. In my case, only vCore reads even remotely close to what it should be, so I'm ignoring the rest of the voltage readings.
OK, so that's lm-sensors installed and configured. But terminals are boring, and it doesn't update, so we need something that can read lm-sensors real-time and give us some nice pretty graphs and stuff. This is where Gkrellm comes in. You can launch it by clicking Applications > System Tools > GKrellM System Monitor.
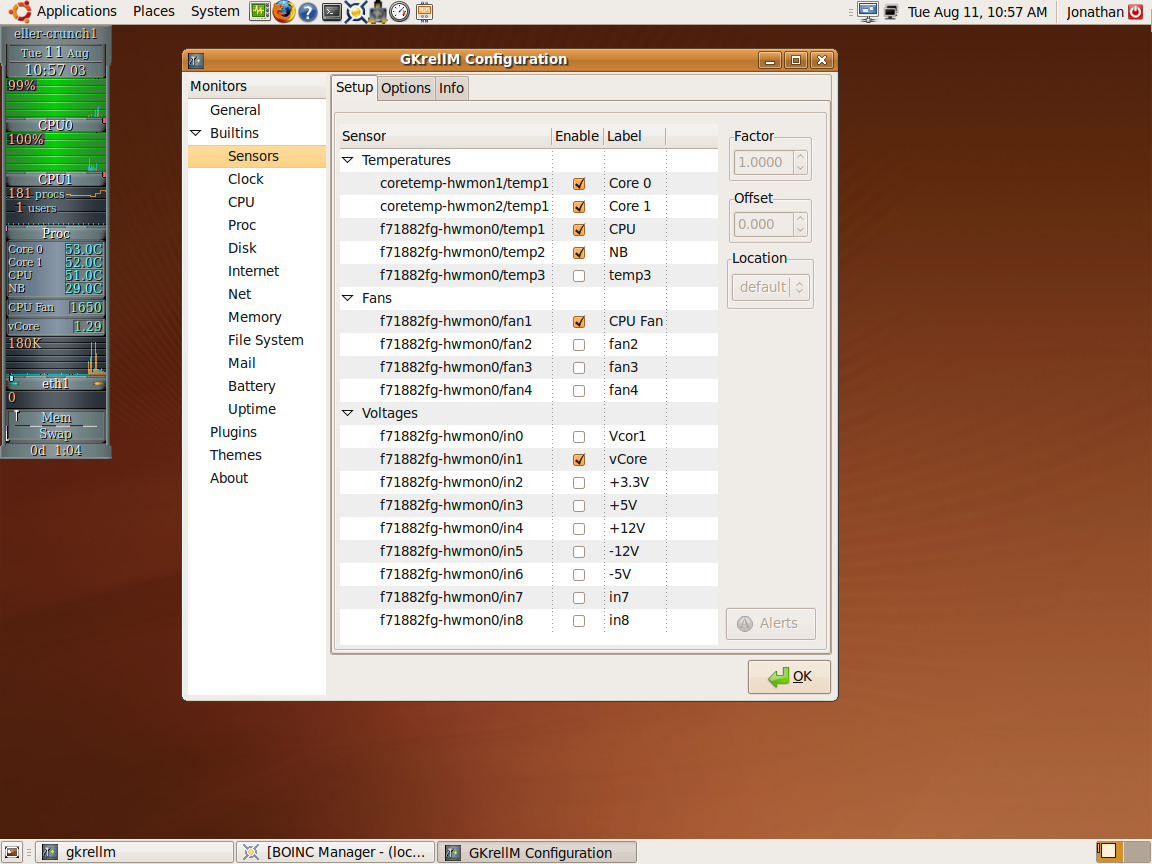
To open the Configuration, either click anywhere on the GKrellM window and hit F1, or right-click on the hostname and click "Configuration". The sensors and other items can be found by expanding "Builtins". I won't bother going into what different things do and how they should be set up, as it'll add way too much to this already kinda lengthy How-to, and I'm sure most of you can figure it out.
This is how mine looks:
Overclocking and stress-testing tools
When it comes to tools for OC'ing, Ubuntu doesn't have a whole lot in it's repositories. However tools do exist, and they are pretty handy. Two that I use are PerlMon, a CPU-Z equivalent, and SysTester, which basically runs X threads of Y loops of Z length SuperPi, and error checks the whole way, rather than making you validate a checksum at the end. I find around 30 loops of 8M digits on all cores gives you a fairly good indication as to if it's WCG stable or not. But as with all OC'ing, YMMV, and the amount of time taken to complete these loops will vary a lot depending on your clock speed.
------------------
Hopefully I was able to help people out with this little addition to s0lid's existing Ubuntu guide.
Eller
Desktop: Q6600 G0 @ 3.6 Ghz | P5E | 2x2 Gb G.Skill PC8000 | GTX 560 Ti | CM690 | TT TP 750 watt | Win 7 Pro x64 | Water Cooling
Server: i3 530 (Stock) | CM Vortex Low-Profile | Zotac H55-ITX WIFI | 2x2Gb Corsair 1333Mhz | IGP | VX450 | Server 2008 R2 x64
Great add
Can add that post to first posts?
You use IRC and Crunch in Xs WCG team? Join #xs.wcg @ Quakenet
Ze gear:[22:53:09] [@Jaco-XS] i'm gonna overclock this damn box!
Main rig: W3520 + 12GB ddr3 + Gigabyte X58A-UD3R rev2.0! + HD7970 + HD6350 DMS59 + HX520 + 2x X25-E 32gig R0 + Bunch of HDDs.
ESXI: Dell C6100 XS23-TY3 Node - 1x L5630 + 24GB ECC REG + Brocade 1020 10GbE
ZFS Server: Supermicro 826E1 + Supermicro X8DAH+-F + 1x L5630 + 24GB ECC REG + 10x 3TB HDDs + Brocade 1020 10GbE
Lappy!: Lenovo Thinkpad W500: T9600 + 8GB + FireGL v5700 + 128GB Samsung 830 + 320GB 2.5" in ze dvd slot + 1920x1200 @ 15.4"
 Posting Permissions


 Reply With Quote


Bookmarks