Page 8 of 17 FirstFirst ... 567891011 ... LastLast
Results 176 to 200 of 404

Thread: PROJECT: MM Pinnacle 300 (previously Ugly Duckling)

  1. #176
    Xtreme Enthusiast
    Join Date
    Jul 2008
    Location
    kibbler the nibbler
    Posts
    984
    Bianco: Thanks, I bought socket cap screws from modelfixings.co.uk through a Google search. Only after the fact did I think about if they're reliable or not. Oh well, I hope I get them soon. If not, at least they weren't too expensive.

    LonghornN: Thanks, the tubing is TFC 3/8-1/2. I like to keep things slim.

  2. #177
    Registered User
    Join Date
    Jan 2009
    Posts
    80
    Subscribed.

    What radiator will you put at the top? Won't it get in the way of the 5.25" bays?

  3. #178
    Xtreme Enthusiast
    Join Date
    Jul 2008
    Location
    kibbler the nibbler
    Posts
    984
    Quote Originally Posted by Alex Suraci View Post
    Subscribed.

    What radiator will you put at the top? Won't it get in the way of the 5.25" bays?
    2 x MCR320, 1 at the top and 1 in front. Yes it will get in the way of the first, maybe even the second bay, I'm actually not sure yet. Still waiting on them screws so I can move forward.

    small updates...
    1) I replaced the male2male connector between the valves and the Q-fittings with BP rotary male2male connectors. Love the quality of these fittings.

    2) What's a good way to clean anodized AL? The surface has a grain that seems to just "absorb" dust from any cloth I use during a fingerprint wipedown.
    Last edited by Kibbler; 03-23-2009 at 06:14 PM.

  4. #179
    Moderator
    Join Date
    Aug 2007
    Location
    Back and forth between Florida and Maine
    Posts
    4,097
    Kibbler ... what I find works for anodized aluminum is to keep a "microfiber" cloth nearby, and constantly wipe it down. The sooner you get to the fingerprints, the better. Wearing plastic gloves is also good, but admit I find that limiting. I'm going to try a soapy water bath before I make my next attempt at photographing the case.

  5. #180
    Xtreme Member
    Join Date
    Aug 2008
    Location
    Singapore
    Posts
    404
    Quote Originally Posted by Kibbler View Post
    Bianco: Thanks, I bought socket cap screws from modelfixings.co.uk through a Google search. Only after the fact did I think about if they're reliable or not. Oh well, I hope I get them soon. If not, at least they weren't too expensive.

    LonghornN: Thanks, the tubing is TFC 3/8-1/2. I like to keep things slim.
    oh. wait, bro you're still in sg or overseas?
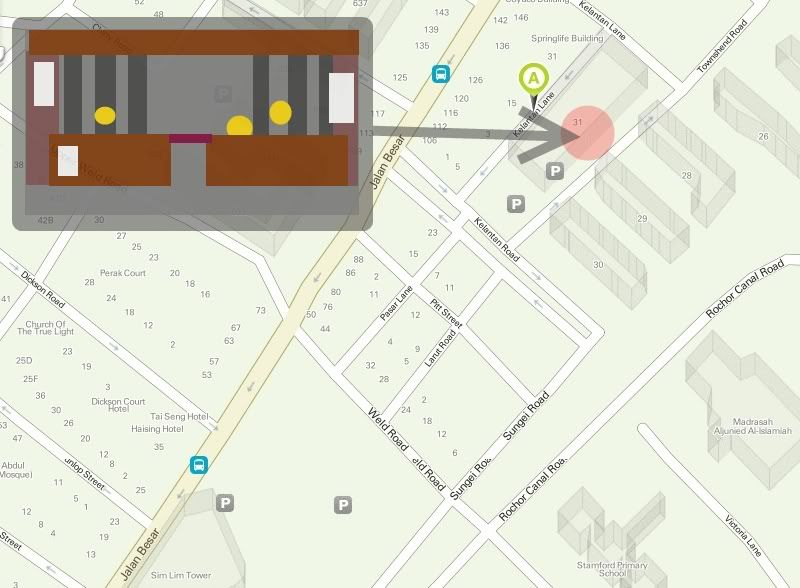
    if you're in sg, my friends and i have found this shop in kelantan lane... a whole lot of selection of screws... i bought hundreds of black socket heads and nuts.

    i can send you a map or something since i didn't get a namecard or contact info.


  6. #181
    Xtreme Enthusiast
    Join Date
    Jul 2008
    Location
    kibbler the nibbler
    Posts
    984
    Bianco: Yes please, I'd appreciate that! I'm aware there are shops there but being busy with work I never had a chance to look around. Heard those shops close on weekends, too. Bummer.

  7. #182
    Xtreme Member
    Join Date
    Aug 2008
    Location
    Singapore
    Posts
    404
    Quote Originally Posted by Kibbler View Post
    Bianco: Yes please, I'd appreciate that! I'm aware there are shops there but being busy with work I never had a chance to look around. Heard those shops close on weekends, too. Bummer.

    np bro. we actually took a leave for that weekday, made a trip to sim lim tower for electricals and suntec for the it fair that just ended. i heard the shops are open halfday on saturdays; but i haven't gone there on a weekend so i cannot say for sure.

    like i said earlier, i don't have the exact address of the shop. however, using the online map, it is roughly in area with the red dot. ground floor shop along the street. it's a bit of a walk from sls and slt.

    i have also included a very crude drawing of the facade of the shop... it's how the shop will look like when you're standing right in front of it. there's just a counter in front and not a walk-in shop. there are screw sample/posters in front (white rectangles), inside are the shelves that house the boxes of screws (grey vertical rectangles) and the clerks just stand on the other side of the counter (yellow circles)... the auntie that acts as cashier sits near the counter (middle yellow circle). best to talk to auntie about the price, large quantities get nice discounts and she seems to be more patient than the guys.


  8. #183
    Xtreme Enthusiast
    Join Date
    Jul 2008
    Location
    kibbler the nibbler
    Posts
    984
    That is fantastic. Far more informative and entertaining than I expected. You even managed to show the shopkeeps' ethnicity.

    Thanks man.

  9. #184
    Xtreme Member
    Join Date
    Aug 2008
    Location
    Singapore
    Posts
    404
    Quote Originally Posted by Kibbler View Post
    That is fantastic. Far more informative and entertaining than I expected. You even managed to show the shopkeeps' ethnicity.

    Thanks man.
    haha. i was going for simpsons' style there wasn't flesh tone in paintbrush; now paiseh that you've mentioned it!

  10. #185
    Xtreme Enthusiast
    Join Date
    Jan 2008
    Location
    Vancouver, Canada
    Posts
    612
    Kibbler, I really like the symmetry of your res/pump config - very strong aesthetic!

    Looking forward to following along.

  11. #186
    Xtreme Enthusiast
    Join Date
    Jul 2008
    Location
    kibbler the nibbler
    Posts
    984

    Cool

    Whew, long time since the last update. Hmm, seems some posts were deleted when the forums went down. Oh well here goes.

    1) New grill! There's another one of the same on top. It originally came with silver mesh, which I thought was tacky. I like the matte aluminum and black mesh combo much better.


    2) Please excuse the wires. They're sleeved but have nothing to plug into yet.


    3) You can see the single fillport up there near the top. One fillport, two res? You'll see Let's get a closer look at the top.


    4) I made this bracket to route tubing and keep it away from where the PSU will be. Needed a lot of sanding to make sure the holes are perfectly round and smooth, no sharp edges allowed. Three holes for rad inlet, filling line, and rad outlet (you can see all three at the back).


    5)


    6)


    7)


    Thanks all for your comments. Now just waiting for the Koolance TMS200 to arrive. More to come!
    Last edited by Kibbler; 05-04-2009 at 09:48 AM.

  12. #187
    Engineering The Xtreme
    Join Date
    Feb 2007
    Location
    MA, USA
    Posts
    7,217
    Once again great work kibbler, every update I see something really nice that you've come up with

  13. #188
    Xtreme Enthusiast
    Join Date
    Jul 2008
    Location
    kibbler the nibbler
    Posts
    984
    Thanks SniipeDogg, I'm waiting patiently for your new LiLi, too.

  14. #189
    Xtreme Enthusiast
    Join Date
    Jul 2008
    Location
    kibbler the nibbler
    Posts
    984

    Koolance TMS-200 is in

    The expansion board is in a separate shipment so I won't be installing it just yet. This weekend hopefully.

    Here's the whole kit.


    Components side.


    Microprocessor side. The surface mount soldering is very good in general.


    Included cables.

  15. #190
    Banned
    Join Date
    Apr 2008
    Location
    Brisbane, Australia
    Posts
    3,601
    Nice case photos Kibbler. I'd be interested in your comments on that Koolance thingie when you get everything up and running.

  16. #191
    Xtreme Enthusiast
    Join Date
    Jul 2008
    Location
    kibbler the nibbler
    Posts
    984
    Quote Originally Posted by MomijiTMO View Post
    Nice case photos Kibbler. I'd be interested in your comments on that Koolance thingie when you get everything up and running.
    I certainly will.

    Rampage Formula, 9800GTX, DDR2 (NB heatsink popped off with a sickening *crack* but the IHS stayed on). Definitely not top of the line stuff anymore but I already spent a alot on camera gear in the past few months...


    Lets start with the video card.


    Got my anti-goo and new goo ready (thermal pads for VRAM/VRM not pictured).


    PITA to clean, finally done!


    Attaching iandh's sinks. They're wonderfully made but I was confused about which side to put the plastic washers. Ended up putting them on the back. Is that correct?


    All done.


    Tomorrow, the mobo.
    Last edited by Kibbler; 05-09-2009 at 10:44 AM.

  17. #192
    Xtreme Enthusiast
    Join Date
    Jul 2008
    Location
    kibbler the nibbler
    Posts
    984

    Part 1 of today

    Sigh...I think no one is interested in this old worklog anymore . Oh well, progress waits for no one, I shall persevere.

    A lot of photos this time, so I'll keep them small.

    Onto the motherboard today...


    Enzotech mosfet sinks. They're very high quality but don't come with any backplates.


    About an hour of PITA cleaning off the old TIM later.


    What's next?


    Another couple hours later. BTW I'm using EK backplates for the mosfets and CPU block.


  18. #193
    Xtreme Enthusiast
    Join Date
    Sep 2007
    Location
    Sydney - Australia
    Posts
    515
    very nice progress kibbler

    I am looking forward to you putting the system together in the case as what you have shown so far is

    Keep it up

  19. #194
    Xtreme Addict
    Join Date
    Jan 2008
    Location
    Bonnie Scotland / Sunny England
    Posts
    1,363
    YAY!!! Nice to see some more work getting done to this!

    ~Bex
    PROJECT :: The Xtreme (WET) Dream!!!

    PERSONAL H2O BESTS :
    E8600 @ 4.8GHz
    E6750 @ 4GHz QX9650 @ 4.6GHz
    i7 920 @ 4.6GHz

    PERSONAL AIR BESTS :
    Sempron140 @ 4Ghz (Stock Cooler)
    i7 3960x @ 5.4ghz (Air Cooler)

    Bex : "Who said girls can't play PC games or overclock!? Do I look like your imagination!?"
    Aaron : "TBH, a girl doing all that is a pretty perfect girl!"
    Swift_Wraith : "could someone please check bex for a penis?"

  20. #195
    Xtreme Enthusiast
    Join Date
    Jun 2008
    Location
    Somewhere in EU
    Posts
    573
    Awesome Looking build
    Corsair Obsidian 650D - EVGA P67 FTW - Samsung F3 1Tb - 8Gb A-Data cheapest crap DDR3 - Intel Core i5 2500K w/ Corsair H50 - EVGA GTX 295 co-op - Corsair AX650

  21. #196
    Xtreme Enthusiast
    Join Date
    Jul 2008
    Location
    kibbler the nibbler
    Posts
    984

    Part 2 of today

    Feser tubing has good kink resistance. I'm using thin wall 3/8-1/2.


    Installed some stuff.


    Did you notice the drain setup is different from before? That's because the original setup interfered with the mosfet sinks.
    So I re-configured a bit. I like this new arrangement much better.


    The orange loop drain valve handle just *barely* clears the mosfet sink without touching. I was super relieved that everything fit.


    View from the top.


    *****

    Idiot me...it seems I either ran out of, or misplaced the rest of the orange tubing. Either I find it again or reorder a few more feet.

  22. #197
    Xtreme Enthusiast
    Join Date
    Jul 2008
    Location
    kibbler the nibbler
    Posts
    984
    Quote Originally Posted by Dangals View Post
    very nice progress kibbler

    I am looking forward to you putting the system together in the case as what you have shown so far is

    Keep it up
    Quote Originally Posted by RCG_Bex View Post
    YAY!!! Nice to see some more work getting done to this!

    ~Bex
    Quote Originally Posted by pcaddict View Post
    Awesome Looking build
    Thanks a lot for the comments guys

  23. #198
    Xtreme Addict
    Join Date
    Feb 2008
    Location
    Australia, Perth
    Posts
    1,167
    Ofcourse we're interested, we just needed pictures!

    Awesome work there Bex

  24. #199
    Xtreme Member
    Join Date
    Mar 2008
    Location
    Finland
    Posts
    250
    That drain setup is sick! It makes me want to do something similiar for my next build

    Just out of curiousity, how much money have you spent to all of those BP fittings
    Not into xtreme builds anymore, just like to keep things silent.
    Asus P6T Deluxe V2 - Intel i7 920 3.6 GHz - 6 Gb 1800 MHz DDR3 - AMD HD5850

  25. #200
    Xtreme Enthusiast
    Join Date
    Jul 2008
    Location
    kibbler the nibbler
    Posts
    984
    Quote Originally Posted by dingdong555 View Post
    Ofcourse we're interested, we just needed pictures!

    Awesome work there Bex
    Thanks man! I'll keep the updates coming.

    Quote Originally Posted by Lagaaja View Post
    That drain setup is sick! It makes me want to do something similiar for my next build

    Just out of curiousity, how much money have you spent to all of those BP fittings
    More than I'd like to admit, but less than you might imagine. For eg all the compresion fittings themselves are Koolance, which are cheaper than BP.

    Good news, I found the misplaced 7ft of orange tubing. The CPU/Mobo loop is now complete except for the final puzzle piece: The shared fill line.

Page 8 of 17 FirstFirst ... 567891011 ... LastLast

Tags for this Thread

Bookmarks

Bookmarks

Posting Permissions

  • You may not post new threads
  • You may not post replies
  • You may not post attachments
  • You may not edit your posts
  •