

Originally Posted by Oliver


rdrash,
Thanks for pics, but to see things...
...we need higher resolution images taken from a shorter distance with no camera flash. Such as those elmor posted in post #2, but of the backside.

You were not supposed to see this.
Ok..sorry about those crappy pics. I will try to get some good ones before the end of the weekend. Did I atleast get the right areas?
Yup, you got pretty much the right places.
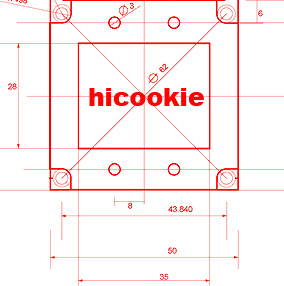
If the camera is capable, macro the areas inside the red squared:

You were not supposed to see this.
Sorry so late to post, I assumed when Elmor posted his pics you guys had all the info you needed. if someone wants to check something with a multi meter PM me.
I have V-Mod info, Please PM if you want to test it. I do not have a card here and need to confirm resistance
QX 9650 5ghz with 1.55v 4.8ghz with 1.5v 24/7 in a VAPOLI V-2000B+ Single stage phase cooling.
DFI LP LT X-38 T2R
2X HD4850's water cooled , volt modded
Thermaltake 1KW Psu
4x Seagate 250GB in RAID 0
8GB crucial ballistix ram
The issue is there's no feasible soldering point on the frontside. The mod itself should be "50ohm VR from pin#9-to-ground" as stated earlier?
You were not supposed to see this.
I should have been more clear. I have the spots to check on the backside. Thanks to W1zzards excellent pics. Visit Tech Power-up and check out his revierw. He generally includes Hi-res pics for us modders. http://www.techpowerup.com/reviews/S...4870_X2/3.html
I do not have a card here so please test before modding. I am not responsible if your card is damaged, please only test if you are comfortable with the risk. Any results or questions I will check in later tonight.
Check from the mod points indicated to ground. multi set to low range. the resistance should be around 2.5 ohm .Voltage read points, of course need to be checked while card is functioning.
Ignore the part about Elmors reading in the pic. I thought he said what resistance , he stated 50 ohm to ground which is for a resistance of roughly 2.25 ohm (resistance X 20 = size of VR recommended) so 20 x 2.25 = 45 ohm so a fifty is fine.
[IMG][/IMG]
[IMG][/IMG]
If the resistance is within spec these should be the mod points. as Elmor stated it should be a 50 ohm VR. PLEASE test before modding, these may not be the proper points!!!
Last edited by jimmyz; 09-01-2008 at 05:53 AM.
QX 9650 5ghz with 1.55v 4.8ghz with 1.5v 24/7 in a VAPOLI V-2000B+ Single stage phase cooling.
DFI LP LT X-38 T2R
2X HD4850's water cooled , volt modded
Thermaltake 1KW Psu
4x Seagate 250GB in RAID 0
8GB crucial ballistix ram
Jimmyz I measure 2.7 ohm's on your 1st picture (the one near the letter D) & 1.6 ohm's on your 2nd picture (the one near the letter U)
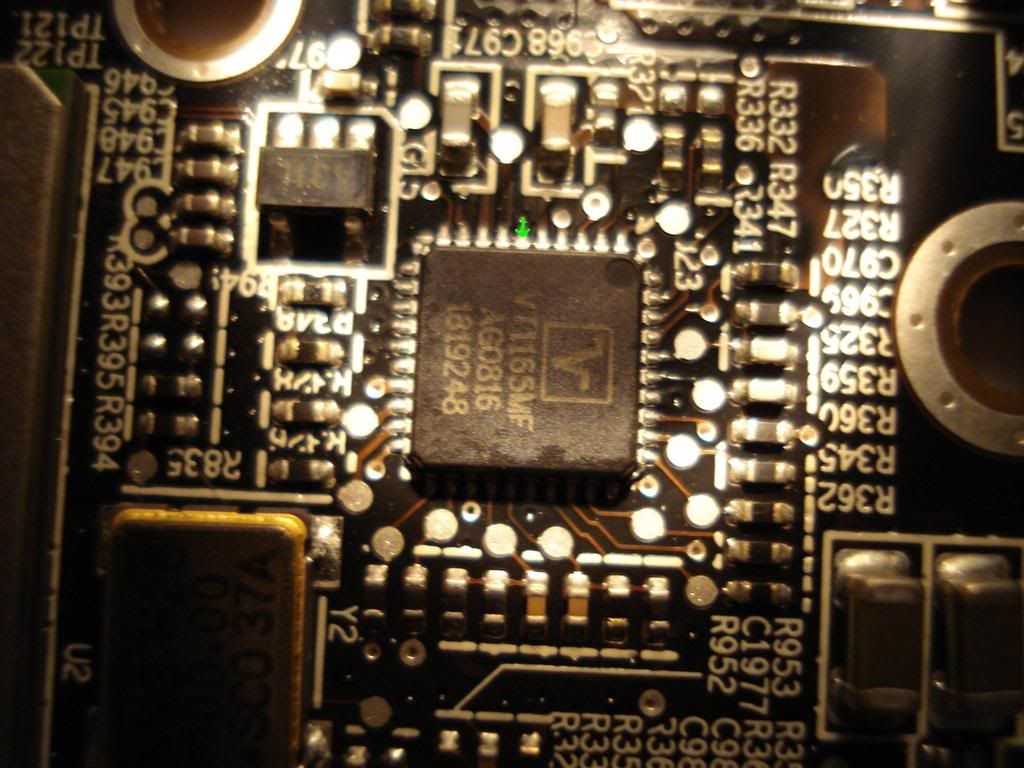
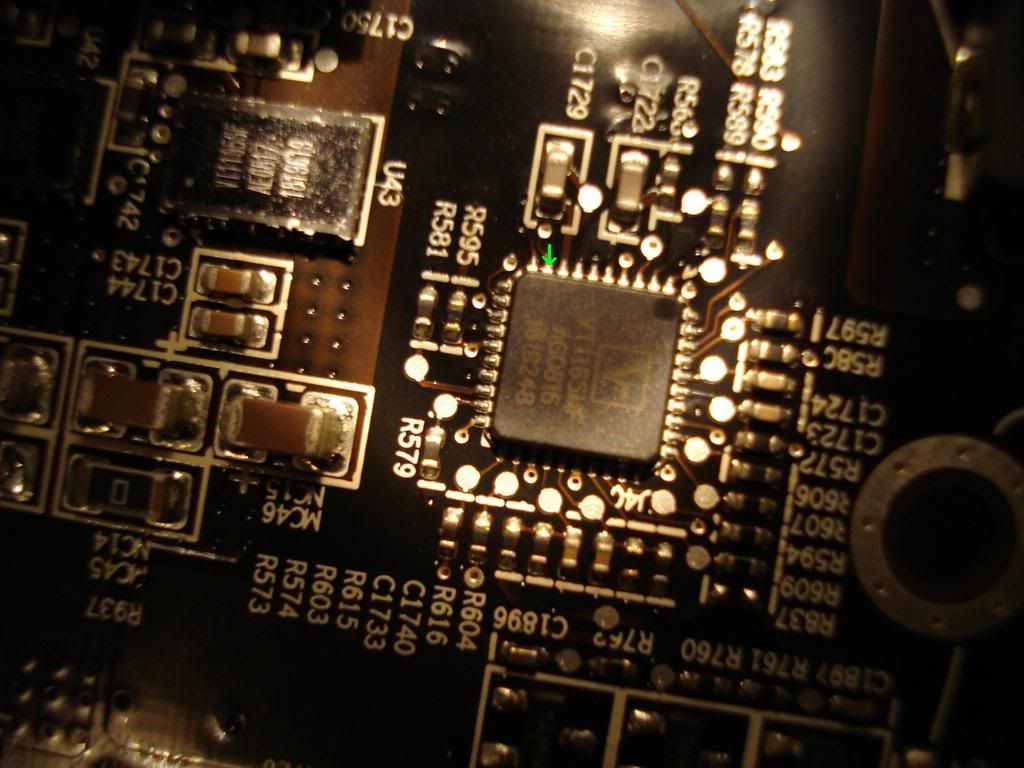
I also checked the continuity through the board to the pins marked by the green arrow in my pics below. I dont have the schematic for the VT1165MF chip but my marks are in 2 different places which obviously cant both be pin 9.
Also has anybody looked into memory volt mods yet?
This 1st pic is the VT1165MF chip near the PCI-E power connectors
This 2nd pic is the VT1165MF chip near the Pulse chip.
Home / Play Rig Asrock Z87 OC Formula/AC, i7 4770K L310B487, 8GB Corsair Dominator Platinum 2666 CL10, BeQuiet Dark Power Pro P8 1200W PSU, 120GB Corsair Force GT SSD, 2 x 1TB WD Sata Drives Mirrored, Palit 680GTX JetStream, Antec Kuhler 920, Windows 10 Pro, Logitech LX700 Deskset, AOC 27" Monitor.
Work 24/7 Rig Gigabyte GA-Z97X-SOC Force, i7 4790K L418C133 ,8GB Team Xtreem LV 2600, PC Power & Cooling 850WPSU, 120GB OCZ Vertex 3 SSD, 2 x 500GB Hitachi Sata Drives Mirrored, Antec Kuhler 620, Windows 10 Pro 64 Bit, Logitech LX700 Deskset, Benq 27" Monitor.
Home NAS DFI P35 T2RL Motherboard, Intel E6850 CPU, 8GB Nanya DDR2 6400, 2X 2TB Toshiba DT01ACA200 SATA Drives, ZFS RAID Mirror On Intel ICH9 AHCI, Artic Blue 850W PSU, Marvell Yukon 88E8053 Gigabit Ethernet, FreeNAS 9.2.1.5 RC, 64-Bit On 4GB USB2 SanDisk Cruizer Blade Thumb Drive.
will look into this thanks for the info.
QX 9650 5ghz with 1.55v 4.8ghz with 1.5v 24/7 in a VAPOLI V-2000B+ Single stage phase cooling.
DFI LP LT X-38 T2R
2X HD4850's water cooled , volt modded
Thermaltake 1KW Psu
4x Seagate 250GB in RAID 0
8GB crucial ballistix ram
Anybody found the right vmod soldrings points??
The man with the littel Barebone!
And proud Crew of!!!
Octeamdenmark.com
Shuttle SX38P2Pro Barebone E8600cpu and HD4870X2 gfx and 2gig Crusial Ballistix PC8500 Cl5 and 2x150gig Raptor in raid 0 and 1x750 gig seagate
Msi 790FX-GD70 Mobo Amd 955-965 PHII cpus and 2gig Crucial value PC10600@800mhz 7-5-5-15 1T
And 4x500GB Seagate 7200.12 in raid0
4xHD5770 in CFQ.
[SIGPIC][/SIGPIC]
the top one's resistance is 2.7 and 50ohm VR does the trick,
the botom one's resistance is 1.7 and 50omh does nothing, so prob wrong point
OC-Lab.si!!
Thanks ghz, i got information from pmp
Sorry guys, Had a big holiday weekend here in the U.S. I looked everything over again and all i can suggest is checking resistance of this point to check it.
[IMG][/IMG]
Photo courtesy of Tech Power up. http://www.techpowerup.com/reviews/S...4870_X2/3.html
QX 9650 5ghz with 1.55v 4.8ghz with 1.5v 24/7 in a VAPOLI V-2000B+ Single stage phase cooling.
DFI LP LT X-38 T2R
2X HD4850's water cooled , volt modded
Thermaltake 1KW Psu
4x Seagate 250GB in RAID 0
8GB crucial ballistix ram
pic/info of the mods below
from mouse
for gpu#2 you have a solder pad point on the backside as stated in the guide at XS
for gpu#1 solder directly to pin#9 of the ic controller
jason said to use a mag headset and a needle point sodler iron tip and once the wire is soldered to cover with hotglue and or AA epoxy as the area is so small/tight you dont want the wire to come loose and or break off
Ill try take pics of the cards when I install EK blocks when they come in stock.
The cards with fans at 100% have no problem at 860/960 inside the case with vgpu on both set at 1.305v load

Win7 64 Ultimate
i7 930 - 4200mhz 24/7 - Dtek v2
ASUS P6X58D-E
2 x MSI 6970's xfire
3 x 2gb G-Skill 2000mhz
Samsung 27" LCD
SilverStone ZM1200w psu
2 x 300gb WD Velociraptors Raid 0, 4TB storage
PS3-used mostly for bluray and media server
do you have a pics of that pin#9 soldering ?
OC-Lab.si!!
@zbogorgon: those pin so tiny and it's really a pain in the ass for finish this connect
i use a pair of 500 Ohm VRM coz i don't have any lower available on hand. Now we happy with the result. Our card is suck 1.10V idle mean 1.33 Full load stuck @ 820/950. Anyway, if any one find out another better spot pls sharing us here, i think due to the super thin wire may be when down to sub zero this connection will be apart anytime

AMTECH - Vietnam
http://forum.amtech.com.vn
that's for sure that I won't be soldering this, but I will try to find beter spot
does anyone know resistance from this point to ground without vmod ?
OC-Lab.si!!
mine yell out ~ 2.9Ohm compare to 3.2Ohm of the first GPU
Before do the pin9 direct solder, i do have try alot for find out another spot, but i'm a looser ... hope that you can help us
AMTECH - Vietnam
http://forum.amtech.com.vn
Someone think a pencil mod will be possible ?
(Sorry for my bad english)

Impossible, Rfb resistance is too low for pencil mod on this card.
MSI MOA 2009 RU #1 | MSI MOA 2010 RU #1 | MSI MOA 2010 EU #8
Gigabyte GOOC 2010 RU #5 | Gigabyte P55 OC Challenge RU #3
ASUS Open Overclocking Cup 2012 #5 | Techlabs Cup 2013 RU #1
Hardware reviews and voltmodding guides
sh*tit 100% sure ?
Can we add more voltage with a flahs bios ? (exemple the 4850 1.15 to 1.21)
You can try out this one
LINK
How I can gain max with a bios flahs ?
upper the clock speed and volt, and chill the card better
Howto:
Flash so the volt is 0.05v or 0.1v more then default and clock it with a app. and test it with furmark for stability, now you need to flash the bios again with the new clock speed's.
I belive it is one bios for each GPU so flash master and slave GPU
Last edited by Norway; 09-03-2008 at 06:59 AM.
Sorry you have miss understang me, How many volt I can won with a flahs bios ?
exemple 4850 4850 1.15v to 1.21v with a bios flahs but 1.26 to how with a 4870x2 ?
 Posting Permissions


 Reply With Quote

Bookmarks