1366 CPU Heatsinks Round 2
Noise Blocker Twintek Xigmatek Thors Hammer - ThermoLab Baram
Introduction
After the success of my previous heatsink round up, Im back with round 2. This time however, only with 3 heatsinks instead of 4 respectively. Mid range heatsinks feature this week from some well-known and respected manufactures. And 2 of which are more known for they fans.
The NH-U12P SE2, which featured in the last round up, was a bit over whelmed against the likes of the Prolimatech Mega Shadow and Thermalright Venomous X. Lets see if its more at home with its mid range counterparts.
Before we crack on, I would like to thank Noise Blocker for sending me they Twintek cooler. Ive had the Twintek for just over 4 months; Noise Blockers tolerance is greatly appreciated.
Xigmatek was also kind enough to send me they Thors Hammer for the round up. And last but by no means least Watercooling UK for providing the Thermolab Baram.
Noise Blocker Twintek
Black noise begin its life back in 1991, offering retail and wholesale trade with selected and tested quiet PC accessories. But it wasnt to 2000 with the launch of the Noise Blockier Branding, did they become the first company in Germany to systematically and successfully take up the theme of silent PCs. Since 2005 the companies own products and corporate customers exceeded the figures for third-party products for the first time. Since then the trade with third party products was reduced or discontinued completely in some cases.
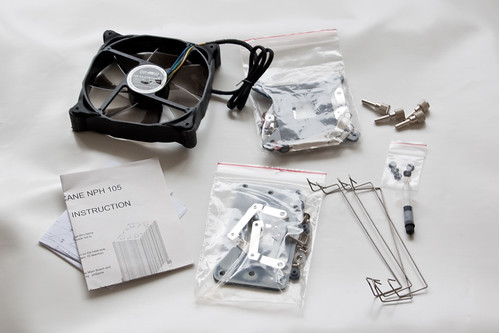
An Overview of what is included:
Twintek Heatsink
Instructions
Thermal Interface Material (TIM for short)
Mounting Hardware
2 Sets Of Fan Clips
One M12-P fan
Intel and AMD Backplates
Thermalright Sticker

Noiseblocker have spent a fair amount of time on the design of Twintek box. Although the box it is just a basic oblong Structure its the 2d wire fame drawings, which are major draw factor just like Noctuas NH-U12P SE2 in the last round up.
The wire frame drawings which are present on two out of the six faces, are an exploded view of the heatsink its self. This is a great feature as it allows the end user to see how much work has gone into the Final Product.
On the back of the box you will find the all specification data for the both the heatsink and the fan.


Once inside the box, you will find the M12-P fan and the heatsink package. The heatsink package is a separate brown cardboard box, which houses the Twintek heatsink and the accessory package. In the accessory package you will find all the mounting hardware and the instructions.
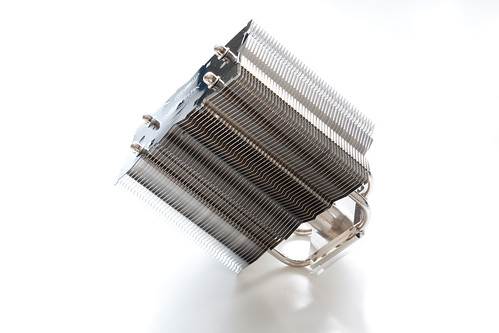
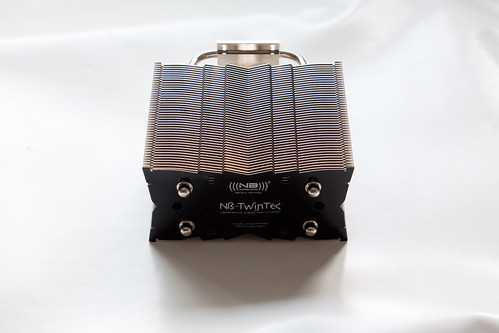
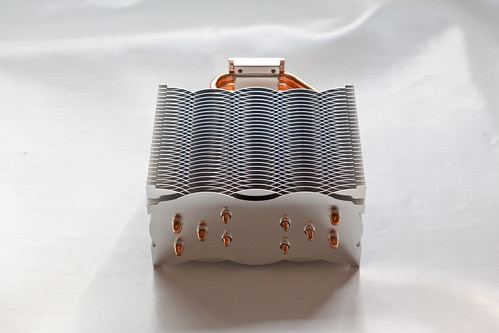
The heatsink is the last remaining piece in the box, surrounded by a white cardboard strip around the heatsink. The nickel-plated heatsink weighs in at 660 grams and its dimensions without fans are 130 x 63.8 x 158mm (W x D x H). Two 6mm and one larger 25mm Super Conductor heat pipe run though the 45 fins, which are 0.40mm thick and spaced out at 1.5mm spacings. The top fin is powder coated black with white writing.
Xigmatek Thors Hammer
Xigmatek Co LTD. Founded in 2005, with targets of becoming one of the worlds leaders in thermal PC products. Xigmatek is one of the worlds most efficient manufacturing operations with over twenty R&D engineers, product designers and technical people. (One main team in German).
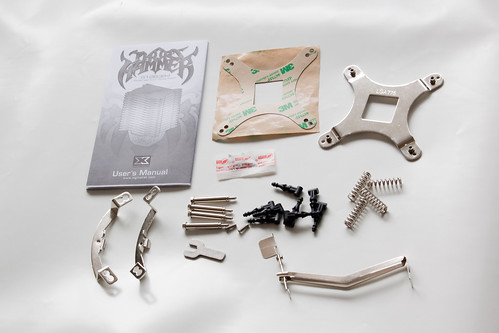
An Overview of what is included:
Thors Hammer Heatsink
Users Manuel
Thermal Interface Material (TIM for short)
Mounting Hardware
2 Sets Anti Vibration Fan Clips
Intel Backplate
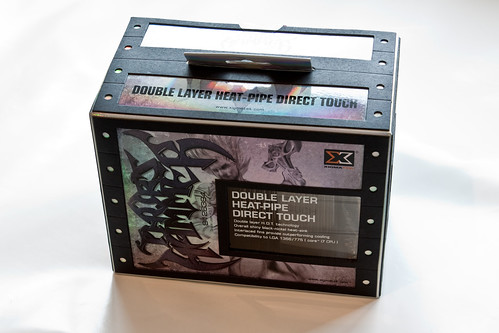
As I have said on many occasions and Im about to sound like a broken record. But first impressions are set very high on my list of priorities. However on this occasion the box design and theme is a bit over the top.
The box is made out of shiny cardboard, which is sliver in colour and has a black cardboard border. The box has two clear plastic windows, tat allow you to see the heatsink though the box. The back of the box holds all the specification for the heatsink. However there is one point I like about the box and that is the Thors Hammer sketch on the front and back.
Once you lift the top of the box off, you will find the accessory pack to one side of the heatsink. The accessory pack contains all the mounting hardware you will need to mount the Thors Hammer. The accessory pack comes in clear plastic zip tie bag, which is reusable.
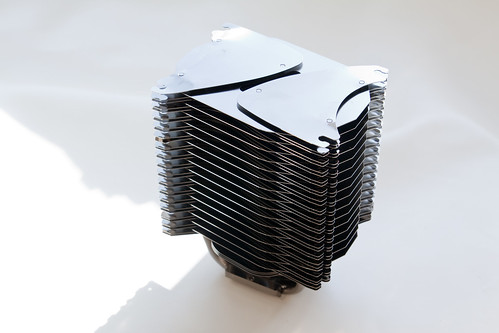
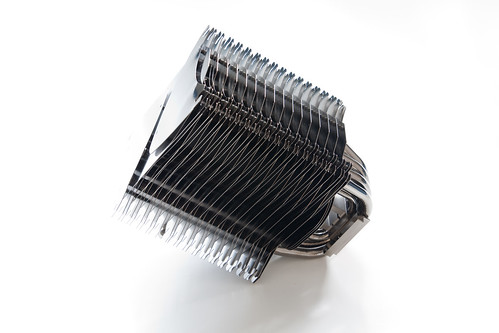
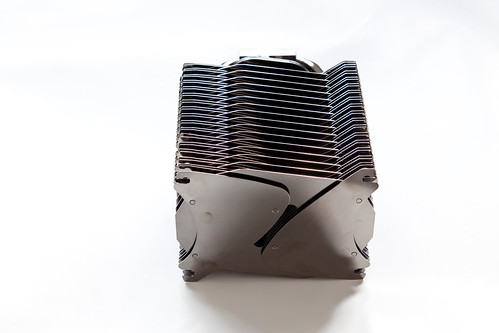
The heatsink is the last remaining piece in the box, secured in clear plastic casing at each end hold and support the heatsink in the box. The black nickel-plated heatsink weighs in at 800 grams and its dimensions without fans are 120 x 90 x 160mm (W x D x H). Four 8mm and three 6mm heat pipes run though the 51 Double Layer fins, which are 0.5mm thick and spaced out at 2mm spacings.
ThermoLab Baram
Thermolab was established in 2004 as a private company based in Korea and later in 2005 changed over to a corporation body as ThermoLab Co., Ltd. Still not very well know and producing a string of thermal control products.
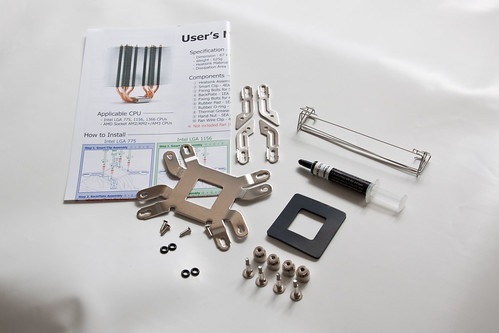
An Overview of what is included:
Baram Heatsink
Instructions
Thermal Interface Material (TIM for short)
Mounting Hardware
2 Sets Of Fan Clips
Intel and AMD Backplate
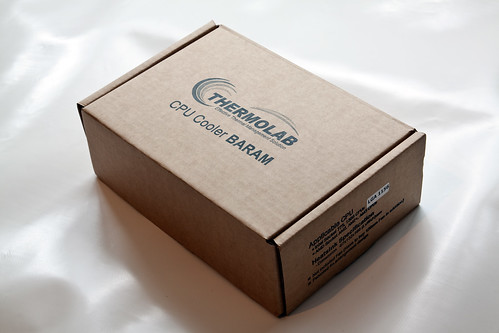
Unlike all the other heatsinks in both round ups to date, this is the first to be shipped in a brown box. And in some cases less is more, and in this instant it suits the product. Its simplistic packaging has the logo and the cooler name printed on the box as well as the meaning of Baram, Which is Korean for Air Flow.

Once you lift the top of the box off, you will find the users manual and Intel Backplate. The accessory pack and the heatsink are stored in a removable brown cardboard shell. Once you remove the removable inner cardboard housing the accessory pack can be found in the fold out pocket on the bottom of the heatsink. The accessory pack contains all the mounting hardware you will need to mount the Baram.
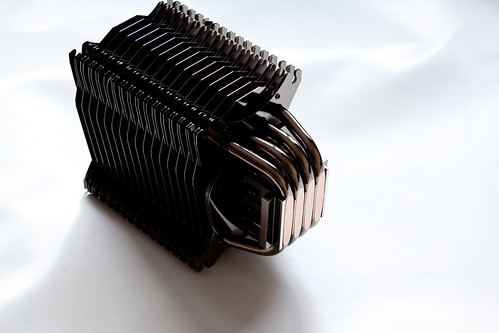
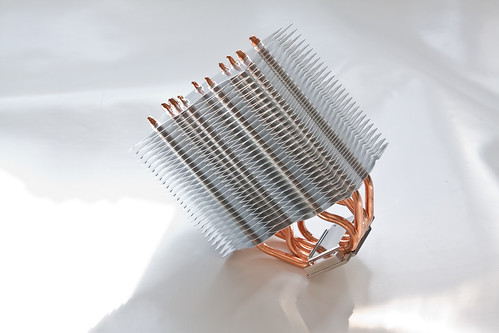
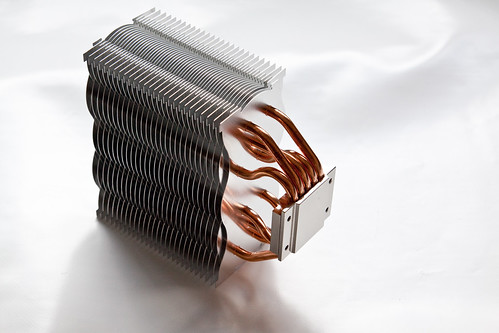
The heatsink is the last remaining piece in the box, wrapped in a clear plastic bag. The nickel-plated heatsink with copper heatpipes weighs in at 625 grams and its dimensions without fans are 132 x 67 x 160mm (W x D x H). Six heat pipes run though the 54 fins, which are 0.50mm thick and spaced out at 1.5mm spacings.
Thermal Test Specification
A 5-mount test with 1hour with each mount, 40 minutes warm up and 20 minutes of temperature logging.
The 1366 Test Setup is as follows: Intel Core i7 920 D0 which is at stock 2.66GHZ (no lapping) running on a Gigabyte UD5 Extreme Motherboard. 6GB (3x2GB) of Patriot Viper DDR3 1600MHz Memory - the motherboard cooling is stock with no extra airflow. Video card is a BFG 9800GXS, also on stock cooling but the outer casing removed. The power comes from a Zalman 850W Modular PSU; Samsung 500GB hard drive split into 2x250 GB partitions. Test case is a Le Chuck Test Bench, which has horizontal mounting.
Each cooler is tested with one, two and no fans. Each is repeated 5 times with 40 minutes warm up and 20 minutes of temperature logging.
oEach cooler is run with no fans (Passive), this is to see its thermal threshold. Its ability to hold and disperse heat without airflow.
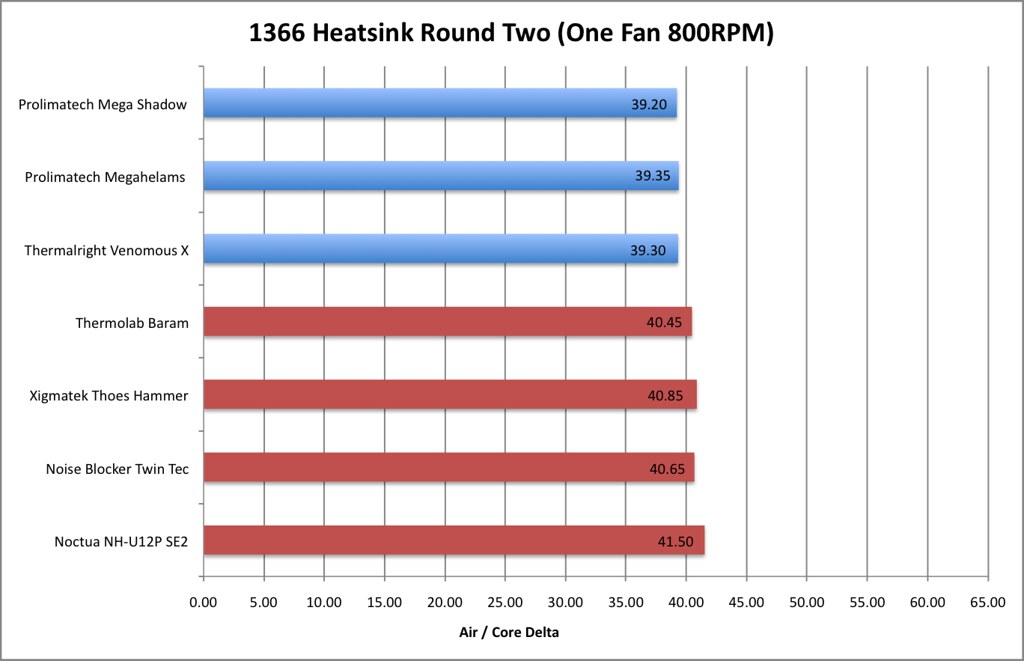
oOne-fan testing is deployed into 2 sections. The fan is run at 1300 and 800rpm controlled via a Crystalfontz 635.
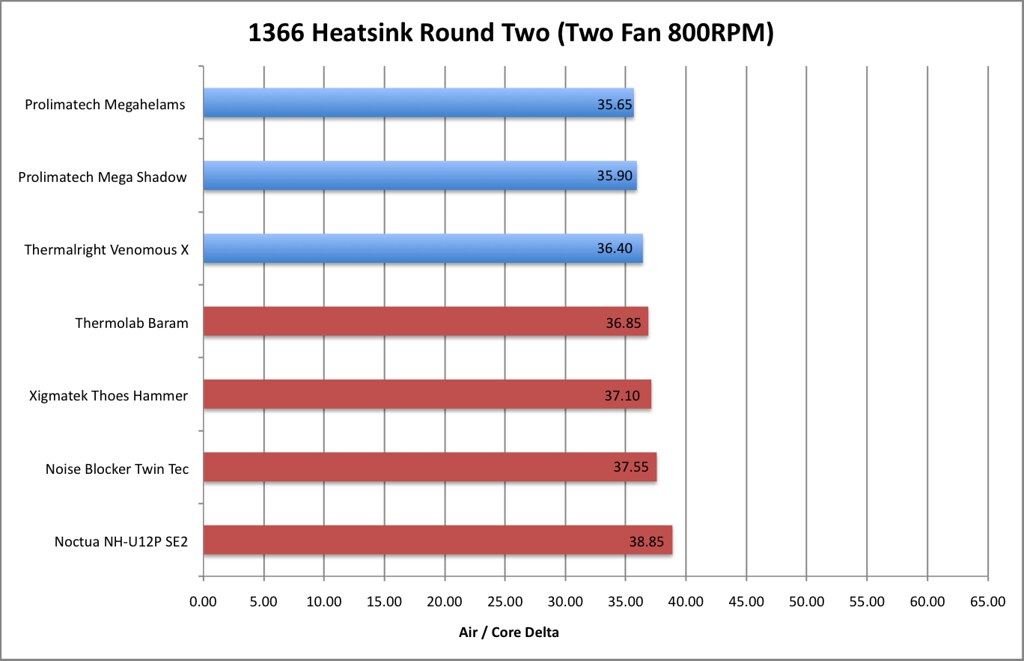
oTwo-fan testing is deployed into 2 sections. The fans are ran at 1300 and 800rpm controlled via a Crystalfontz 635. Where applicable the fans are lined into a push pull configuration. This means one fan is pushing air though the heatsink and the other is pulling it thought the other side. Adding more pressure and hopefully gaining better temps.
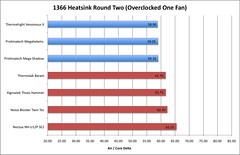
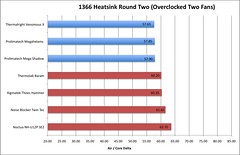
Each cooler is tested at overclocked settings with one, two and no fans. Each is repeated 5 times with 40 minutes warm up and 20 minutes of temperature logging. The overclocked CPU settings are 20x200MHz which is equal to a modest 4GHz overclock.
oEach cooler is run with no fans (Passive), this is to see its thermal threshold. Its ability to hold and disperse heat without airflow.
oOne-fan testing ran at 1300rpm controlled via a Crystalfontz 635.
oTwo-fan testing ran at 1300rpm controlled via a Crystalfontz 635. Where applicable the fans are lined into a push pull configuration. This means one fan is pushing air though the heatsink and the other is pulling it thought the other side. Adding more pressure and hopefully gaining better temps.
The same fans which are used on each heatsink are Noctua's NF-P12 120mm Fan.
The thermal interface material (TIM) I use is MX-2 like most other enthusiasts and testers alike, with it working as soon as you apply it (no break in time like AS5). Also being non conductive, conductive could become a problem with multiple applications per test and multiple coolers.
The TIM application method I use is the dot in the center. (Small pea sized dot applied to the center of the CPU, then when block is Compressed TIM is spread evenly across the cores of the CPU), Recorded data is only used if the TIM application is good after inspection on remount (my way of validating my results). The CPU is cleaned after every mount using Arctic Clean.
I have 18 temperature probes across the test bench, 10 Dallas DS18B20 Digital one-wire sensors positioned as follows; 2 x Heatsink Fins, 4 x Air In, 4 x Air Out and 4 Intel DTS in the CPU.
Temperature logging is recorded via my Crystalfontz 635, Using they WinTest V1.0 software for the Dallas one-wire sensors (Air). WinTest automatically logs temps and outputs them to .CSV files. OCCT V3.1.0 is used to log the core temps using the CPUs built in DTS sensors, which are also automatically outputted to .CSV files. The .CSV are loaded in to Excel where the data in analyzed and interpreted into Graphs.
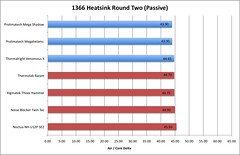
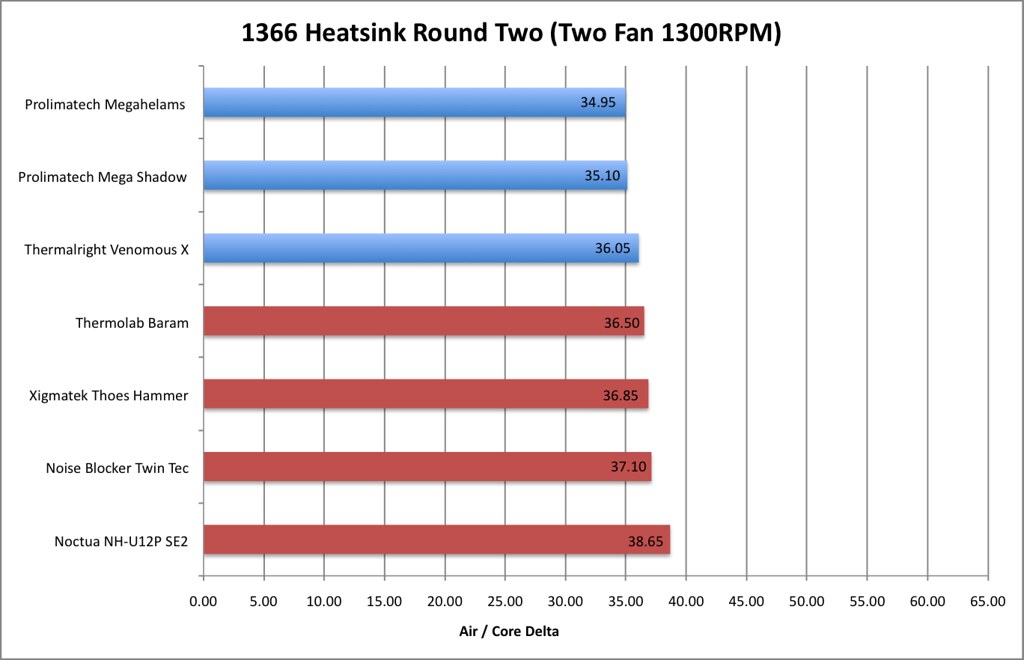
Thermal Test Results (Stock)


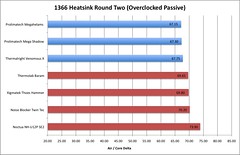
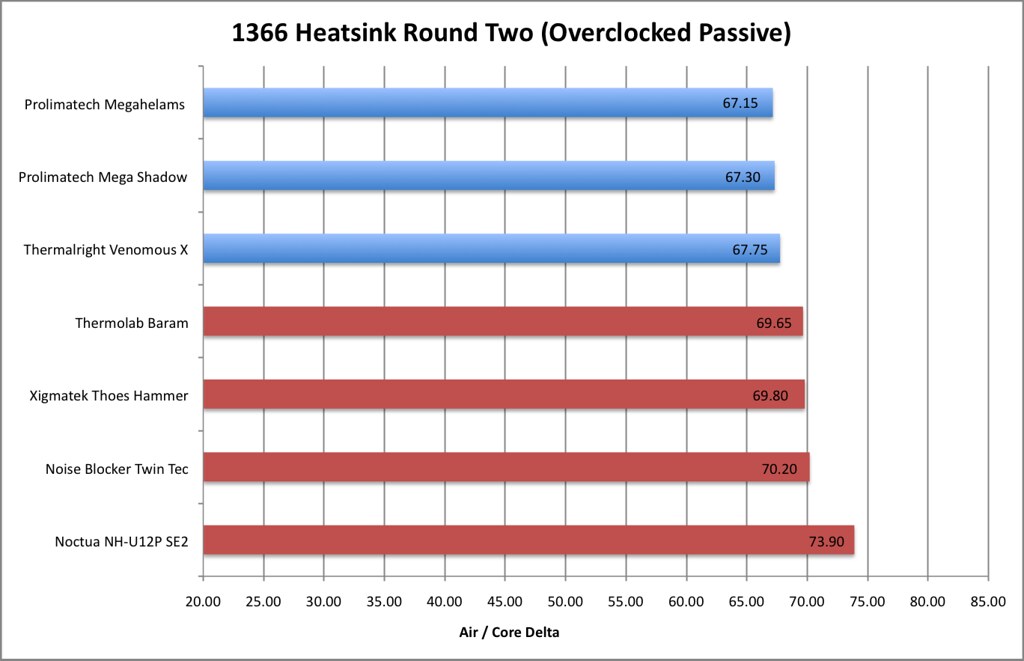
Thermal Test Results (4GHz Overclock)


 Reply With Quote
 Thanks to your great reviews, I have chosen the slim Venomous X

 . I have big respect for anyone who takes they time to test things for the community. The more results the better, I look forward to reading your results
  .
.


Bookmarks