-
InWin 315
Introduction
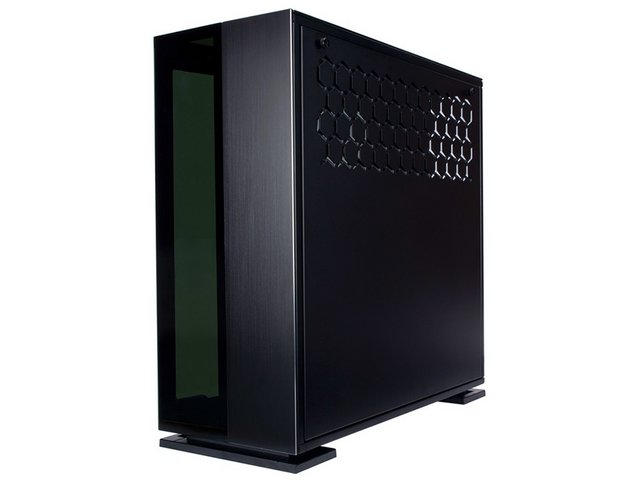
InWin is one of the oldest manufacturers of PC cases and power supply units. Unlike most other companies, InWin has remained almost exclusively focused on the design and marketing of PC cases, AIO's and PSUs rather than trying to diversify into other areas of the market. Today InWin is offering one of the most comprehensive selections of cases, ranging from low-cost towers to entirely unique designs. Well, we continue our momentum with this time, the InWin 315 test! The InWin 315 case is designed to become the basis of a gaming-grade desktop computer with an unusual design. As a reminder, this model is based on the 303 chassis. However, there are some differences, especially in the design and materials. On this version, we have a front panel and an upper part split in two combining aluminum and tempered glass creating an eye-catching contrast in appearance.

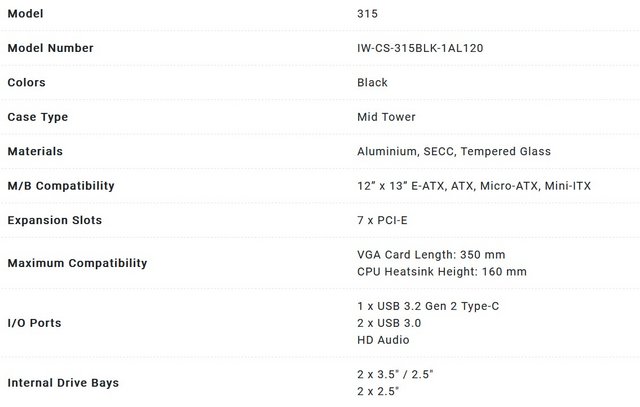
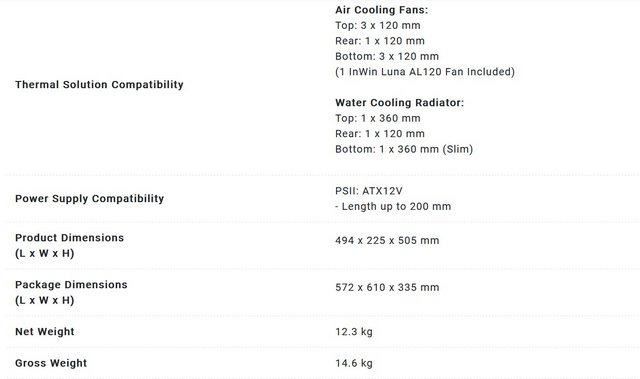
Specifications.
Packaging & Contents
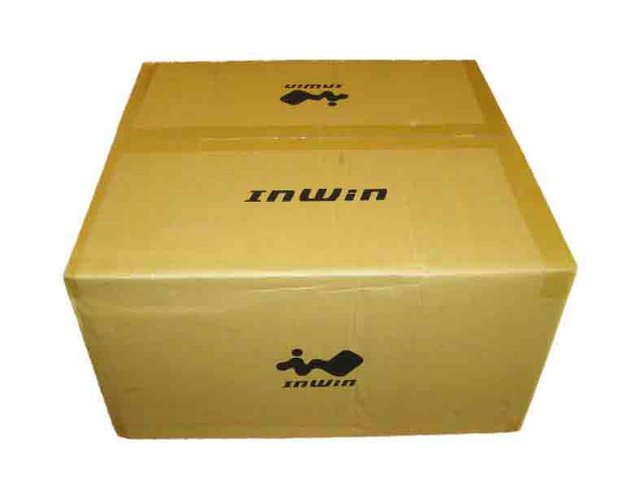
The case ships in a really big box, which is unusual for a unit that can be considered traditional when it comes to its overall dimensions.
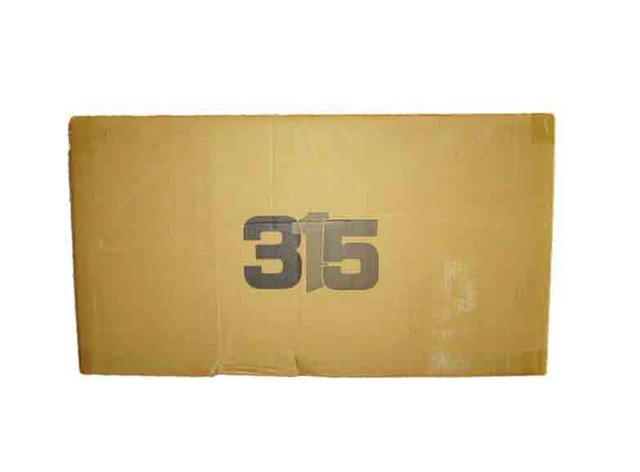
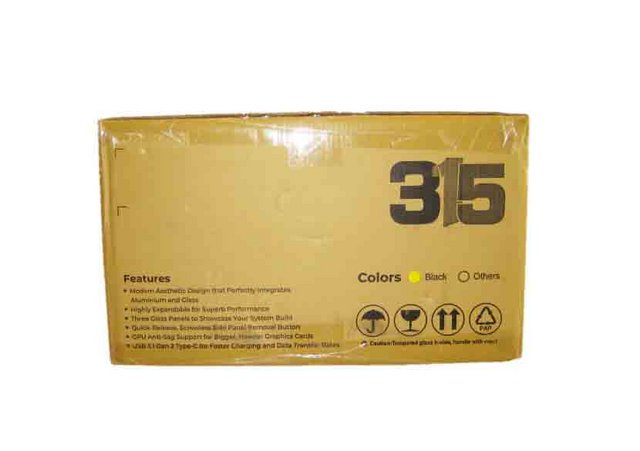
The two opposing sides here show the product name on one side, while the other has the InWin naming.
There are six listed features. There is also some compliance/safety iconography at the bottom right. Above the icons is the color indication, which is black in our case, and the only color the 315 comes in at the time of writing. There is an "other," which makes us wonder if another hue is in the works.
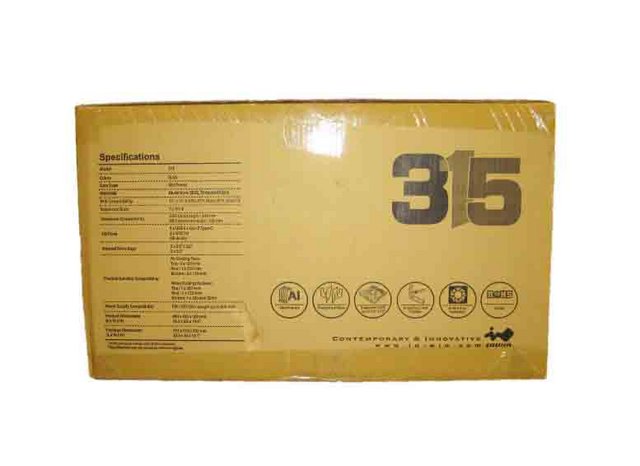
The final side of the packaging has the 315 naming, along with a copy of the specification table.
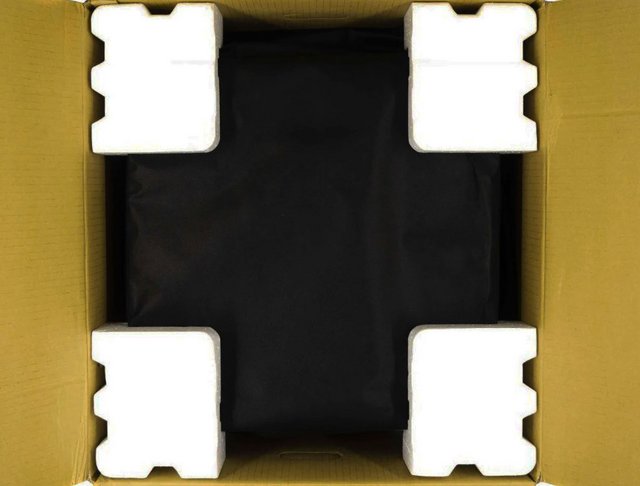
The chassis is protected in styrofoam and a soft black cloth like bag. There were no noticeable scratches, dents, fingerprints, dust, mud or graffiti spray on it whatsoever.
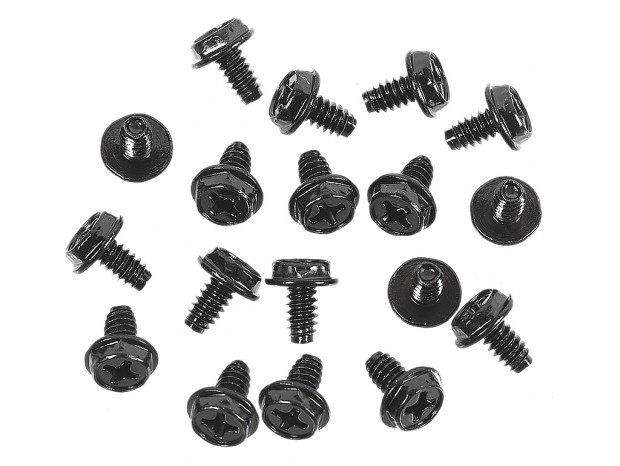
Getting the case out we find a zip lock bag filled with all of our screws and accessories. The paper manual is not included, and the PDF manual is viewed from the attached QR code. I'm afraid that PDF, which can be enlarged rather than seeing small letters on paper, is convenient for me, and I don't necessarily need a conventional manual.

The accessory array is large and enough to easily build the N515. Here is everything you get in the package:
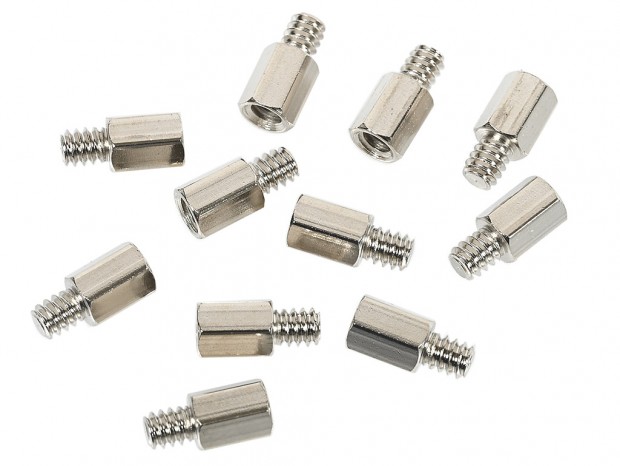
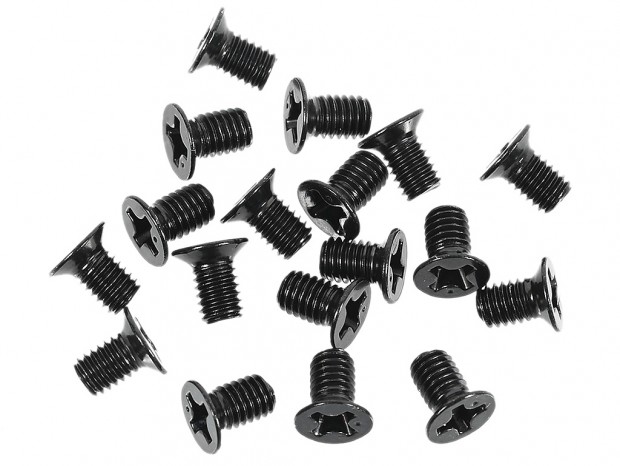
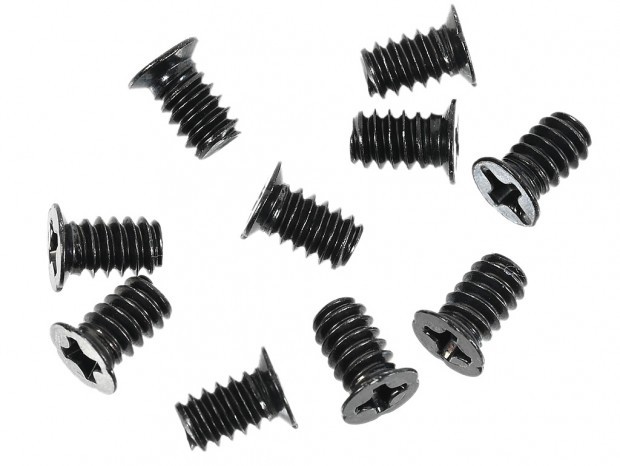
11x Motherboard standoffs
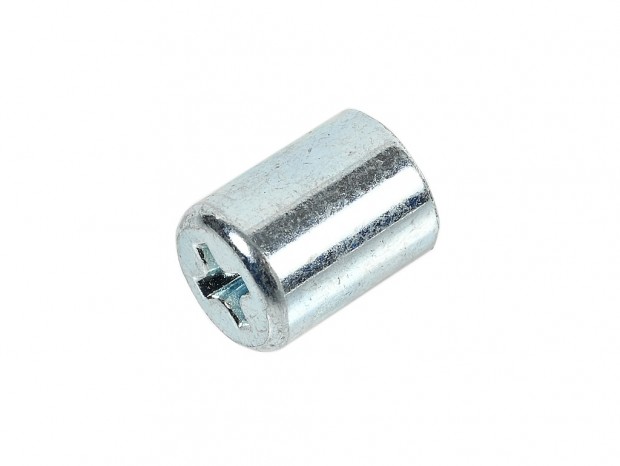
1x Motherboard stand-off socket
1x Standoff tool
18x Hexagonal head screws (motherboard and PSU)
18x 2.5" HDD screws
10x 3.5" HDD screws
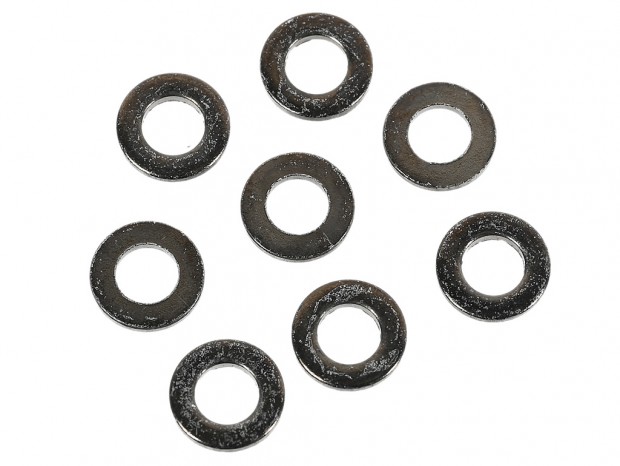
8x Water cooling washers
1x GPU support bracket
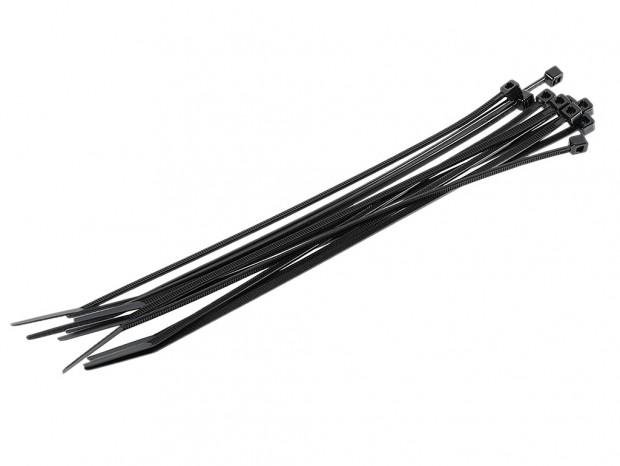
10x Zip ties
The accessories are adequate to build the rig. It also does appear that InWin opted to give a few extra screws across the board to ensure that if you lose one, you have extra over the life of your rig.
A Closer Look- Outside
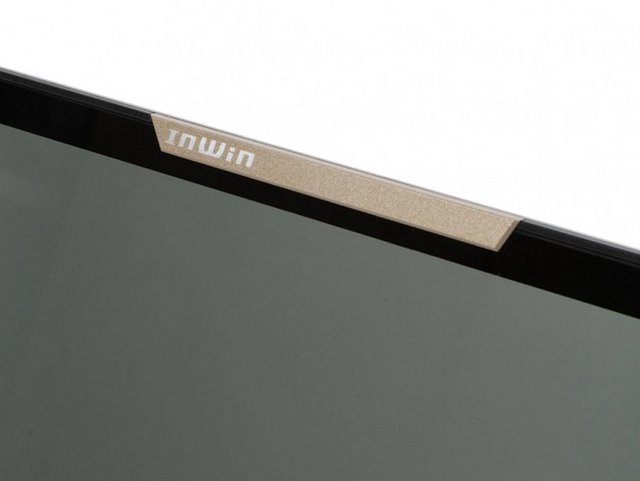
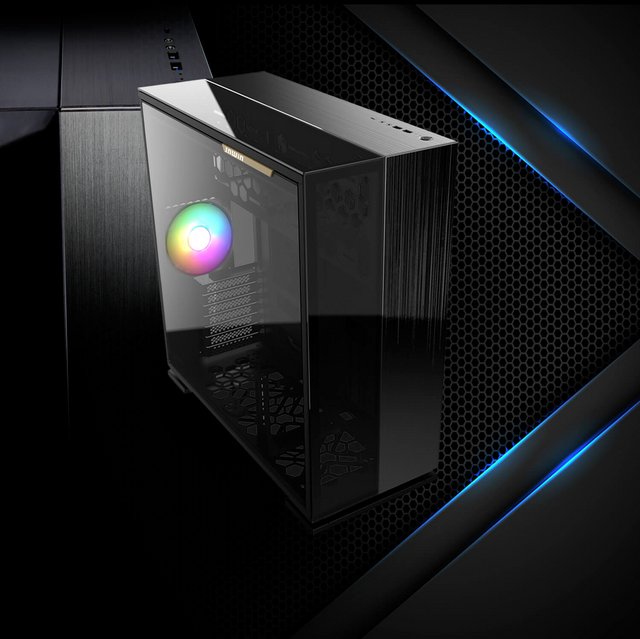
We attack this test by the measurements of the 315. Here, the case is not particularly compact since it measures some 225 mm wide by 494 mm deep and 505 mm high. It may be said that the size is close to that of a full tower. The weight is 12.3kg, which is heavy for a middle tower PC case. One of the factors is that tempered glass is used not only on one side panel but also on key points. In terms of materials, we have tempered glass, aluminum and steel. By the way, the width of both the aluminum on the right side and the tempered glass on the left side is about 105 mm. This balance is inherited by the top panel design. The edges of the aluminum are carefully treated with a diamond cut finish. You can see the height of the texture at key points.
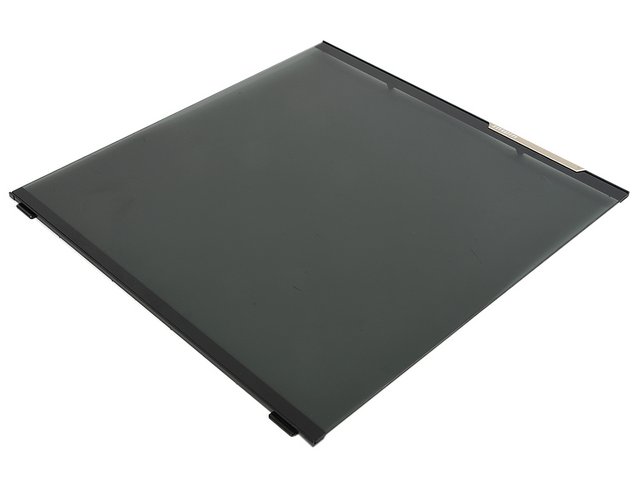
The design of both side panel materials is also inherited from the left and right split design. The left side panel is made of 3mm thick tempered glass and is made of smoked colored glass as well as the front and top. ABS resin plates that also serve Τhe glass part is a square with a width of about 455 mm and a height of about 455 mm. To remove it from the chassis, push the quick release button at the top of the back to unlock it. It can be attached and detached without tools and screws.
A gold plate with the InWin logo is attached to the upper edge.
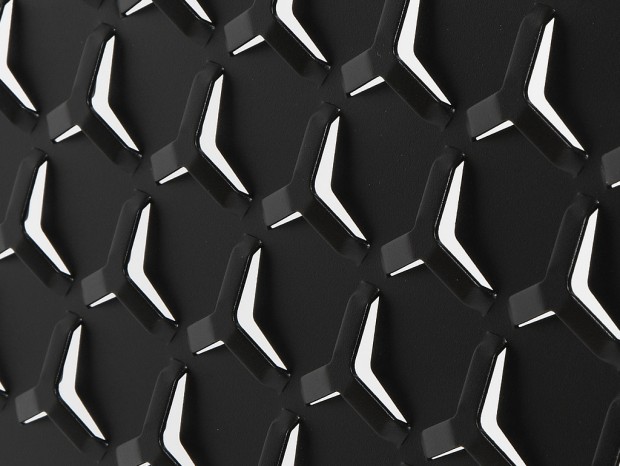
On the other hand, the right side panel is made of 1.2mm steel. Except for the exposed part of the rear chassis, the only exterior panel is made of steel. The characteristic is the ventilation hole at the top. The hexagon design, which is familiar to In Win PC cases, plays the same role as a vent.
The quick release button is not adopted because it is attached and detached less frequently than the left side panel. To fix it to the chassis, screw the top and bottom of the folded part on the back with a hand screw.
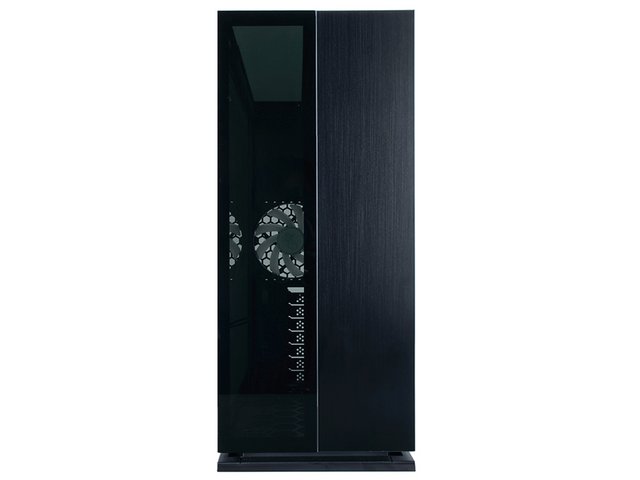
The front panel design may be the biggest feature of 315. Looking straight ahead, the right half is made of hairline-processed aluminum, and the left half is made of smoked tempered glass. There is no extra decoration, and by using different materials while being flat, the design is inflected and the beauty is emphasized. Perhaps the number one reason many owners around the world chose 315 is design. There is no place or space for 5.25" drives, so optical units are a thing of the past. The front panel cannot be removed. I will explain the internal structure in detail later, but the 315 does not have a space for adding a cooling fan on the front panel, and of course it cannot be equipped with a radiator.
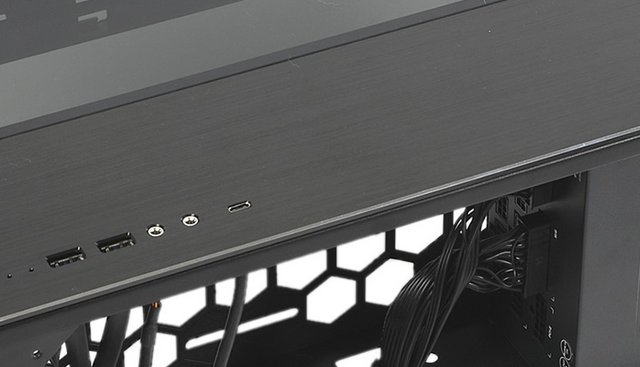
The switches and access ports are laid out in front of the right side of the top plate. The interface unit contains a USB 3.1 Gen.2 Type-C port, two USB 3.0 connectors, a microphone and headphone jack. The control panel will therefore allow us to connect a lot of things.
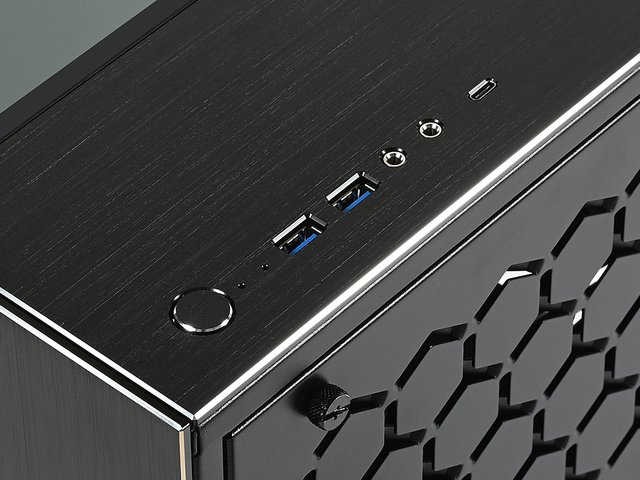
Observing the top panel, in terms of practical use, there are only a few switches and access ports, and there are no ventilation holes or any additional space for cooling fans.

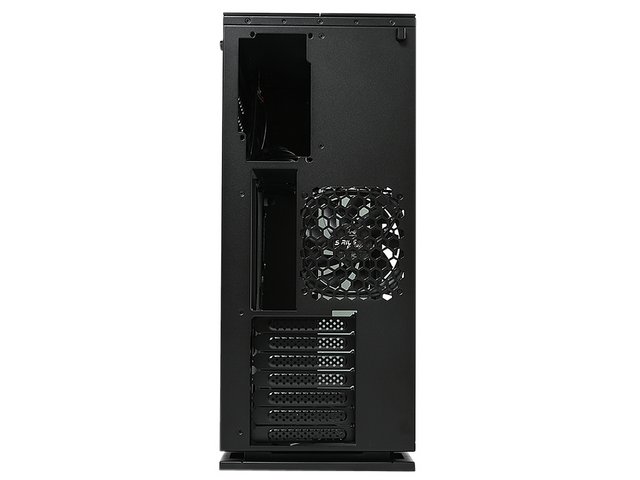
The layout of the rear panel is probably the most important part of the 315, which has begun to realize that its original design is the key point. On the back, which only feels strange, there is an opening in the space for mounting And on the left side of the middle row is the back panel I / O opening of the motherboard, on the right side you can see the standard 120mm fan, and on the left side of the bottom row is an expansion slot with a horizontal layout. From this, it can be imagined that unlike the normal internal structure, at least the mainstream bottom cover is not equipped. Also, the top mount of the power supply unit was the basis of the previous generation, but it seems to be In Win that it is placed vertically.
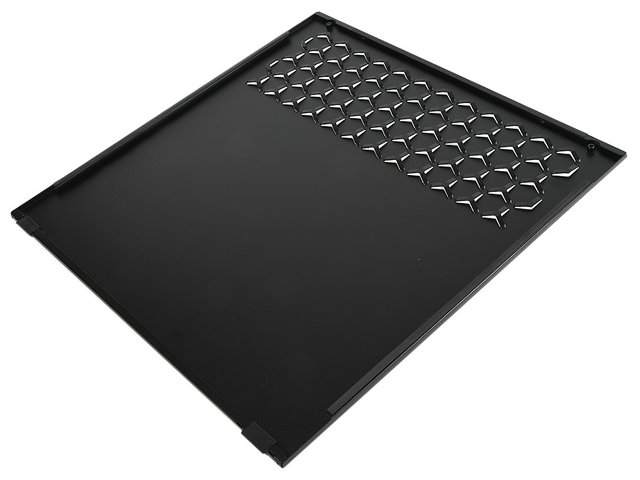
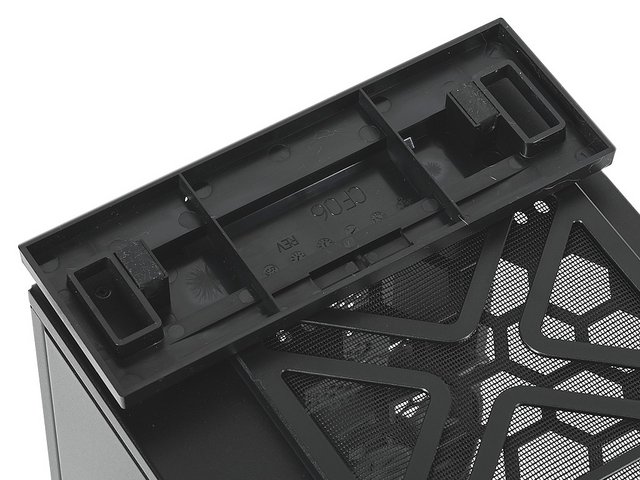
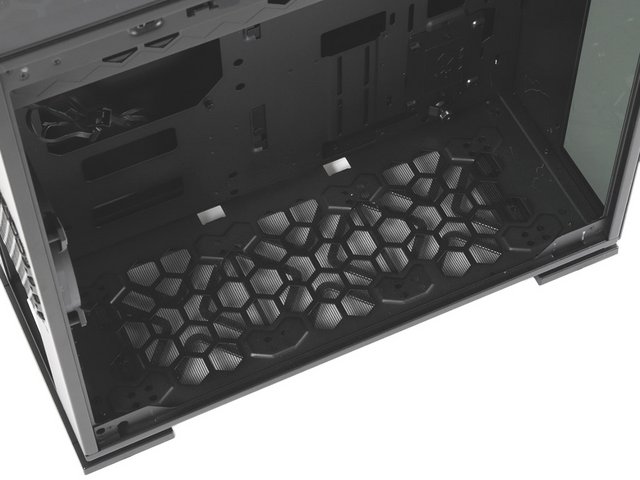
Turn the main unit upside down and check the state of the bottom panel. Once you've assembled the components, you probably won't have a chance to hit the bottom with this style. The large-format slide-removable dust filter is actually measured to have a width of about 150 mm and a length of about 375 mm. Since it is made of plastic, it can be washed with water to remove dust. The bottom of the chassis has a large honeycomb-shaped ventilation hole.

The front and rear pedestals are made of plastic, and small non-slip (measured length about 18 mm, width about 11 mm) are already installed in 4 places. Really ready to support the heavyweight class.
A Closer Look- Inside
In order to get inside the case, you won't bother removing a lot of screws. Indeed, the InWin 315 comes with a screwless system for the glass panel, which is quite practical. On the other side, two hand screws and the panel is removed, that's it, it's done! The lock mechanism slides by pressing the quick release button.

Inside, the layout changes from the productions we are used to seeing. Thus, the card takes place in the bottom of the case vertically. The power supply will be installed vertically at the top, hidden behind a honeycomb grid. Here, however, we find a large backplate access as well as a few cable passages, few however.
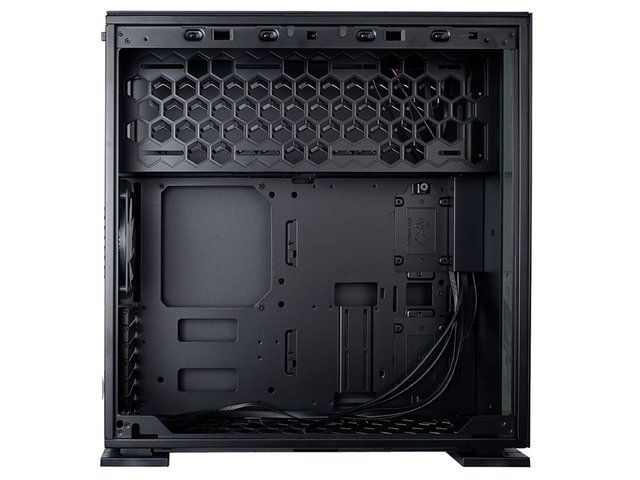
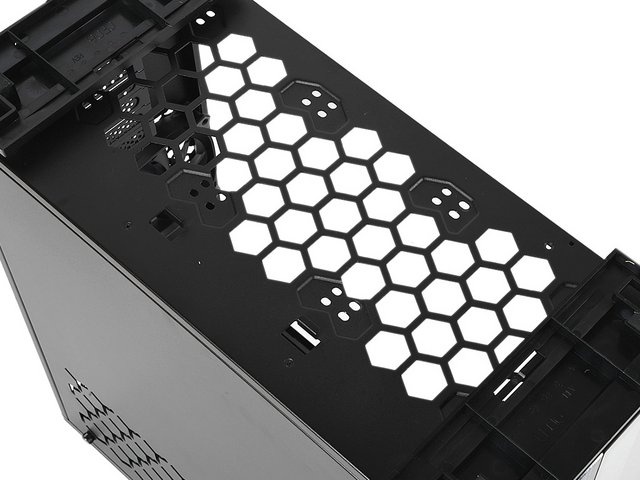
Due to the characteristic internal structure of 315, the airflow layout is also original and interesting. What all InWin products that adopt this style have in common is that they are being designed, probably for the purpose of optimizing the airflow layout. According to InWin's product data, the airflow direction is to the right, so if you want to place the main unit on the right wall, you may need some space. Unlike many PC cases, there is no additional space for a cooling fan on the front panel. The top area is prepared instead. This is also unique, without using the top panel part, and a honeycomb-shaped ventilation hole is provided on the surface extending vertically from the ceiling. A maximum of 3 120 mm fans can be installed here. Basically, if it is a radiator, 120/240 / 360mm size can be fixed.

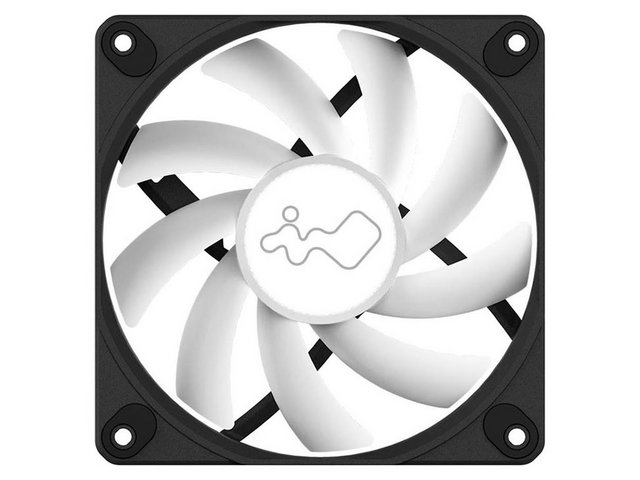
The rear fan is structurally located in the middle of the PC body. The Luna AL120 120mm fan is standard equipment here from the time of shipment. It is also possible to install a radiator. With a support size of 120mm, this is the place to go if you're looking for the most basic all-in-one water cooling unit.
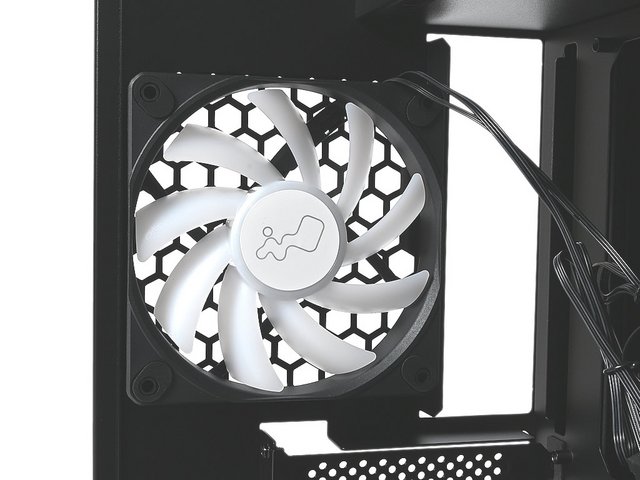
The Luna AL120 uses sleeve bearings and has a service life of up to 30,000 hours. Excellent cost performance, especially if you purchase a pack of 3, an ARGB controller is included.
The first storage space is the area on the right side of the motherboard tray accessed from the left side. Two 2.5-inch SSD expansion trays are prepared in a place directly behind the mounting space that uses the back wiring space. By the way, the 303 has the same specifications, but in the 315, the upper tray cannot be moved to the empty space on the left.
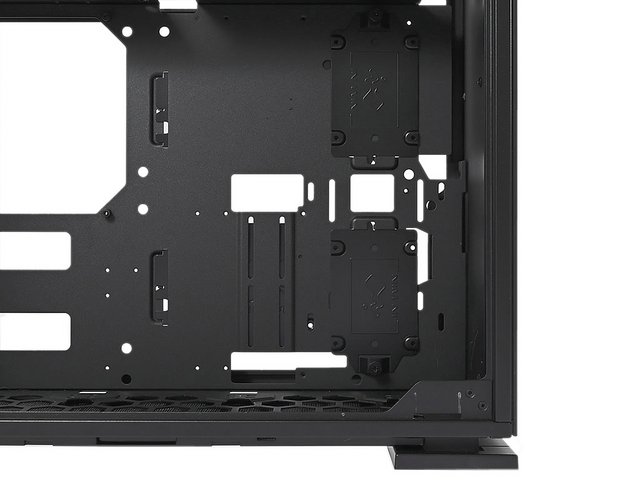
Those trays are for 2.5" inches only. SSD is fixed with 4 screws on the bottom. The upper/lower parts has hand screws. Therefore, the connectors will be fixed facing each other.
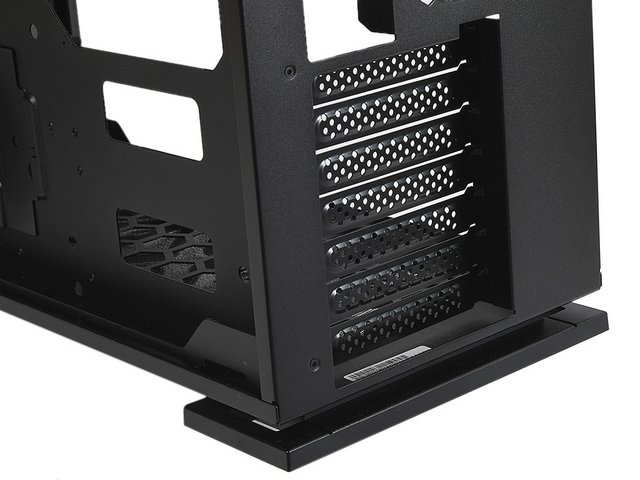
Since there is no bottom cover, the expansion slot is located in the lowest area of the main body. A total of 7 expansion slot fittings were provided with ventilation holes, and each was fixed from the inside with a hand screw. There is space that could be installed, but it seems that the style is not very aggressive. The effective space of the graphics card is up to 350 mm in length. In the installation test of the final session, I would like to check the peripheral clearance again.
The bottom part is also provided with a cooling fan expansion space comparable to the top part. While handling as an option, up to 3 120mm fans and 120/240 / 360mm radiators can be installed. By the way, according to the spec table, only the 360mm size radiator has a "slim" note added.
The recommended airflow layout is intake air that takes in outside air from the outside.
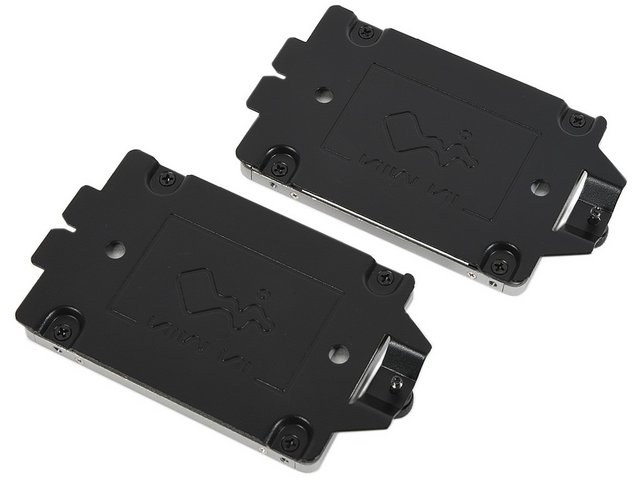
By the way, the attached "VGA support stay" is fixed to the bottom (inside) before shipping.

At the rear, the cable management mechanism is a little different because the internal design is different from the usual "unique route". Its main part is in the vertical top mount of the power supply unit. Looking at the motherboard tray surface, there are clearly fewer through holes than a normal middle tower PC case. The back wiring space on the back of the CPU socket is actually about 30 mm.
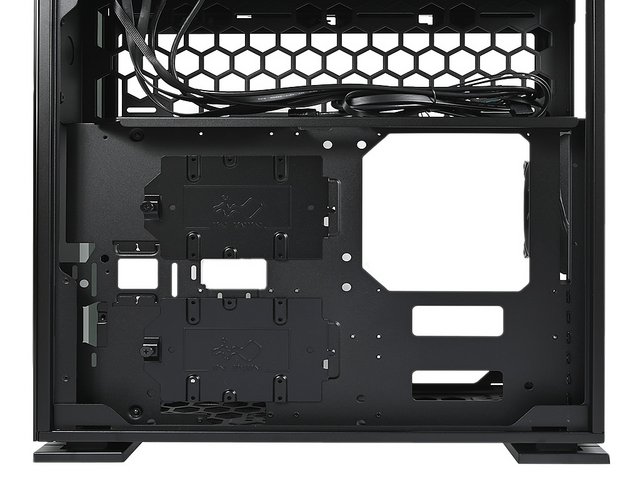
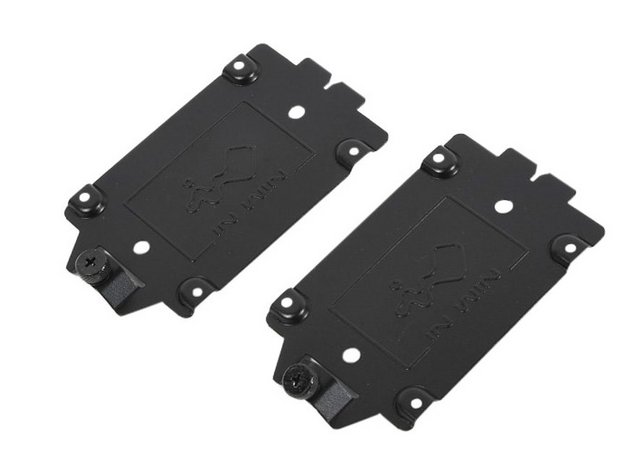
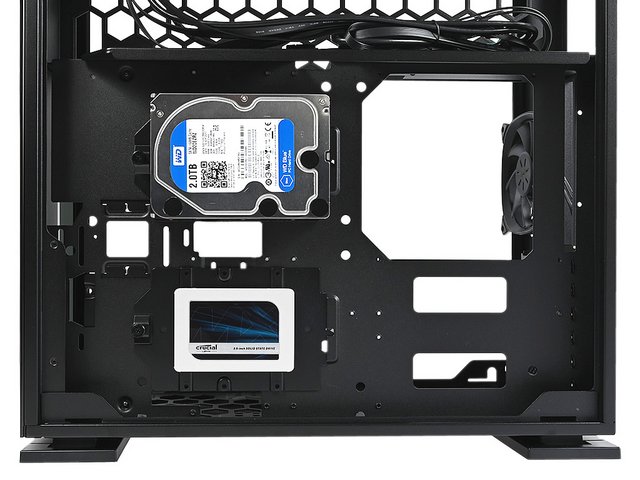
Two trays are fixed with one hand screw near the front right of the 315. This is a 3.5-inch HDD expansion space, and the tray also has a hole for mounting a 2.5-inch SSD, so up to two storage units can it can be said that it is one of the designs that effectively utilize the back wiring space with simple equipment without any mechanism such as tool-free.
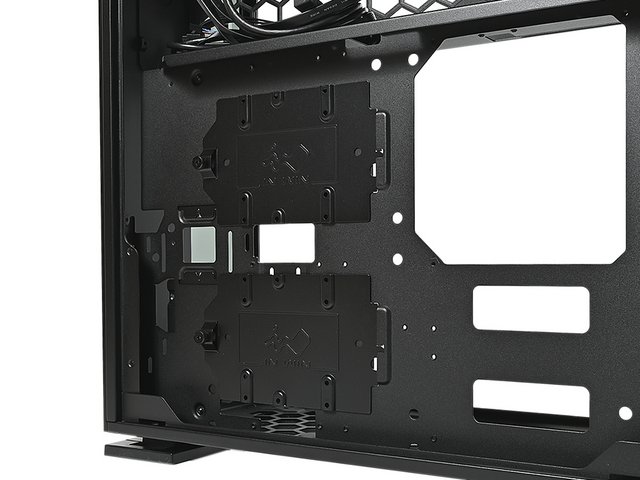
The trays are made of black painted steel and has the InWin logo pressed. Both 2.5-inch SSD and 3.5-inch HDD are fixed by screwing from the back.

InWin is good at designing the power supply unit to be top-mounted. It is also unique when it is placed vertically, and you can feel the intention accordingly. The mounting space that can be taken in and out from the right side supports up to a depth of 200 mm. It seems that it will be necessary to check the positional relationship with the added top fan later. It's location is unfortunately not equipped with anti-vibration systems. Finally, we can note the presence of a single cable passage at this level.

Through hole at the bottom of the power supply unit mounting space. The main cable extends from here to the main area.
All the cables within the InWin 315 are sleeved black and of the default variety when it comes to the I/O and basic case elements.


Installation Process & Finished Looks
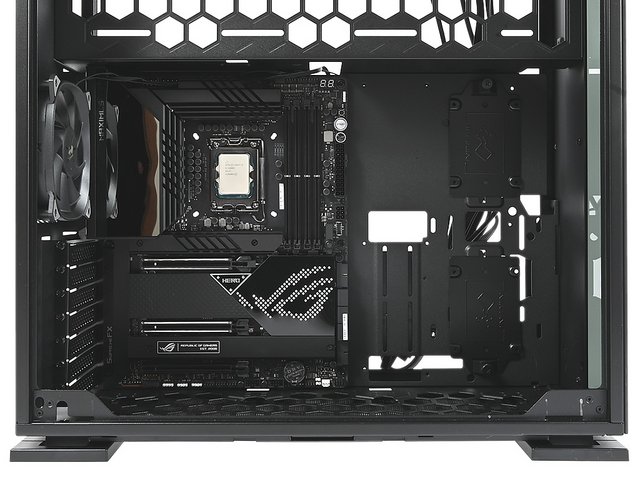
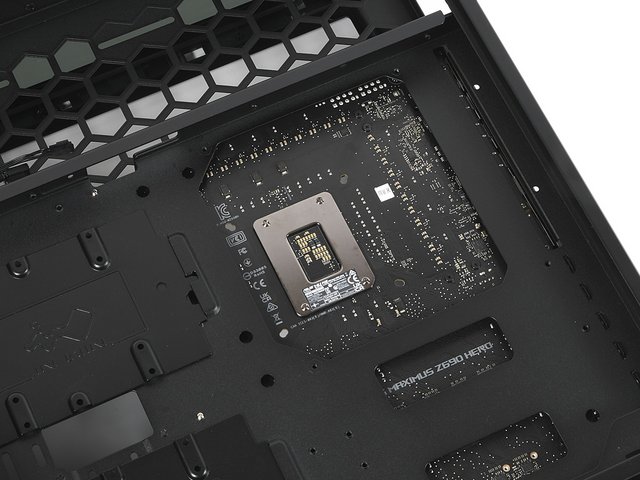
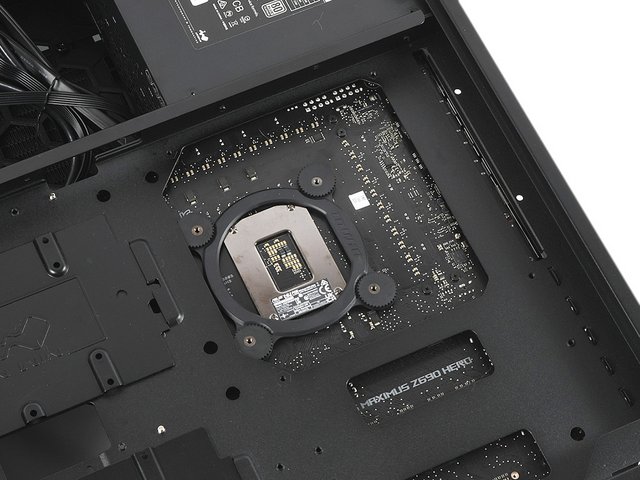
It is time to gather some gear and build us a PC. I am not going extraordinary with extensive and custom liquid cooling etc. We'll be building a system that you guys would build at home. The first thing to do is the motherboard. For this installation test, we prepared the LGA1700 motherboard ASUS ROG MAXIMUS Z690 HERO adopted by the 12th generation Intel Core processor. There is no problem with the installation work itself, but only four standoffs are pre-installed, and five must be installed by themselves. Also, it may be convenient to have a screwdriver with a long shaft with almost no empty space at the top and bottom. The clearance after mounting is about 210mm up to the front panel in the right direction. The upper part with a slight gap was about 5 mm.Everything fits easily, even E-ATX sized motherboard has plenty of clearance.
The gap at the top is as small as about 5 mm. If you have a motherboard with a large heat sink, do some work in advance, such as handling the rear cooling fan and connecting the ATX 12V power cable connector.
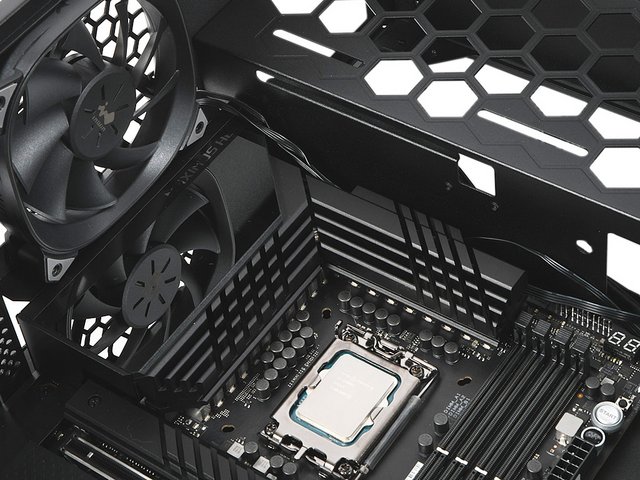
After fixing the motherboard, actually measure the effective space of the CPU cooler and the maintenance hole. The CPU cooler supports heights up to 160 mm. It's an average number for a middle tower PC case, but it's a bit tough for a large CPU cooler that is oriented toward ultra-high end. There is a service hole in the lower left corner. To use this, prepare a screwdriver with a long shaft (around 200 mm).

When the opening of the CPU cooler maintenance hole was measured from the back of the motherboard tray, it was actually measured to be about 147 mm wide and about 155 mm high. Visually, the back plate attached to the motherboard and the screw holes for the CPU cooler are also exposed. The cables can be well managed. The amount of tie-downs does mean that you have to be a bit more judicious with your cable routing if you want the tied down and proper look. I would like to see a CPU EPS connector cutout in future chassis just to make the run not have to be across the top of the board. However, if that does not matter to you, the area has a large enough gap that everything can sit back here out of sight, and nobody would be the wiser.
The power supply unit is fixed vertically on the top mount. The mounting procedure is to slide the power supply unit body from the right side in the open state and tighten it with four inch screws from the back.
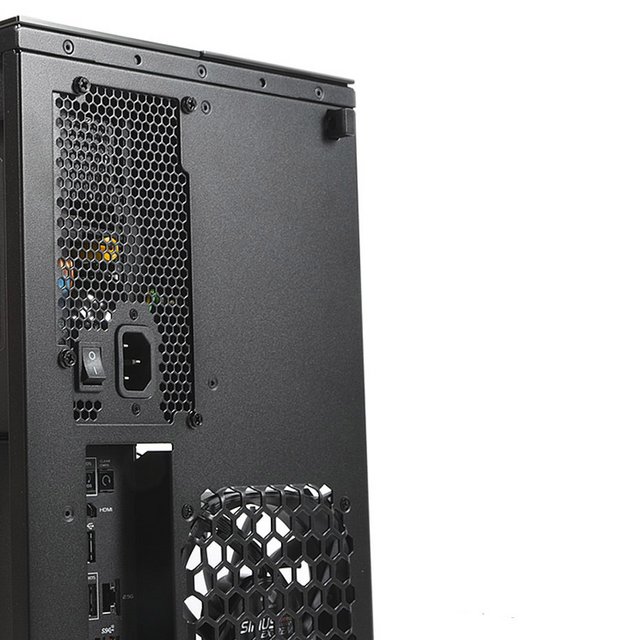
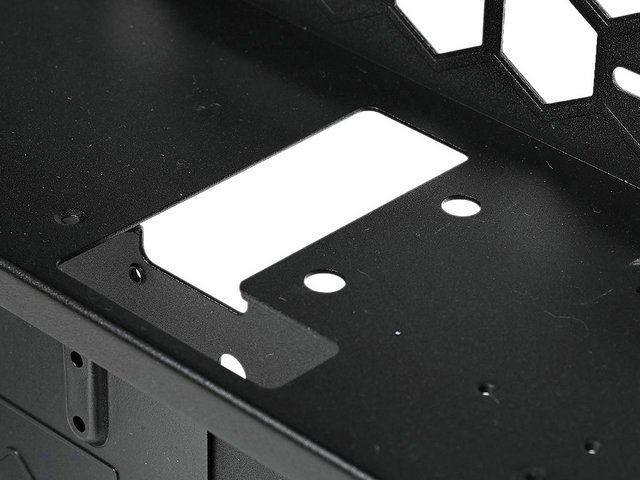
The power supply unit with a depth of 180 mm can be easily fixed to the effective space of 200 mm. When checking the clearance after mounting, a large space of about 300 mm is left up to the front panel in actual measurement. It's an empty space that can be used as a storage space for extra cables, but why is the power supply unit kept at a depth of 200 mm? The reason was the position of the through hole. A through hole through which the ATX24pin connector passes is provided on the bottom of the power supply unit mounting space. The hole located at a distance of 45 mm from the depth of 180 mm of the power supply unit is the way that the cable extending from the "almost the only" power supply unit goes out to the main area on the left side. This is extremely important, and if it is blocked, there is no hole for the cable to pass through. In other words, 315 consisting of the top mount of the power supply unit does not hold. A space for mounting a power supply unit that seems to have a high degree of freedom at first glance due to the vast space. However, it turned out that the existence of through holes actually imposes restrictions.
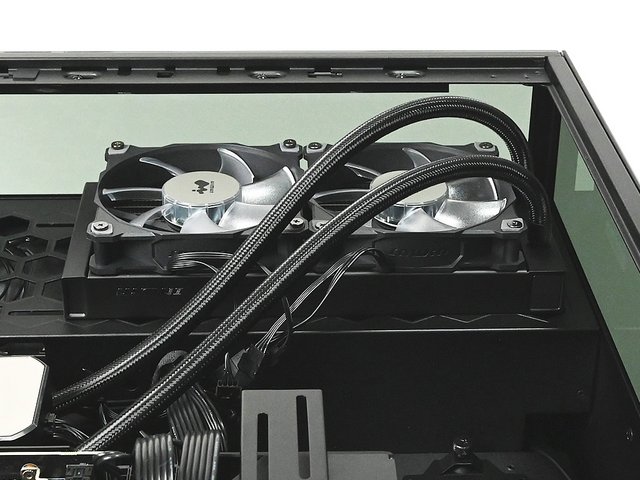
Here, we change the rear fan to Sirius Extreme ASE 120.

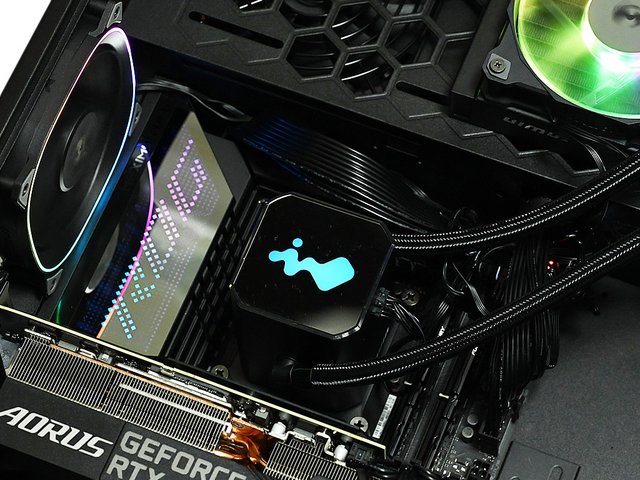
Now that you have installed the motherboard and power supply unit, let's install the all-in-one water cooling unit. I prepared In Win SR24 PRO. It is a 240mm size radiator model and has a built-in patented twin turbine in the pump. The head of the aluminum water-cooled block is equipped with an ARGB compatible logo LED. It mounted vertically on the top. Because the inside of 315 is wide, the tube length of 400mm is just barely enough. However, it fits well without stress.
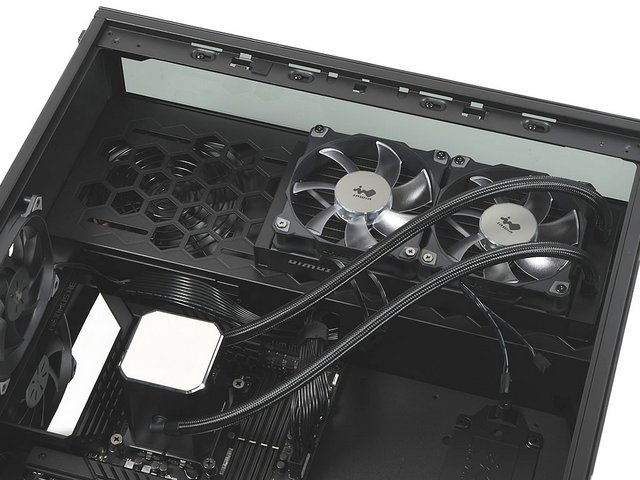
First, screw the radiator to the top from the right side, and then screw two 120mm fans from the left side. The water block with built-in pump was fixed using the retention for LGA1700 that was ordered separately. Wiring work remains, but if you look at the completed drawing, it will look like it fits neatly. I was a little busy with the fixing work on the right and left sides, but this is not limited to 315, so it is not a negative point.
Here, I would like to mention the location and size of the radiator. The 315, which has a distinctive internal design, has the power supply unit installed vertically and top-mounted. The area directly behind this is the additional space for the cooling fan. Up to 3 120mm fans can be installed, and a 360mm size radiator can be mounted naturally. Certainly, in the example image of In Win, a 360 mm size radiator is installed here and the high cooling system is completed, but it feels a little strange when the intake fan of the power supply unit and a part of the radiator are in a state of being covered. Anyway, when testing the N515 with a 360 mm size radiator we didn't face heat issues.
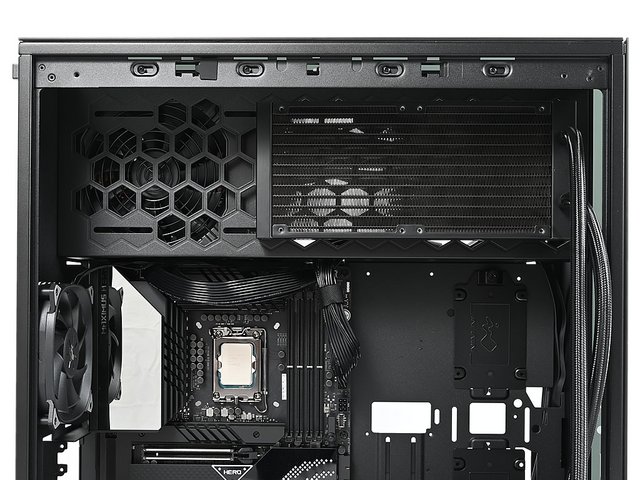
When the 240mm size radiator was mounted on the top part, the empty space between the cooling fan and the left side panel was actually about 40mm.
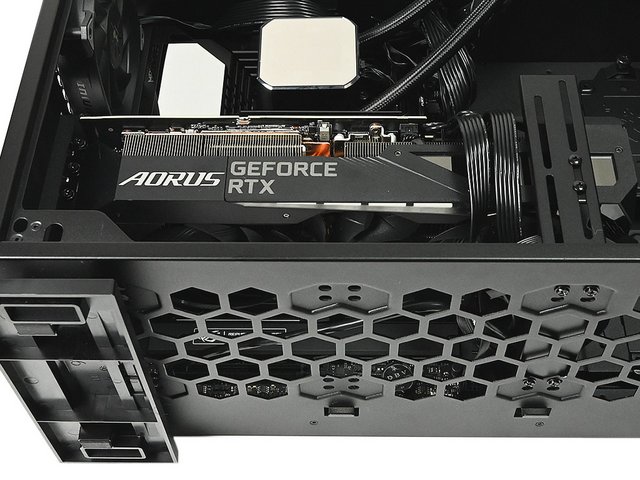
The next thing to work on is the graphics card. GIGABYTE AORUS GeForce RTX 3080 MASTER 10G is available in the effective space up to 350mm . The high-end graphics card with a length of 319 mm is a choice that is comparable to the medium to large PC case 315. The fixing method is simple, just tighten it with an inch screw in the back expansion slot. Then, I attached the VGA support stay that comes with the 315 with the bottom fixed.
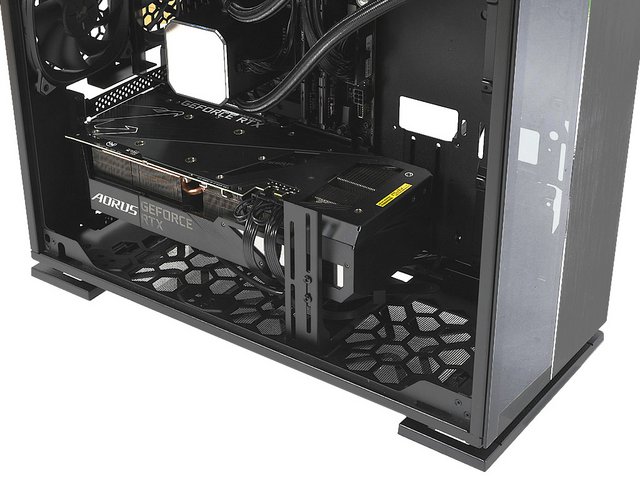
There are no special precautions for installing the graphics card, and it is completed without difficulty. An empty space of about 140 mm was actually left from the end of the card to the front panel. At face value, it turned out that a large high-end-oriented graphics card can be installed with a margin. As for VGA support stay, it is recommended to install it after installing the graphics card only for large size.

When GIGABYTE AORUS GeForce RTX 3080 MASTER 10G with a thickness of 70 mm is installed, the empty space to the bottom surface is actually about 55 mm. If you choose a high-end graphics card, installing a radiator (+ cooling fan) on the bottom surface will make it quite tight.
All of the Drive trays require fasteners to mount the drives, which is not a huge deal but is more work than a slide-in drive tray that vibration mounts the drive with quick-swap metal pins.

An example of mounting two 2.5" inch SSD's near the motherboard.

An example of mounting an upper 3.5" inch HDD and a lower 2.5" inch SSD at the back. The connector will be installed in the right direction.
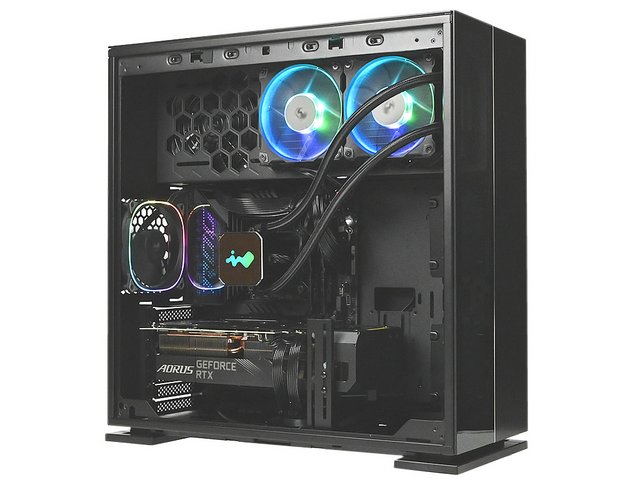
A selection of photos of the finalized build. The chassis is definitely lovely in all its ways and manners.
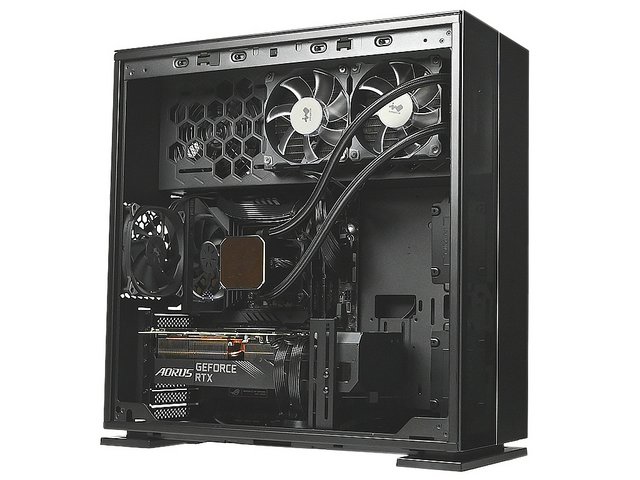
There is no doubt that the main concept is a charming PC case because tempered glass is used for the front and half of the top, including the left side panel. The mainstream of new products remains unwavering, with the feeling of being completely exhausted. We chose an all-in-one water cooling unit equipped with a light emitting fan and a shining head, and a motherboard that also features a flashy production. I built a PC that fits the concept, but if I personally own it, I would dare to avoid the luminous parts.
The biggest appeal of the 315 is its beautiful appearance, which is superior to the internal design. The main design is a well-balanced design in which the alumite-treated aluminum material and the transparent tempered glass material are divided into equal parts of about 105 mm each. After completion, it is good to see the inside depending on the viewing angle, and the diamond-cut aluminum edge extends straight to the rear. In order to enjoy these things, I would like to have the mainstream light emitting parts be quiet and enjoy the calculated design to the fullest.
Performance
For the overview, this round we use the following parts:
– Asus ROG Strix B450-F Gaming motherboard
– AMD Ryzen 7 1700X CPU
– Crucial Ballistix Tactical Tracer 16GB RGB memory
– InWin Nebula NR36
– Asus ROG Strix RX 580
– Samsung 970 EVO 500GB
– be quiet! Straight Power 11 850W
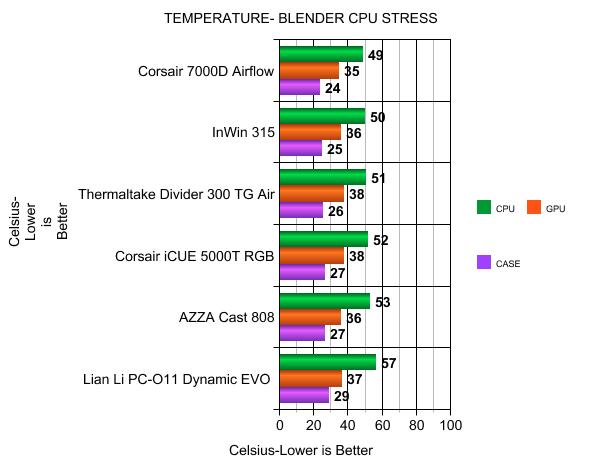
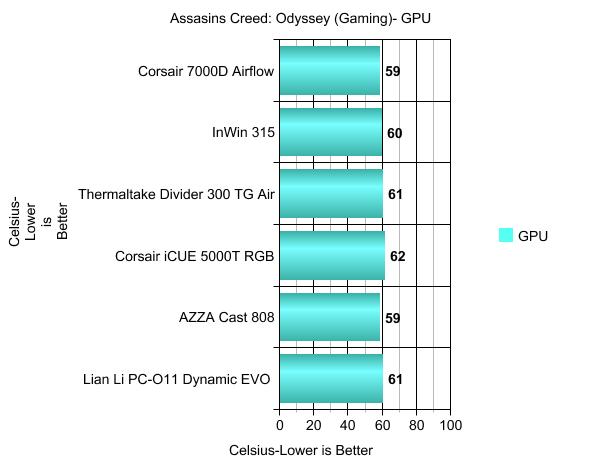
Time for some benchmarks. For CPU stress I use both a hefty Blender render for CPU stress and Assassins Creed: Odyssey for game performance. In both cases I look at the CPU, GPU and Case temp, and the noise production. Cases that cost between $200-$250 are tested. What I only add was an extra Sirius Extreme ASE 120 on the base of InWin 315.

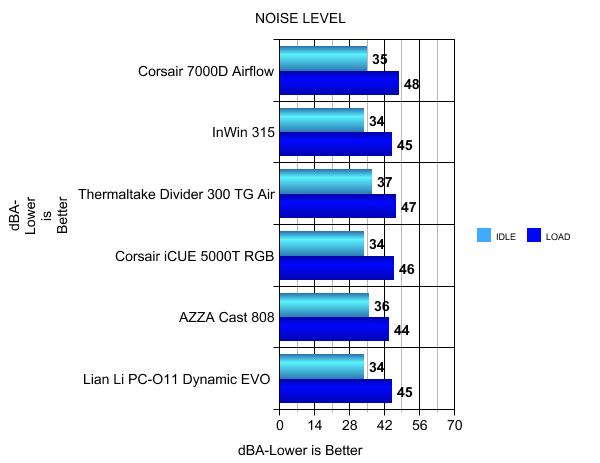
Testing the InWin 315 quickly showed that it cools fantastically. With both gaming and CPU load, the temperatures inside the case are very decent, and around the processor are even quite low. Under gaming, the graphics card is slightly higher, but still within limits.
InWin's thick paneling and glass helps contain some of the noise, but the performance is more-or-less identical between the cases, at least, as far as human perception goes.
Final Thoughts
That's it, here we are already at the end of our InWin 315 test, so in the end, what do you think? That's what we're going to see. First of all, the case for its format and is quite heavy thanks to 1.2mm SECC instead of 0.8mm of other cases. Just bear in mind its sheer heft if you are thinking of buying one, as it weighs over 12kg empty, so you might want to add some additional support to that Ikea desk if you plan to sit the 315 next to your monitor. Otherwise, for the moment, on the rest, it's faultless, good finish (quality paint, aluminum with precise adjustments) and design that we appreciate. The looks then, I do like the InWin 315 model with its dark feel and see through finish, you can't argue taste as it is the most subjective thing and does not make the job of reviewer any easier. Inside, we will find an unusual internal layout. There is a slot for the motherboard up to E-ATX in 33 cm width. For graphics cards, fans and power supplies, we have respectively: 350 mm, 160 mm and 200 mm. The storage part will be able, via its four plates, to accommodate up to four storage units. We are talking about two in 2.5″ and two others in 3.5″/2.5″. On the cooling side, we will have seven slots for 120 mm fans at the top/bottom and rear. Too bad, there is still no 140 mm compatibility for this series. One minor point worth mentioning is that the case come with only one pre-installed fan, although this may not be an issue for those building a unique custom water cooling setup inside. You should also know that for AIOs, it will be possible to install models equipped with 120/240/360 mm radiators. Here, fans will necessarily be delighted with the possibility of installing two 360 mm radiators! In terms of thermal performance, the InWin 315 excels in this department. This is mainly due to that fact that it is technically an open-air chassis, even though it has glass right side/top panel and a closed looking front panel. There are various large air gaps all on the rear/bottom and right side of the chassis which obviously assists airflow and system temperatures. The chassis has nice motherboard cutout and there's enough space on the right for cable routing, all in that all-black interior. The area of cable management is a little disappointing is the lack of rubber grommets around the cable cutouts. Granted, it would be tricky to apply cable grommets to certain cutouts, such as those at the top of the chassis that are somewhat hidden away. I would have expected the main cable cutouts to have grommets applied, however, so that is certainly disappointing from a case in this price range. We could deplore the absence of anti-vibration elements on the bottom of PSU, however, during our tests, we did not notice any vibrations. The last downside is the visibility of the SSDs maybe? Other than that I am nitpicking.
InWin offers an appealing product with the 315. It isn't cheap at $229. The magic is to be found in the see-trough design with the smoked colored glass front/top/side panel, the all dark interior and that lovely upper compartment where you can hide your PSU and mount a 360 radiator. Design wise I have very little to complain, the chassis is easy to use and fairly maintenance free. You have enough yet ample storage options alongside good cable routing. Everything sits in the right place as well. The airflow is plenty enough for any decent build. The air intake at the bottom is huge (covered by a large removable dust filter) and the honeycomb design exhaust on the right side do the job well. Once again InWin offers a very unique product, please do add some LED lights in there and you will be amazed once you see that expensive kit of yours through that front/top/side panel window. As such we can recommend the InWin 315 very much it does offer an excellent combination of features, requirements and comes with nice looks. If you want to make a statement with your PC, then the InWin 315 certainly fits the bill.

Last edited by testman78; 07-11-2022 at 01:22 AM.
 Posting Permissions
- You may not post new threads
- You may not post replies
- You may not post attachments
- You may not edit your posts
-
Forum Rules


 Reply With Quote
Bookmarks