-
DeepCool Castle 280 RGB
Introduction
Along with the launch of its new 240mm liquid cooler "the Castle 240 RGB" now DeepCool has also released the Castle 280 RGB, a bigger 280mm AIO. In reality, radiator and fans size is the only real difference between the two models, as they are almost identical in every other area. You do spend $20 more by going for the bigger model, though, but might that be cash worth spending instead? Let's find out.

Specifications.
It supports mainstream INTEL and AMD socket mounting, including TR4/AM4.

Packaging & Contents
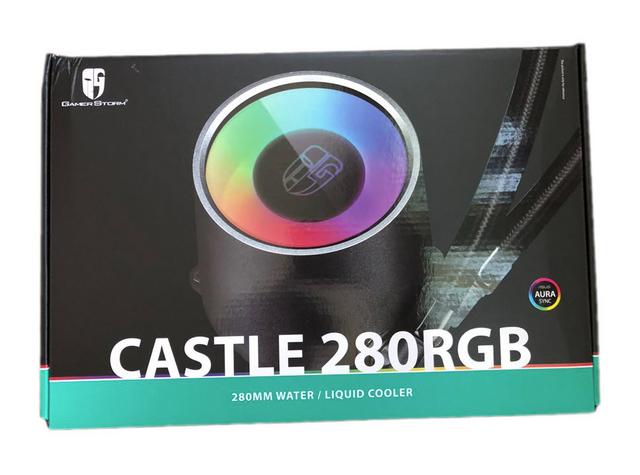
The Deepcool Castle 280 RGB ships in a dark box with unmissable RGB accents. Front and center is a color image of the pump lit up in RGB fashion.
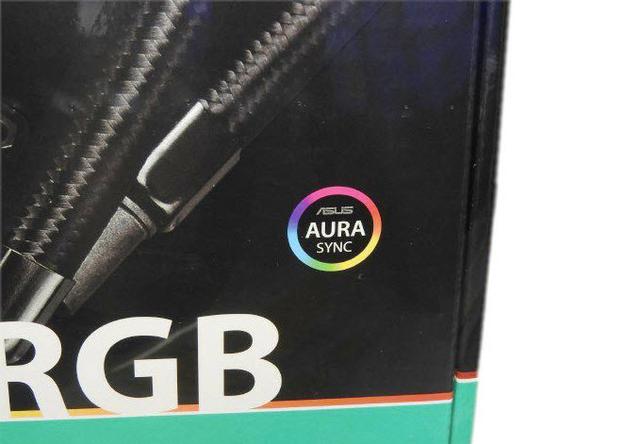
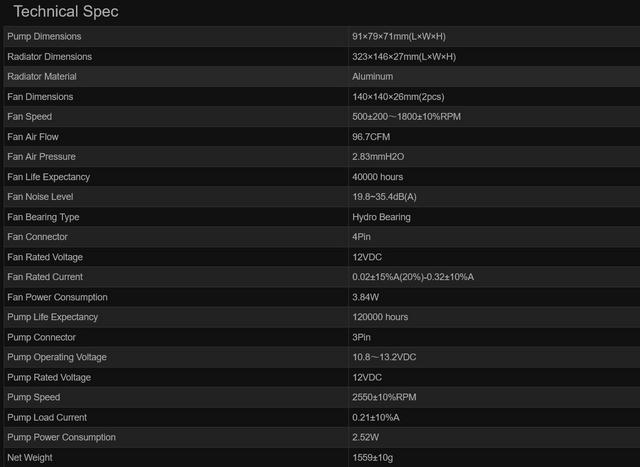
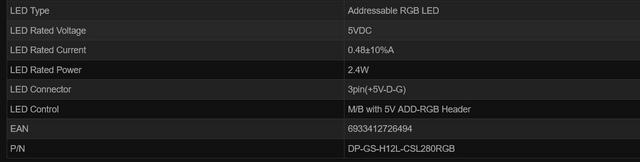
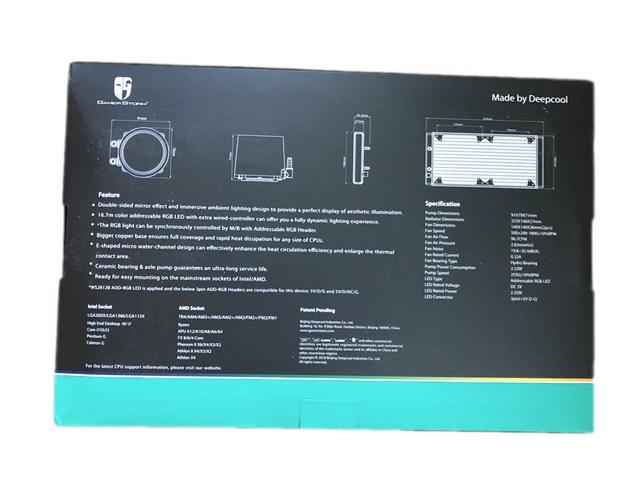
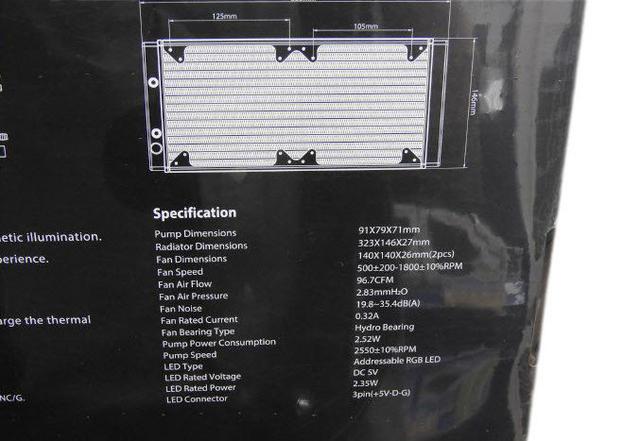
On the back of the box, you are treated to all the technical specification you could want. This includes the dimensions of the water block, fan, and radiator, the Intel and AMD socket compatibility as well as the key features of the product in bullet points. I must credit Gamer Storm for putting all this relevant information not only on the box but clearly legible. It's something that more manufacturers should consider with their packaging. Particularly the product dimensions as they could be quite critical to your system build. You will note on the box that this product is made by Deep Cool and that is a point we will be returning to later.
The top is blank with just the UPC and QR codes.

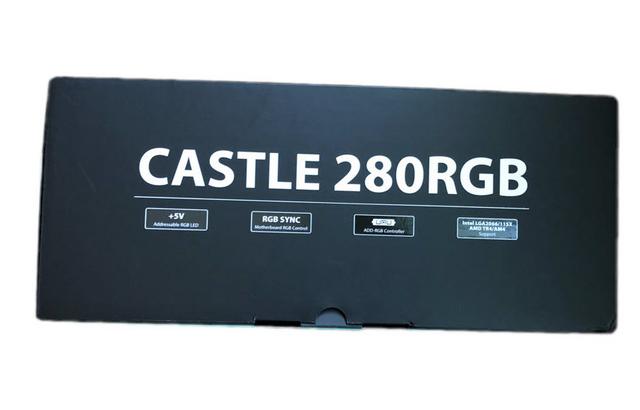
The bottom has the product name along with a quick list of included items related to the CPU cooler's RGB functionality.
Not exactly surprisingly yet oddly satisfying is to find the foam top for added measure. When you open the box, you will be pleased to find that everything is well presented and, more importantly, well organised. Everything has a well-spaced insert within the cardboard, and all the major components are individually wrapped in plastic containers. This is fairly standard, but I feel that Gamer Storm has made a little extra effort to make things as nice and intimidating as possible.
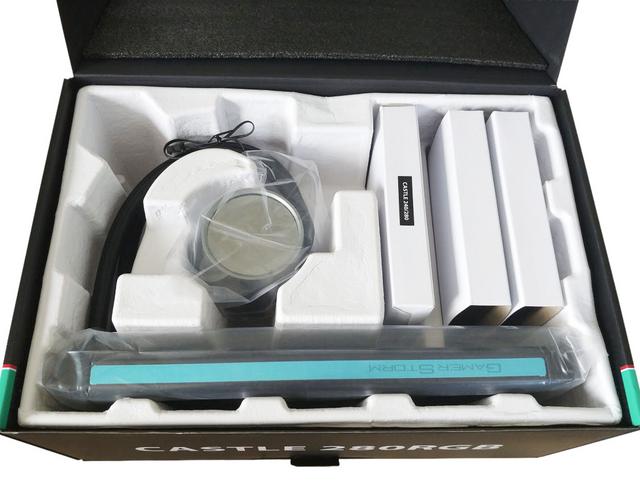
Everything needed for just about every modern socket is present. Also included is a 3M sticker, a User manual, a PWM fan hub, a Zip tie, various cables for the RGB mode and a wired RGB controller, if the user opts against using the addressable RGB function built into newer motherboards. This helps to customise the lighting system between 5 built-in effects, including dynamic, static, breathing, comet, and fashion collision, alongside 36 interchangeable lighting modes.

A Closer Look
Once unpacked the Deepcool Castle 280 RGB, we have an all-in-one kit with a quite original design in terms of base-pump, although classic in terms of tubes and radiator.
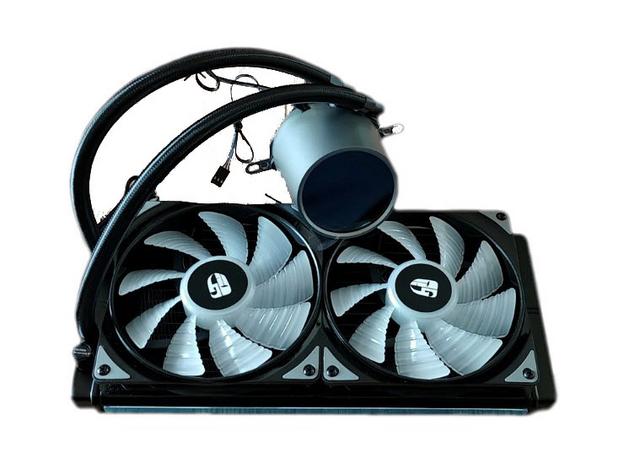
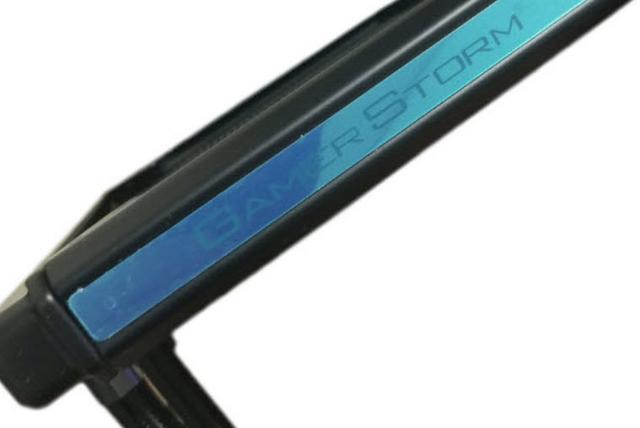
The radiator offers dimensions of 323 x 146 x 27 mm, so it requires a chassis with support for radiators of 240 mm. On the side of the radiator, a Gamer Storm logo is present.
The radiator, made entirely of aluminum features an arrangement of high-density 16 FPI (fins per inch).

The hoses look much thicker than previous models, with some of the nicest weave braiding I?ve ever seen on an AIO.

The heat shrink-wrap on the fittings also looks more durable and the whole thing just looks more robust in general. They are flexible and we can accommodate them in the position that we like the most.

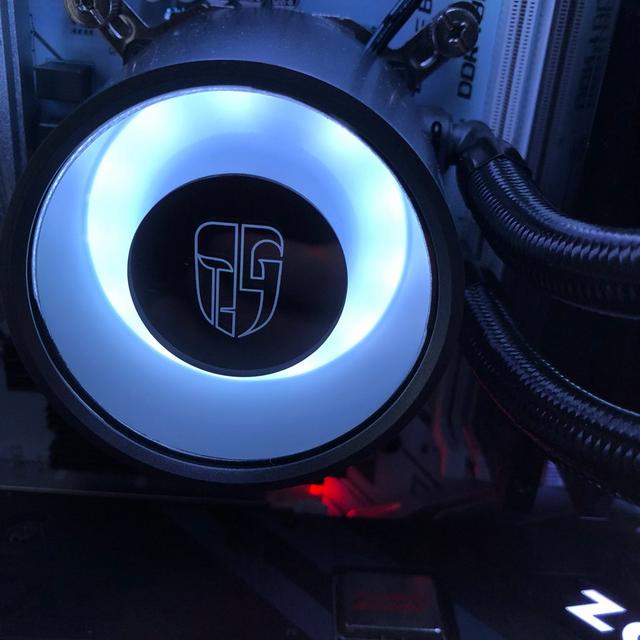
The Castle Series features a brand new waterblock, endowed with double window panes to showcase the immersive ambient lighting design. This is intended to sync with the included RGB fans, 140mm for the Castle 280RGB, to provide access to 16.7 million colors. The pump turns at 2550 RPM and promises a durability of 120,000 hours.

The optimized E-shaped micro water channel design effectively enhances heat circulation efficiency and enlarges heat contact areas.

The coldplate itself is made from copper and screwed to the pump housing via ten hex screws. The ceramic axle bearings and axle cores guarantee an ultra-long service life.

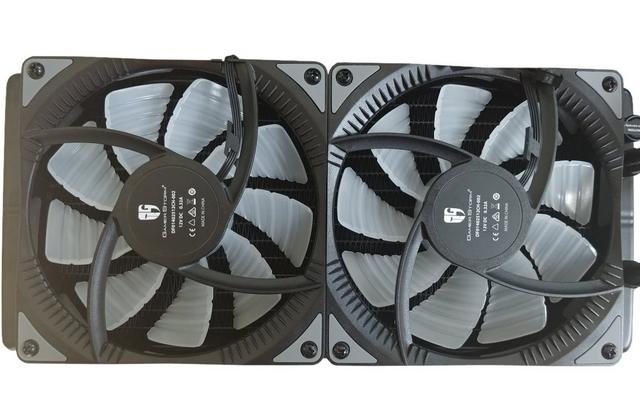
Also included are 2 DeepCool 140 x 140 x 25 mm fans with PWM control (4-pin connector) that offer addressable RGB LED lighting on the blades, so we can generate powerful lighting effects on them. They are generating a sound of low decibels. This is, in part, thanks to the anti vibration system mounted by each of the fans and the graphite bearings, which generates less friction and vibration when working at maximum performance.
Installation Process
Mounting the cooler is a relatively easy thing to do, though the motherboard needs to come out of the chassis unless you have a chassis with a mainboard cutout for CPU cooling. The first thing you will want to do is to get the backplate ready. Start by sliding the backplate screws into place and using the plastic buckles to hold them there.

With that done, simply fit the backplate to the motherboard.

Grab the proper mounting brackets, in my case Intel's, and, using the small silver screws, secure them to the pump. Carefully apply an adequate amount of thermal paste to the IHS and place the Castle's pump down onto the CPU, securing it in place with DeepCool's included thumbscrews.

Now is also a good time to install the fans to prepare the radiator for mounting inside a case. All that remains is to attach the fan and pump headers to the motherboard to complete the install.

No text needed, just feast your eyes on what's below.
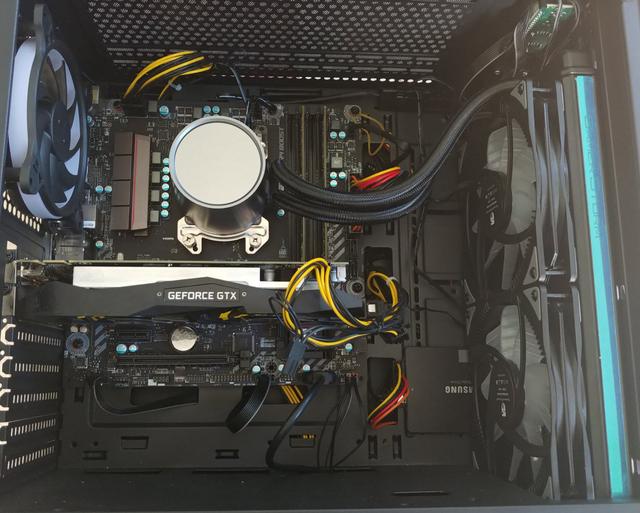
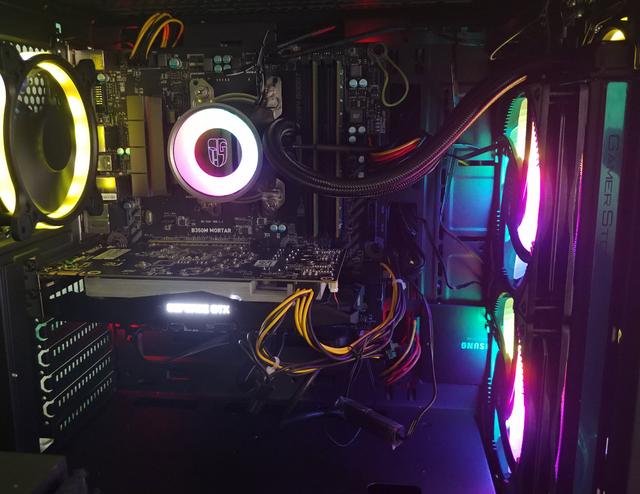
Installed - Memory Clearance
Even with large heatshink rams installed there's still plenty of clearance between the rams and the pump.

Test System & Methology
Test System:
Cpu:Intel Core i7-4790K,OC@4.6GHz-1.3 Volts
Motherboard:ASUS Maximus VI Gene Z87
Memory: 16GB Mushkin
Graphics Card: Sapphire HD 6970
Power Supply: Antec HCG 750W
Boot Drive: Ocz Vector
Storage Drive: 3TB Seagate Barracuda
Boot Drive: Ocz Vector
Chassis: Dimastech Bench Table Easy V2.5

Software:
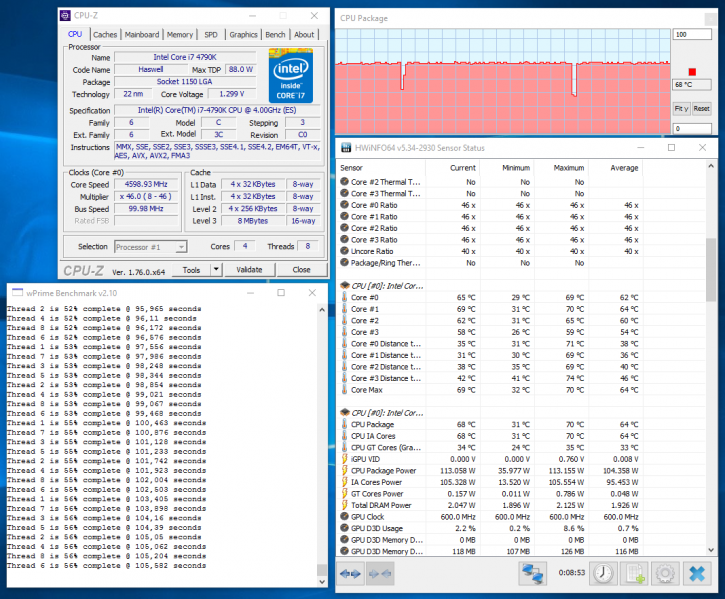
CPUID HW Monitor 1.23
CPUID CPU-Z 1.65
wPrime
I am testing the performance as follows:
Ambient temperatures are kept at 23C throughout my tests.
The CPU Fan is set to 100% to eliminate inconsistencies as a result of PWM control.
Idle temperatures are obtained after booting the PC and idling on the desktop for 30 minutes.
Load temperatures are obtained after running wPrime′s test for 15 minutes.
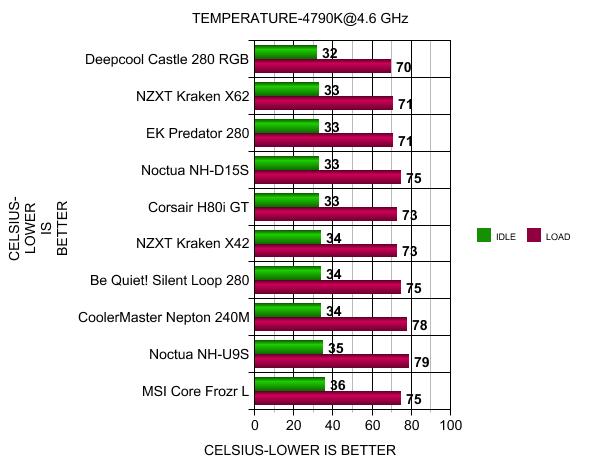
Temperature
The results are the IDLE temperatures thus you are on your desktop doing pretty much nothing. At default clock speed, our idle temperatures were surprisingly low at only 26 degrees Celsius.
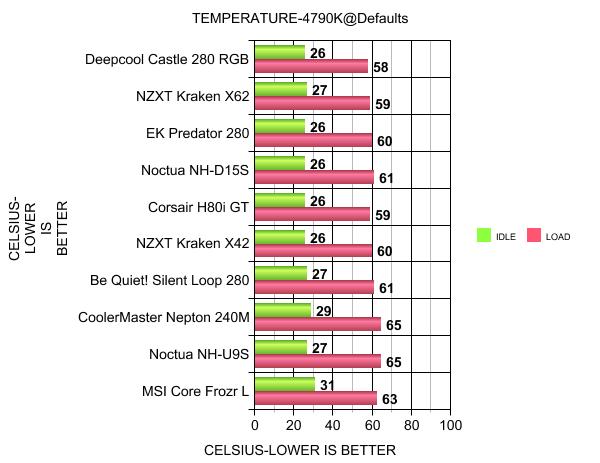
AIO coolers do better here and the DeepCool Castle 280 RGB hold ground really well. The reality is that very few coolers and kits can actually manage a Core i7 4790K @ 1.3+ Volts / 4600+ MHz temperature wise well enough. So these are pretty impressive results.
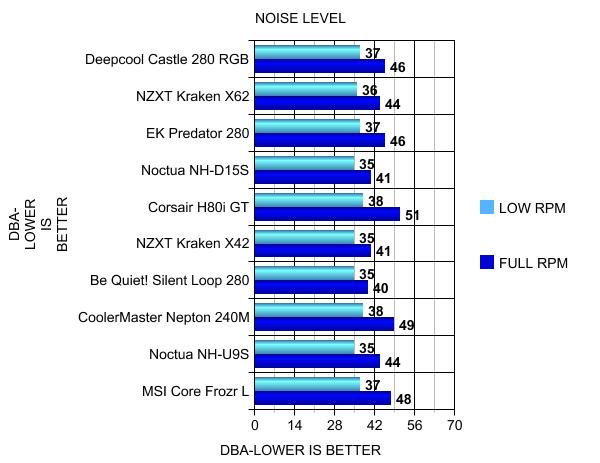
Noise Level
Even with two fans, we found the AIO cooler to be very agreeable in terms of acoustics at low rpm. When overclocked, the acoustics were audible at 46dB.
Conclusion
There's just something grand about the DeepCool Castle 280 RGB Liquid CPU cooler. Not sure if it's the packaging or the fact that it just looks aesthetically pleasing. Most AIO coolers are just ugly looking. Anyhow, one thing is for sure, the DeepCool Castle 280 RGB performs as good as it looks. The quality of construction of the Castle 280 RGB is undoubtedly very good, DeepCool clearly did a good job of producing this cooler. The black design will make this kit match up nicely in any PC. The hoses have been given an upgrade too, they look much thicker than previous models, with some of the nicest weave braiding I've ever seen on an AIO. The Castle 280 RGB is very easy to install with its mounting system. The unit is factory filled with coolant in a closed loop. Just install the backplate, the standoff-screws, position the cooler and secure it. No 'advanced' skills are required other than the need for ten minutes to install the kit. Provided with the Castle 280 RGB is a pair of motherboard adaptors, for syncing the RGB lighting with ASUS, Gigabyte, MSI and ASRock motherboards, as well as a SATA power adaptor with in-line RGB controls for those without RGB motherboard headers. And if you aren't into the RGB hype, simply don't activate it and your problem is solved. The Castle Series isn't all for show, as DeepCool Gamerstorm infuses the water-block with copper, backed by an optimised E-shaped micro water channel to effectively enhance heat circulation. This helps cool the latest of processors, from AMD's Threadripper to Intel's high-end i9 Core CPUs thanks to its wide range of socket support. Overclocked was nothing of concern for the Castle 280 RGB. Even at 4.6 GHz, it made light work of our CPU. If you're looking for a cooler to take your CPU to the next level, it will certainly get the job done with ease.

The bigger of DeepCool's two new liquid coolers, the Castle 280 RGB is still an impressive piece of kit. The RGB lighting on the fans, as well as the pump, looks fantastic. Those planning to build or use AMD Ryzen systems are also in luck as the Castle 280 RGB supports socket TR4/AM4 out of box. The DeepCool Castle 280 RGB offers a unique aesthetic design, a very low-noise pump, and some quiet and stylish RGB fans. Additional things such as the hub and the wired RGB controller may be the bonus features you're after though. You do get a lot for your money, and if you like the design, I highly recommend the DeepCool Castle 280 RGB. Both watercoolers can be seen across major retailers, with the Castle 240RGB priced at $109.99 (€129.99 / $109.99 VAT included) and the Castle 280RGB slightly more expensive at $129.99 (€149.99 / $129.99 VAT included).

Last edited by testman78; 09-11-2019 at 02:20 AM.
-
I am Xtreme

Not bad, maybe this could be my RGB setup for LGA1151 benchtable
ROG Power PCs - Intel and AMD
CPUs:i9-7900X, i9-9900K, i7-6950X, i7-5960X, i7-8086K, i7-8700K, 4x i7-7700K, i3-7350K, 2x i7-6700K, i5-6600K, R7-2700X, 4x R5 2600X, R5 2400G, R3 1200, R7-1800X, R7-1700X, 3x AMD FX-9590, 1x AMD FX-9370, 4x AMD FX-8350,1x AMD FX-8320,1x AMD FX-8300, 2x AMD FX-6300,2x AMD FX-4300, 3x AMD FX-8150, 2x AMD FX-8120 125 and 95W, AMD X2 555 BE, AMD x4 965 BE C2 and C3, AMD X4 970 BE, AMD x4 975 BE, AMD x4 980 BE, AMD X6 1090T BE, AMD X6 1100T BE, A10-7870K, Athlon 845, Athlon 860K,AMD A10-7850K, AMD A10-6800K, A8-6600K, 2x AMD A10-5800K, AMD A10-5600K, AMD A8-3850, AMD A8-3870K, 2x AMD A64 3000+, AMD 64+ X2 4600+ EE, Intel i7-980X, Intel i7-2600K, Intel i7-3770K,2x i7-4770K, Intel i7-3930KAMD Cinebench R10 challenge AMD Cinebench R15 thread Intel Cinebench R15 thread
 Posting Permissions
- You may not post new threads
- You may not post replies
- You may not post attachments
- You may not edit your posts
-
Forum Rules


 Reply With Quote

Bookmarks