-
Synology DiskStation 414j
Introduction
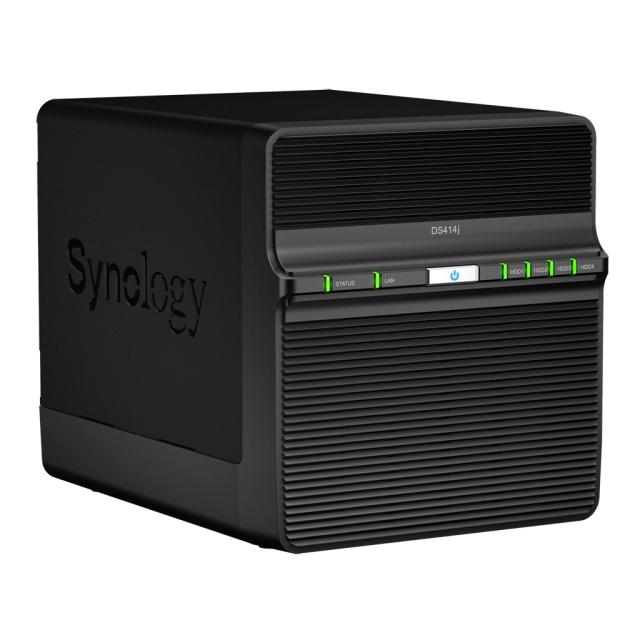
Synology's j-series NAS units have traditionally provided consumers with a very budget-friendly entry-level window into the DSM (Disk Station Manager) ecosystem. As the amount of user-generated data in the average household keeps increasing, the demand for more resilient storage keeps going up. With drive capacities on the increase, we have seen people move to 4-bay NAS units in order to take advantage of RAID-10 (despite the loss of effective storage space). This helps to avoid (to a certain extent) risk-prone rebuilds associated with RAID-5 arrays.Today we will have a look on the Synology DS414j,which is a NAS for small to home offices.The DS414j is the first NAS with new MindSpeed Comcerto 2000, 1.2 GHz budget CPU and a USB 3.0. port.It has two Cortex-A9 cores running at 1.2 GHz.It has support for 5TB drives, and has a max storage capacity of 20TB (4 x 5TB HDD).RAM support stays the same as the previous model with 512MB on board.
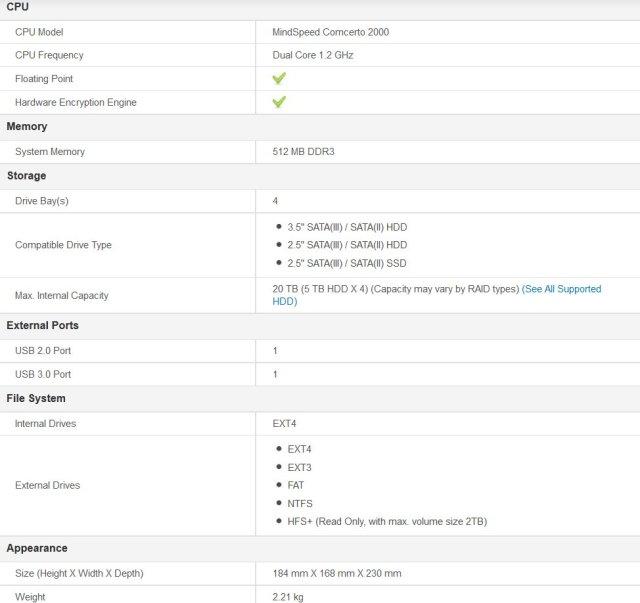
The DS414j brings in all the exciting features of DSM 5.0 (along with its acclaimed apps for quick and easy remote access, private cloud features and backups) to the entry-level market. Main Specifications:
Packaging & Contents
The DS414j is supplied in a large cardboard box which features a plastic handle for ease of transport.The DS414j box is brown, and in line with other models from Synology the front box the box is quite plain, carrying the DiskStation name and some small graphics.

The right hand side of the box lists the key features that we can use the DS414j for, including multimedia center,private cloud and that it is fully supported by mobile access.

The left hand side of the box shows a picture of the DS414j and lists the technical specifications of the device.

Bundled with the DS414j i find a selection of screws for installing either 3.5" or 2.5"drives.There is a quick guide pamphlet giving us a very high level view of what we need to do to start using the DS414j, however Synology have also provided a software CD that includes a full installation guide and user's manual in PDF format.A separate power unit is supplied with the DS414j and Synology have also included a RJ-45 LAN cable.


The Nas
Taking a closer look at the DS414j, the unit oozes quality.For the more aesthetically minded, the colour switches this year from white to black, too but there's no refresh of the retro-tastic chassis design which Synology are now positioning as "Absolutely Vintage, Perfectly Modern".

The outer shell is thick and well made, on the sides are the engraved Synology logos, adding a bit of style to a rather plain, large panel.

The DS414j is quite a weighty unit. It weighs in at 2.21KG, so its probably a good idea to have this places on a shelf or desk.

The front panel takes advantage of corrugated front panelling. In the centre of this fascia is a strip with power, activity and HDD LED's. In the very middle is a power button with a polished metal finish.

Moving to the rear of the DS414j we have the openings for the dual 80mm fans, below these two fans are the output ports.
- DC Output
- LAN
- USB 3.0 port
- RST (Restart)
- USB 2.0 port
The above outputs give quite a bit of flexibility, the LAN connector gives gigabit transfer speeds.

Turning the DS414j over i find that the bottom of the case has four non-slip rubber feet.This provides the case great stability and ensures that it sits securely on our desk.

Installation
Getting the HDDs into the DiskStation DS414j isn't a very difficult task at all.All you have to do is remove the screws at the rear of the unit, which loosens the outer shell. You can then remove this shell, to expose the inner chamber, housing the PCB, components and HDD cage.

For each level inside the DS414j, there are mounting trays.Having 4x bays the DS414j can take advantage of 4x HDDs. Within these brackets we can install 3.5" HDDs or 2.5" HDDs.Depending on the configuration you want to use will determine where the HDDs go.Placing one in the top of our unit or even at the lowest shelf seems to limit the cooling capabilities of the DS414j because the two fans mounted on the back of the NAS unit do not cover these shelves.It's important for us to have adequate cooling because like most NAS boxes, the unit is going to be powered up for long periods of time.So we want to keep the HDDs in particular as cool as possible.

To install the HDD you have to remove the mounting tray, place the HDD inside the tray and secure the HDD with screws.

HDD goes into the tray and four screws secure the HDD.


The sleds are plastic so you don't get a lot of vibration through the system. This also eliminates a lot of the noise that some lower cost NAS servers usually have.

The two (Ys. Tech FD128020HL)80mm fans can be replaced if required, just unscrew from the mounting and plug into the PCB.Their speed is kept at low RPMs at normal operation so their noise output is minimized.According to Y.S Tech they are equipped with Sintetico bearings,a bearing type we have never encountered before, but it looks to be of high quality and should last longer than sleeve bearings or double-ball bearings.


When you are ready to install the HDDs, just slide them along the shelves and at the very end are the SATA data and power ports that fit perfectly into the HDDs.When done, just place the shell and screws back on and we?re ready to go!

Hardware
It's time now to strip down the NAS and discover what components it hides under the metal casing.To remove the single-piece top and side panel you need to remove two screws on the rear side first, and gently pull the panel up and back. You must be extra cautious during this procedure, as you risk breaking something.


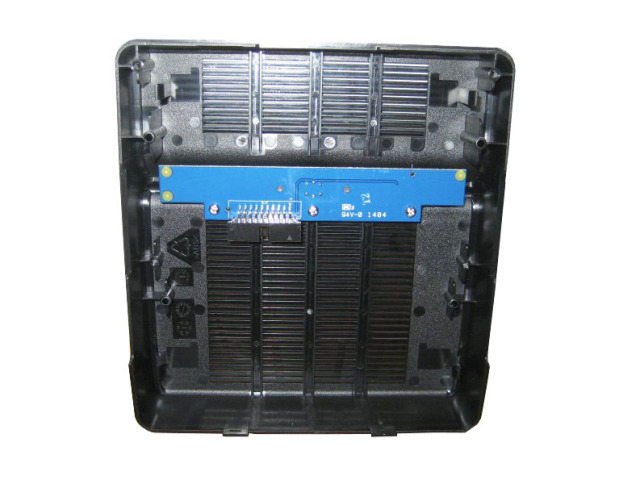
Afterwards, to gain access to the mainboard you must remove the HDDs cage which also holds the PCIe card that houses all SATA ports.

The NAS takes fresh air in through the front panel, drives it along the HDD bays and exhausts it through the back panel.The ventilation system is rather quiet due to the lack of hot-swap disk bays and to some other design peculiarities.
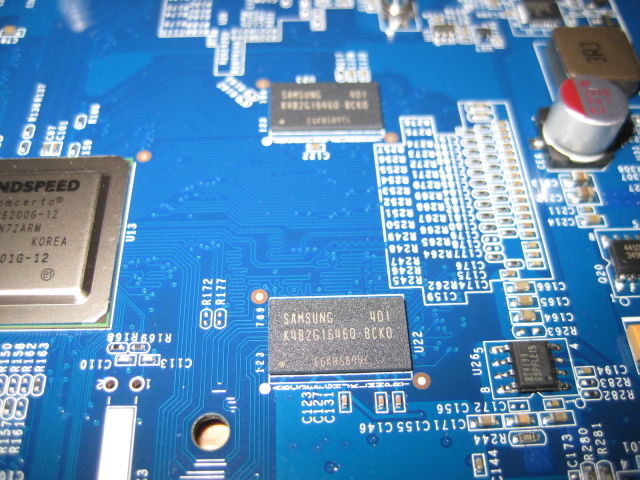
The mainboard of the DS414j is small.In the bigger slot the expansion card that holds all SATA ports is attached.


There are two 256MB Samsung DDR3 chips.The DDR3 modules are directly soldered to the mainboard, so you cannot upgrade the RAM.
On the solder side of the main board is a Realtek RTL8211E Gigabit Ethernet Transceiver.

The PCIe card to which all four removable drives attach utilizes a Marvell 88SX7042 controller. It supports the SATA II protocol and not the newer SATA 6 Gbps, but the 88SX7042 surely won't bottleneck the system since non-mechanical drives cannot exceed SATA II limits.

Comcerto C2200, which consist of dual-core 1.2GHz ARM (News - Alert) Cortex-A9 MPCore processor respectively, feature symmetric multi-processing, consistent level two cache and ARM TrustZone security.The cpu also feature Mindspeed's OPAL engine, a wire rate gigabit-speed programmable data-path acceleration engine and a complete set of I/O and peripherals, apart from supporting DDR3 with ECC.

Latest protocols and elevated speeds, along with lesser power consumption, is supported by this economically viable cpu.

Uses of the Comcerto 2200 include a control and management processor or an incorporated control and data path processor.An API can be used to completely program and configure the network accelerators, letting the idea of SDN expand to huge-volume communications applications at the border of the network.Scalable multi-core technology from ARM is enabling a new level of energy-efficiency and performance in networking communications applications.

DSM 5.0 Initialization
Right after installing the drives, connecting the cables and powering up the unit, we can go straight to the DSM download page, get the suitable file for the model and also install the latest version of Synology Assistant.Synology Assistant will help us detect the unit on the network in just a few seconds and guide through the installation procedure.First we will be prompted for the file we have just downloaded, which contains the latest DSM version.


Then, we will be able to specify a password for the default “admin” account.

The Installation Progress page will show us the progress and after it has completed, we will be able to log into the web interface.

The initial screen will require entering the credentials.

We are prompted to enable QuickConnect, which will permit access to the NAS from any location, without setting up port forwarding on our routers.

We will have to create a volume in order to be able to store data on the internal drives.

We are allowed to create multiple volumes or a single volume on the drives.


A disk check can be also scheduled after the volume has been created.

The newly created volume will show up in Storage Manager, with its health status and remaining storage space.For accessing the newly created folder much easily, we have set read/write permissions for both admin and guest accounts.

DSM 5.0 Part 1
DSM 5.0 looks completely different from the previous version. It has a cleaner and flatter design, and larger icons make DSM much more suitable for use with touchscreens. The icons' resolution has also been improved, so they look and work better on hi-res panels. The widgets that inform you about the system's status are hidden by default. If you like, you can add these to you homescreen in just a few clicks. DSM 5.0 also allows you to update packages automatically, provided the packages support that of course.

The settings pages also got a make-over.The widget display is completely customizable, for showing System Health, Resource Monitor, Connected Users, Scheduled Tasks and more.

The Main Menu button which is placed on the top left corner will open up another set of icons.

As the rest of the interface, the Control Panel section is revamped for faster access, as soon as we will click on one of the sections, the menu will re-organize itself on the left column so we never have to go back as when the menus were opening in separate windows. The Shared Folder menu will allow us to define new ones at the same time we will have to specify on which volume they should reside, along with the file permissions for each one.


DSM 5.0 Part 2
Cloud Station for Synology NAS is a file-syncing application that lets you easily synchronize files on your Synology NAS with other devices, such as computers or mobile devices (with DS cloud). Once Cloud Station has been installed on both your Synology NAS and computer, files stored in a specified folder on your computer will be automatically synced to your Synology NAS.


QuickConnect is a service that can help you set up Cloud Station syncing easily without configuring port forwarding rules for your DiskStation.

DDNS services or port forwarding rules can be specified.
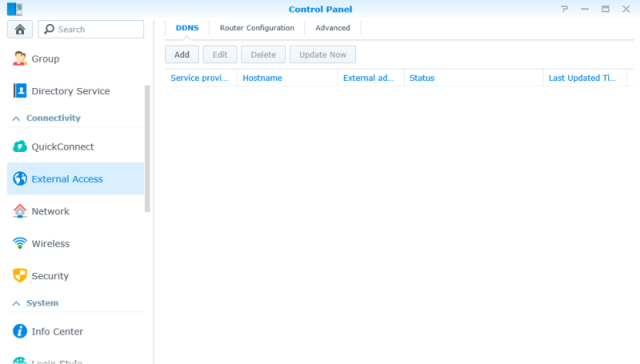
From the Network menu we will be able to modify the current LAN settings, customize the network interfaces, create traffic control rules or customize the DSM settings.

The Wireless menu will be accessible when we have a Wi-Fi dongle attached to the NAS.Here we will be able to set multiple functionalities of the Wi-Fi like Hotspot, Router or Client.A similar menu is available for Bluetooth dongles.

DSM 5.0 Part 3
Resource Monitor allows you to monitor the CPU usage, memory usage, disk utilization and network flow. You can choose to monitor in real time or view previous data.Click on Performance tab to view the resource utilization data. Detailed date, time and information of the chart will be shown upon mouseover.


Synology NAS can serve as a multimedia server on the local area network, allowing home devices, such as TVs/stereo systems and Sony PlayStation3/Xbox 360, to play its multimedia contents. These devices are DLNA/UPnP-compliant DMAs. To stream multimedia contents from your Synology NAS to DMA devices for playback, you need to configure media playback settings, including adjusting the basic settings of DMA devices, managing browsing settings of media files, and enhancing the compatibility of the files.


One very important change concerns Surveillance Station’s 6.2 entrails, where Java is replaced with a homemade web-plugin. The Beta introduced it on Chrome and Firefox, it’s now also on Internet Explorer with the official release. Why does that matter?First, as it gives a real boost to performances, making using Surveillance Station 6.2 all the more pleasant and responsive. When viewing both camera live feeds and recorded events for instance, page loading is up to 5 times faster.Less obvious but just as essential: it makes Surveillance Station independent of the behavior and performances of other software. This is quite crucial for a Security app, making it less prone to being impacted by security holes of software such as Java over which our engineers have no control.When monitoring a large scale installation, the number of cameras which can be handled in a single view is essential. With the latest web plugin, Surveillance Station can handle up to 49 and, in Full HD.With over 1700 cameras officially supported, and frequent firmware updates by camera manufacturers, it’s essential to have a flexible system to always maintain the best possible support for this entire range of cams. This new device pack does just that: allowing us to rapidly push the frequent updates needed to handle the latest camera firmware changes, and without users having to perform and wait for the regular full-scale Surveillance Station updates.Sometimes, discreet improvements are the most noticeable on a daily basis. In Surveillance Station 6.2, you’ll find the cursor changed into a small arrow: forget PTZ controls on the control panel and adjust camera positions directly on the live view.Live View allows you to monitor and control all IP cameras in real time.You’ll also find on-screen buttons on the live view screen to obtain more instant access to the functions you need.Speaking of camera positioning, for those who are often in meetings and only have their phone or tablet with them, DS cam now allows to select preset positions to point the live view wherever you need, or even start a camera’s patrol to screen an area.


Explore Package Center and install Synology-designed or third party applications that are tailored to your needs, such as sharing files on the cloud, sharing photos from an online album, setting up a VPN environment and antivirus to protect your system. You can start anytime by installing free packages on your Synology NAS. As for paid packages, we will ask you to register a MyDS Center account to provide you with more satisfying services.


DSM 5.0 Part 4
The EZ Internet Wizard can set up access via the Internet with an easy to use wizard, without going through the complicated firewall settings, PPPoE setup, DDNS registration, and router port forwarding configuration.


Creating an Apple iTunes server on a Synology is easy to setup and it is nice feature to have enabled if you got multiple devices in the house that are capable of playing music from the iTunes server.


Plain text files can be edited directly in DSM 5.0.Rich features are available, such as the ability to change character encoding, recognize file types, and see variable highlighting.


Online help files can be viewed in DSM Help, allowing you to read the latest versions of documentation regarding DSM and packages.Font size can be changed to larger sizes.


Syslog Server and System Logs have been integrated into a single,centralized application.


Support tickets can now be sent directly from DSM 5.0.Remote access and log generation allow Synology support engineers to remotely diagnose technical issues on your Synology NAS.


DSM 5.0 Part 5
The Storage Manager section will allow us to manage storage spaces like volumes, disk groups, iSCSI targets or iSCSI LUNs.
 n
n
The Volume section will show us detailed info regarding the current volume health, RAID type and much more.

Let’s take a short look at the usual applications too.Audio Station is the integrated player which can create playlists with the indexed audio files or can also access Internet Radio streams like Shoutcast.


With the latest version of Photo Station we will be able to create new albums, upload, organize, edit and share our photos in a quick and easy way. Thumbnail creation can take a while and during this process we will get to see some placeholders.


Download Station is the integrated application for downloading files from different sources and it also supports drag-and-drop for torrent files, file search off portals and more. Before using the service we will need to prompt a new folder where the files will be downloaded.
 host image
Video Station application will download covers for each identified movie or TV show which has been indexed and will also display extra info.

Playback in your browser works great from Video Station.

You can even watch and record TV in Video Station. All you need is a compatible DVB-T stick.
 upload image no signup
Antivirus Essential is another Synology application which scans the files for malware and viruses.
 s
s
DSM 5.0 Part 6
DS Audio is the equivalent of Audio Station and will help us navigate through the audio content from our NAS.

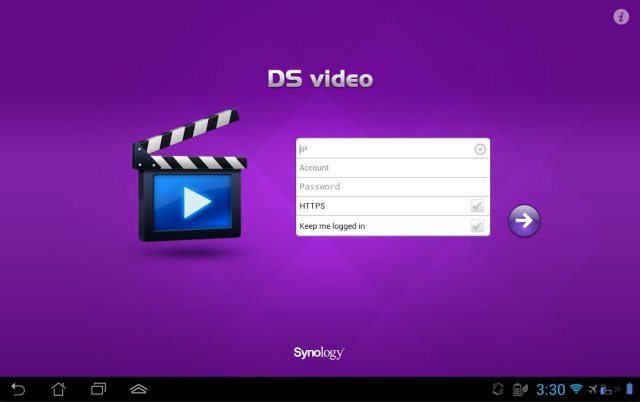
DS Video is the mobile equivalent of Video Station and with it we will be able to browse through our video collection and the player also supports subtitles.


DS File is a simple file manager, really easy to use for navigating though the NAS folders.

DS photo+ allows you to browse through the photos and videos of your Photo Station library on the go, as well as interact with friends using the photo or video comments in real time. Better yet, download albums to the iDevice to view them even when no network connection is available. And by enabling Instant Upload, the photos and videos on your iDevice can be effortlessly uploaded to your Photo Station.


DS cam is the mobile extension of Surveillance Station. With DS cam, you can watch up to 6 channels1 simultaneously, take snapshots anytime, and adjust your cameras’ position and zoom with PTZ actions.2 You can also browse through recorded events and use a timeline bar to move backward or fast forward.


DS Finder.As the name suggests, this app will enable you to pinpoint your device on the network, display all important information such as name, model, IP, MAC address, storage status, uptime, etc. This data can be easily sent via email or used in other sharing apps. Also, once you login you can add the device as a favorite which will spare you the need to fill in the credentials next time. Here are the most important actions you can perform with this app.


 ie
ie
Downloading stuff on your home network is one of the best features you get from owning a NAS system. DS download is the app that allows you to manage your download tasks wherever you are and have them ready for the time you get home.The app is pretty simple. You have quick access to your download tasks, you can remove, resume, delete etc. There is also an integrated browser available so you can use that to navigate and select what file or torrent you wish to download. If you want extra options, you can tap on menu > settings and there you can set download speed limits per protocol (FTP, Bit Torrent, NZB).


Next on our list is DS Cloud. If you are used to cloud sharing services such as Dropbox, SugarSync, Sky Drive or Google Drive then you should be already familiar with what this app provides. In a nutshell, it’s a way to map a folder on your NAS with a local folder on your Android device. The app runs in the background and synchronizes all changes directly to your phone. But don’t worry about bandwidth: you can easily set the app to only work when connected to Wi-Fi or set a size limit per file.


Test System & Methology
I now begin the benchmark portion of this article, but first let me show you my test system and the software I used:
OCZ Vertex 4 512GB SSD
Mainboard X79 MSI GD65 - Intel SATA 6G controller in AHCI mode
Processor Core i7 3960X at default configuration
Graphics Cards GeForce GTX 580
Memory 16 GB (4x 4096 MB) DDR3 1600 MHZ
Power Supply Unit 1200 Watt
Monitor Dell 3007WFP - up to 2560x1600
OS related Software Windows 7 64-bit SP1
Using a single hard drive and four HDD (Seagate Barracuda 3TB XT 7200RPM)for testing the NAS.
Performance Results
The Intel NAS Performance Toolkit was used, for performing 2 different test runs. Here are the results:
1 Disk:

4 Disks:
 e
e
I have also used ATTO Disk Benchmark:

Comparing the all new USB 3.0 standard Vs the previous generation USB 2.0 in term of performance, of course the new USB 3.0 is faster:

Temperature,Power Consumption,Output Noise
Temperatures were almost the same at all HDD's.The temperatures seems pretty descent.

It is a great option for high capacity, energy-efficient storage by using less power than a standard light bulb. If you use hard drive hibernation, or a power schedule, the overall power consumption will decrease even more.

One final note is that the DS414j is rather quiet when running, I never really heard the fans running at all. As far as noise from the hard drives, you really cannot hear them either. The Synology DS414j was sitting on my desk about two feet from me, and the noise level didn't bother me at all.
 c
c
Conclusion
Synology has taken a slightly different approach with their latest generation 4-bay NAS series, dumping the highly clocked Intel Atom D2700 dual-core processor in favor of lower clocked Comcerto C2200.Despite the lower clocked CPU and a single LAN port, the DS414j succeeds to provide good read/write speeds when transferring files from the server or to the server.Depending on the number of disks i have installed, the unit supports the following types of RAID: Synology Hybrid RAID, Basic, JBOD, RAID 0, RAID 1, RAID 5, Raid 5+ Spare, RAID 6 or RAID 10.To install each drive, we can easily remove each tray, use the included screws for securing the drive onto the bay, and then slide it back in.It comes with support for the latest Seagate 5TB drives, for a total storage space of 20TB when all bays are populated.When it came to power consumption the DS414j was much more efficient than devices fitted with Atom processors.The DS414j makes a perfect companion for any home environment.The DLNA capabilities and file sharing services are very potent for the average home or small office.I dare say the DS414j is very capable to serve up to 5 people who stream music, watch HD movies or work with various office files within the local network. The integrated backup features make sure either PC or Mac will not lose data when things go wrong.The dual fans are silent in operation and we are able to customize their speeds from inside the OS.

Coming back at the latest DSM version,i was very pleased with what Synology has done by building on the already proven platform and improving the visual aspect massively.Speaking of the OS, the NAS runs the latest version of the DSM, which is really easy to use and comes with a GUI similar of a regular operating system. From it we can also install new modules, coming from Synology or 3rd party.Add-ons are also available, like Audio Station, Photo Station, iTunes Server, DHCP server, Antivirus, Time Backup and many more.Synology also has available free applications for mobile devices running iOS, Android or Windows Phone OS like DS photo+, DS audio, DS cam, DS file or DS finder.I can’t tell you how good it feels to finally have a reliable, central storage device. I now have complete peace of mind when it comes to the safety of my precious data and backups, confident in the knowledge that if my computer broke tomorrow, I’d be back up and running sooner than you can say “AppleCare”. In a mixed OS environment, where I frequently encounter problems like my Mac not seeing my media center PC or vice-versa, a reliable shared network device is also a godsend. I may not be making of use of all the features the DiskStation offers, but that’s the point – you can make this thing into anything you want it to be.If your requirements are no higher than 5 people simultaneously using your NAS and there is no need for VM/Citrix, then the DS414j is a solid winner.And currently Synology’s DS414j is the most energy efficient device money can buy.If you're looking at Synology's latest crop of four-bay NASes, but want to spend $100 less than the dual-core Marvell Armada XP-powered DS414, the DS414j would be a logical choice.Synology is one of the top builders for this kind of solutions, but the decrease in price does not also mean lower quality materials.
Last edited by testman78; 09-22-2019 at 07:39 AM.
 Posting Permissions
- You may not post new threads
- You may not post replies
- You may not post attachments
- You may not edit your posts
-
Forum Rules


 Reply With Quote
Bookmarks