

Heey guys, I am entering.
Case is ordered (thnks to www.highflow.nl)
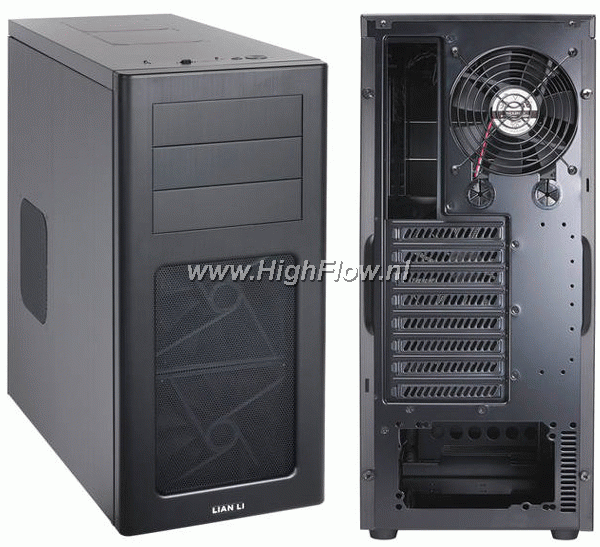
All black version
Soon more ofcourse! lets get some subbers!
Final pics


Heey guys, I am entering.
Case is ordered (thnks to www.highflow.nl)
All black version
Soon more ofcourse! lets get some subbers!
Final pics
Last edited by k.3nny; 01-13-2013 at 11:47 AM.
Casemodding Addict.
Case arrives tomorrow!
Casemodding Addict.
It haz begun!
Package arrived
Some seconds later
Dismantled the case and start measering things out.
Made an working table.
The first adjustment will be the front.

Casemodding Addict.
Update
Started with the top and front,
some masking and lining everything out.
Raw cut
After some elbowgrease
Then i started with the front, removed original frontpanel mesh, Tried some lianli mesh from another case on the drivecage area but Nah, thats not it.
I didnt want the Dual 14mm intake, so i fixed a plexiglass window for it, still not done ofcwaiting on some stuff.
Mounted
Started with the top plexi window,
rawcut
After some elbowgrease and P400 sandingpaper
Nice and smooth!
To the next update!
Casemodding Addict.
update time!
Psu relocation + searching for watercooling opertunities
Voiding the warranty like a boss!
Lets find a place for that naked psu!
Well thats a nice spot isnit?
Some motherboard standoffs to mount the psu-pcb to the case
i did a good job, with to standoffs
deleted some more Aluminium from the case.
gonna mount the fan on an angle, so it gets fresh air (update for that incomming) and blowns the air to the headspreaders, and pcb.
Thinking about this layout, but i need a mcp355 pumptop to confirm this loop, so thats on hold untill i got the top.
Greets!
Casemodding Addict.
Update
Created an "intake" so i had no airflow isseus with the psu
Then i sawed of the mounting side of the psu INCLUDING the inline filter, so its all 1 part and not 1 thing here and 1 thing there (oh wait, xD! )
Today also came 2 packages in the mail, 15meter of red paracord sleeving and 50x152cm matte black vinyl (still wanted to try that and i kinda like it)
Cleaned the front, no more fans there, because the hole innerside will be random build :P
* matte black blends in perfectly with brushed alu!
My psu was already sleeved with MDPC sleeving, but i wanted to go heathshrink less, so i took paracord.
when sleeving all wires 1 at a time i created this wire pass thru.
*also ripped a piece of metal away so i can let the wires guide at the back of the motherboard panel
also my top a step further, more about that tomorrow.
see u with the next update
Last edited by k.3nny; 11-28-2012 at 04:53 PM.
Casemodding Addict.
Nice work!
Thnks Wisk
Casemodding Addict.
Looking good!
GlobalPR.com.tw | Official Agency for Lian Li
Visit Lian Li at www.Lian-Li.com
www.facebook.com/LianLiHQ
update
top window done and finished off with a black matt vinyl edge
Bought myself some aluminium
500x1000mmx1mm
Drawing all the plates on the big plate and cut them to size
Frontplate innerside.
Ready to bend.
Psu plate is done
Mounted
Reservoir spot.
Midplate done!
creating some tabs to mount the midplate on.
Thats straight
Radiator placement ?
See u next time
Casemodding Addict.
update!
Creating the hole for midplate
Jigsaw time!
Perfect!
Creating 2 pass thru's
Used realy strong gleu to hold up the rad against the midplate, so its supper clean
started with some matt black vinyl to create some finished looks
midplate
frontplate
psu plate
Overall for today
See u guys next time
Casemodding Addict.
Started with sleeving, Yes i am using Sata sleeving
Both done.
Then i started to play around with the reservoir, Did something realy nice, but need opinions tho Red acrylic tube in the midde, and will support 1 10mm led!
Thats it folks !
Casemodding Addict.
Soo, Made finally the ventilation for the PSU.
Stil looking clean (in my opinion).
Casemodding Addict.
That came out handy with the grill in the top. Looking good
update,
Well, My budget has reached his max point (49 euro) so yeah, All i can do is take the my daily and strip it down so i could do the heart transplant :P also using some other parts
Also created a new powercable fot the pump and sleeved it
Because i was so busy i forget to take pictures, i spend around 6 hours today on the setup and case.
Here some random pics, less text more pics
Thats it for this update
Main point was i could re-use 3 pieces of solid tubing, glady saved me 10 euro on a new 2 meter acrylic pipe!
Budget modding is always fun to do, and see what u can realy achieve with less expensive things
Costs:
Case: 110 euro
Alu sheet / paracord: 25 euro
Splitted order with a pal HighFlow.nl: 60 euro 20 Euro my costs
2 liter Demiwater: 4 euro
Mat black vinyl : Free
Total 159 euro
Got 1 euro left, The point was i had some things laying around, could save on those allot
Bye guys!!

Casemodding Addict.
Time to explain how to make acrylic tubing * my english is not THAT good!!!!
First of al, search and use object for the bends, i prefer steel, it keeps the heat stuck, and doesnt cool down your acrylic pipe that quick.
Always make the tube longer than u need!, the bends can not come out how u want sometimes (weakspots)
I use a Power suply 7mm thick cord (EU)
I prefer a hairdryer, because u cannot overheat the tube and it wont make it to warm so you pull the tube flat.
If the tube is hot enough, u cant start bending the pipe, dont pull to hard otherwise u get a flat spot at the end of the pipe.
If u are at the point that your tubing is bend and lined up with the fittings u can cut it to size
I used a cheapo rotary tool and a dremel atachment (sanding barrel P120)
My working situation xD!
Tape it 7/8mm of the edge, so you know you dont get an ugly spot above your fitting
only sand the tube till its frosted! dont use pressure, dont create flatspots, the pipe is sold as 12mm but the exact size is 12.3/12.7! so yes just a little touch all around is enough! finish it up with sandpaper Grid P400 so the rubber ring wil fit nicely!
Test the fitting
Thats it for this little guide*tips
1. Use always the same test fitting! Orings can and will be damaged while testing!
2. If there is to much tension in your object between for example GPU-CPU bend, leave it in place, Heat it up til you see that the tension will be away *you wil probaly feel or see gpu moving
3. always use the same bending object in a build, its not that nice to see different bends in a casemod( or the situation is different)
4. Cool the tube after bending with a bucket of cold water
5. Only use C47 of bitspower!
6. This "guide" works only the best with 12mmODx8mmID Acrylic tube, I know there is also 1/2mm thick pipe but u will get flat spots or kinks in the inner bend.
7. Cut the tube gently! u dont want to trow away a perfect bended tube! because of a crack.
Further on with this update!
ready to be cleaned and Filled up
Waterrr
Dirty loop
After draining the loop, i put fresh and new water in it, Then started to play with Mayhems red Dye!
1 drop
2 drops
3 drops
4 drops
5 drops
6 drops
Gonna leave it like that for now, maybe some more or ill thin it up, we will see in the future
Rest of the pics.
Bye bye!
Casemodding Addict.
Looking great, k.3nny!
GlobalPR.com.tw | Official Agency for Lian Li
Visit Lian Li at www.Lian-Li.com
www.facebook.com/LianLiHQ
Ty for the kind words
Casemodding Addict.
Hi k.3nny,Originally Posted by k.3nny

can I ask you how you managed to bend that alu plate?
I have a 1,5mm thick alu sheet that I need to bend, and I would like to know what tools you used.
Thanks in advance
Like that :P
haha
Casemodding Addict.
So basically a couple of C-Clamps and some force will do the trick?
Awesome
Yes
Casemodding Addict.
I like how you make your own tools. Given the proper tools, most anything is easy. But making your own... That's genius!
@Syndil
Thnks for the kind words!
Some pics with installed light.
Window preparing.
*Lightning is CCFL! and i love it! the light is perfect (IRL)
Casemodding Addict.
A little update, Did some Frosting edges on the plexi top, same design will be on the sidepanel

Casemodding Addict.
 Posting Permissions


 Reply With Quote


Bookmarks