

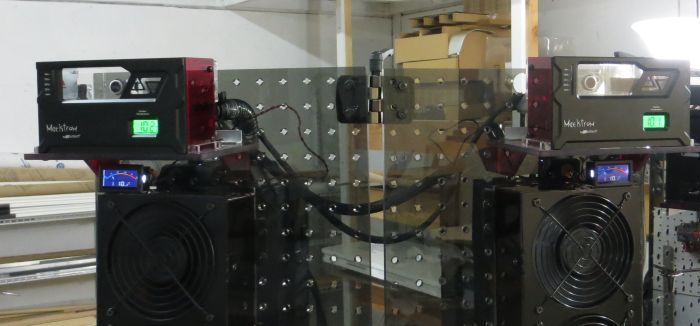
Starting to look like something there:


Starting to look like something there:
Navig's list of mod links ~ Exoframe Mini ~ Cabinet PC ~ Vertical Benching Station ~ Brass Tacks ~ Exoframe 2.0 ~ Project Vitis ~ Project Resilience ~ Very Low Cost Benching Station ~ The Exoframe Project ~ Jewel Box Project ~ DIY Benching Station ~ Console Project ~ Project Dark Side ~ Tower PC ~ Dual Tower PC ~ Bench Rig ~ My only standard case
Awesome
Sorry for my bad english
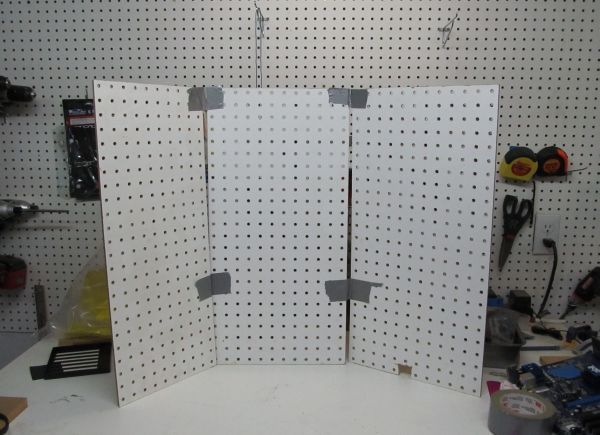
Double up the radiator panels!
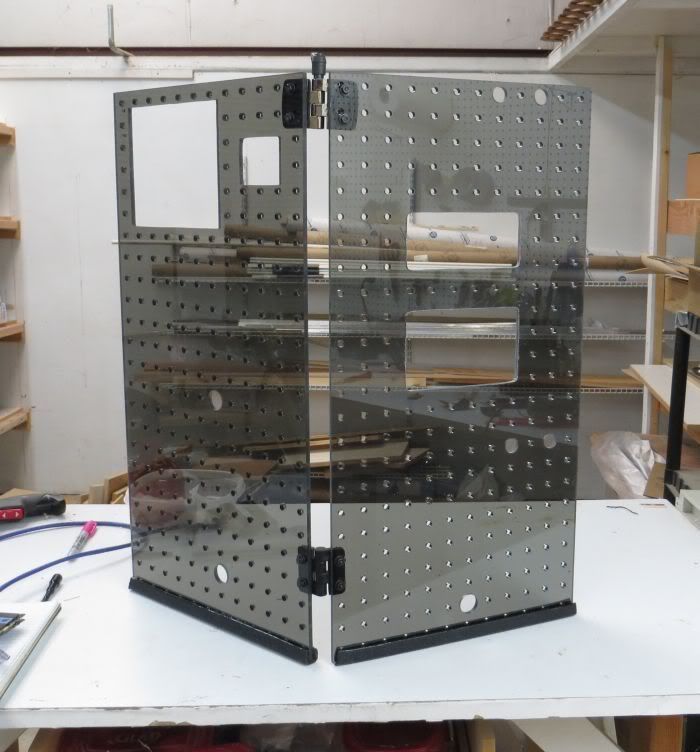
Assemble all the panels.
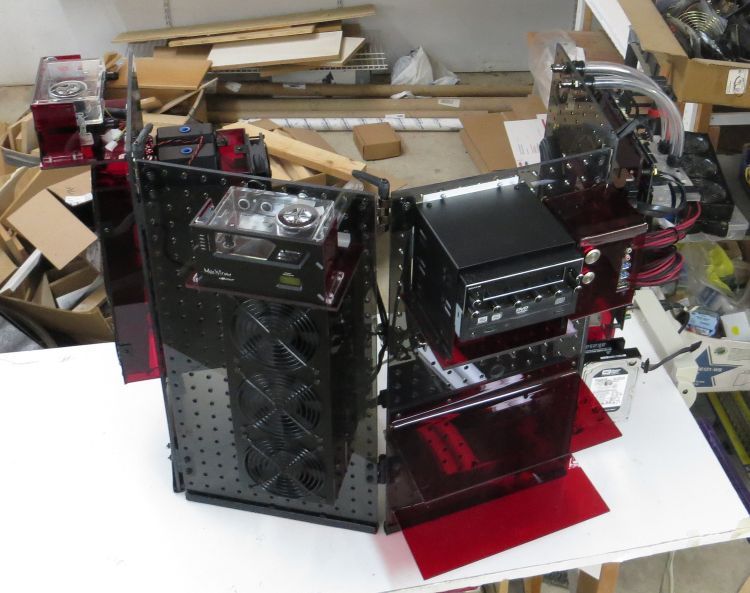
Here I?ve got them all laid out like Asian panels. If I kept them all in a single plane like this, then I definitely need the extra edge support strut.
However, this unit is going on a square coffee/end table, so the actual end configuration of the panels will be something like this:
Photographing this layout is going to be a little goofy tho, because at face level, you can?t really photograph the whole thing in one picture.
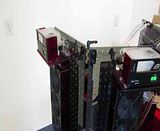
Going from left to right of the case:
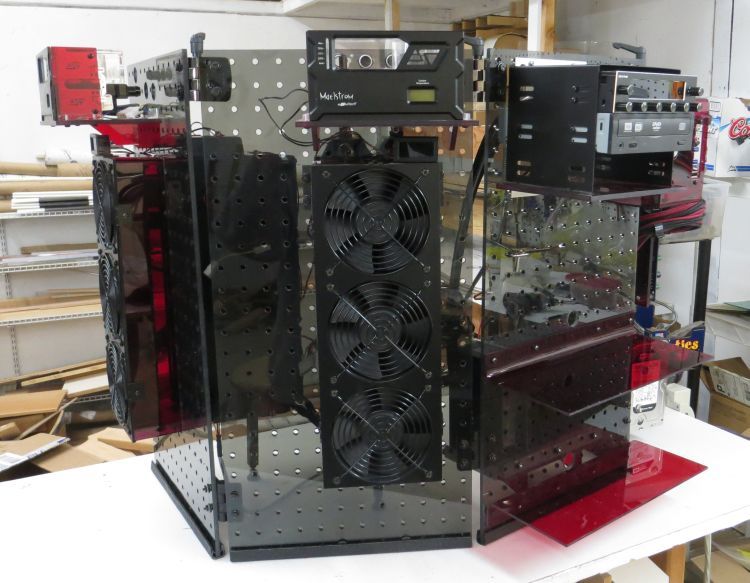
And the view from the backside.
I know this project is looking like its almost complete, but these is still a lot of cleaning up to do--working all the cabling (remember 12 fans, 2 pumps, 2 radiators, 4 temp probes, 6 hard drives, 2 optical drives, switch panel devices), plus I?ve got to run all my watercooling lines.
Navig's list of mod links ~ Exoframe Mini ~ Cabinet PC ~ Vertical Benching Station ~ Brass Tacks ~ Exoframe 2.0 ~ Project Vitis ~ Project Resilience ~ Very Low Cost Benching Station ~ The Exoframe Project ~ Jewel Box Project ~ DIY Benching Station ~ Console Project ~ Project Dark Side ~ Tower PC ~ Dual Tower PC ~ Bench Rig ~ My only standard case
I wonder if placement of elements on these panels shouldn't be planned such way so that it can be folded (with elements inside for extra protection) in very compact way for transportation? At least on panels with relatively lot of free space unused by mounted components, eg. with rads.
An interesting idea. I did base the entire concept of this build around modularity, so I could see how some sort of transforming system would fall out. I think that you would need something stronger than 1/4" acrylic.
Navig's list of mod links ~ Exoframe Mini ~ Cabinet PC ~ Vertical Benching Station ~ Brass Tacks ~ Exoframe 2.0 ~ Project Vitis ~ Project Resilience ~ Very Low Cost Benching Station ~ The Exoframe Project ~ Jewel Box Project ~ DIY Benching Station ~ Console Project ~ Project Dark Side ~ Tower PC ~ Dual Tower PC ~ Bench Rig ~ My only standard case
Time to start putting together all the wiring.
I needed to build a custom wire to provide 5v power to all my temperature probes.
Sleeved it out:
And here it is installed with some labels of other wires running around the back:
Red = 5v power to temp probes
Blue = wires to pumps
Purple circle = silver cables to all the fans
Fire the system up and make sure all my temp probes are functioning:
But I?ve got to get that cable mess cleaned up a bit:
I?ve found that cable organization, you?ve got to all different kinds of techniques to get clean results. I group cables that run together in visible areas and organize them in lines that make sense. I use multiple different types of cable clips. And I find ways to hind excess wire lengths in bundles.
Next I turned my attention to the PSU cabling.
I?ve got all kinds of data and power cables running between these 2 panels.
I also pre-wired up power and SATA cables for 6 hard drives. That way when I transfer over my main system components, I can just hook those bad boys right up.
I decided to try out a new product to organize these cables:
http://www.performance-pcs.com/catal...Path=44_32_655
Techflex F6.
And voila:
Worked pretty much as advertised. I cut with a stout pair of tin snips, then melted the ends with a mini-plumbers torch. Edges are not very pretty without a hot-knife, but it was fine for me as this is on the backside of this mod. Without a ht-knife, you could wrap the ends with some velcro strip.
Navig's list of mod links ~ Exoframe Mini ~ Cabinet PC ~ Vertical Benching Station ~ Brass Tacks ~ Exoframe 2.0 ~ Project Vitis ~ Project Resilience ~ Very Low Cost Benching Station ~ The Exoframe Project ~ Jewel Box Project ~ DIY Benching Station ~ Console Project ~ Project Dark Side ~ Tower PC ~ Dual Tower PC ~ Bench Rig ~ My only standard case
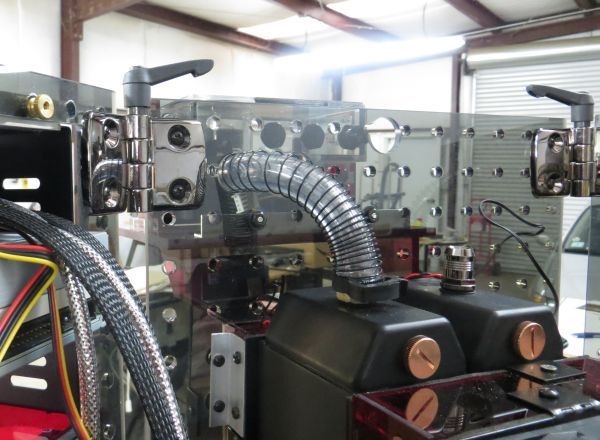
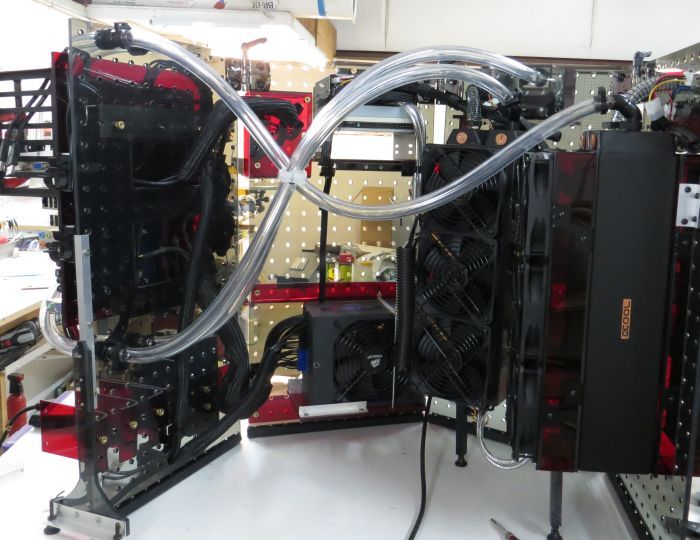
Next it was time to get to work on the watercooling tubing. I went with some simple ?”OD ?”ID cleaflex tubing.
My first run was the most difficult--this tight bend from the pump to the radiator:
I had to use some anti-kink coils to prevent a little flattening of the tubing.
And double it up! One for the cpu unit and one for the gpu unit.
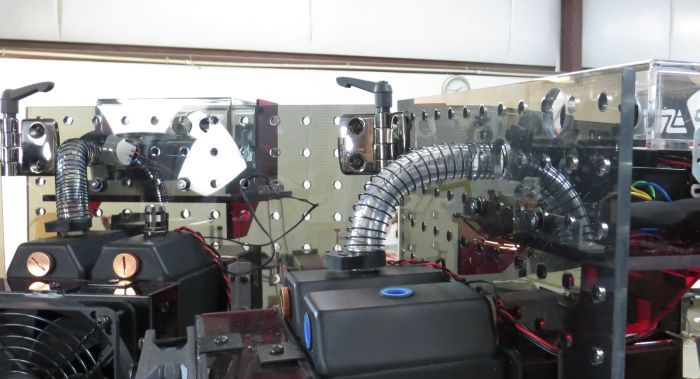
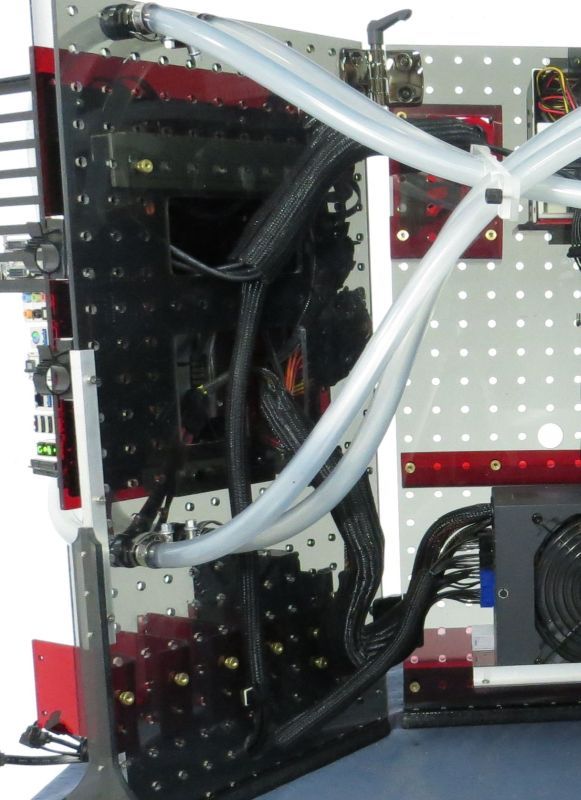
Next I started in on the longer tubing connecting the radiator panels to the motherboard panel.
And I paused here because I felt these long lengths of tubes needed some structural organization.
So I started fabricating a tube clip to cinch them together.
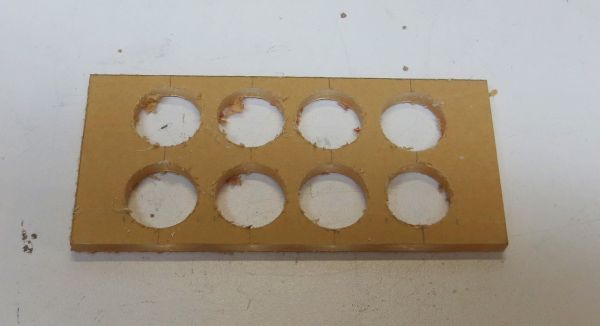
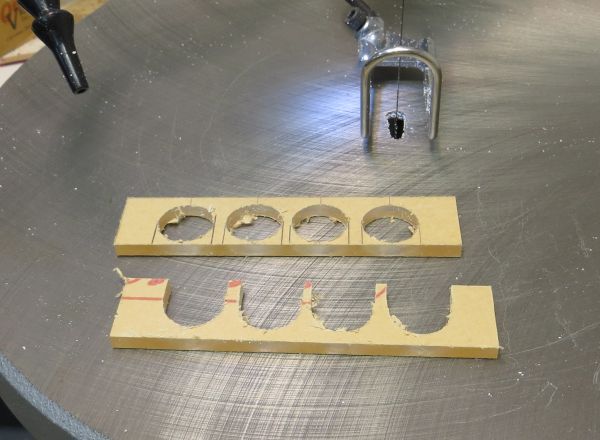
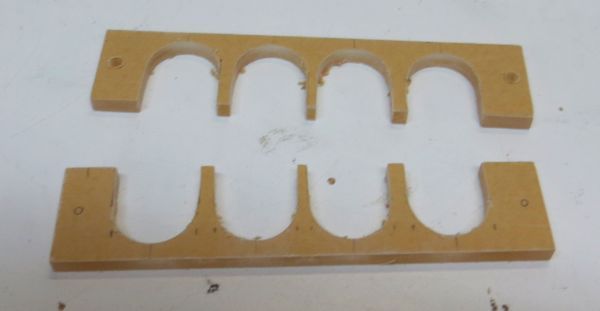
I started with a sheet of ?” clear acrylic:
Drilled a bunch of holes with a ⅞” unibit.
Bisected and slotted the pieces:
So that I had 2 halves:
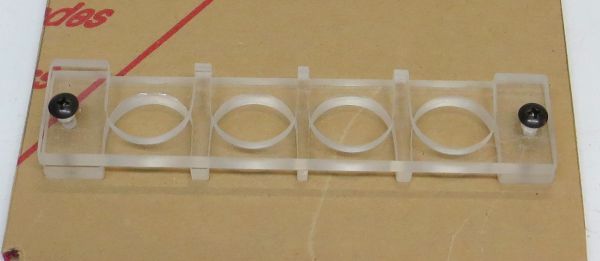
A lot sanding and smoothing, and here was my clip:
And here I installed the rest of the tubing runs, with the clip:
The front portions of tubing to the gpu and cpu were already run early on:
So now it was time to actually fill and bleed my loops.
Navig's list of mod links ~ Exoframe Mini ~ Cabinet PC ~ Vertical Benching Station ~ Brass Tacks ~ Exoframe 2.0 ~ Project Vitis ~ Project Resilience ~ Very Low Cost Benching Station ~ The Exoframe Project ~ Jewel Box Project ~ DIY Benching Station ~ Console Project ~ Project Dark Side ~ Tower PC ~ Dual Tower PC ~ Bench Rig ~ My only standard case
At this point in the build, I suffered a few significant setbacks.
First, my fan controller burnt out, thanks to jab-tech replaced, then upgraded to the Lamptron touchscreen controller.
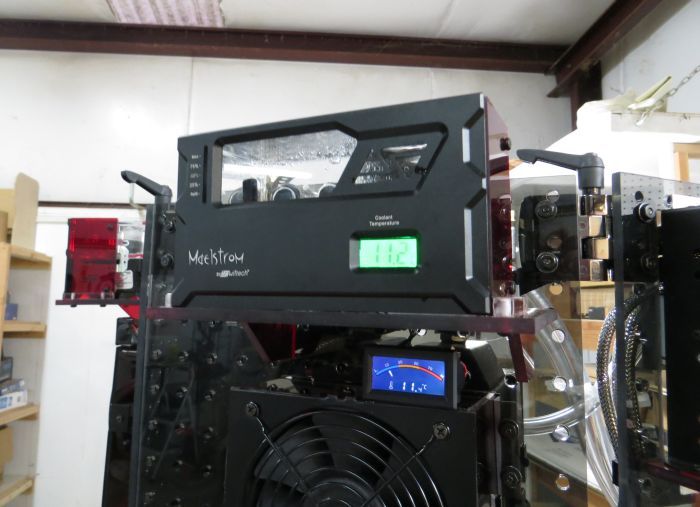
At the same time, I had to deal with a leak from one of my Swiftech Maelstroms.
After running loop for a while, I would get tiny tiny droplets, seemingly from this general location:
In fact, I managed to get an actual pic of the leak:
Given the location, I immediately suspected the seal between the pump and pump top, as this was the Maelstrom where I mounted my previously bought MCP35-x. But after rebuilding it several times and checking the O-ring, it persisted.
So I completely disassembled the Maelstrom, which turns out to be quite easy. After taking off the cap and scooping out the bubble sponge, there is a nut that compresses a nipple fitting that holds the pump top to the reservoir.
And this revealed the source of the leak:
If you look carefully, you can see that the black wire had strayed into the area between the pump top and reservoir (getting flattened) and opening enough gap to let a tiny bit of fluid past the O-ring. Easy fixed!
Flushed the system with distilled water.
Navig's list of mod links ~ Exoframe Mini ~ Cabinet PC ~ Vertical Benching Station ~ Brass Tacks ~ Exoframe 2.0 ~ Project Vitis ~ Project Resilience ~ Very Low Cost Benching Station ~ The Exoframe Project ~ Jewel Box Project ~ DIY Benching Station ~ Console Project ~ Project Dark Side ~ Tower PC ~ Dual Tower PC ~ Bench Rig ~ My only standard case
Bleeding the system is pretty easy. I just open the taps at the bottoms of the alphacool radiators.
Even easier than this pic, as I?ve since added shut-off taps here.
Navig's list of mod links ~ Exoframe Mini ~ Cabinet PC ~ Vertical Benching Station ~ Brass Tacks ~ Exoframe 2.0 ~ Project Vitis ~ Project Resilience ~ Very Low Cost Benching Station ~ The Exoframe Project ~ Jewel Box Project ~ DIY Benching Station ~ Console Project ~ Project Dark Side ~ Tower PC ~ Dual Tower PC ~ Bench Rig ~ My only standard case
Very unique.
I like it. Good job.
Well my system was go to go. Ready to change out the mock-up parts and make way for a real system.
But first I needed to move it across my shop to the corner where I take my photos. I?ve had a few questions about its portability, so here?s how I did it:
1) Disconnect all the wires from the fan controller (actually this step I was also changing the fan controller to the Lamptron touch screeen).
2) Drain and disconnect the tubes from behind the motherboard.
3) Undo the hinges between the radiator unit and the mobo/device panels.
It was pretty easy to move in these 2x2 panels.
After move:
Re-hook up the hinges, wiring, and plumbing.
Navig's list of mod links ~ Exoframe Mini ~ Cabinet PC ~ Vertical Benching Station ~ Brass Tacks ~ Exoframe 2.0 ~ Project Vitis ~ Project Resilience ~ Very Low Cost Benching Station ~ The Exoframe Project ~ Jewel Box Project ~ DIY Benching Station ~ Console Project ~ Project Dark Side ~ Tower PC ~ Dual Tower PC ~ Bench Rig ~ My only standard case
This has been my first watercooling system in a while (last was my Exoframe)
While I’m no expert seasoned watercooled expert, 2 little tips I’d like to share!
Tip #1
I cut all my tubing with--a standard Home-Depot pvc pipe cutter.
Not really designed for this application, so you have to maintain pressure on the jaw blades to ensure the ratcheting mechanism closes. But its cheap, most people have one laying around from DIY projects, and it makes super clean cuts:
(Click pic for video)
Tip #2
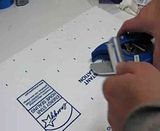
I also had one of these tools around, for DIY house projects. It’s known as a strap wrench:
This allows you to tighten fittings without scratching them, say with a wrench.
It’s a little big for computer case fittings, but it still works great.
.
Navig's list of mod links ~ Exoframe Mini ~ Cabinet PC ~ Vertical Benching Station ~ Brass Tacks ~ Exoframe 2.0 ~ Project Vitis ~ Project Resilience ~ Very Low Cost Benching Station ~ The Exoframe Project ~ Jewel Box Project ~ DIY Benching Station ~ Console Project ~ Project Dark Side ~ Tower PC ~ Dual Tower PC ~ Bench Rig ~ My only standard case
The last thing I fabricated was something that actually won’t show up much on the final pics for this system: dust filters.
Aesthetically, I don’t really want to be covering up my lovely radiators, but as this is going to be my main system, its got to have some dust protection.
I’m going with these DEMCifilters:
http://www.performance-pcs.com/catal...ducts_id=27510
I’ve got the magnetic strips mounted to a plastic frame that is double-stick taped to the radiator fronts:
That way I can just reach over and take the filter off, clean it, and slap it back on.
Navig's list of mod links ~ Exoframe Mini ~ Cabinet PC ~ Vertical Benching Station ~ Brass Tacks ~ Exoframe 2.0 ~ Project Vitis ~ Project Resilience ~ Very Low Cost Benching Station ~ The Exoframe Project ~ Jewel Box Project ~ DIY Benching Station ~ Console Project ~ Project Dark Side ~ Tower PC ~ Dual Tower PC ~ Bench Rig ~ My only standard case
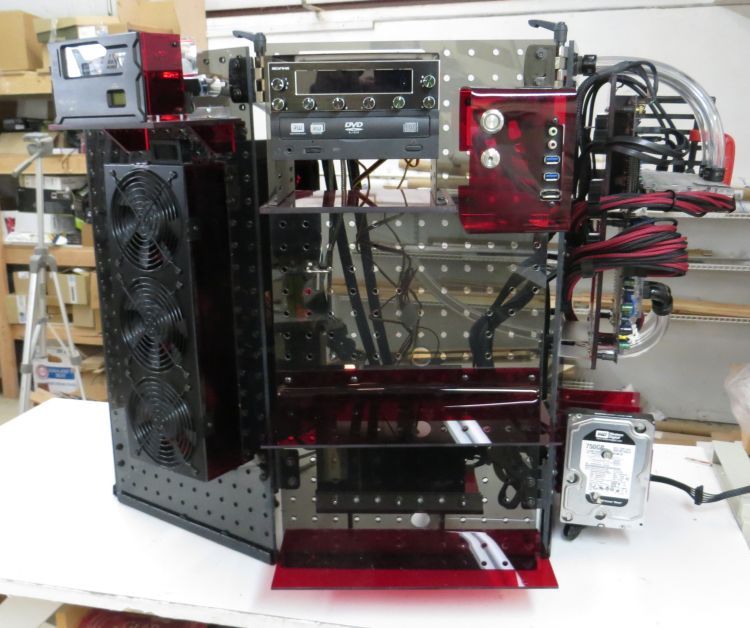
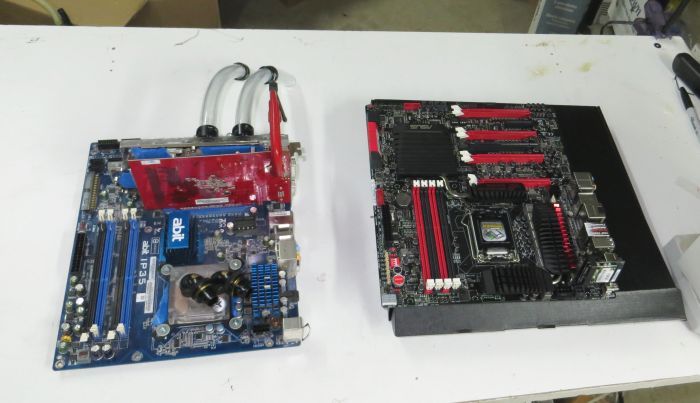
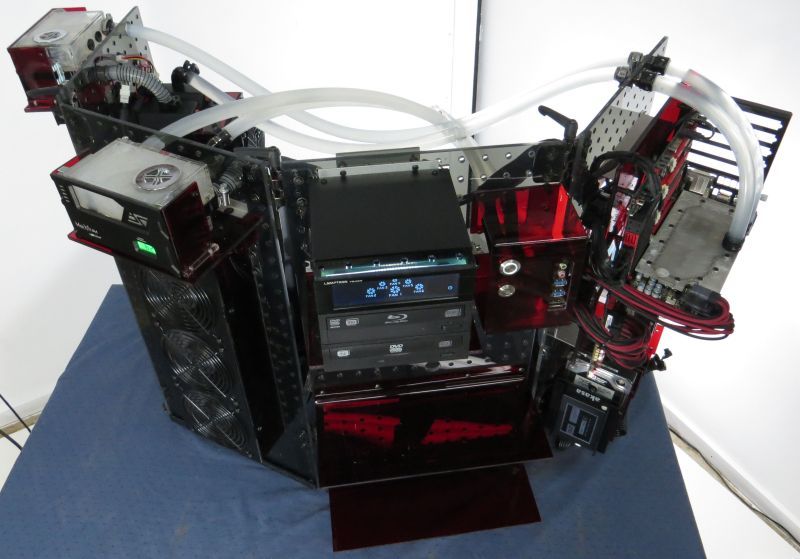
Okay, time to start installing the real hardware!
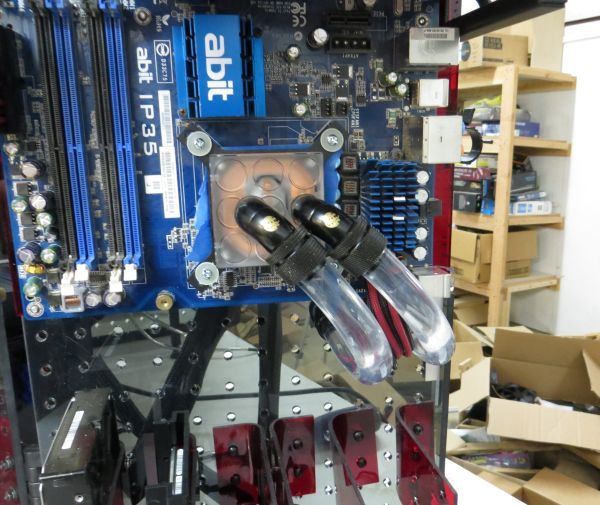
Got my mockup board (fully functioning IP35) off, and going with a Asus Maximus V, i3770k.
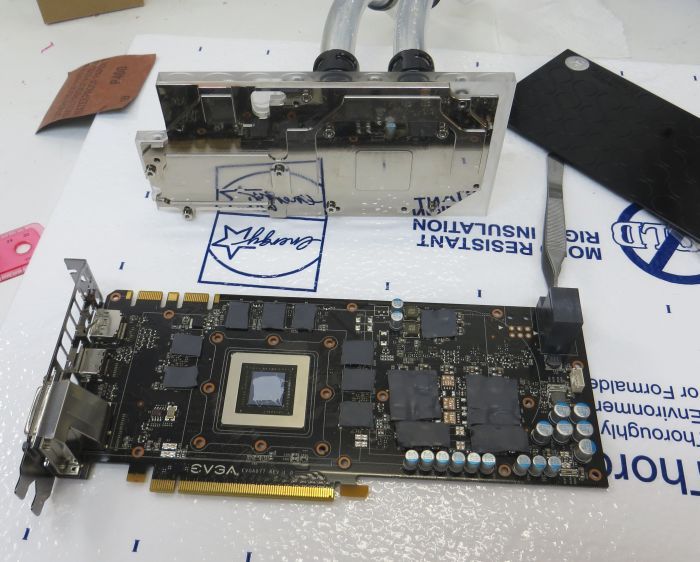
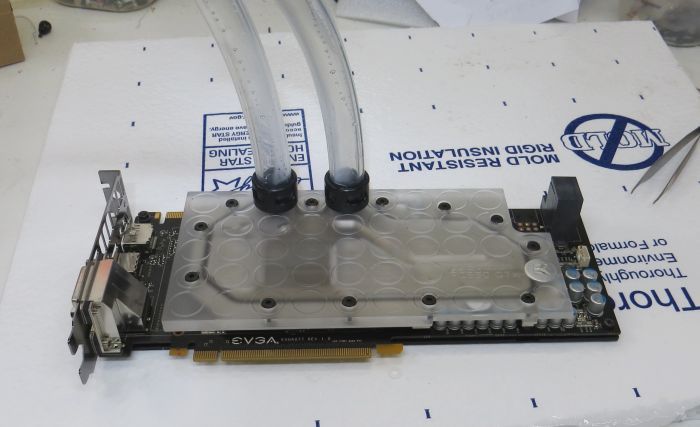
Actually, first I tackled the video card, evga GTX 680. We’re putting on an EK full coverage block with backplate.
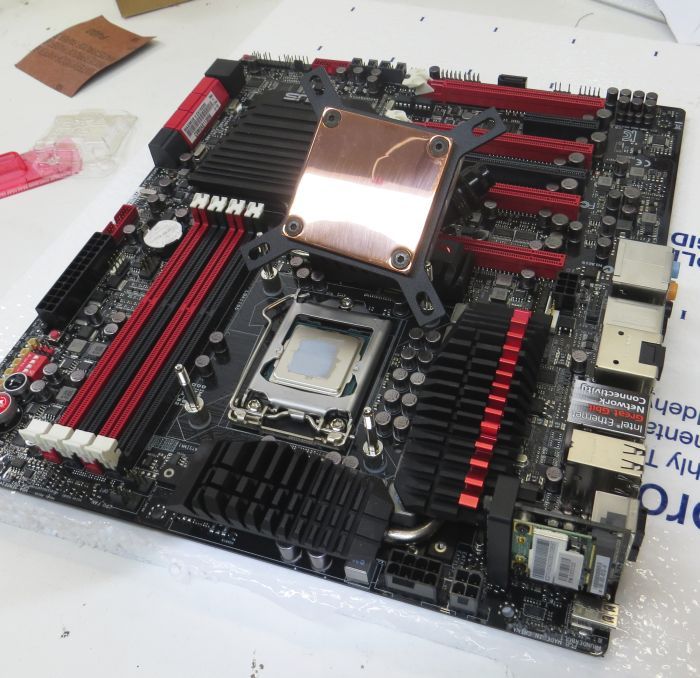
Then transferred the cpu block, again EK (supremacy acrylic):
I'm using Phobya HeGrease as my TIM on both blocks.
Put’er up on the rack:
Had to re-cut the tubing, but really only in these short runs from the bulkhead to the blocks:
Install some hard drives:
That’s the beauty of the modularity and openness of this system. LIterally went from mockup parts, to a fully installed, ready to power-up system in one hour.
And here I fired it up for the first time:
The system is over in this corner of my shop, where I got some nice plain walls. This is where I take all my nice hi-res, closeup pics of my completed builds. Ultimately, this one is destined to be in my office as my main system.
My “completed build pics” to come....
Navig's list of mod links ~ Exoframe Mini ~ Cabinet PC ~ Vertical Benching Station ~ Brass Tacks ~ Exoframe 2.0 ~ Project Vitis ~ Project Resilience ~ Very Low Cost Benching Station ~ The Exoframe Project ~ Jewel Box Project ~ DIY Benching Station ~ Console Project ~ Project Dark Side ~ Tower PC ~ Dual Tower PC ~ Bench Rig ~ My only standard case
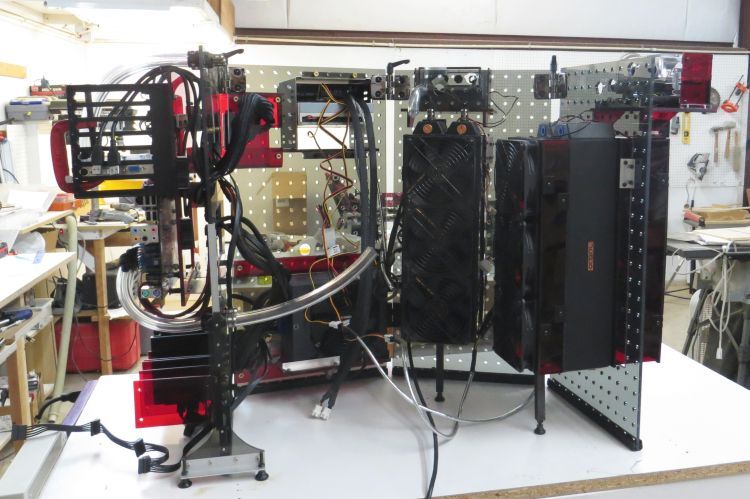
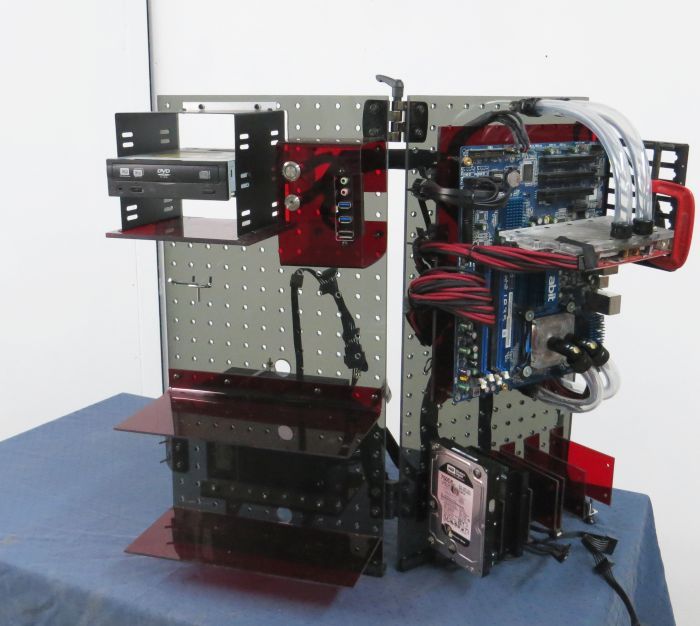
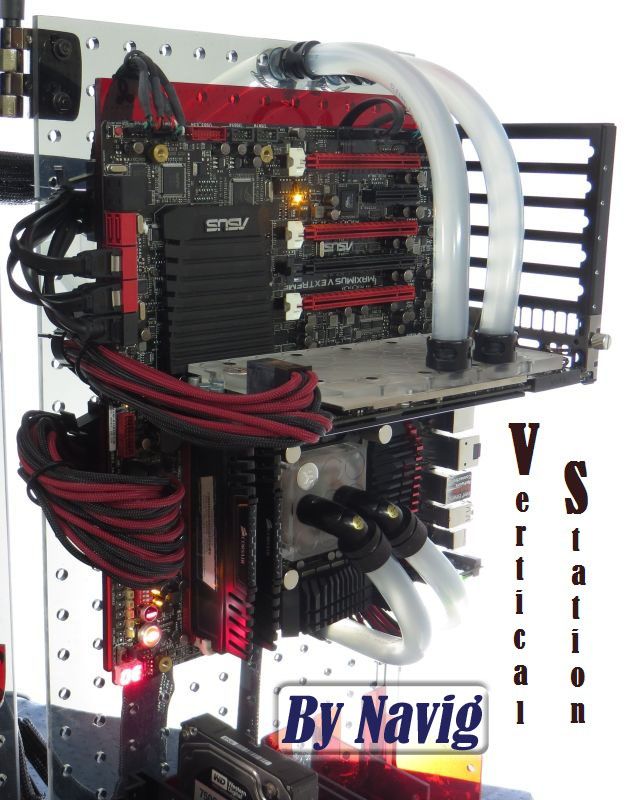
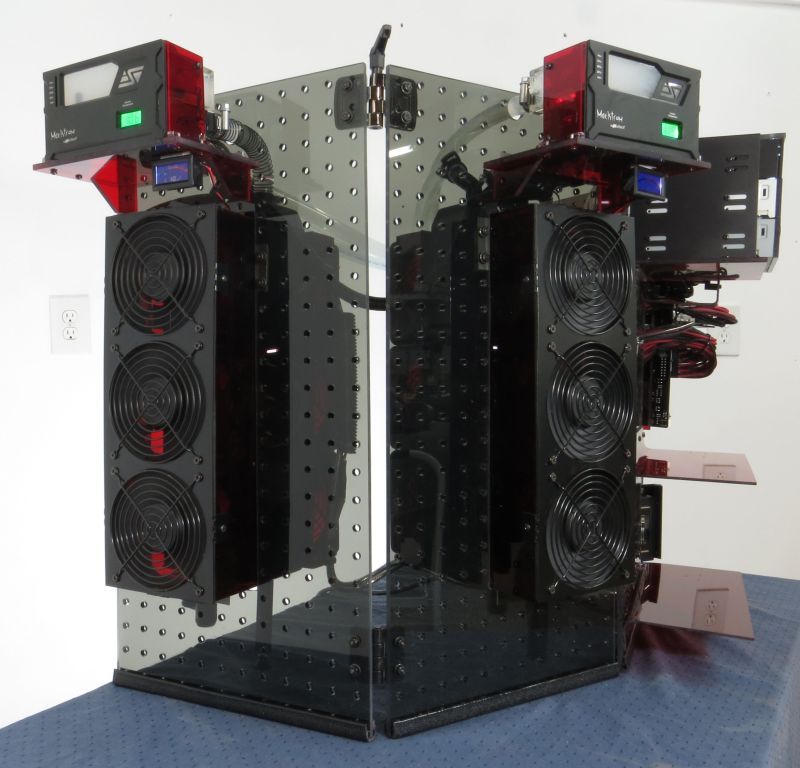
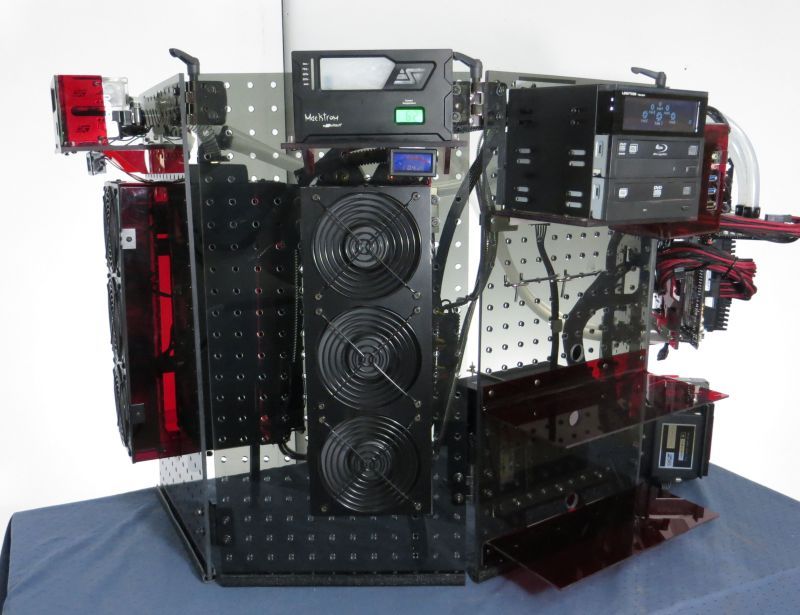
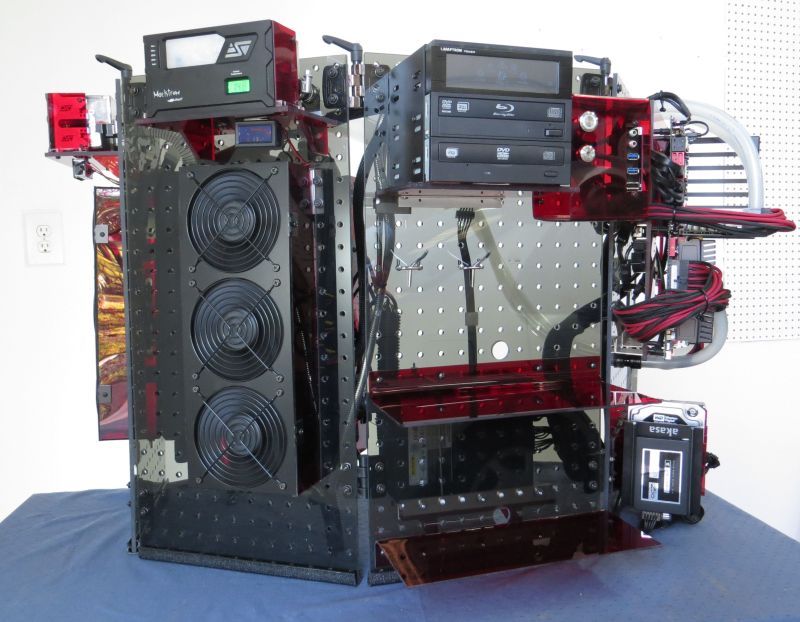
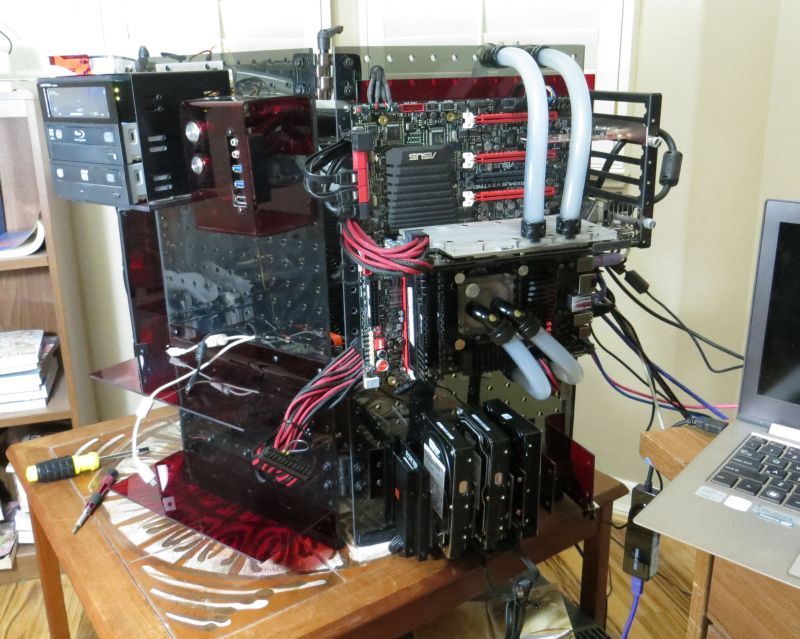
Vertical Station, Completed
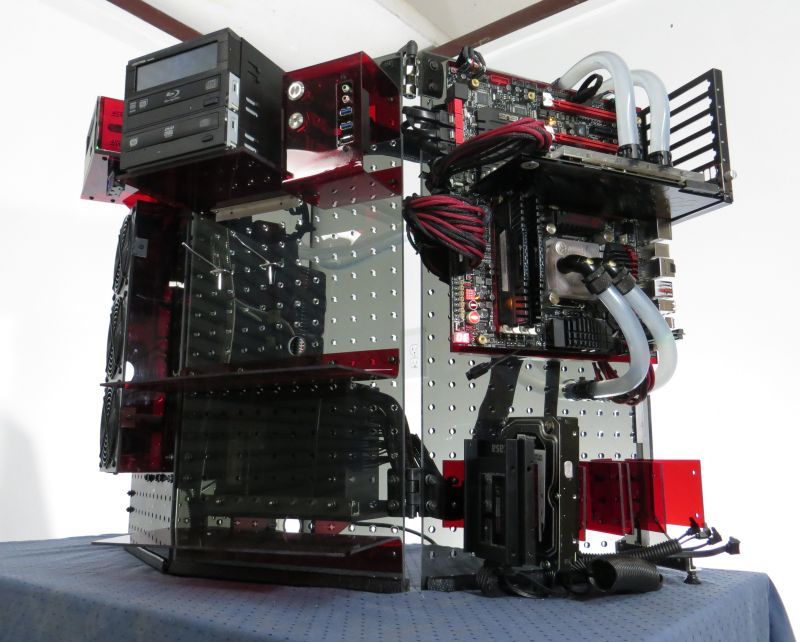
Welcome to my Vertical Station Completed thread. The build log is right above this post. But there might be folks linked directly into this post, who may not want go thru the entire build log, so I will have a few introductory pics summarizing the build.
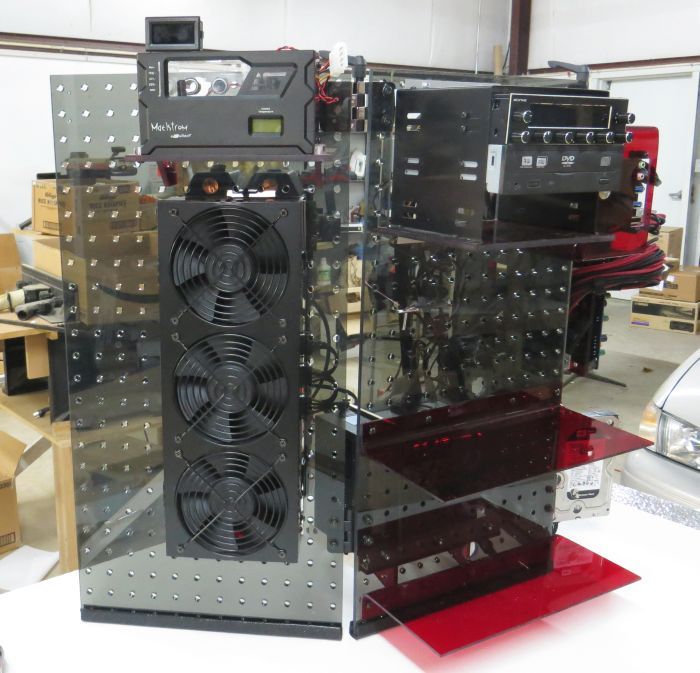
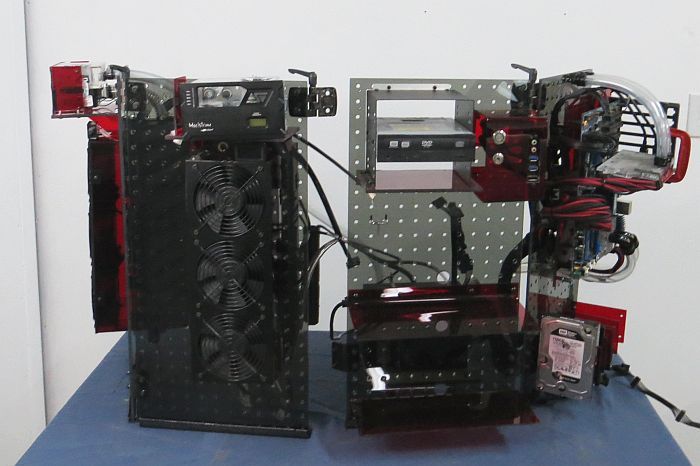
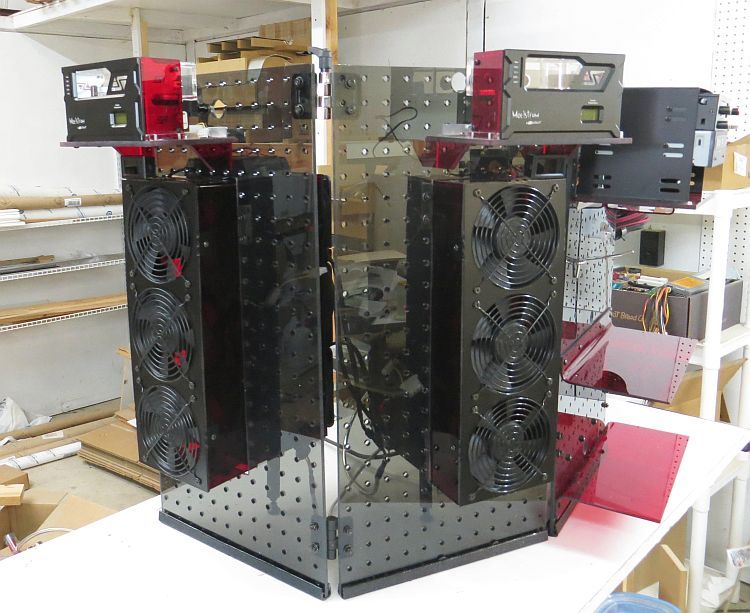
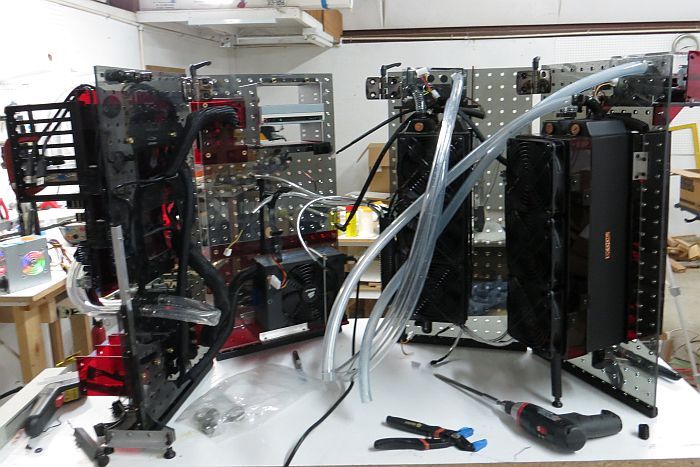
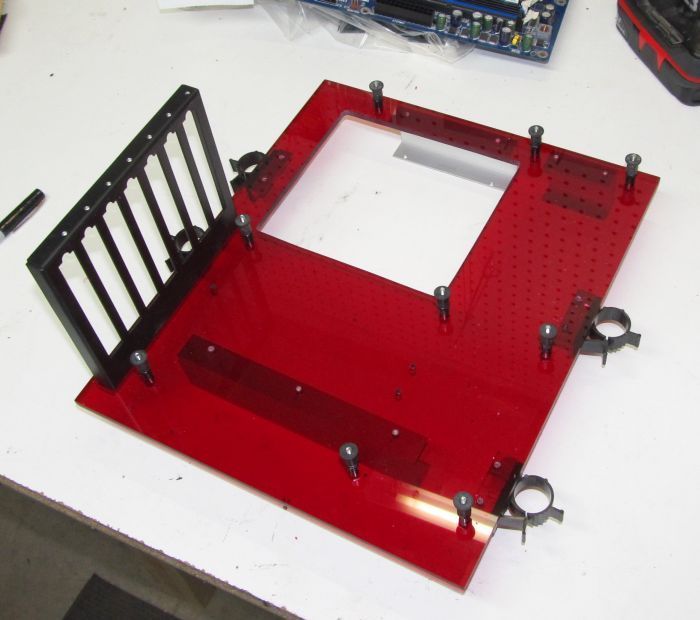
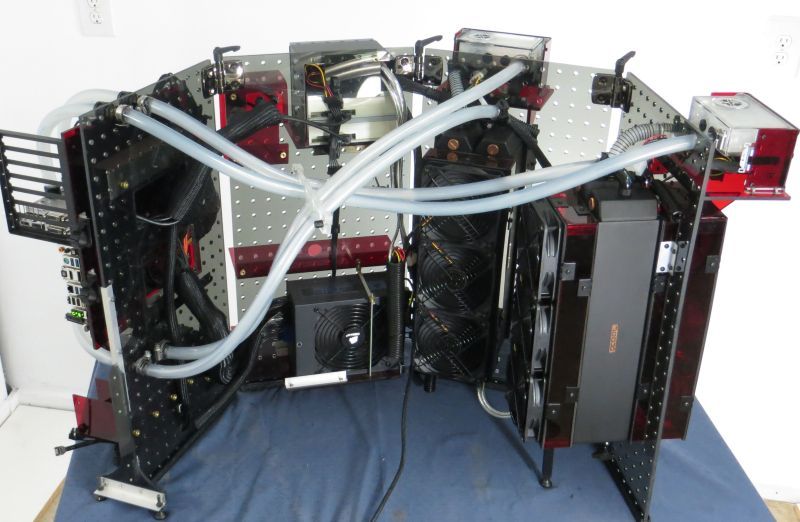
The whole concept of this build revolved around hinging together panels of pegboard to provide a structure to mount my various components.
The structural panels were made with ?? thick gray acrylic with laser cut pegboard holes, and I custom fabricated mounting units for all the components:
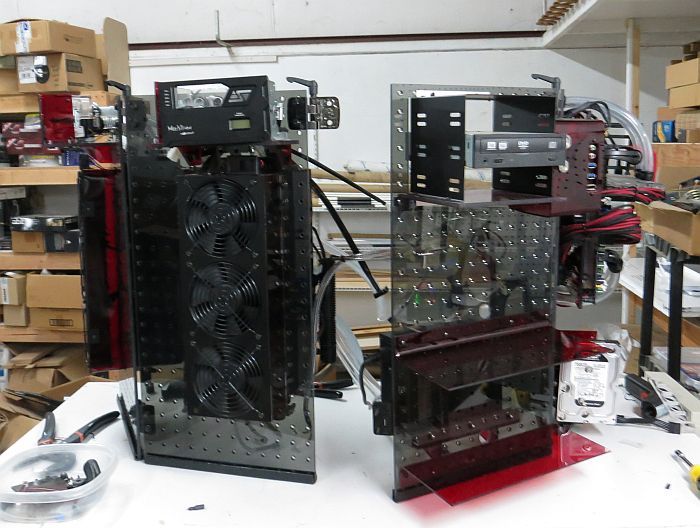
The leftmost panel holds my radiator, pump and reservoir for my graphics card.
The second panel holds the same units, but for the cpu.
The third panel houses my 5.25 bay, switch panel, and some storage shelves.
The rightmost panel holds the motherboard and hard drives.
The locking hinged panels allow me to choose whatever configuration I want the panels in.
(Click pic for video)
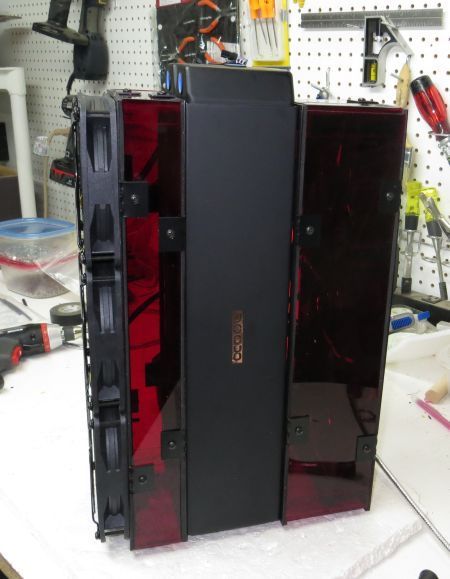
Ultimately I chose a semi-circle arrangement, so that the unit would fit on my table.
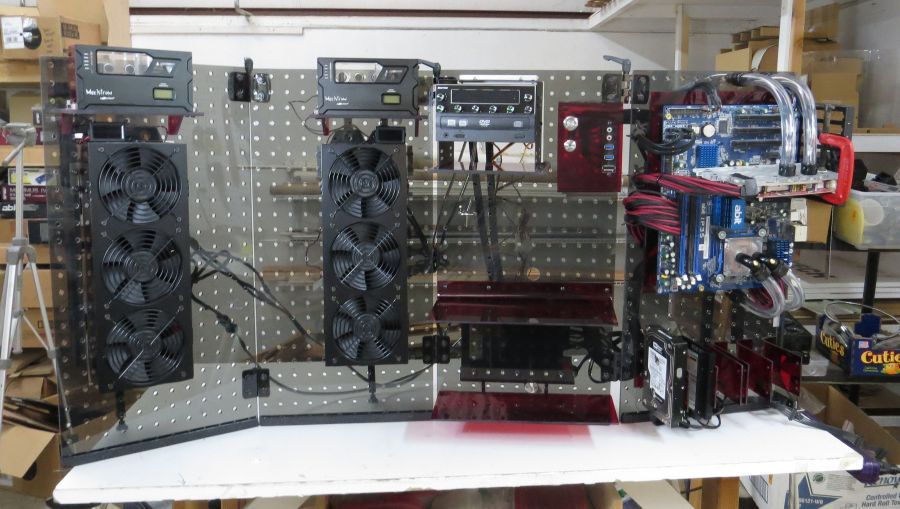
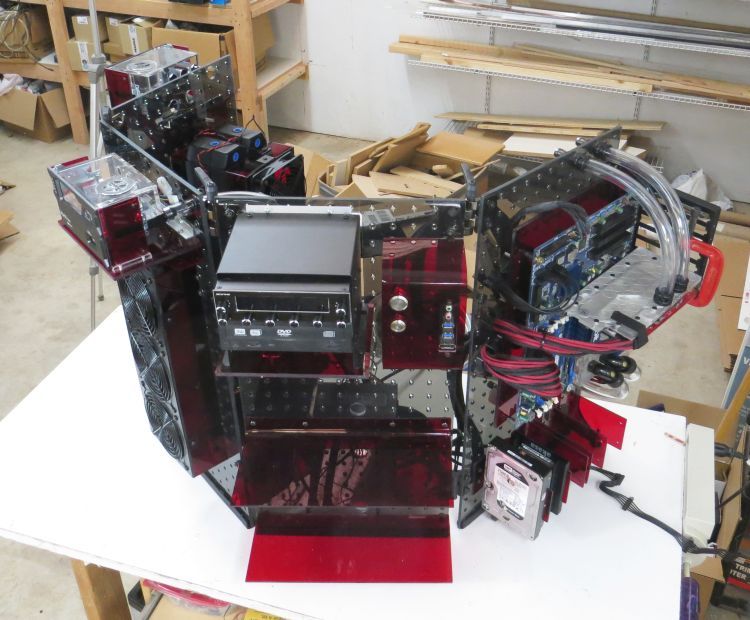
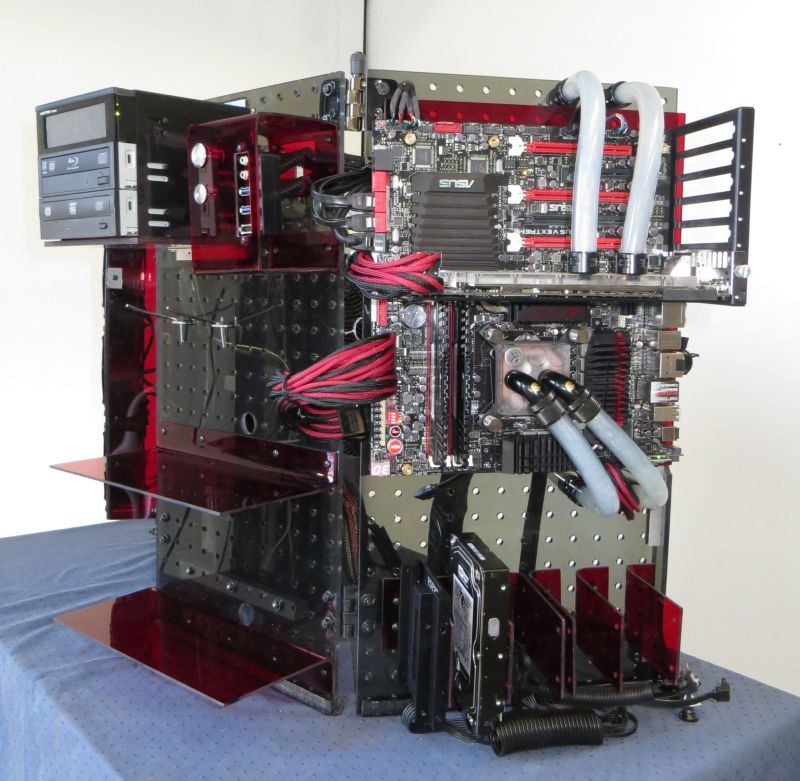
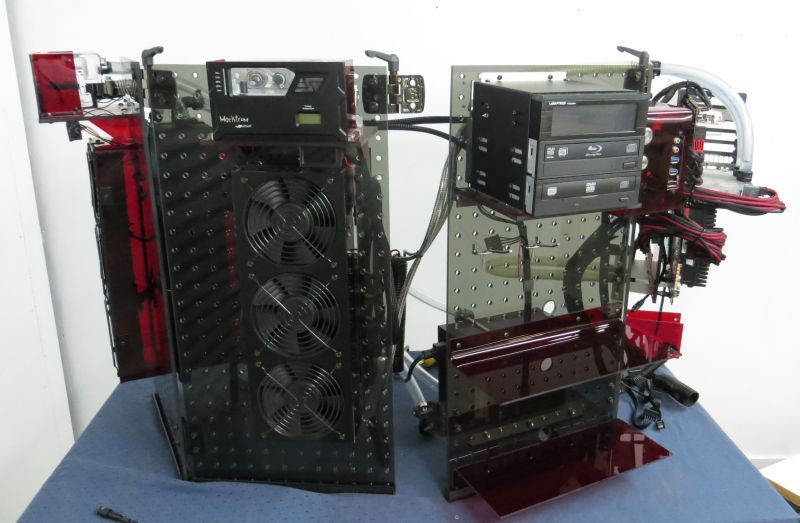
And here is the finished unit!
Navig's list of mod links ~ Exoframe Mini ~ Cabinet PC ~ Vertical Benching Station ~ Brass Tacks ~ Exoframe 2.0 ~ Project Vitis ~ Project Resilience ~ Very Low Cost Benching Station ~ The Exoframe Project ~ Jewel Box Project ~ DIY Benching Station ~ Console Project ~ Project Dark Side ~ Tower PC ~ Dual Tower PC ~ Bench Rig ~ My only standard case
Now let’s get up close to each of the panels.
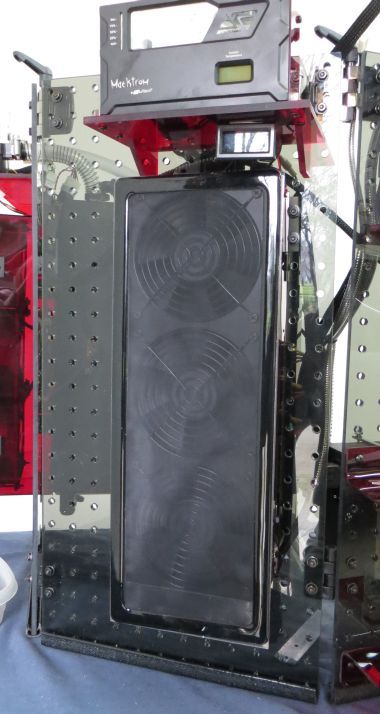
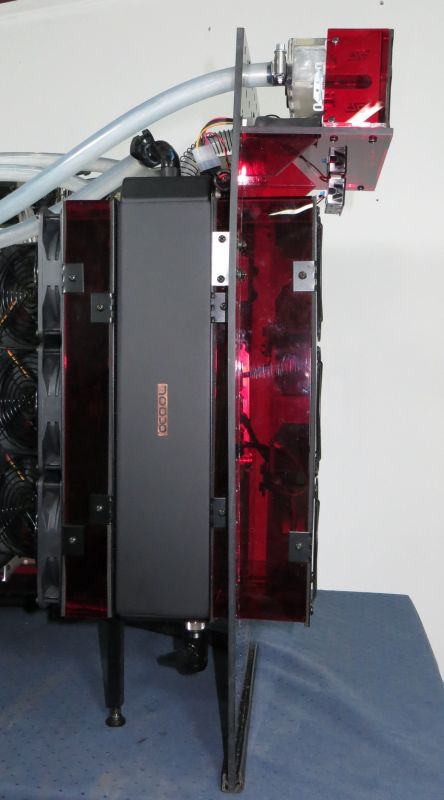
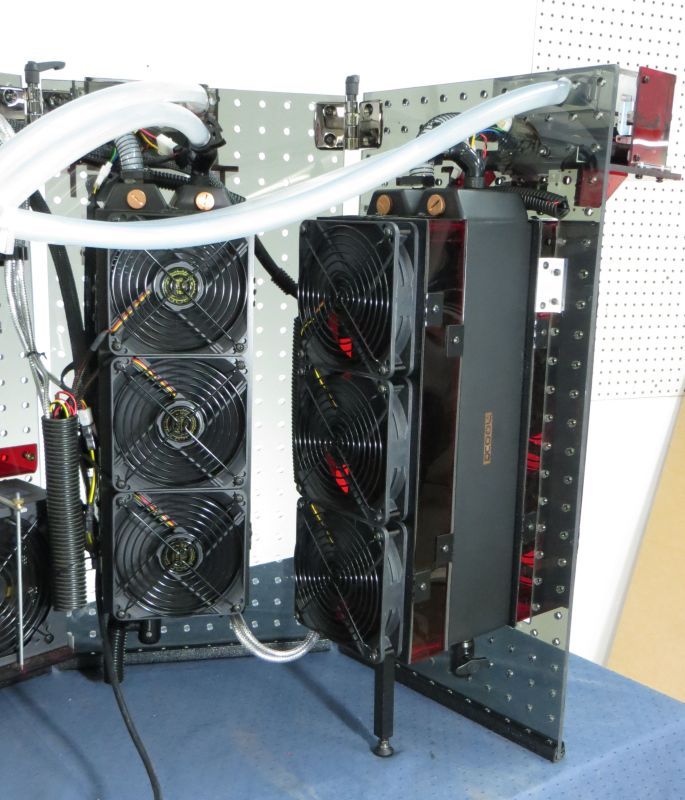
On the left side, I’ve got 2 duplicate panels, that carry out the business of the watercooling loops.
Each panel mounts a pump/reservoir unit, a radiator unit, and some temp probes. There is a complete and separate loop for the cpu and for the graphics card.
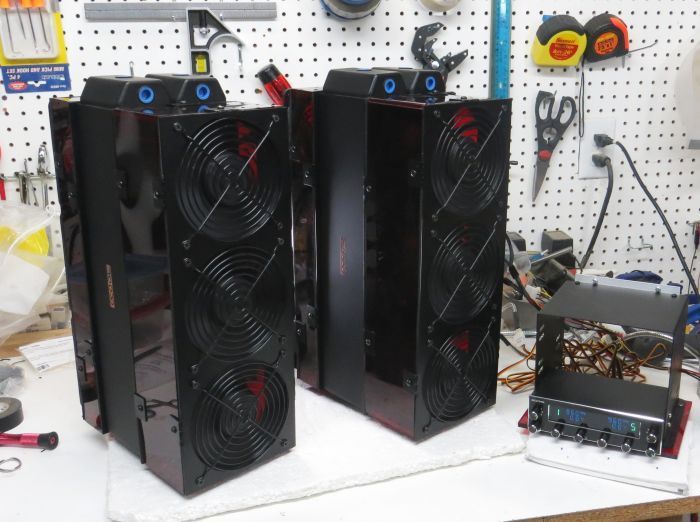
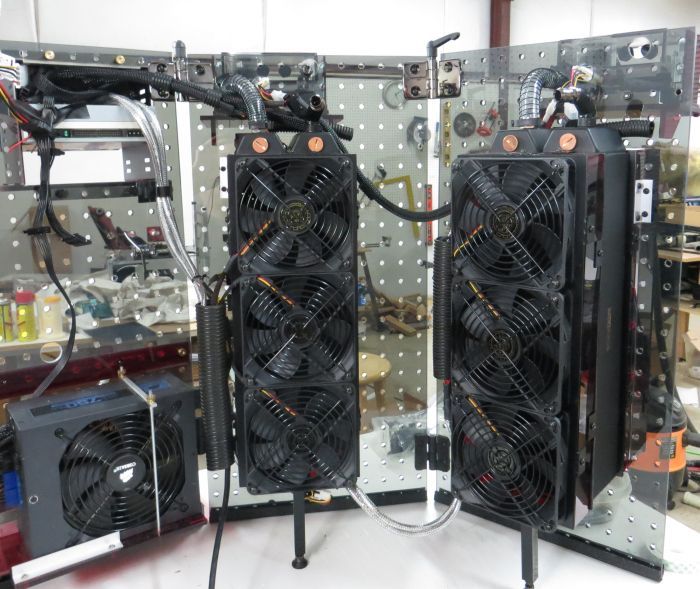
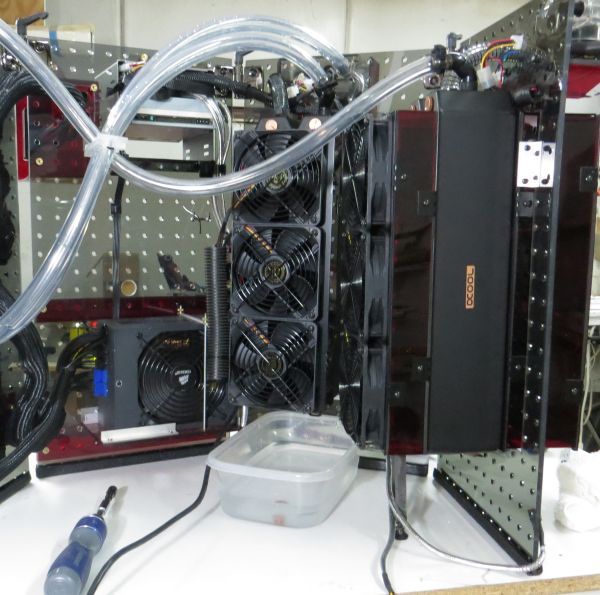
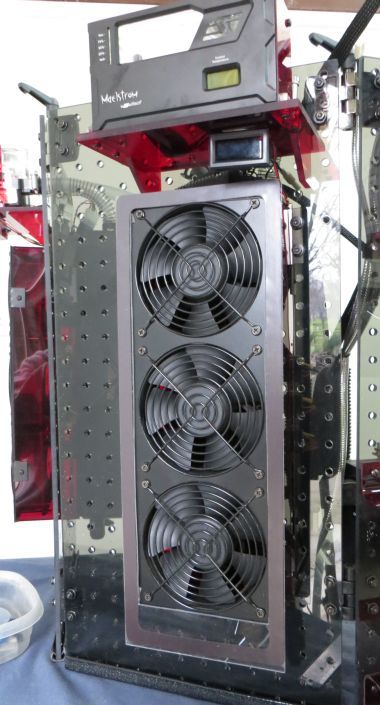
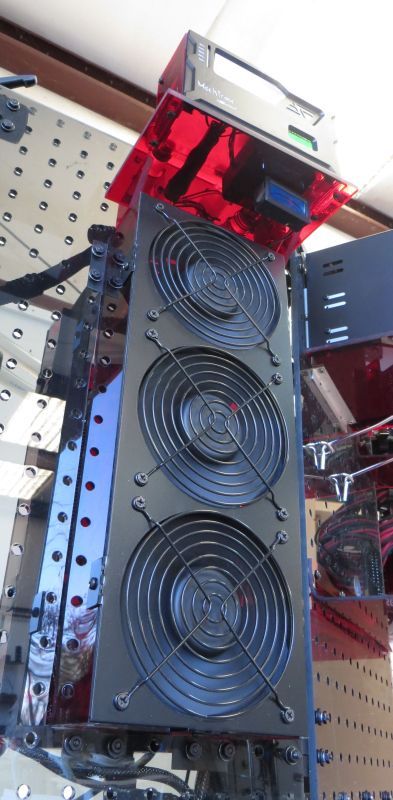
From front on, you can see I’m using triple 120mm radiators, and from the profile you can see that my fans are also operating with a shroud box.
Specifically, my radiators are Alphacool 360 Monstas, which are 80mm thick, so naturally paired with fans in push-pull.
In full profile, you can see the sort of ridiculous nature of having Alphacool Monstas with push-pull and double shrouded, but this system ain’t exactly about restraint.
The shroud boxes were a lengthy side project, but one that I had wanted to do for a long time.
You can find the thread to their development here:
http://www.overclockers.com/forums/s...d.php?t=722236
http://www.theraptorpit.com/forum/in...diator-shroud/
http://www.xtremesystems.org/forums/...adiator-shroud
(Self advertisement, if anyone is interested in a shroud-box, I have a few ready to go, and I can custom fabricate based on their design, shoot me a pm).
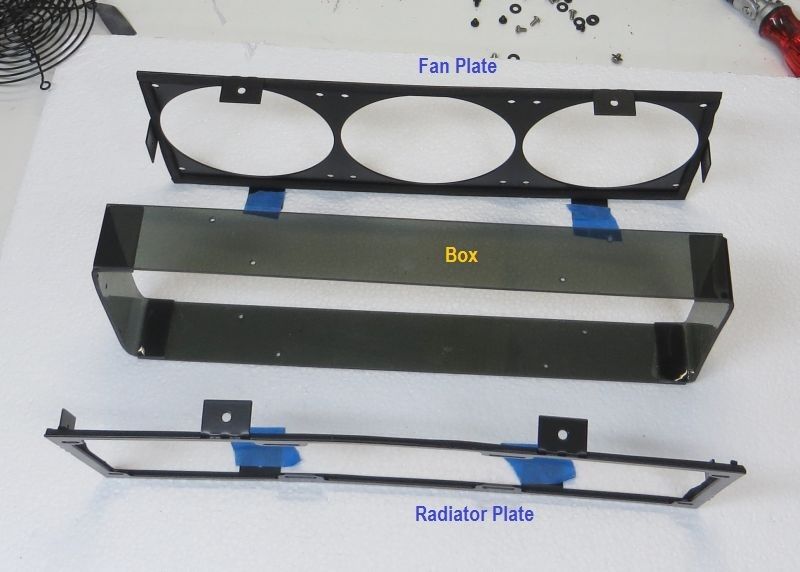
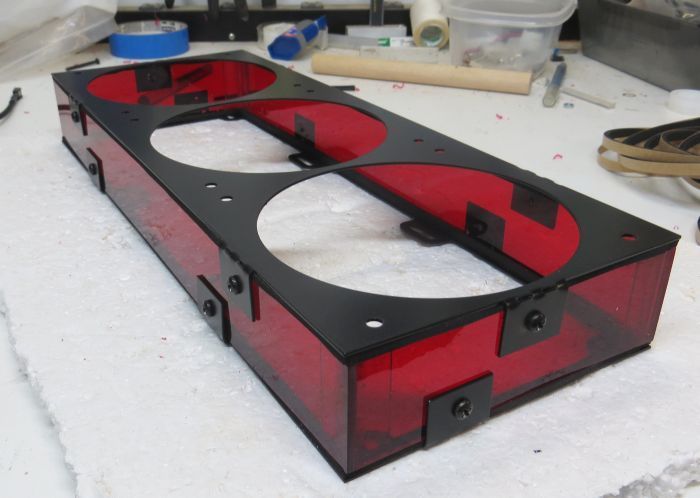
The shroud boxes are each fabricated from a sandwich of components:
The end plates were made from laser cut steel and powdercoated in a matte black, and interface with fans (top plate) and the radiator (bottom plate). The box is made from ⅛” acrylic.
Put together, they give space between the fans and the radiator to theoretically improve flow, especially in the “wind shadow” of the fan motor housing.
Unmounted from the panels, here is what each radiator unit looks like:
On the push side, I’ve got 3 Yate Loon low speed 38mm thick fans. The shroud box is particularly deep, because I wanted the fans internally mounted within the box, to give it a cleaner look at the front side.
On the pull side, I’ve got 3 Yate Loon low speed 25mm fans. I keep all the fans running at about 780rpms, about as loud as I want them.
That is some monster cooling!
Navig's list of mod links ~ Exoframe Mini ~ Cabinet PC ~ Vertical Benching Station ~ Brass Tacks ~ Exoframe 2.0 ~ Project Vitis ~ Project Resilience ~ Very Low Cost Benching Station ~ The Exoframe Project ~ Jewel Box Project ~ DIY Benching Station ~ Console Project ~ Project Dark Side ~ Tower PC ~ Dual Tower PC ~ Bench Rig ~ My only standard case
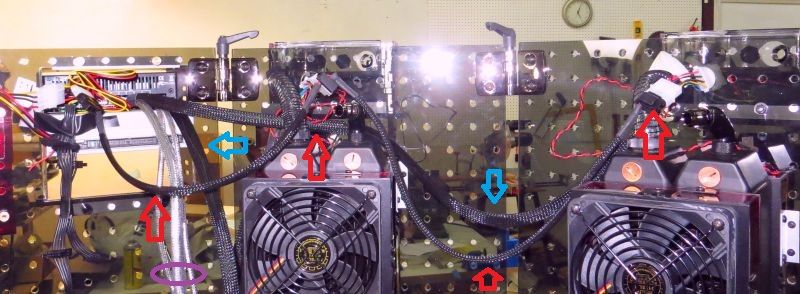
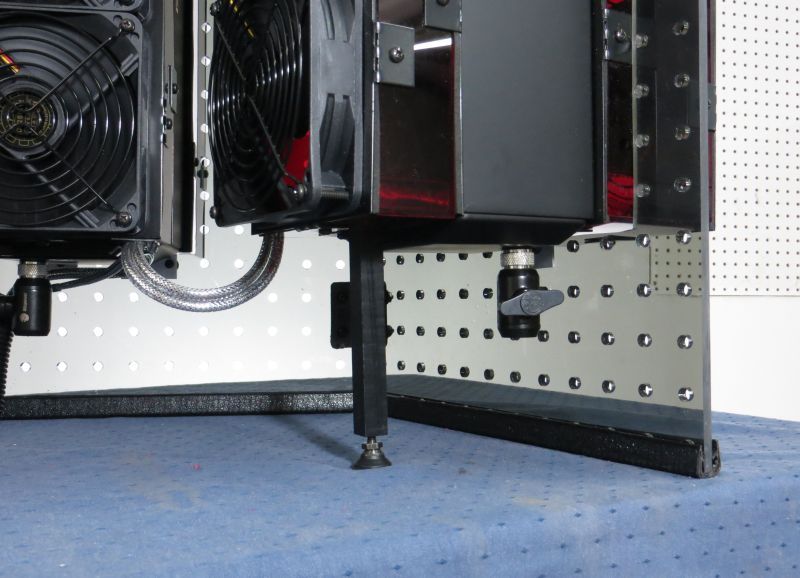
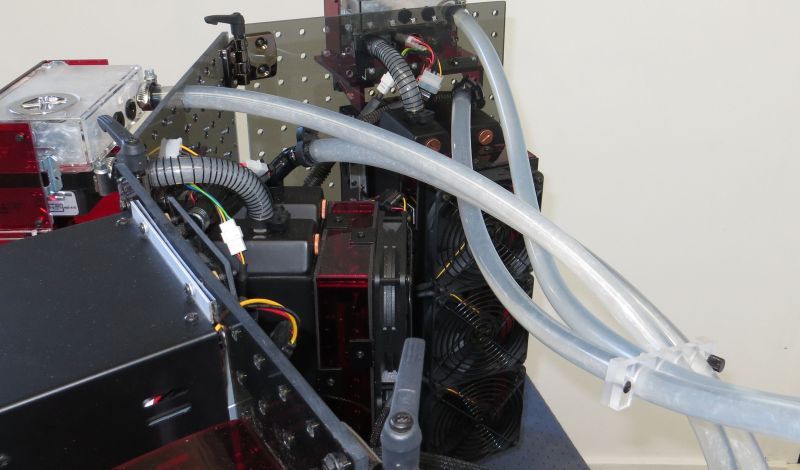
Here you can see the backside of the radiator units, when mounted:
I’ll put in 2 comments. It took a thorough cabling job to keep this area neat (each unit has 6 fans, 1 pump, and 2 temp probes).
Second, at the bottom of each radiator, I added a tap for bleeding each loop:
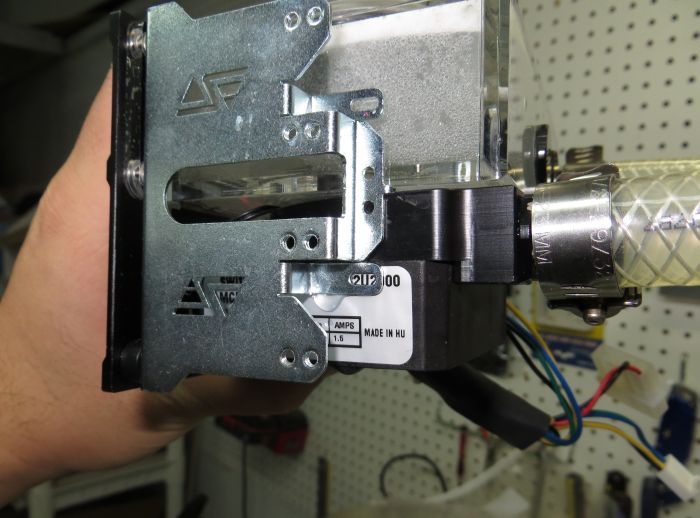
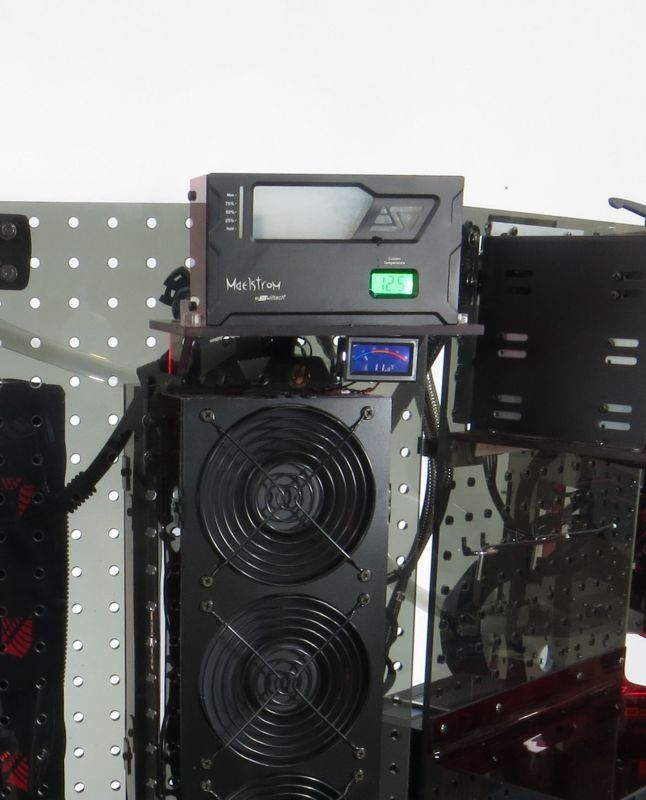
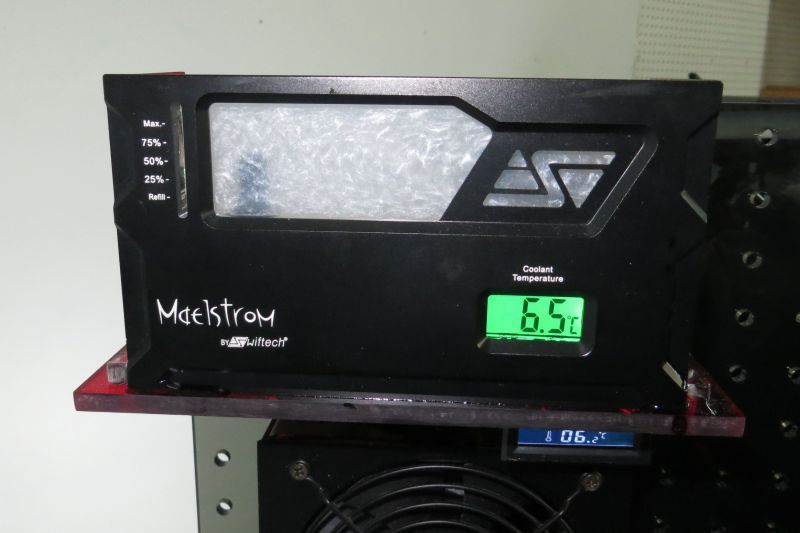
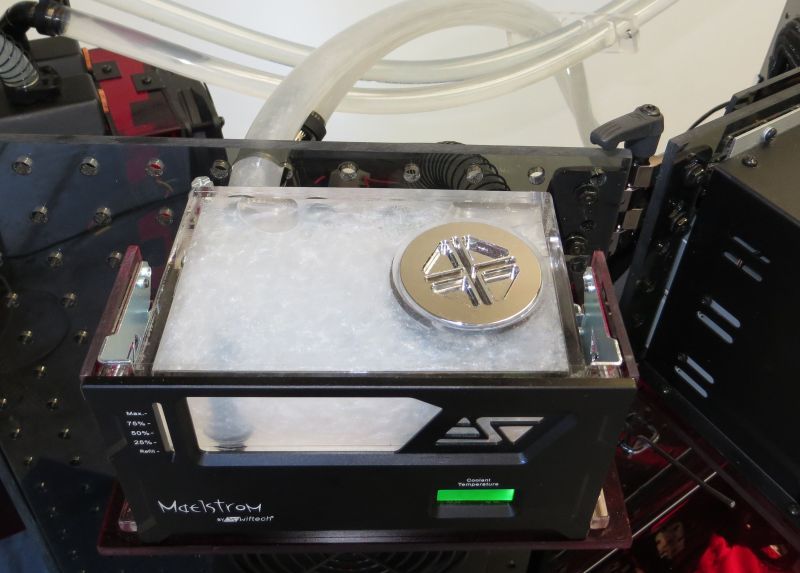
Pump and reservoir duties were assigned to a pair of Swiftech Maelstroms, sporting MCP35x pumps.
These units worked great, and were nearly flawless. One unit did have a wire caught under one of the pump mounts, causing a tiny leak. But the unit was easily disassembled and the problem fixed.
Altho made for standard 5.25 bay mounting, I put mine on some custom brackets:.
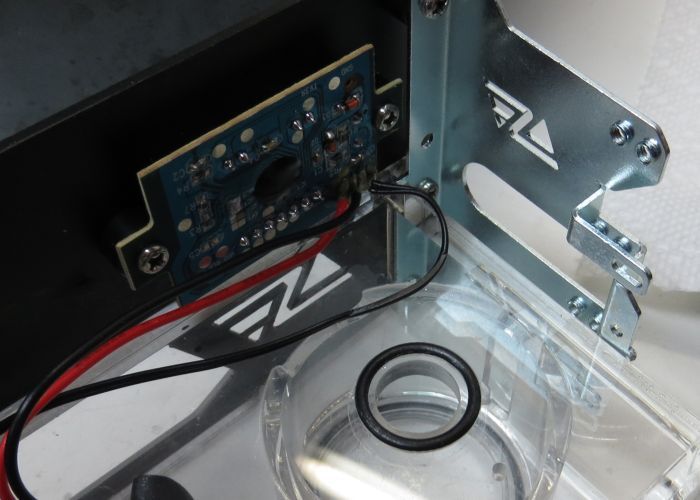
The top temp probe is from the unit itself, within the reservoir (ie after returning from the block). The lower temp probe is in the exit port of the radiator (ie after the radiator has removed heat).
Also, if you haven’t already noticed, I’m running Mayhem’s Aurora Supernova.
Definitely hard to capture on pic, but I will devote a section to my experience later on down this thread. No doubt, super pretty fluid.
Navig's list of mod links ~ Exoframe Mini ~ Cabinet PC ~ Vertical Benching Station ~ Brass Tacks ~ Exoframe 2.0 ~ Project Vitis ~ Project Resilience ~ Very Low Cost Benching Station ~ The Exoframe Project ~ Jewel Box Project ~ DIY Benching Station ~ Console Project ~ Project Dark Side ~ Tower PC ~ Dual Tower PC ~ Bench Rig ~ My only standard case
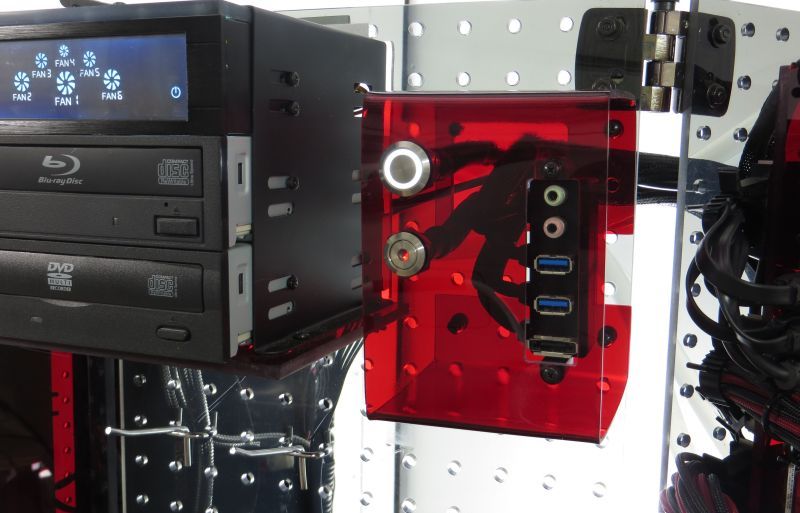
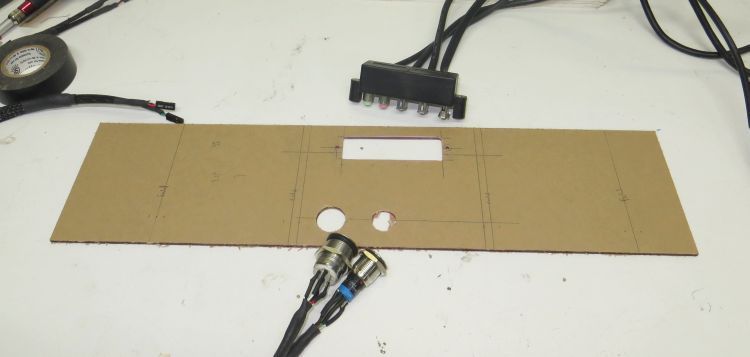
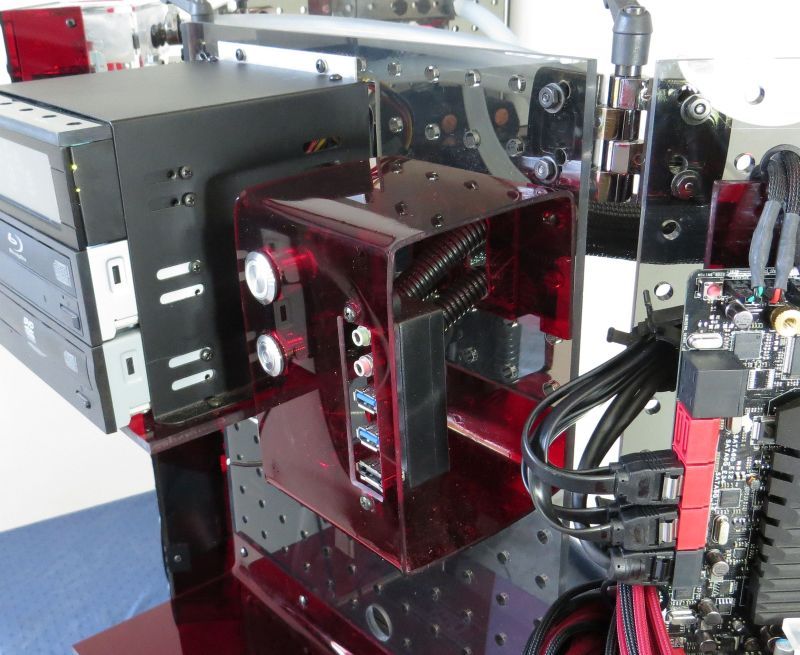
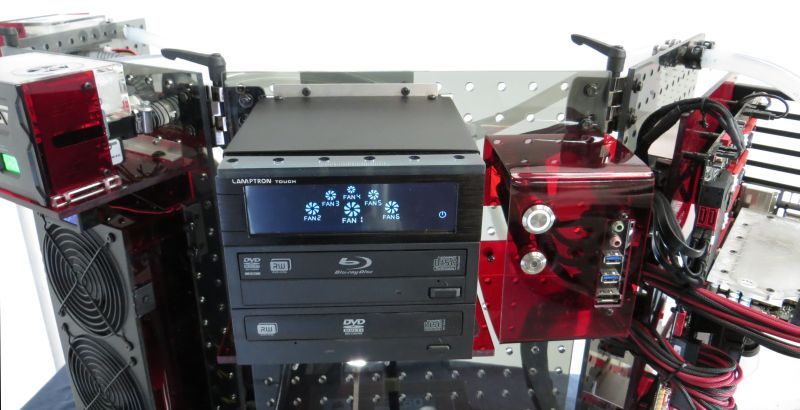
The next panel to the right of the radiator units is the panel with my 5.25 bays, switch panel, and some storage shelves:
Focusing in on the top portion, I’ve got my 5.25 bay and switch panel:
The 5.25 bay unit is really just a standard benching station 3 bay rack mounted to ?” red acrylic with some brackets to stick it to pegboard:
It is currently housing my Lamptron touch controller, and 2 optical drives.
The Lamptron is real nice, allowing for good control of 6 channels, hi watts. I put all fans to about 780 rpms, and my 2 pumps to 3000 rpms.
Channel 1: CPU pump
Channel 2: CPU fan intake bank
Channel 3: CPU fan exhaust bank
Channel 4: GPU pump
Channel 5: GPU fan intake bank
Channel 6: GPU fan exhaust bank
In addition to the Lamptron, I’ve got a Blu Ray burner and a DVD burner, both Lite-Ons I believe.
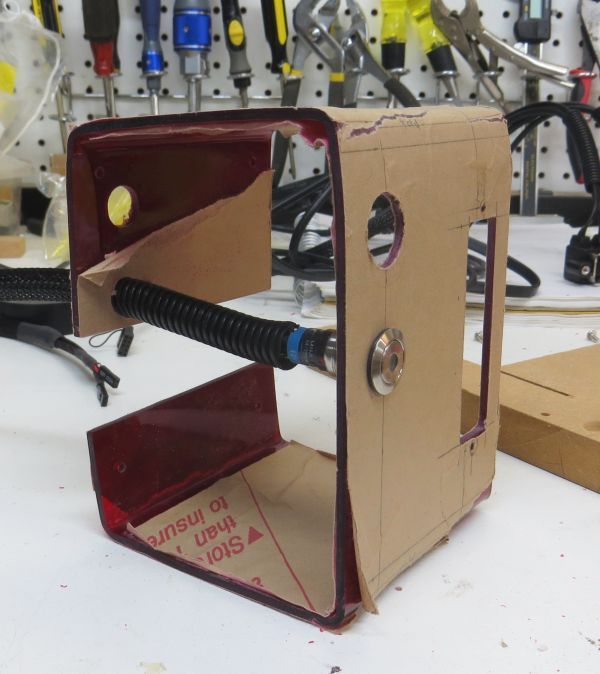
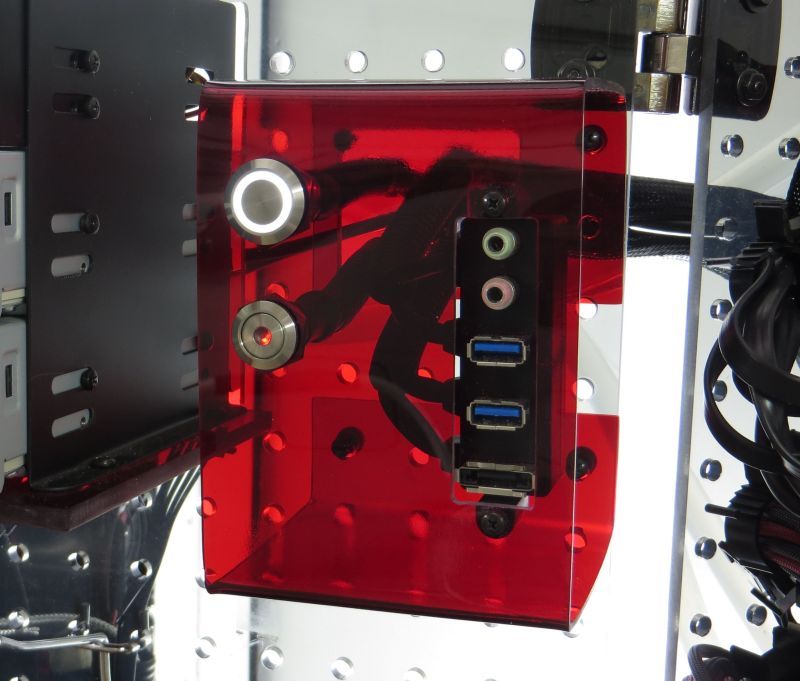
The switch panel holds my Power-on button with a white circle LED indicator for power, and a Reset button with a red dot LED for HDD activity. Next to it is a set of ports for e-sata, USB 3.0, and audio (the unit is from Lian Li).
The unit itself was crafted from a single piece of ⅛” red acrylic, quadruple-folded into the C profile.
Started its life as a flat sheet:
Four folds later:
Since the whole thing is still made from translucent plastic, I did keep all the many cables running from this structure bundled with corrugated tubing and heatshrink.
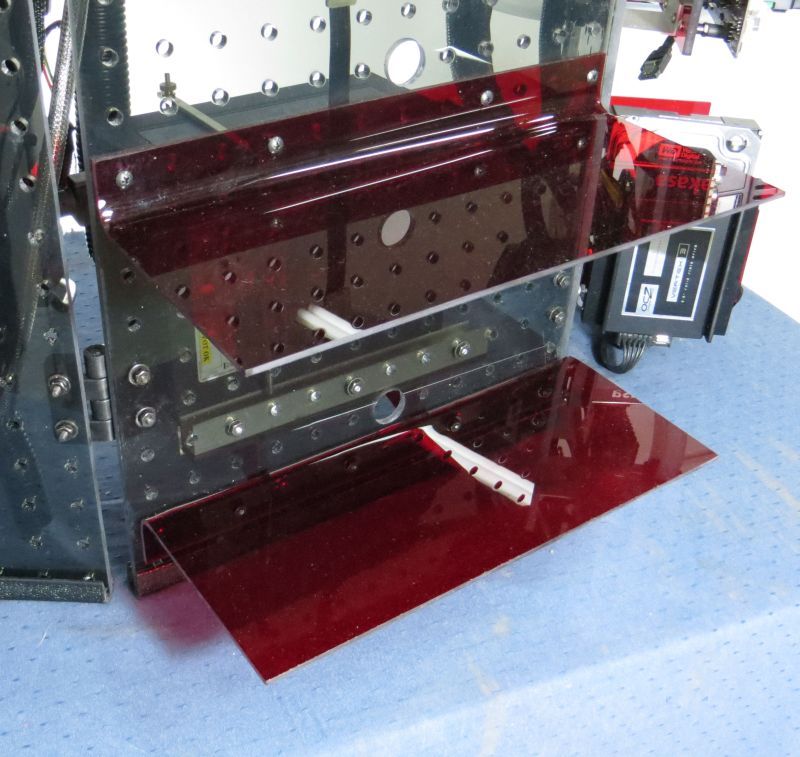
The bottom half of this panel has some shelving units:
My plan is to store my camera, phones, etc. on these shelves. There are holes to allow for USB cables to pass thru--I plan on mounting a USB hub on the backside of this panel.
Navig's list of mod links ~ Exoframe Mini ~ Cabinet PC ~ Vertical Benching Station ~ Brass Tacks ~ Exoframe 2.0 ~ Project Vitis ~ Project Resilience ~ Very Low Cost Benching Station ~ The Exoframe Project ~ Jewel Box Project ~ DIY Benching Station ~ Console Project ~ Project Dark Side ~ Tower PC ~ Dual Tower PC ~ Bench Rig ~ My only standard case
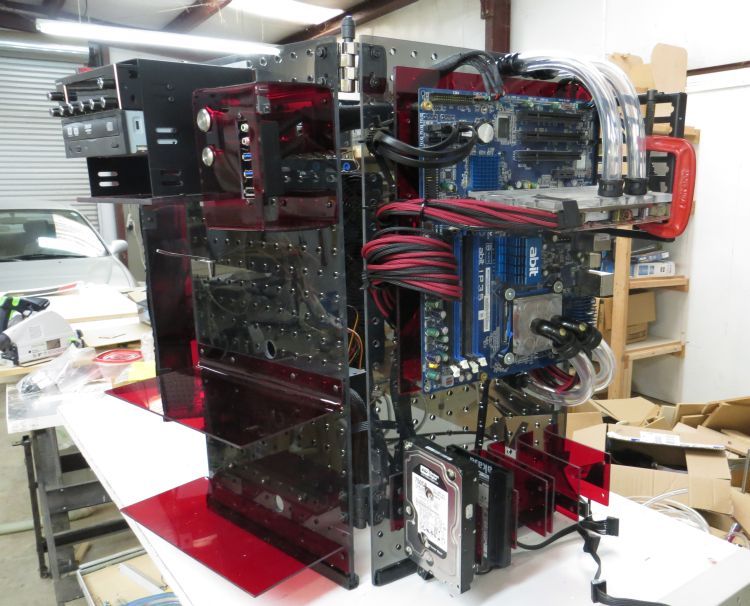
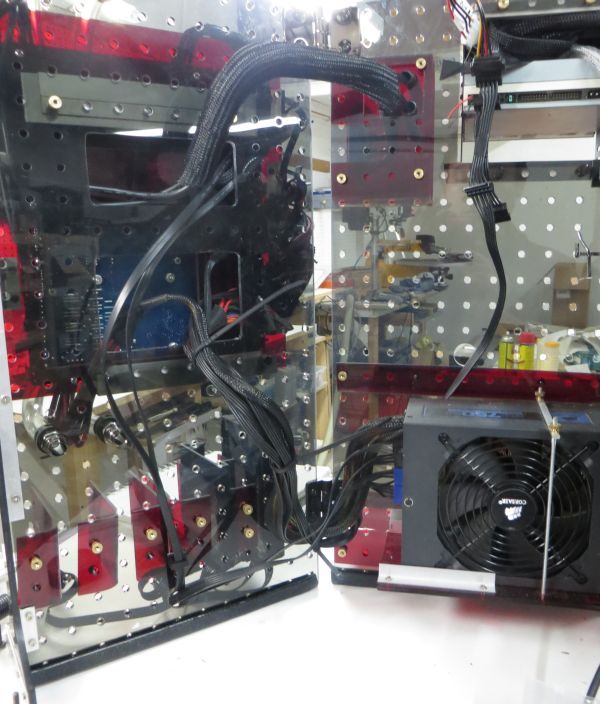
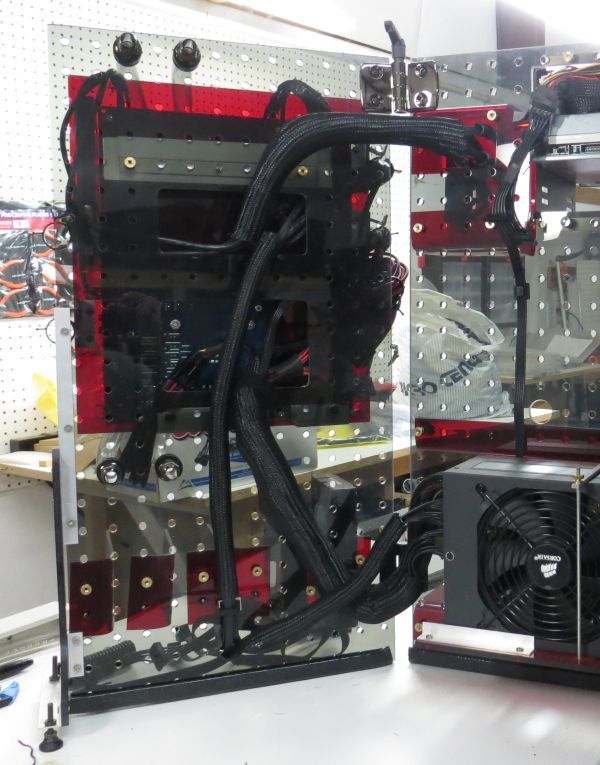
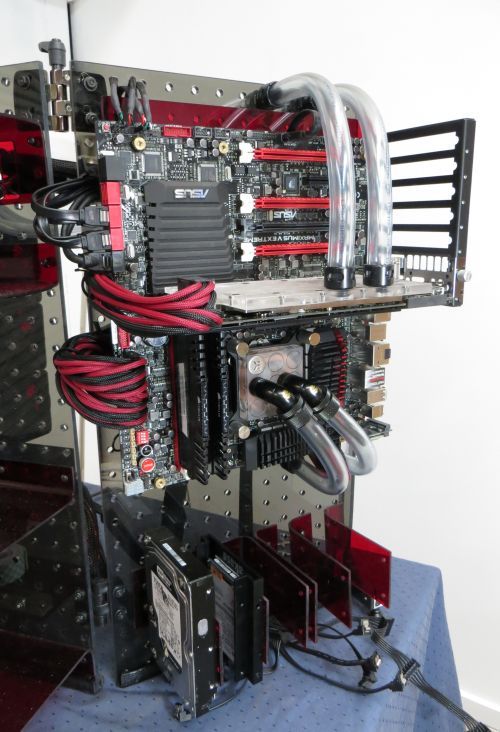
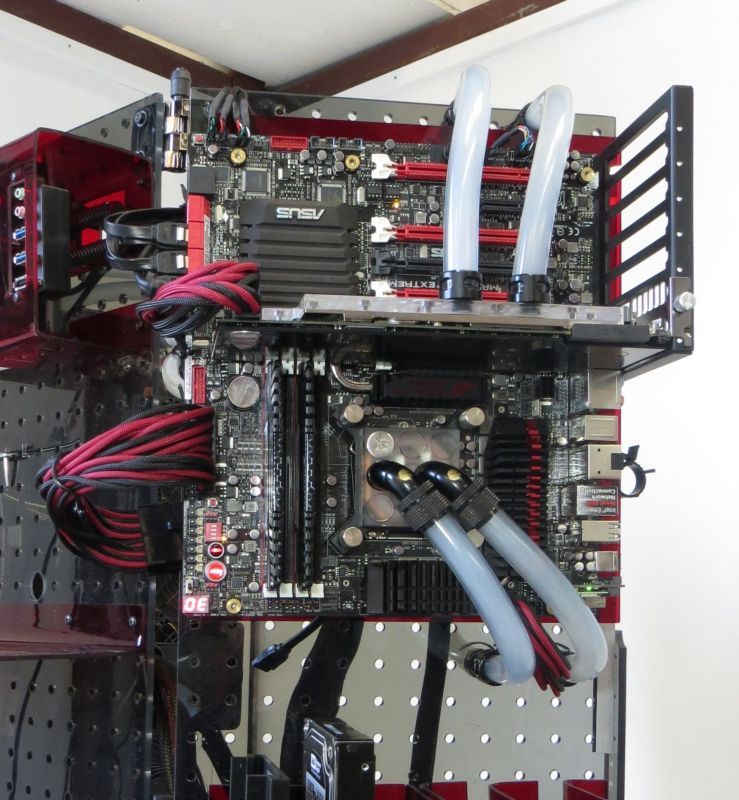
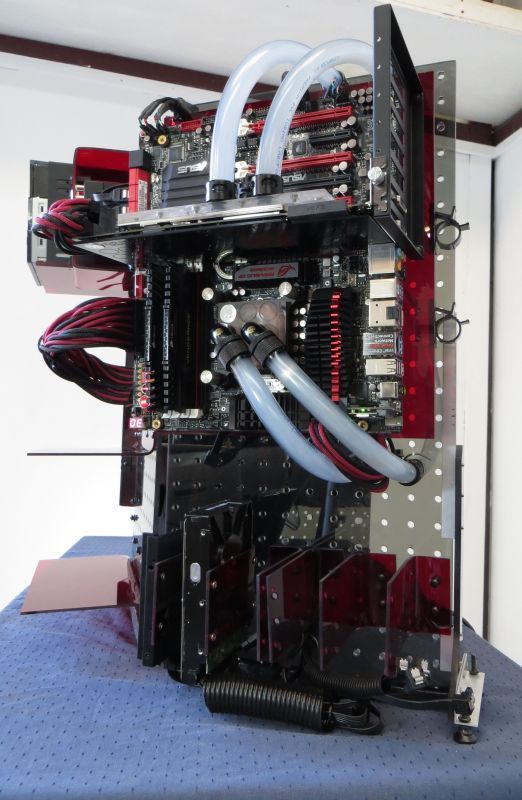
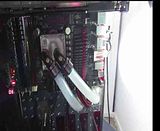
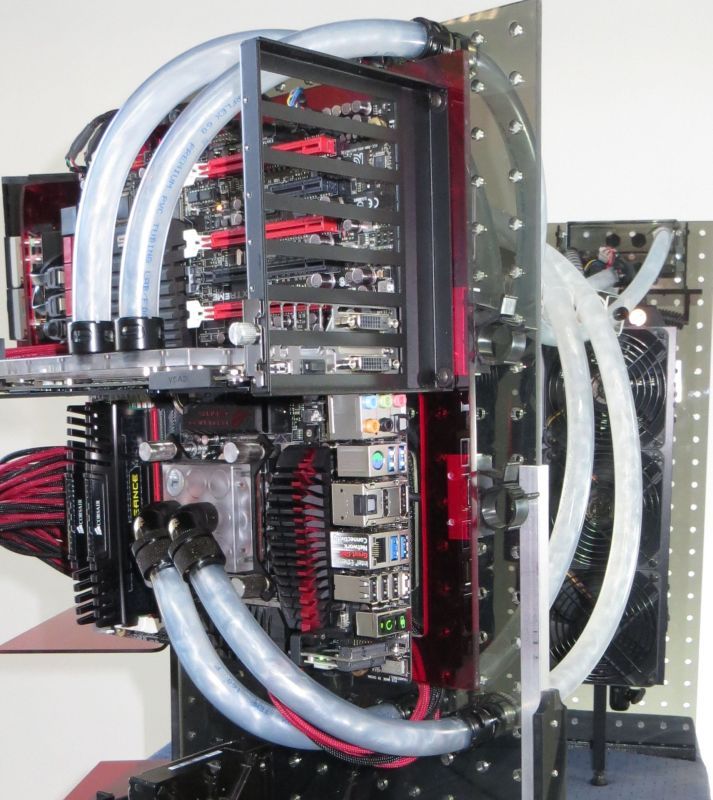
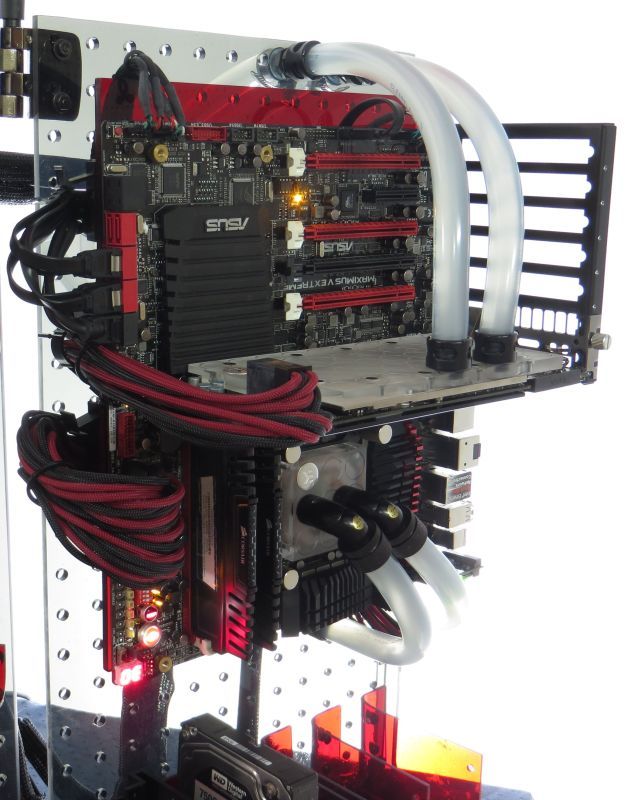
And finally, to my last panel, my piece de resistance, the motherboard panel:
The top portion of this panel holds my motherboard, with all of its cables and watercooling lines.
The bottom holds space for 6 hard drives (3.5”).
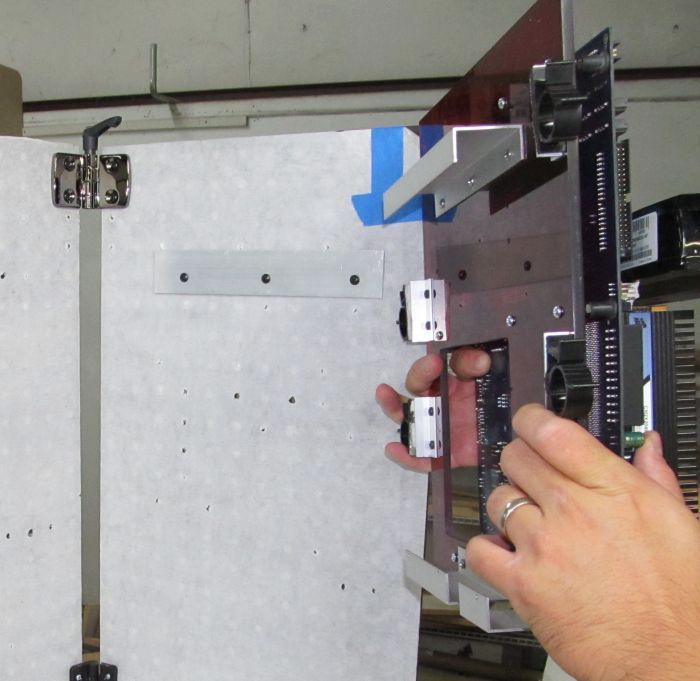
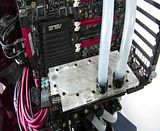
The mobo tray itself is a really pretty component:
It hangs on the panels with a tool free mechanism.
The panels behind are carved out to let cables pass thru, which then mate to the various clamps and organizers on the mobo tray itself. I used a set of Maxfinder braided cabling.
I tried to keep my watercooling lines as simple as possible.
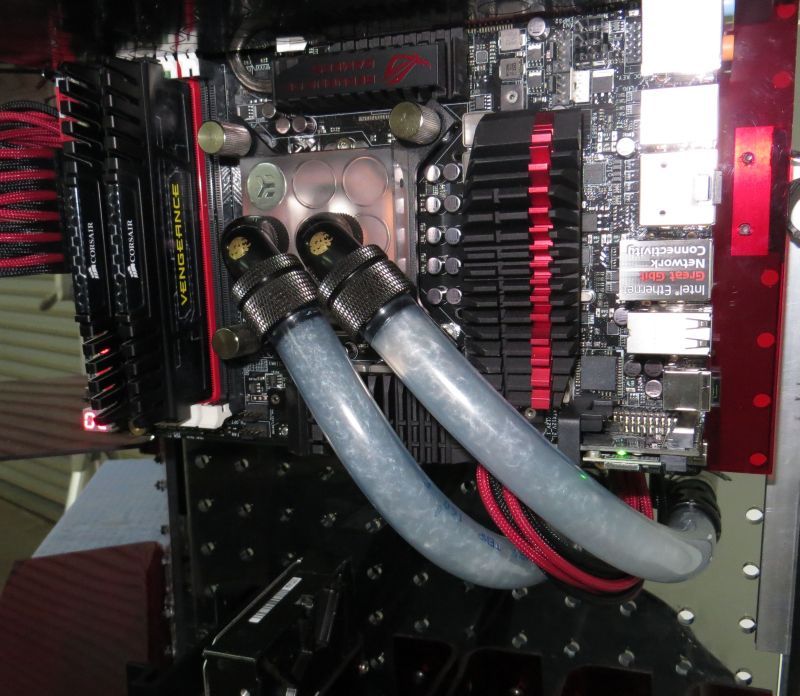
From the front, you’ve got 2 parallel lines each to the cpu and gpu, coming from bulkhead fittings set within the pegboard panels. I’ve got a mix of Monsoon and Bitfenix fittings.
I also decided to go with the inverted motherboard because this system will ultimately sit on a table to the left of my desk--so I wanted all of my i/o cables coming off the end of the whole panel structure.
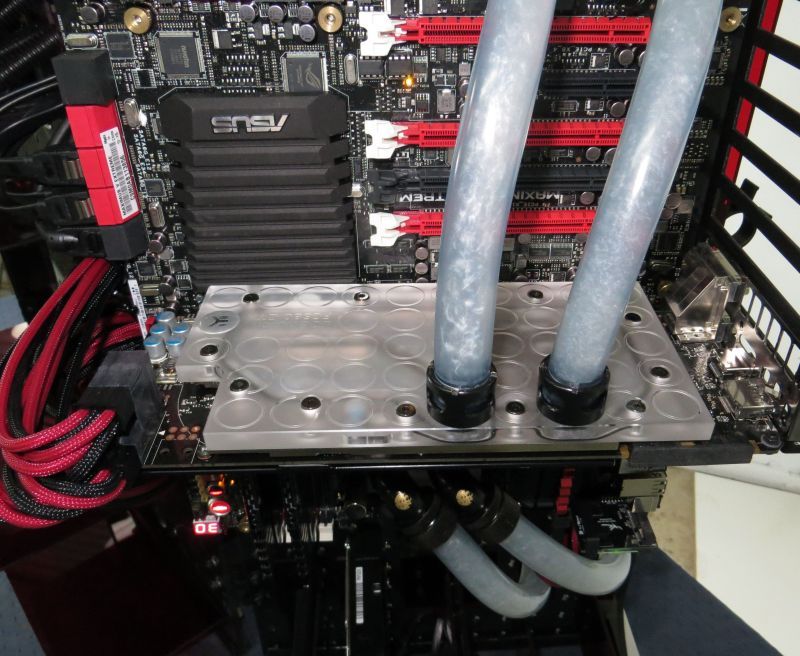
The graphics card is a evga GTX 680, cooled with a full coverage EK block and backside plate.
Man, how purty is that Mayhem’s fluid?
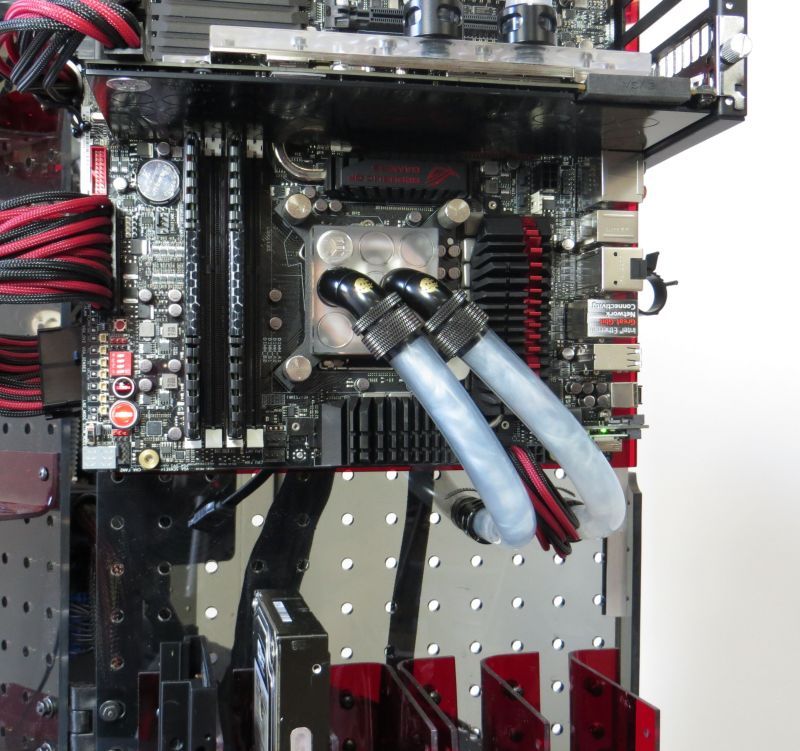
Lower down, I’m again using an EK supremacy block.
I had exactly ZERO difficulties working with the EK products. Of course, the aesthetics are a matter of (fairly hotly debated) personal preference. They work for me. The gpu and cpu blocks sit about 20 inches from my face, so I wanted to go with something interesting and unique to catch my eye, and they are that.
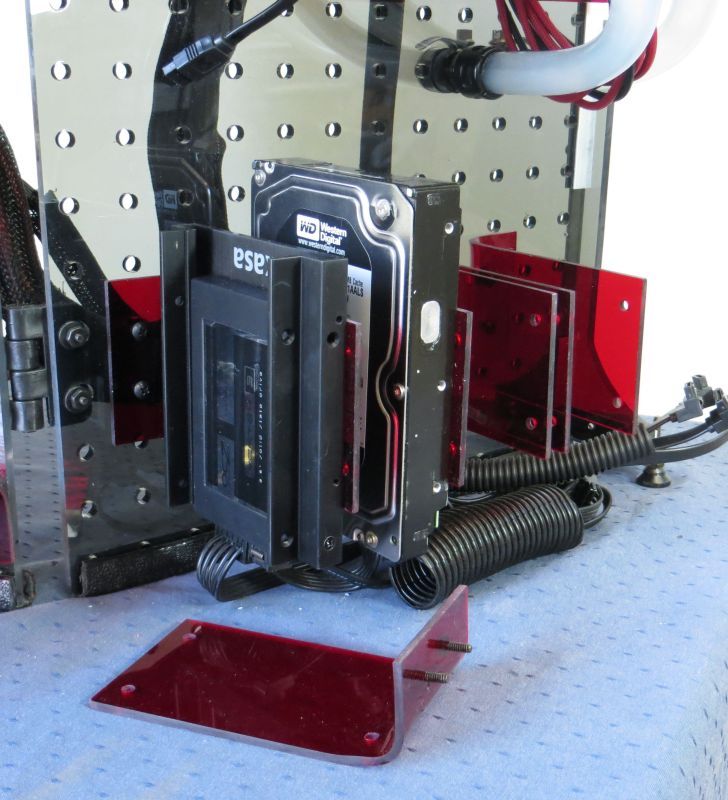
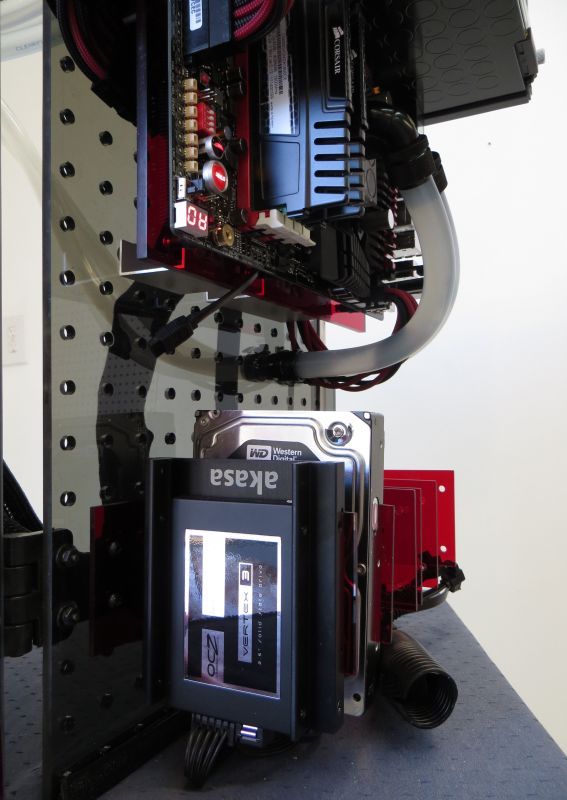
Below the motherboard, I’ve stashed my hard drives:
Hard drives are mounted pretty simply--they mount to a ⅛” red acrylic bracket with a 90 degree bend. The bracket then mounts (with rubber grommets if needed) to any 2 pegboard holes.
I’ve got my drives spots all lined up like soldiers, but really, I could hang a drive anywhere I wanted, with an appropriate pass thru hole for cables, and long enough cables.
Speaking of cables, I’ve found it easier to go ahead and pre-wire my drive spots with both power and data--which is why you see a bunch of empty connector heads. That way, changing in hard drives is as easily popping the drives on to the brackets and attaching leads.
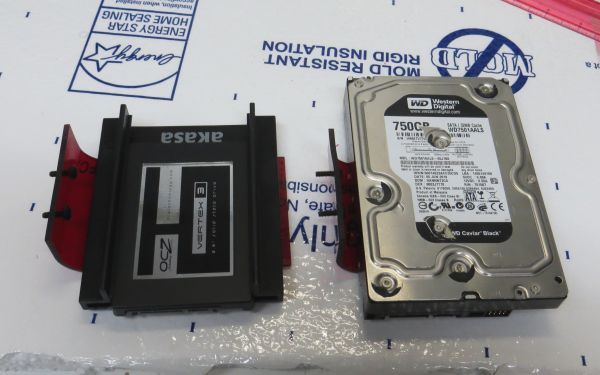
Right now I’m sporting a 240gb Vertex 3 and a WD 1Tb.
I was trying for a strange blend of simplistic yet sophisticated, out-in-the-open but also structured, practical, but with a definite aesthetic.
Navig's list of mod links ~ Exoframe Mini ~ Cabinet PC ~ Vertical Benching Station ~ Brass Tacks ~ Exoframe 2.0 ~ Project Vitis ~ Project Resilience ~ Very Low Cost Benching Station ~ The Exoframe Project ~ Jewel Box Project ~ DIY Benching Station ~ Console Project ~ Project Dark Side ~ Tower PC ~ Dual Tower PC ~ Bench Rig ~ My only standard case
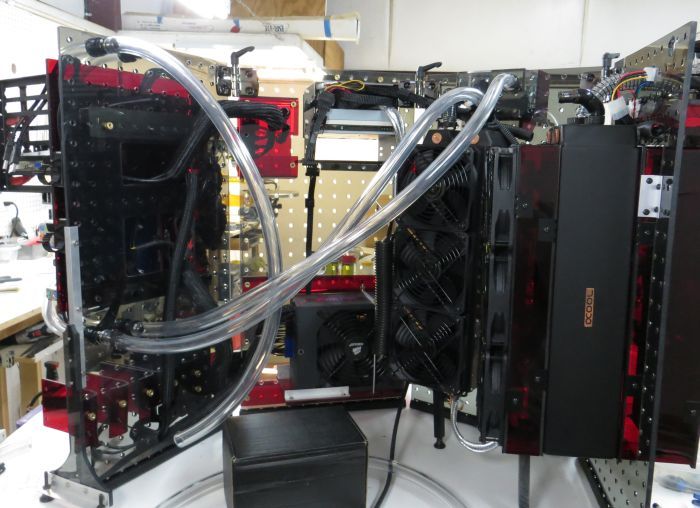
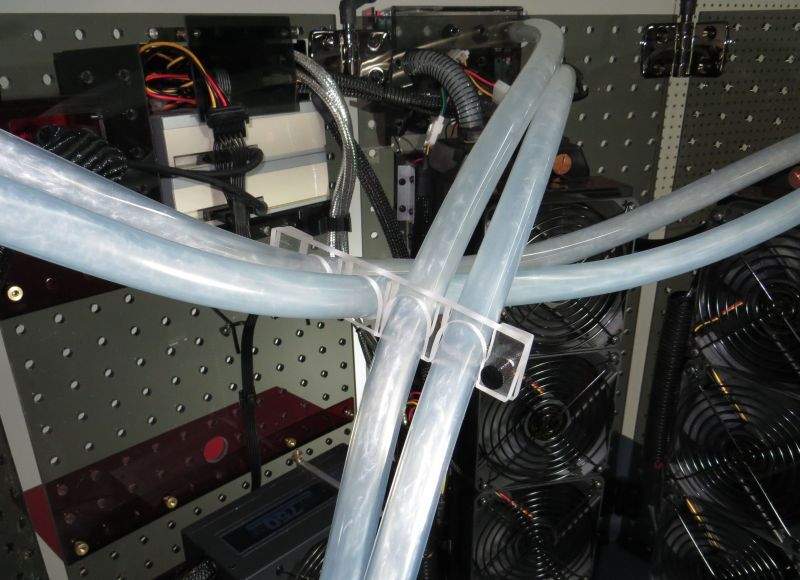
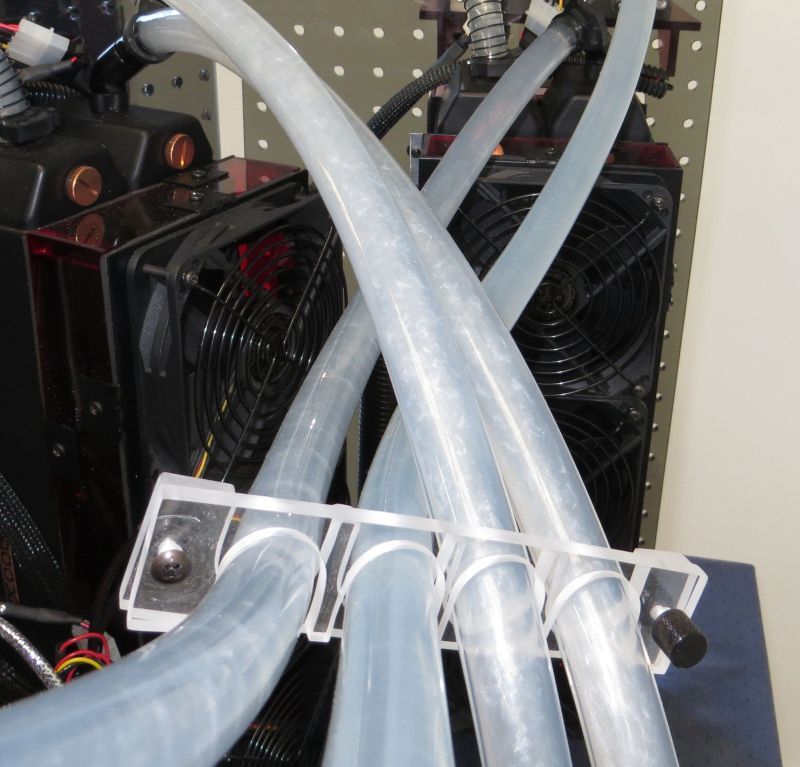
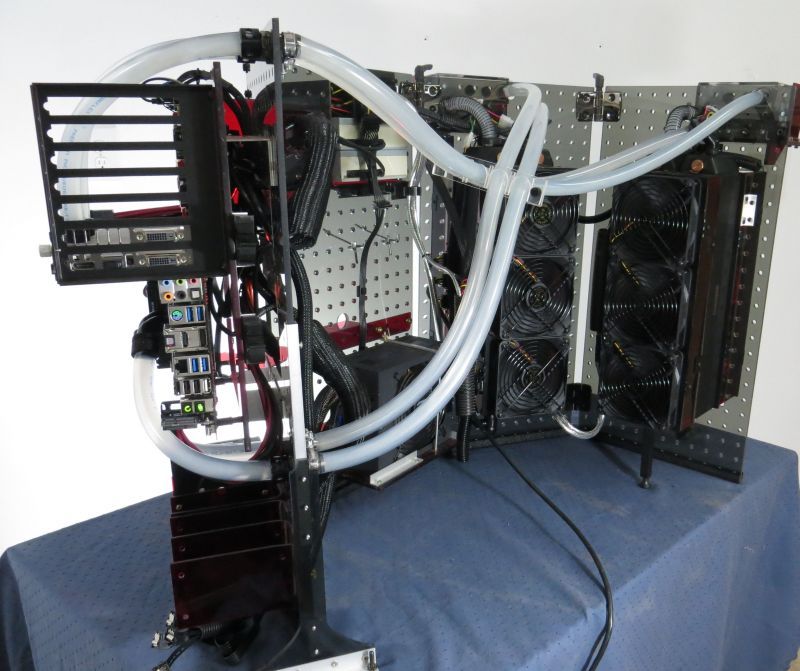
Time to take a look behind the curtain:
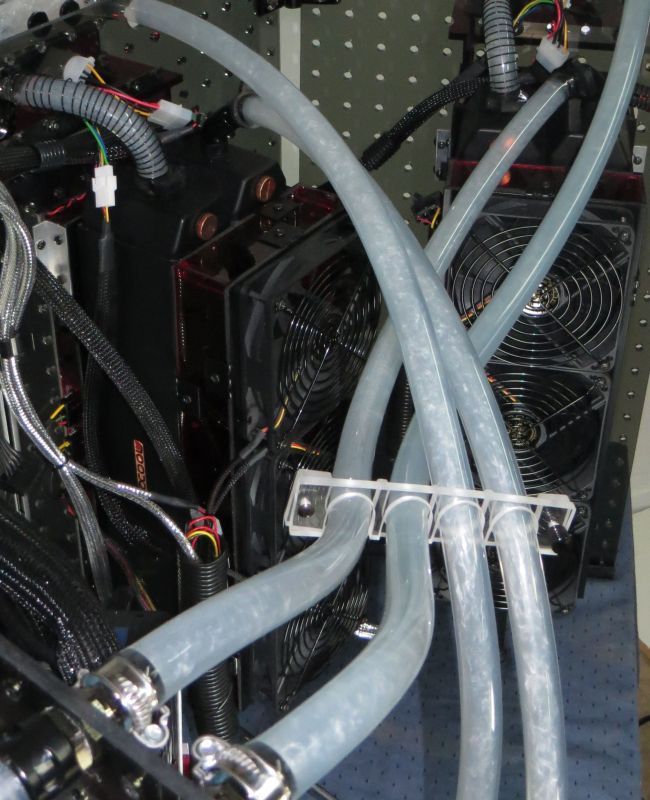
I think that perhaps the first thing that sticks out are the watercooling lines. Again, I’m running 2 completely separate loops.
At first, I just ran lines to where they needed to be, but there was a definite disorganized look, which is really a problem unique to this caseless build.
In the end, I put together a cable clip from ?” clear acrylic, which cinched the tubing into a sort of X organization.
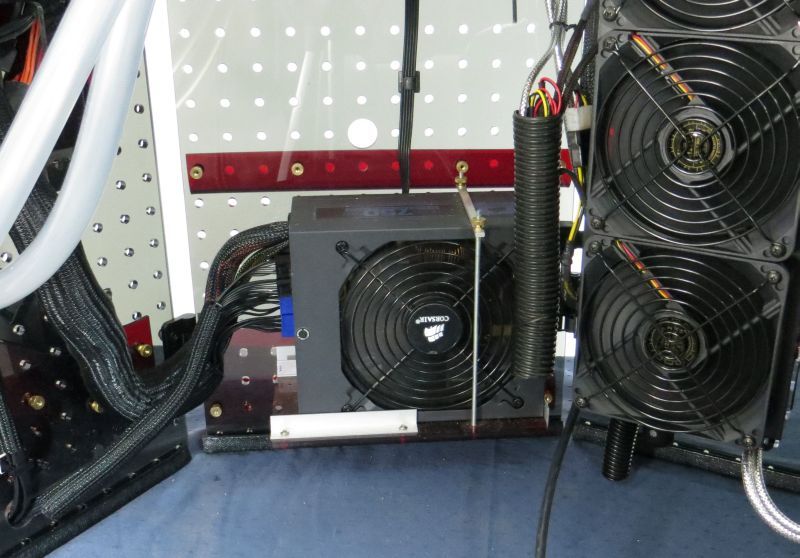
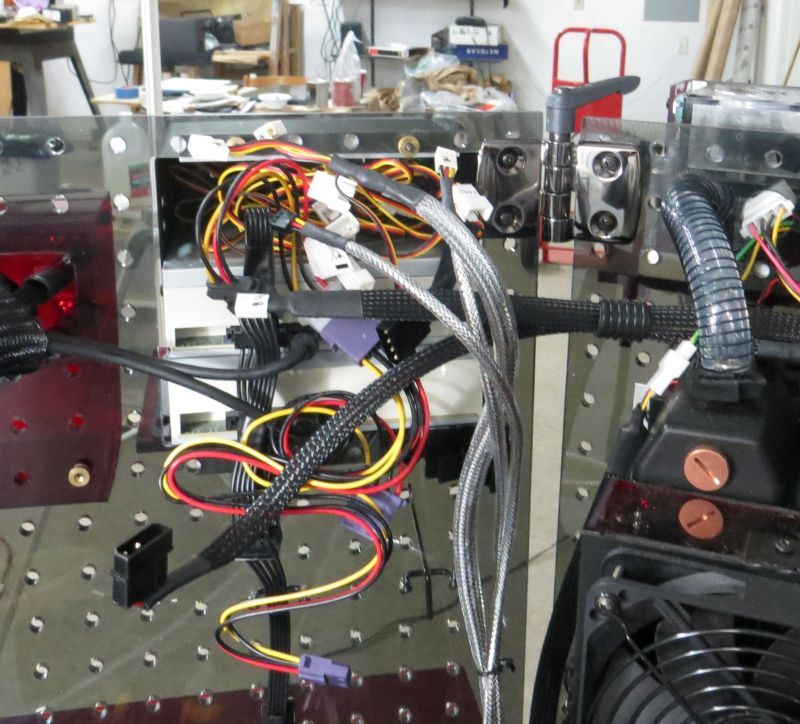
Tucked back here, in a nice central location is my powersupply:
Corsair HX-750.
It took a fair bit of work to keep the cables clean, even being modular:
In this picture, running between these 2 panels are cables for 20 pin ATX, 4 pin ATX, 2xPCI-e video card cables, power for 6 Sata hard drives, data cables for 6 Sata hard drives, power for 2 optical drives, data for 2 optical drives, power for the fan controller, plus 4 temp probes, e-sata cable, 2 USB 3.0 cables, power switch, reset switch, power LED, HDD activity LED,
To keep things bundled and clean I used a fair bit of techflex split weave.
Navig's list of mod links ~ Exoframe Mini ~ Cabinet PC ~ Vertical Benching Station ~ Brass Tacks ~ Exoframe 2.0 ~ Project Vitis ~ Project Resilience ~ Very Low Cost Benching Station ~ The Exoframe Project ~ Jewel Box Project ~ DIY Benching Station ~ Console Project ~ Project Dark Side ~ Tower PC ~ Dual Tower PC ~ Bench Rig ~ My only standard case
Watercooling
Here you can see my overall flow design:
Swiftech Maelstrom pump → drops down into Alphcool Monsta radiator → crosses over to bulkhead fitting behind motherboard panel → flows to block → flows away from block back to bulkhead → long line back to Swiftech Maelstrom.
I specifically used bulkhead fittings on the motherboard panel, because it really isolates the lengths of tubing seen from the front:
That way, if I want to change the aesthetics of my tubing, I really only need to change these 4 short lengths up front.
Regarding fittings and stuff:
For areas highly visible, I used a mix of Monsoon compression fittings, and Bitspower rotary and compressiong fittings.
On the backside, I got a little cheaper and went with standard Dangerden barb fittings with worm-drive clamps.
For my tubing, I used a combo of masterkleer and clearflex, all ?” ID, ?” OD. I mixed it up because, well I ran out of masterkleer. (More on that later).
I decided to give Mayhem’s Aurora (Supernova) a try. This is an expensive concentrate that throws some sort of shiny semi-viscous material in the loop.
I have to say, it looks fantastic!
The pictures do not really do it justice (note for other folks trying it out--in order to photograph it you must use a flash or flash-level lighting).
Video does a little better job, again super strong contrast lighting necessary:
(Click to play)
(Click to play)
(Click to play)
Its definitely neat to look over into the tubing and see actual movement--in fact I can guess what rpms my pump is set to merely by watching the movement.
Now the downside (or maybe otherside) of Mayhem’s Aurora:
1) Lasts only about a week. Where does the additive go? I don’t know. Judging by the warnings on the Aurora FAQ, you might think it would collect in my drain nipple. But I tried draining a little, and the viscous component was not there!
2) On the other hand, a full draining, and second flush thru, and I recovered a lot of the viscous component. Enough so, that a little addition of concentrate and I could re-fill my system and it would look just as new.
3) My loops hold approximately 1.1 L of fluid, and one bottle of concentrate was fine.
4) The fluid definitely reacts with certain tubings. Clearflex tubing at about 2 weeks had developed a semi opaque, slightly green coating. This is not mentioned for Aurora fluids, but it is mentioned to occur with Mayhem’s Pastels, presumably a reaction to plasticisizers in the tubing. At 2 weeks, Masterkleer tubing remained completely clear.
Navig's list of mod links ~ Exoframe Mini ~ Cabinet PC ~ Vertical Benching Station ~ Brass Tacks ~ Exoframe 2.0 ~ Project Vitis ~ Project Resilience ~ Very Low Cost Benching Station ~ The Exoframe Project ~ Jewel Box Project ~ DIY Benching Station ~ Console Project ~ Project Dark Side ~ Tower PC ~ Dual Tower PC ~ Bench Rig ~ My only standard case
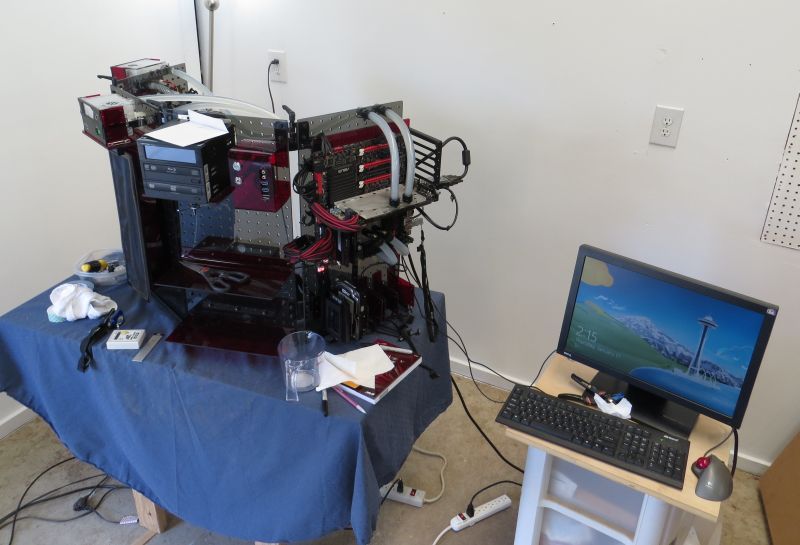
As I have mentioned, this system is my personal gaming system, so here is a pic in its current location:
Hardware and performance:
i3770k
Asus Maximus V Extreme
2x8gb G.skill
evga GTX 680
Samsung 840 500gb, various bulk 1-2Tb WD storage drives
Corsair HX 750
Blu Ray and DVD burner
Cooling:
2 radiator units:
Swiftech Maelstrom + MCP 35x
Alphacool Monsta 360
EK Supremacy
EK full cover GTX680 block with back plate
Lamptron Touch fan controller
Current settings:
i3770k @ 4.8ghz @ 1.4v
Dram 1.5v 800mhz 9-9-9-24-1T
Idle cpu temp 32c
Load cpu temp (OCCT) 45c
At some point I will push for the big 5.0!
GPU at stock
GPU idle temp 22c
GPU load (furry evga) 32c
I’ve had folks ask me how I move around such an ungainly system.
Turns out its pretty easy.
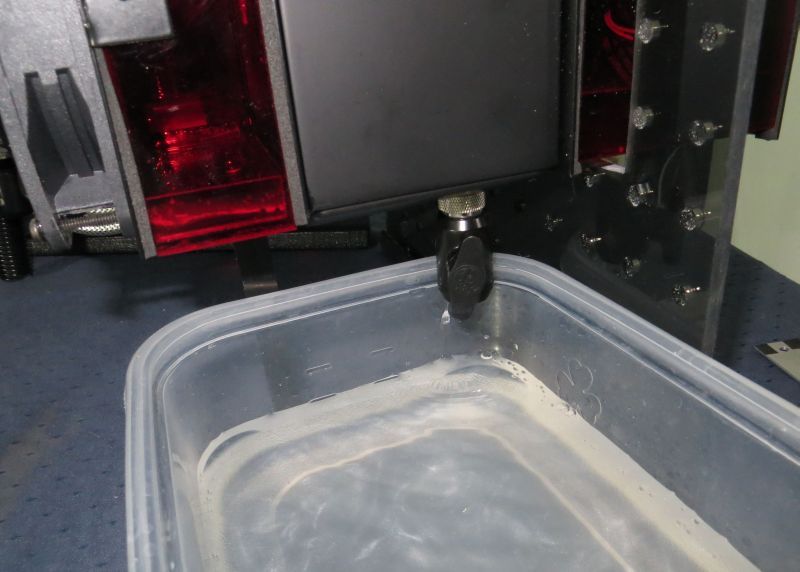
First I bleed the system, which is as easy as putting a tupperware under the tap:
Next, I disconnect and bleed the tubes from the bulkhead fittings behind the motherboard panel.
Disconnect the wiring from the fan controller, and temperature probes.
Then break apart the hinges down the middle.
This separate the unit into 2 panels of 2, which are easily transported.
Navig's list of mod links ~ Exoframe Mini ~ Cabinet PC ~ Vertical Benching Station ~ Brass Tacks ~ Exoframe 2.0 ~ Project Vitis ~ Project Resilience ~ Very Low Cost Benching Station ~ The Exoframe Project ~ Jewel Box Project ~ DIY Benching Station ~ Console Project ~ Project Dark Side ~ Tower PC ~ Dual Tower PC ~ Bench Rig ~ My only standard case
And some final random pics:
(Video click to play)
Thanks to:
My wife, and all the supporters at the ocforums, raptorpit, xtremesys.
My vendors:
delviesplastics
Norcal Laser
Matt Mione solidworks
Platinum powdercoating, Chico
mcmaster.com
performance-pcs
jab-tech
frozen-cpu
svc
newegg
Thanks for tuning in!
Navig
Link to jump back to start of the "Completed" portion of this thread.
Last edited by Navig; 03-02-2013 at 02:43 PM.
Navig's list of mod links ~ Exoframe Mini ~ Cabinet PC ~ Vertical Benching Station ~ Brass Tacks ~ Exoframe 2.0 ~ Project Vitis ~ Project Resilience ~ Very Low Cost Benching Station ~ The Exoframe Project ~ Jewel Box Project ~ DIY Benching Station ~ Console Project ~ Project Dark Side ~ Tower PC ~ Dual Tower PC ~ Bench Rig ~ My only standard case
Update Fall 2013
As I have mentioned, this is actually my main (gaming) system. So it's going to have some updates!
At the the time I started my updates in July, here was what my system looked like:
Update #1
Added hard drives. My current hard drive list is now:
OS drive: Samsung 840 500gb SSD
Storage: WD Black 1 TB (drive for backups), WD Black 1 TB, WD black 2 TB, WD black 2 TB.
My 2 optical drives, Blu-ray burner and DVD burner, are now connected to e-SATA add-on PCI card.
Update #2
Digital control over pumps.
I decided I wanted digital control of my pumps. The reason is fairly simple--get the system quieter. With voltage control of my pumps via my Lamptron Touch controller, the slowest I can control my pumps to is about 2900rpms. Below this, and the pumps may not start up.
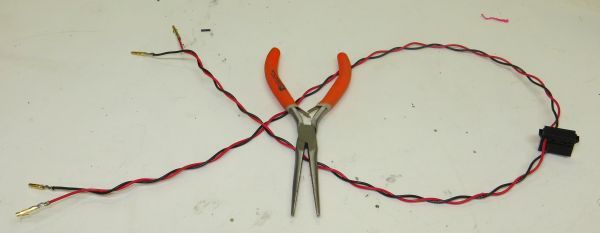
To take digital control of my pumps, first I had to cull out the cabling from the pumps:
Then I had to build a custom cable because I still wanted to monitor my rpms from my Lamptron controller, but I wanted digital PWM cables to run to my motherboard (Asus Maximus V Extreme):
And here is the end result:
After tuning AI suite, at idle the pumps run at a silent 1575rpms. At full load (my system is currently running 4.6ghz at 1.3v) the pump will cycle to full speed (about 3900rpms), putting full load at roughly 70c.
The downside to digital control of my pumps is that the Maximus V only has ONE digital-pwm controlled channel (which to me is utter laziness). Therefore my GPU-dedicated pump is slaved to the cpu. So when my cpu moves to 100% usage, I've got 2 pumps running at 3900rpms, which is loud. Fortunately, its rare that I push those kinds of temps.
Ideally, Asus should have provided multiple PWM controlled ports (I know the motherboard has multiple 4 pin fan plugs, but they are all actually analog voltage controlled. The only digital-PWM controlled port is the CPU_fan and its slave CPU_Opt). If had another PWM contoller, I'd stick my GPU pump at 1600rpms (even under 100% load 2xSLI GTX680s only put their max temps to 45c, more on that later....)
Navig's list of mod links ~ Exoframe Mini ~ Cabinet PC ~ Vertical Benching Station ~ Brass Tacks ~ Exoframe 2.0 ~ Project Vitis ~ Project Resilience ~ Very Low Cost Benching Station ~ The Exoframe Project ~ Jewel Box Project ~ DIY Benching Station ~ Console Project ~ Project Dark Side ~ Tower PC ~ Dual Tower PC ~ Bench Rig ~ My only standard case

congrats for such an amazing work bud !
Intel Core i9-7980XE@ 4.8GHz 18C/18TH (Direct Die Contact)
ASRock X299 OC Formula
ADATA XPG SPECTRIX D80 (4x8GB) DDR4-3800C17 B-Die
1x Intel Optane SSD 905P 480GB
4x HP EX950 NVMe 2TB on ASRock ULTRA M.2 CARD
EVGA RTX 2080TI KINGPIN 2190/8000 Stock Cooling AIO 240
SilverStone ST1500W-TI TITANIUM
Alphacool Custom Water Cooling
 Posting Permissions


 Reply With Quote


Bookmarks