

Looks awesome!Originally Posted by churchy

Good luck with the project!


Looks awesome!
Good luck with the project!
Donate to XS forums
Good job churchy!Original WC setup idea on such a common case
The meshes come off, they are a seperate layer, the grills are built in three layers with a sealer as the third.
Creeking: Demciflex filters won't stick? Aren't they with included adhesive magnetic part (exactly for aluminium cases) that sticks on and to which filter can stick on by magnetic forse?
Thanks zalbard, mingbogo. As for more .. i'm waiting for perfboard for DIY fan splitter to appear @ppcs, so that i can round up order with radgrills/2nd rad. Including long shipping time to ex-soviet countries overseas i doubt it happening sooner then in a month. That's what "lazylog" for.
yeah i saw on the demci site that they came with self adhesive mounts, but they didn't come with mine.
X2k
The comments above are in no way endorsed by the management, the poster or any sane, rational, intelligent entity. Any complaints or offence arising from said comments can please refer to Avatar <
Good stuff, churchy! Great to see your worklog here.
I love seeing revolutionary things done with the 800D, I love how you fitted that rad in the top, i think when I upgrade I will have to put a quad rad in the top of mine (Already have a quad in the bottom!)
ThanksMonkeyface & Shazza. Pitty i can not take good pics on par of beautiful worklogs of others, including you
Creekin: i'm shure that if you custom order from their site you can tell if you want adhesive one or not. Or if filter is "for lian-li" (which almost all cases are aluminium), then probably it will have adhesive mount. eg. this 2x140 for li-li filter: "Features: * Metallic Strip Included for Non-Ferrous Cases"
Hmm, though then again .. you probably had these 140 filters? For them metallic strip is also mentioned. Wierd.
EDIT
Just checked mine 140mm i bought for test - seems it includes that strip in package, i just had to peel it from filter.
P.S.
Monkeyface: imho you'd be better off with putting 4x120 instead of 4x140 on top. - no need to make wider 5.25 bays, no need to extra mod case to fit lenght wise && you can use scythe GTs on it. If you still gonna go 4x140 route, better don't throw out that much money on noiseblockers with sleeve bearing, but get as good but three times cheaper yate loons.
Last edited by Church; 11-08-2010 at 08:56 AM.
my retailer claims the demcis dont come with the extra magnets, the demci product page does, but its page about the magnets mentions "optional extra" I have never seen them listed for sale on there own.
I have emailed demci to ask, might have to get customs made.
edit: emailed demci this morning, just got a reply saying sorry for any misunderstanding, they will happily send them to me for free, If i pay the $12 postage.
thats some excellent customer service,
Last edited by Creekin; 11-08-2010 at 10:12 PM.
X2k
The comments above are in no way endorsed by the management, the poster or any sane, rational, intelligent entity. Any complaints or offence arising from said comments can please refer to Avatar <
Hey, Churchy.
Good to see you finally got your project up and running.
Awesome job, mate. Cant wait to see more.
Thanks y0gi.
But it really is simple job of cutting/drilling/dremeling excess out on back. Nothing compared to eg. you making custom frame to fit in your X2000.
Here imho it's more job to widen 5.25 bay enclosure, then just cutting back as needed and combining lego from fittings of needed width (or bending tubing to do same for much less/wiser&cheaper choice).
hi, great project !!
can be measured between the red lines? exactly - I mean the dimensions of the radiator with folded fans (from the corner of the first and last)
becauseI would to hide all of the condenser 560 to Obsidian
sry for my english :/

Last edited by Piospi; 11-19-2010 at 08:59 AM.
i5 3750K + EK Supreme HF Full Nickel | Asrock Z77 Extreme4 | G. Skill ECO 1600 MHZ CL7 2x4GB | Seasonic X-Series 760W Gold
EVGA GTX 480 + EK Acetal Nickel | Samsung 2233RZ
Samsung 830 128GB | Samsung F3 1 TB | Samsung SH-S222AB
Xonar ST + H6 | Sennheiser HD 555
Obsidian 800D | Swiftech 350 |EK-DDC X-RES 140 Acetal | Phobya G-Changer 360
BQ SilentWings 3x120mm | BQ SilentWings 2x140mm | Zalman ZM-MFC1
I already answered him via PM, but If someone else needs - this size can be seen in here in HWLabs drawing (577.5mm Bracket, though with my beaten up measuring tape it looked like 579mm), and in adition to it rad outside shroud/bracket is +20mm rad end with inlets, +7mm other end.
(if it's till center of the screw hole, it's 30mm on inlet rad end, and 15mm on other one)
Last edited by Church; 11-19-2010 at 02:54 PM.

Very interesting work, I'll be watching this one...
"Monolith" - [ Xeon W3540 (4.22) - Rampage 2 Extreme - 12 GB Ripjaws 1600 - GTX 570 - 120 GB OCZ Vertex - Antec TruePower 750W - Corsair 700D - Apogee XT CPU Block - XSPC 360 Rad ]
Old Box - [ E4600 2.4 @ 3.7ghz (11x335) - P5W-DH - 4gb Gskill @ 893mhz - Radeon 3850 ]
Hey churchy. Who's log is more lazy, yours or mine???
Well, your can almost be called as complete, so I'll take laziness crown
I'm waiting for two orders from PPCs & Sidewinders to arrive. Without rad grills and second rad on hands i can do nothing to advance (i prefer start cutting/drilling when i have them here, to not have some mishap with wrongly guessed sizes), and shipping over the pond takes some time to this country
Meanwhile i have more time to think which motherboard to choose. Choice is rather wide, as most announced P67 boards for Sandy Bridge have black PCB.

you two can't beat me in laziness, no doubt
Worklog: Project Black Copper
Lian Li PC-P80 | Thermochill PA140.3 | Noiseblocker fans | mdpc-x stuff
it is the Lord, the Messiah of all that is lazy
...

This just took my breath away... My BF isn't into this stuff and even he was desperate to look into more details!!! Post more!
~Bex
PROJECT :: The Xtreme (WET) Dream!!!
PERSONAL H2O BESTS :
E8600 @ 4.8GHz
PERSONAL AIR BESTS :
Sempron140 @ 4Ghz (Stock Cooler)i7 3960x @ 5.4ghz (Air Cooler)
Bex : "Who said girls can't play PC games or overclock!? Do I look like your imagination!?"
Aaron : "TBH, a girl doing all that is a pretty perfect girl!"
Swift_Wraith : "could someone please check bex for a penis?"
This just took my breath away... My BF isn't into this stuff and even he was desperate to look into more details!!! Post more!
~Bex
PROJECT :: The Xtreme (WET) Dream!!!
PERSONAL H2O BESTS :
E8600 @ 4.8GHz
PERSONAL AIR BESTS :
Sempron140 @ 4Ghz (Stock Cooler)
Bex : "Who said girls can't play PC games or overclock!? Do I look like your imagination!?"
Aaron : "TBH, a girl doing all that is a pretty perfect girl!"
Swift_Wraith : "could someone please check bex for a penis?"
Bex: I feel lot of irony radiating from you, knowing your extreme builds being much better then this ugly hack up job of mine
Well, here comes second batch of updates with nearing rad/fan placement till finished state and only actual PC hardware and LC components left to be bought and installed
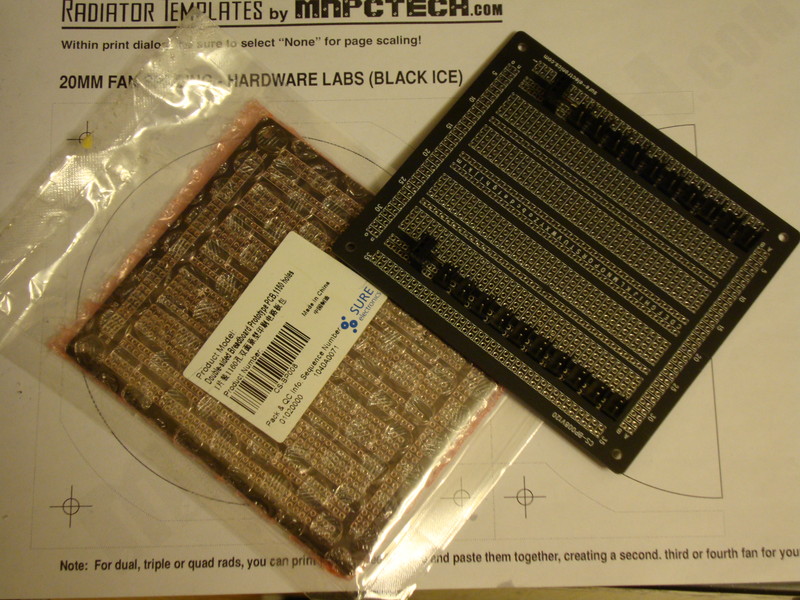
First I received two shipments:
Eeek, unfortunately I was unable to find anywhere 3x140 Iandh's Stealthgrills, settled to all rad grills to be of similar Phobya's with stripes pattern (in white cardboard paper above). Unfortunately when shipment was about to get shipped, got hit that there are no 4x140 Phobya stripes grill, so ordered elsewhere 4x140 Iandh's grill. Half a month later got hit once more, Phobya released 4x140 with stripes pattern as well. BAD luck

Soo, what will fall next victim to all mighty dremel? First candidates for, enter:
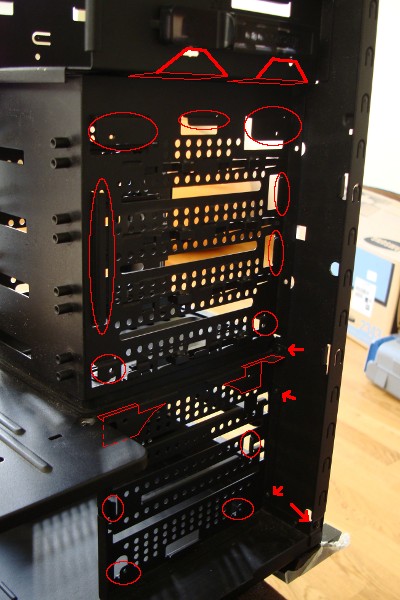
What do I have here? Lot of protruding original mounting points for 140 & 120mm fans, same with middle floor side. Hey, I want some more room for rads and fans there! Off we go. And what's that? I doubt that original round puncturing will help much airflow with that little open area :/. But I still wish to use both original hard disk enclosures, so disk guides and something to keep enclosure walls more or less rigid have to be left. With arrows I marked few rivets, heads of which I dremeled a bit lower without removing them completely. Here is what resulted:
Though cuts look ugly, they will be hidden behind fans (and +rad from one side) anyway, so me being lazy
EDIT: Worked a bit more on 280mm mounting ..
Test fit:
Gotcha
Last edited by Church; 02-25-2011 at 04:10 AM.
Next come sidewalls.
Putting it on, thinking a bit .. seems I'll need to space a bit from front and from bottom, and to fit dust filter cutting a little side of transparent window.
Taping on, cutting with principle used first on top rad cuts - to cut less/re-cut/adjust later, but now applied to horizontal lines, to be able to adjust them according to fans on rad and radgrill ribs between-fans-spacing later on.
Result:
.. and after getting vertical cuts right, used right door as template for left one. Drilled holes and threaded them M3 to mount radgrill.
Now I need to cut up a bit with knife 2x140mm Demciflex magnetic dust filter for better/tighter fit:
Test fit (also shows, how I cut transparent window side):

Finally off to drilling holes for top rad grill:
BTW, few tips I got for drilling here (without thread, to easer fit bolts down in rad) and on sidewalls/enclosures with thread cutting there as well:
- There was no need to buy dremel head for drills. Maybe partially it's because I was too lazy to clean insides of dremel with air from metallic shards, so it always ran at max rpm-s, maybe partially because of too little weight/hard to keep steady, but after few drills all the rest were done by borrowed normal drill. Much easier/more pleasant experience.
- Learn how to re-sharpen drill bits. They get dull very quickly, when drilling steel case. Dremel's sanding stone makes it very easy. (You can look for reference how drill bit head looks when new, or just remember to sharpen it at slight angle, not just from center to sides, but also each side at slight angle to screw in. Put dremel with sanding stone on stable surface, secure it well with hand and sharpen with drill bit in another against it)
- Puncture first center point for drill not to jump around in the beginning of drilling (don't worry too much about it. Spray paint can can fix a lot of mistakes
- Thin walls of case and disk enclosures aren't too good for making good/long/secure thread in them, as such short thread in thin wall can be easily broken by screwed in too strongly bolts/spacers. (don't be too scared of that, you can bolt-on nut from another side of wall to secure it and dremel it down thinner. Result will be just 1.5-2mm thicker)
Oh, almost forgot to add, that had to additionally dremel off a bit tips of tools-free mounting handles for top fan motor and blades to not touch them and be able for fan to spin freely:
Few extras in this post:
My bolt painting contraption
Future drain fitting (CF+female-female threaded multi-transfer base+cap) and fill port (fill port+cap+90deg non rotary angle+3/8ID-1/2OD CF(I thought that 1/2-3/4 used elsewhere won't fit here, hence used two smaller fittings and piece of tubing from fill port till reservoir. BTW, I used same method for cutting hole for fill port as for holes for fittings at back of case. First with small disk (you get several of such from dremeling other parts of case
Here you can see unfinished fan splitters. I need to cut them smaller and bolt on to case wall. Soldered in usual way power and ground together, rpm tach wire from first fan. First I wished to just borrow soldering gun from my colleague, but he offered to even let solder himself. Who am I to not agree on that, not lazy? -Of course I agreed on this offer
Now some pics from test assembling with near final looks:
Now what's left todo:
- Buy longer black M4 screws for top rad
- Order custom 4x140 dust filter from Demciflex
- Reapply more neatly rubber edging on cuts
- Order actual PC hardware
- Buy missing LC stuff and connect all together
- Sleeve stuff
Now here come more problems with choice. Seems in around half a year LGA2011 platform will be out, and by that time possibly also dual-gpu cards by Nvidia & AMD. I am less and less willing to buy temporary motherboard/CPU/GPU for less then half a year. By all the time my lazy build took, I'm more and more thinking along the penny-pinching lines, that it will be much wiser to skip buying current LGA1055 SB/current GPU for that short of time. Depreciation will bite badly and by all this time I kind of used to having only laptop around, even if I cannot play games that I like on linux installed there. Also waiting will let me wait for results of oncoming Koolance CPU-370 waterblock results. Decisions, decisions ..


 Reply With Quote


Bookmarks