Page 1 of 24 123411 ... LastLast
Results 1 to 25 of 595

Thread: The Linux Help and Tutorial Thread

  1. #1
    Xtreme Cruncher
    Join Date
    Jan 2009
    Location
    Nashville
    Posts
    4,162

    The Linux Help and Tutorial Thread

    I thought I would start this thread for all those who are using or want to use Linux for a cruncher and are new to the OS. Those that are experienced with Linux/UNIX can offer the commands and tools they have found the most useful in installing and maintaining a Linux Cruncher.

    While there are many useful GUI tools the real strength of Linux/Unix and the most intimating and confusing are the command line tools.

    Keeping in mind this is focused on crunching please add whatever commands you have found helpful.

    I will start off recommending this book UNIX In A Nutshell. Commands are grouped and referenced by task and cross referenced and there is a keyword index. Also has example command lines. Although at 908 pages not a lightweight.

    Online Linux Tutorials and Knowledge Base:
    Linux Knowledge Base and Tutorial
    Getting Started with Linux - Course Material
    Linux Terminal Command Reference


    This thread assumes a Debian/Ubuntu based Linux Distro. All command line examples should work on Ubuntu, Mint, Kubuntu and more.

    Start here:
    How To Open Terminal and Use The Command Line

    My most used commands:

    top
    A command line task manager like program displaying memory and CPU usage, tasks running, uptime, CPU load, virtual memory, swap space and more.

    tail
    tail -f /var/log/syslog
    will show the last 10 lines of the system log and any new lines written to the file in real time. tail, without -f will show the last 10 lines and exit.
    tail - 100 /var/log/kern.log | more
    show the last 100 lines of kern.log a page at a time. Q to quit, B to scroll back one page, space to go to next page.

    grep
    grep error /var/log/syslog
    Find the word error in syslog and display all lines containing it.
    grep error /var/log/syslog | more
    Find the word error in syslog and display all lines containing it a page at a time.

    sudo cat filename | more
    To view a file a page at a time with no editing.

    uname -a
    Displays info concerning the kernel version, useful if there are issues with certain kernel builds.

    uptime
    Show time since last bootup, CPU load averages. Top also displays this info.

    dmesg | more
    dmesg displays bootup info and more displays it a page at a time. This is when the OS is doing hardware detection and will show if a piece of hardware was detected by the OS. Helpful when determining what a NIC card or wireless card is not working and if you need to get a driver not supplied by your linux distro.

    free
    Ram memory and swap usage.

    du
    Shows disk usage by directory.
    du /var/tmp
    Shows Disk Usage for directory /var/tmp

    df -H
    Disk free.

    ls -la
    List files. -a show hidden files that start with a period. -l show long display.
    ls alone lists files and directoies only.

    cd /var/tmp
    Change Directory to /var/tmp

    cd /
    Change Directory to the root directory /

    cd ..
    Change Directory to one below current.

    pwd
    Present Working Directory

    Get name of current directory and change to directory below it.
    pwd
    /var/tmp
    cd ..
    pwd

    /var

    Change to my home directory using cd ~ or cd
    cd ~
    cd
    pwd
    /home/poppageek

    If you think your hard disk needs to be checked for errors:
    sudo touch /forcefsck reboot the PC
    This will force a check for disk errors on next reboot.

    To find a file or directory named boinc-client starting in the / root directory
    sudo find / -name boinc-client -ls

    When at the command line you can use the up arrow key to scroll through the command buffer or history. Handy for reviewing and re-entering earlier commands.
    ls
    pwd
    cd /var/tmp
    Up Arrow Key

    cd /var/tmp
    Up Arrow Key
    pwd
    Up Arrow Key
    ls

    You can use the Tab key to complete a file name or directory name that is in the current directory.
    cd /etc/boi <tab key>
    cd /etc/boinc-client <enter key>
    pwd
    /etc/boinc-client
    ls -la
    drwxr-xr-x 2 root root 4096 2010-10-30 19:01 .
    drwxr-xr-x 129 root root 12288 2010-10-08 03:26 ..
    -rw-r--r-- 1 root boinc 1276 2010-09-10 07:23 cc_config.xml
    -rw-rw-r-- 1 root boinc 1290 2010-09-13 23:21 global_prefs_override.xml
    -rw-r----- 1 root boinc 0 2010-10-30 19:01 gui_rpc_auth.cfg
    -rw-r--r-- 1 root boinc 310 2010-09-10 05:22 remote_hosts.cfg
    tail glob <tab key>
    tail global_prefs_override.xml <enter key>
    last 10 lines displayed of global_prefs_override.xml

    -------------------------------------------------------------------------------------------------------------------------------
    All files are owned by a user registered in the system password and group files. TO be able to Read a file you need read permission if you are not the owner. The same to be able to write to a file or edit it. If you down load the boinc archive from Berkely you need to be able to execute it.

    Get a directory listing of directory currently in:

    Code:
    ls -la
    drwxr-xr-x 2 poppageek poppageek    4096 Nov 11 14:50 Music
    drwxr-xr-x 2 poppageek poppageek    4096 Nov 12 02:56 personalVPN
    drwxr-xr-x 2 poppageek poppageek    4096 Nov 11 14:50 Pictures
    drwxr-xr-x 2 poppageek poppageek    4096 Nov 11 14:50 Public
    drwxr-xr-x 2 poppageek poppageek    4096 Nov 11 14:50 Templates
    drwxr-xr-x 7 poppageek poppageek    4096 Nov 11 21:19 tor-browser_en-US
    drwxr-xr-x 2 poppageek poppageek    4096 Nov 11 14:50 Videos
    -rw-r--r--  1 poppageek poppageek     675 Nov 11 14:45 .profile
    Files preceded by a period are usually important configuration files and should be left alone unless you are sure what you are doing.

    In the row of the listing above the d means directory. Then we have 3 sets of letters or dashes. first 3 are owner, second 3 are group and last 3 are world. so the Public directory has rwx, Read Write eXecute permissions set or enabled for user or owner of Public, poppageek. The next 3 are -xr which means write is NOT allowed, eXecute is allowed and Read is allowed.

    My .profile has no eXecute permissions but does have Read and Write for the owner and Read for group and world. The first poppageek is owner the second is group. A user can belong to more than one group. To see what groups you are in:

    Code:
    groups
    To change the ownership:

    Code:
    sudo chown newuser:newgroup .profile
    sudo chown boinc:boinc cc_config.xml
    Changes the cc_config.xml to be owned by user boinc in group boinc.

    To change permissions we will add group and world read to Public. Then remove eXectue to Templates for world

    Code:
    sudo chmod gw+r Public
    
    sudo chmod w-x Templates
    To make a new empty file then add world Read, Write and eXecute then add group eXecute.

    Code:
    sudo touch newfile1
    sudo chmod w+rwx newfile1
    sudo chmod g+x newfile
    More on how to get around the file structure and editing the command line.
    ---------------------------------------------------------------------------------------------
    How to create and edit files using the GEdit Text Editor.
    This is like Windows Notepad and just as simple. I will use the Boinc config files gui_rpc_auth.cfg and remote_hosts.cfg as examples.

    Applications > Accessories > Terminal When terminal opens type the following then hit enter: sudo /usr/bin/gedit Enter your password. gedit should now be open.

    For Boinc installed from the command line using apt-get:
    Click on Open then in the left column click on File System on right column double click on etc scroll down to boinc-client and double click.

    For Boinc installed from download:
    Click on Open then in the left column click on File System on right column double click on home scroll down to your login name and double click and double click on BOINC.

    For Dotsch Boinc/Linux installs:
    Click on Open then in the left column click on File System on right column double click on home scroll down to boinc and double click and double click on BOINC.

    If Boinc was installed another way just replace the directory names above with the location your config files are in.

    If you are in the correct directory now, depending on the way Boinc was installed, you should see gui_rpc_auth.cfg in the right column. Double click on gui_rpc_auth.cfg. On my install the file is empty. If there is anything shown in the window delete it all using the Backspace or Delete keys. Now click on Save. Now File > Close.

    Now click on File > Open or the Open Icon. Double click on remote_hosts.cfg. If remote_hosts.cfg is not listed then click on Cancel at bottom right corner. Then click on File > New. Go to the end of the file and type in the IP number of the machine that BoincTasks is running on. After entering the information click on save and enter the file name. In this case remote_hosts.cfg. Make sure the correct directory is in the box under the filename, else choose the correct directory by selecting File System which will open a directory browser. You can restart Boinc or reboot the machine. BoincTask should see your Linux cruncher now.

    If BoincTasks does not see your Linux machine click on the Computers tab then click on Computer on the task bar and select Find Computers. Narrow down the IP range to cover the IPs of any machines you want to add. If left at default it will scan the entire 256 range and take a while. Scan Address Range and Find use different methods and are not the same. Once listed select and click Add Computer.
    ---------------------------------------------------------------------------------------------

    Basic commands for using the Visual Editor a non-gui terminal editor

    vi somefilename

    a
    Append, the characters typed in will be inserted after the current cursor position.

    i
    Enter insert mode, the characters typed in will be inserted before the current cursor position.

    dd
    Delete line.

    o
    Open a new line after current line

    j or down arrow key.
    move the cursor down one line.

    k or up arrow key.
    move the cursor up one line.

    l or right arrow key.
    move the cursor to the right one character position.

    h or left arrow key
    Move the cursor to the left one character position.

    r
    replace one character under the cursor.

    u
    undo the last change to the file. Typing u again will re-do the change.

    x or Del key.
    Delete character under the cursor.

    :q quit
    :q! force quit not saving changes
    :w write file
    :wq write file and quit

    VI cheat sheet Extensive vi command reference.

    __________________________________________________ ______________________

    For GPU projects:

    If Boinc claims it does not see a GPU on reboot
    __________________
    Last edited by PoppaGeek; 01-02-2014 at 10:04 AM.

  2. #2
    Xtreme Member
    Join Date
    Mar 2010
    Location
    Raleigh, NC
    Posts
    267
    This could be very useful, thanks!

    I run Ubuntu 10.10 x64 on my laptop without issue and I had Ubuntu 10.10 x86 on my server until it refused to boot, that one logged about a month up uptime, crunching all the time.
    WCG Rigs: 184 threads, mostly i7s

  3. #3
    Xtreme Cruncher
    Join Date
    Jan 2009
    Location
    Nashville
    Posts
    4,162
    man grep
    Will display a manual page showing command line switches or options for grep.

    sudo
    Lets you run a task that you do not have sufficient rights to execute.
    sudo grep /var/log/syslog
    password: enter your password here (EDITed)

    Ubuntu package management from command line

    Ubuntu Package Management using Synaptic

    To update the local list of packages, enter in a Terminal:
    sudo apt-get update

    To install all available updates:
    sudo apt-get upgrade

    To search for a package:
    apt-cache search package

    To install a package:
    sudo apt-get install package

    To remove a package:
    sudo apt-get remove package

    To list other apt commands and options:
    apt-get help

    How I install Boinc
    sudo apt-get install boinc-client boinc-manager

    See the Ubuntu Manpage for apt-get for more options.

    Installing boinc-client on ubuntu server (no GUI) From wiki.ubuntu.com

    How to install and Manage Ubuntu Server and boinc from the command line from second machine with a desktop GUI.

    If you are running 64 bit Linux and 64 bit BOINC then you might have a problem with projects that issue 32 bit applications rather than 64 bit applications. To allow 32 bit applications to run on 64 bit Linux you must install 32 bit versions of certain shared libraries (as explained here)

    sudo apt-get install ia32-libs libstdc++6 freeglut3

    Then install main client:

    sudo apt-get install boinc-client boinc-manager

    Preferably reboot, otherwise restart boinc-client

    sudo /etc/init.d/boinc-client restart

    Then add your project(s) using

    boinccmd --project_attach URL auth

    Test if boinc is running with

    boinccmd --get_state | more

    More info on boinccmd here

    If you see this in the Messages Tab:
    [error] App version has unsupported platform i686-pc-linux-gnu
    [error] No application found for task: i686-pc-linux-gnu 617 ; discarding
    then add this line to the /etc/boinc-client/cc_config.xml
    <alt_platform>i686-pc-linux-gnu</alt_platform>

    restart Boinc Manager and bonic-client or reboot.
    sudo /etc/init.d/boinc-client restart

    How to enable Backports in Ubuntu based distros for additional versions on Boinc.

    Howto set up a cron job to have Boinc client update at set times.

    Network Trouble shooting

    To see if Linux sees your network device:

    Ethernet
    poppageek@Linux1354:~$ dmesg | grep eth
    [ 1.275221] eth0: RTL8168d/8111d at 0xffffc900001f8000, 6c:f0:49:96:a2:48, XID 083000c0 IRQ 26
    [ 13.869255] r8169: eth0: link down
    [ 13.869434] ADDRCONF(NETDEV_UP): eth0: link is not ready
    Wireless
    poppageek@Linux1354:~$ dmesg | grep wlan
    [ 14.260262] ADDRCONF(NETDEV_UP): wlan0: link is not ready
    [ 22.962563] wlan0: deauthenticating from 00:21:29:71:59:db by local choice (reason=3)
    [ 22.962736] wlan0: direct probe to AP 00:21:29:71:59:db (try 1)
    eth is a wired network device. if there is one network device it should be eth0, with eth1 for a second and so on. The RTL8168/8111d is the device chipset. Linux does not care about device brands it goes by the chipset for drivers. Any brand may use several different chipsets and a chipset may be used by many brands. So here we can see that the RealTek chipset RTL8168d/8111d is recongized and a driver was present.

    wlan is the wireless network device. We do not get all the device info we did with the wired one. But we can see that it is recognized.

    poppageek@Linux1354:~$ ifconfig
    eth0 Link encap:Ethernet HWaddr 6c:f0:49:96:a2:48
    UP BROADCAST MULTICAST MTU:1500 Metric:1
    RX packets:0 errors:0 dropped:0 overruns:0 frame:0
    TX packets:0 errors:0 dropped:0 overruns:0 carrier:0
    collisions:0 txqueuelen:1000
    RX bytes:0 (0.0 B) TX bytes:0 (0.0 B)
    Interrupt:26 Base address:0x8000

    lo Link encap:Local Loopback
    inet addr:127.0.0.1 Mask:255.0.0.0
    inet6 addr: ::1/128 Scope:Host
    UP LOOPBACK RUNNING MTU:16436 Metric:1
    RX packets:8 errors:0 dropped:0 overruns:0 frame:0
    TX packets:8 errors:0 dropped:0 overruns:0 carrier:0
    collisions:0 txqueuelen:0
    RX bytes:480 (480.0 B) TX bytes:480 (480.0 B)

    wlan0 Link encap:Ethernet HWaddr 00:24:21:c7:fd:ff
    inet addr:192.168.1.120
    Bcast:192.168.1.255 Mask:255.255.255.0
    inet6 addr: fe80::224:21ff:fec7:fdff/64 Scope:Link
    UP BROADCAST RUNNING MULTICAST MTU:1500 Metric:1
    RX packets:2293264 errors:0 dropped:0 overruns:0 frame:0
    TX packets:477195 errors:0 dropped:0 overruns:0 carrier:0
    collisions:0 txqueuelen:1000
    RX bytes:372159730 (372.1 MB) TX bytes:624973529 (624.9 MB)
    Here we see that eth0 is recongized but not used. In the first line HWaddr shows the MAC address of the card.
    eth0 Link encap:Ethernet HWaddr 6c:f0:49:96:a2:48
    The wireless device wlan0 has been assigned a IP address and is in use .

    Below we have a PC with 2 ethernet wired devices recognized with the first one not used and the second one used and active. The lines that are underlined show the device is up and what it's ip address is.

    lo is the loopback and should not be an item of concern.

    poppageek@poppageek-desktop:~$ ifconfig
    eth0 Link encap:Ethernet HWaddr 00:50:45:02:61:49
    UP BROADCAST MULTICAST MTU:1500 Metric:1
    RX packets:0 errors:0 dropped:0 overruns:0 frame:0
    TX packets:0 errors:0 dropped:0 overruns:0 carrier:0
    collisions:0 txqueuelen:1000
    RX bytes:0 (0.0 B) TX bytes:0 (0.0 B)
    Interrupt:30 Base address:0x4000

    eth1 Link encap:Ethernet HWaddr 00:50:45:02:61:4a
    inet addr:192.168.1.104 Bcast:192.168.1.255 Mask:255.255.255.0 <---- Device was assigned IP number by DHCP server.
    inet6 addr: fe80::250:45ff:fe02:614a/64 Scope:Link
    UP BROADCAST RUNNING MULTICAST MTU:1500 Metric:1
    RX packets:3053354 errors:0 dropped:0 overruns:0 frame:0
    TX packets:608140 errors:0 dropped:0 overruns:0 carrier:0
    collisions:0 txqueuelen:1000
    RX bytes:609271385 (609.2 MB) TX bytes:2327755283 (2.3 GB)
    Interrupt:31 Base address:0x6000

    lo Link encap:Local Loopback
    (listing deleted for simplicity)
    To lessen the info displayed you can use: ifconfig eth or ifconfig wlan

    If you have a device, wlan or eth, that is shown as recognized but not up and you are running Ubuntu:

    Goto System > Preferences > Network Connections then click eth0 (or whatever the device number is)then click Edit then on IPv4 Settings tab and make sure Method says Automatic (DHCP)

    If your device shows an ip such as inet addr:169.254.9.237 and your network is not 169.254.x.x then it is not able to talk to your DHCP server or router. Most home networks are 192.168.x.x or 10.10.x.x If you have done the above and it still not working try rebooting, check wires and connections and make sure DHCP is turned on in the router. If there are led lights on your device and they are not blinking then there is not a physical connection to your network, ie bad cable, or your device is bad.

    Howto: Ubuntu Linux convert DHCP network configuration to static IP configuration

    To setup networking on a wired ethernet controller using the Ubuntu GUI tools:

    If you think you have hardware unsupported by your Linux distro try this.

    poppageek@Linux1354:~$ sudo lshw | more
    *-bridge:0
    description: Ethernet interface
    product: RTL8111/8168B PCI Express Gigabit Ethernet controller
    vendor: Realtek Semiconductor Co., Ltd.

    physical id: 8
    bus info: pci@0000:00:08.0
    logical name: eth0
    version: a3
    serial: 00:50:45:02:61:49
    width: 32 bits
    clock: 66MHz
    capabilities: bridge bus_master cap_list ethernet physical
    configuration: broadcast=yes driver=r8169 driverversion=0.64 latency=0 maxlatency=20 mingnt=1 multicast=yes
    resources: irq:30 memory:d0009000-d0009fff ioport:2808(size=8) memory:d0005800-d00058ff memory:d0005400-d000540f
    The output will be much longer than above. Look for the description: Ethernet interface such as the first bolded line above. Then using the vendor and product you can Google Ubuntu RTL8111/8168B drivers and see if it is supported. The example above has the drivers and is working.


    More to come later.
    Last edited by PoppaGeek; 12-26-2013 at 11:18 AM.

  4. #4
    Xtreme crazy bastid
    Join Date
    Apr 2007
    Location
    On mah murder-sickle!
    Posts
    5,878
    Quote Originally Posted by PoppaGeek View Post
    sudo
    Lets you run a task that you do not have sufficient rights to execute.
    sudo grep /var/log/syslog
    password: enter root password here
    Actually you enter your user password there, not the root password.

    Ubuntu, by default (you can change this) doesn't have a root login or password. It's pretty much a hidden account. Sudo can be described as "super user do". It lets you execute a single command as a super user (only a hair away from the root user). If you need to execute a bunch of commands as the super user you can use the command:
    Code:
    sudo su
    but make sure you enter:
    Code:
    exit
    when you're done or you could leave yourself open to all sorts of nasty accidents.

    [SIGPIC][/SIGPIC]

  5. #5
    Xtreme Cruncher
    Join Date
    Jan 2009
    Location
    Nashville
    Posts
    4,162
    Quote Originally Posted by D_A View Post
    Actually you enter your user password there, not the root password.

    Ubuntu, by default (you can change this) doesn't have a root login or password. It's pretty much a hidden account. Sudo can be described as "super user do". It lets you execute a single command as a super user (only a hair away from the root user). If you need to execute a bunch of commands as the super user you can use the command:
    Code:
    sudo su
    but make sure you enter:
    Code:
    exit
    when you're done or you could leave yourself open to all sorts of nasty accidents.
    Considering the number of times a day I use that.....ah the joys of aging.

    Fixed it.

  6. #6
    Xtreme crazy bastid
    Join Date
    Apr 2007
    Location
    On mah murder-sickle!
    Posts
    5,878
    If you REALLY want to you can limit the powers of the sudo command. It's actually quite versatile if you don't mind getting your "hands" dirty in the config files.

    [SIGPIC][/SIGPIC]

  7. #7
    Xtreme Cruncher
    Join Date
    Jan 2009
    Location
    Nashville
    Posts
    4,162
    Quote Originally Posted by D_A View Post
    If you REALLY want to you can limit the powers of the sudo command. It's actually quite versatile if you don't mind getting your "hands" dirty in the config files.
    When I worked as Unix Admin I had to manage some sudo files as every team and person had different privileges. Hardware, storage, Oracle, Sap and OS teams were all different and people on the teams might have different permissions. Screw up and NOT give a Oracle or SAP person the permission they think they have and all sorts of interesting discussions start.
    Last edited by PoppaGeek; 10-26-2010 at 08:12 PM.

  8. #8
    Xtreme crazy bastid
    Join Date
    Apr 2007
    Location
    On mah murder-sickle!
    Posts
    5,878
    "interesting discussions"


    That's one way to put it!

    [SIGPIC][/SIGPIC]

  9. #9
    Xtreme Cruncher
    Join Date
    Jan 2009
    Location
    Nashville
    Posts
    4,162
    Added more commands to original post. Not seeing much interest here. Maybe let thread die?

  10. #10
    Xtreme crazy bastid
    Join Date
    Apr 2007
    Location
    On mah murder-sickle!
    Posts
    5,878
    Nope, there's too many linux newbies out there that might need a quick reference.

    [SIGPIC][/SIGPIC]

  11. #11
    Xtreme Cruncher
    Join Date
    Jan 2009
    Location
    Nashville
    Posts
    4,162
    Basic commands for using the Visual Editor a non-gui terminal editor

    vi somefilename

    a
    Append, the characters typed in will be inserted after the current cursor position.

    i
    Enter insert mode, the characters typed in will be inserted before the current cursor position.

    dd
    Delete line.

    o
    Open a new line after current line

    j or down arrow key.
    move the cursor down one line.

    k or up arrow key.
    move the cursor up one line.

    l or right arrow key.
    move the cursor to the right one character position.

    h or left arrow key
    Move the cursor to the left one character position.

    r
    replace one character under the cursor.

    u
    undo the last change to the file. Typing u again will re-do the change.

    x or Del key.
    Delete character under the cursor.

    :q quit
    :q! force quit not saving changes
    :w write file
    :wq write file and quit

    VI Cheat Sheet - Extensive command reference.
    Last edited by PoppaGeek; 10-28-2010 at 01:23 AM.

  12. #12
    Xtreme Cruncher
    Join Date
    Jan 2009
    Location
    Nashville
    Posts
    4,162
    To enable Remote Desktop:
    Click on System > Preferences > Remote Desktop
    Under Sharing enable the first 2 options. I leave the rest blank as all machines are on local lan.

    You can now use VNC or another desktop viewer to remotely use the desktop.
    TightVNC

  13. #13
    Xtreme Cruncher
    Join Date
    Mar 2010
    Posts
    451
    Quote Originally Posted by PoppaGeek View Post
    Added more commands to original post. Not seeing much interest here. Maybe let thread die?
    I for one am very happy to see this thread, as I have recently installed Ubuntu on two new crunchers. Things have gone relatively smoothly considering my linux noobishness, but I do have a question...

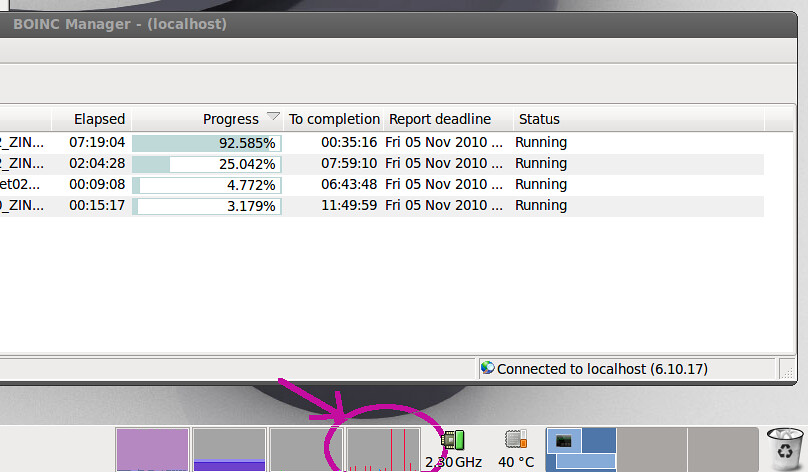
    One of my machines uses an SSD; per jcool's thread, I have adjusted the "Task checkpoint to disk" setting from 60 to 600 - but I'm still seeing frequent writes (according to the system monitor panel applet):


    Nothing else is running on this machine other than BOINC/WCG. Is there a way to get file and/or application details on this write activity - a la Resource Monitor in Windows?

    Any help appreciated!

    Regards

  14. #14
    Xtreme crazy bastid
    Join Date
    Apr 2007
    Location
    On mah murder-sickle!
    Posts
    5,878
    The system monitor in Ubuntu cover many if not all the same bases. Browse through the options and see if what you want is there.

    [SIGPIC][/SIGPIC]

  15. #15
    Xtreme Cruncher
    Join Date
    Jan 2009
    Location
    Nashville
    Posts
    4,162
    iostat and sar might if you can figure out the right switch. Both are installed with the following.
    sudo apt-get install sysstat

    The number of options or switches can be daunting but they are powerful programs. I will do more reading and see if I can find how to do what you want, iostat shows everything about disk activity, network and cpu but so far I do not see it naming the process who is writing or reading.

    There are several system processes that write to log files and read other files on set intervals or after an event. cron and syslog being 2. While both are configurable and you may even be able to shut them down it may not be a great idea. It might be ok on a crunchers that is operating fine but you will loose alot of trouble shooting ability. syslog writes to files in /var/log and they can get big so there are cron tasks that compress and rotate them. Do not shut that off unless you shut down syslog and like I said I do not know what will happen if you do. Never heard of it. Possibly a better solution is mount /var/log and /var/tmp on a USB mem stick or small HD.
    Last edited by PoppaGeek; 10-28-2010 at 02:23 PM.

  16. #16
    Xtreme Legend
    Join Date
    Mar 2008
    Location
    Plymouth (UK)
    Posts
    5,279
    DON'T let this die....Once the week is over I want to have a go at ubuntu ...every try to date has failed ...and looking at the stuff above I'm starting to see why


    My Biggest Fear Is When I die, My Wife Sells All My Stuff For What I Told Her I Paid For It.
    79 SB threads and 32 IB Threads across 4 rigs 111 threads Crunching!!

  17. #17
    Xtreme Cruncher
    Join Date
    Jan 2009
    Location
    Nashville
    Posts
    4,162
    Thanks for the feedback guys.

    @SMTB1963 After reading on the various utilities, mpstat, vmstat, iostat, pidstat and sar and reading this thread at unix.com you are best off mounting /tmp and /var/log and /var/tmp on a HD or USB stick. The easiest is to re-install and use the partition program to tell it to create the file systems but we can help ya do it without a re-install if you want to do it.

    And the sar program creates and writes to files so you may not want to use it as it will just create more disk use. Logging is not enables by default.
    Last edited by PoppaGeek; 10-28-2010 at 07:10 PM.

  18. #18
    Xtreme Enthusiast
    Join Date
    Mar 2010
    Location
    Minnesota
    Posts
    587
    Hardware monitor is a nice app. You can monitor temps of cpu, ram, etc.. go to synaptics package manager to get it. Just do a search. It will download all necessary files. lm-sensors comes with ubuntu lucid so go to terminal:
    sudo sensors-detect, just hit enter on all responses. then add hardware manager applet to the top, go to settings, select what you want to see. I have it on both my linux boxes. A little different for each brand of mobo. Not all boards have same amount of sensors.
    Last edited by bearcatrp; 10-28-2010 at 03:15 PM.

  19. #19
    Xtreme crazy bastid
    Join Date
    Apr 2007
    Location
    On mah murder-sickle!
    Posts
    5,878
    With sensors-detect, at the end you will be asked to copy and paste a couple of lines into your /etc/modules file. You need to at least open the text editor with sudo for this to work (ie sudo gedit /etc/modules if you have a desktop or sudo nano /etc/modules if you're using the server version. I tend to use nano but you could use vi, vim or a number of other text editors.)
    To get the modules loaded straight away (without rebooting) enter sudo modprobe <thing listed> and it will load the module for you. For example, if I run sensors-detect on my Sossaman I end up getting:
    Code:
    #----cut here----
    # Adapter drivers
    ipmi-si
    # Chip drivers
    coretemp
    pc87427
    #----cut here----
    For this you could enter
    Code:
    sudo modprobe ipmi-si coretemp pc87427
    to load the driver modules immediately. Of course if you don't want to have to do that every time you reboot they need to be copied into the /etc/modules file so they are automatically loaded.
    Yes, I'm still talking Ubuntu if it makes any difference.

    [SIGPIC][/SIGPIC]

  20. #20
    Xtreme Cruncher
    Join Date
    Jan 2009
    Location
    Nashville
    Posts
    4,162
    @SMTB1963 If you are up to doing a software install this looks like it will do what you want. IOTOP It is listed in the Synaptic package manager so should not be a big deal to install.

    Use iotop -o to show only processes that are writing or reading to disk. Far easier to read.
    iotop -a is even better as it shows the accumulated writes and reads and they stay on screen instead of flashing.
    Last edited by PoppaGeek; 10-28-2010 at 04:24 PM.

  21. #21
    Xtreme Cruncher
    Join Date
    Mar 2010
    Posts
    451
    Quote Originally Posted by PoppaGeek View Post
    @SMTB1963 If you are up to doing a software install this looks like it will do what you want. IOTOP It is listed in the Synaptic package manager so should not be a big deal to install.

    Use iotop -o to show only processes that are writing or reading to disk. Far easier to read.
    iotop -a is even better as it shows the accumulated writes and reads and they stay on screen instead of flashing.
    Thanks!!! That's exactly what I was looking for!

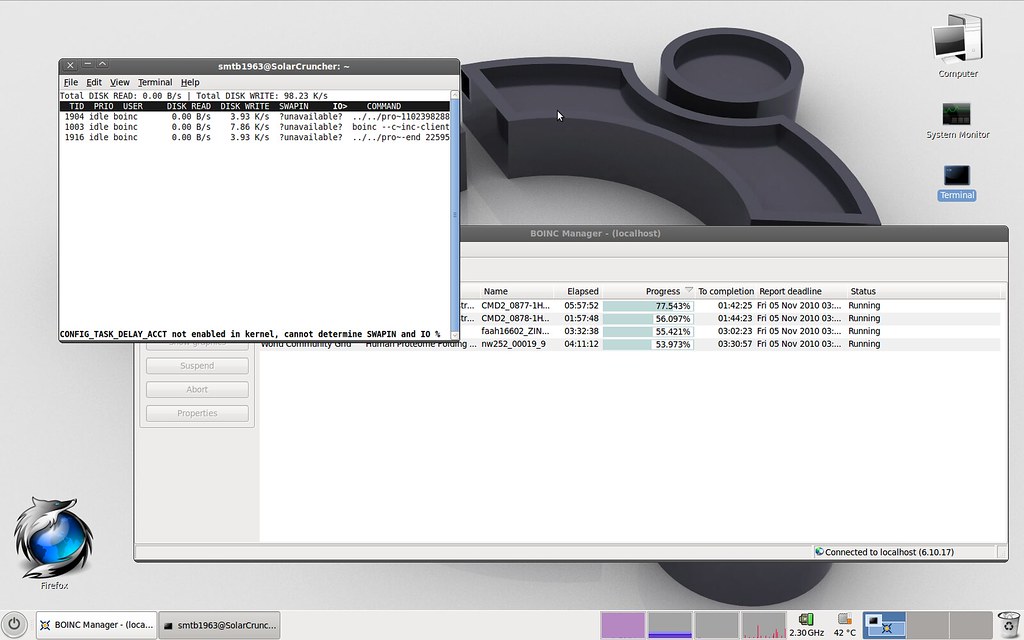
    It appears that the kernel shipped with Ubuntu 10.04 was not compiled with the CONFIG_TASK_DELAY_ACCT option enabled - but I still get output from IOTOP showing the threads responsible for the IO activity. As I feared, BOINC is the culprit:


    These writes occur at least every 2 seconds. Since the SSD is small (32GB), I'm a little concerned about its longevity crunching 24/7.

    Thing is, I've noticed this behavior from BOINC on my Win 7 x64 machine as well...continual small writes show up in Resource Monitor - no matter what value I input in the "Task checkpoint to disk" setting.

    Any thoughts?

    Speaking of sensors, I do have another (much less urgent) question maybe you guys might be able to help with. Are any of you guys running linux on an AMD system? My PII 1055t box is running Ubuntu 10.10 (which has k10temp support in the kernel), but the sensors applet shows a completely different CPU temperature than what's indicated in BIOS - about 19C cooler. The applet allows for both additive and multiplicative adjustments to the value displayed, so I simply added 19 to the temperature value at idle. Is this correct, or is it more complicated than that? The machine's been running for several days now with no hiccups, so I'm not real concerned about this one.

    Again, I really appreciate you guys getting this thread going.

    Regards

  22. #22
    Xtreme crazy bastid
    Join Date
    Apr 2007
    Location
    On mah murder-sickle!
    Posts
    5,878
    Are you running with a swap partition? If you are (and you should be) then you probably should have that on a regular mechanical drive to save wear and tare on the SSD.

    [SIGPIC][/SIGPIC]

  23. #23
    Xtreme Cruncher
    Join Date
    Mar 2010
    Posts
    451
    Quote Originally Posted by D_A View Post
    Are you running with a swap partition? If you are (and you should be) then you probably should have that on a regular mechanical drive to save wear and tare on the SSD.
    There is a small swap partition (1.3GB), but System Monitor has always shown "0 bytes" usage. There's 4GB of memory, and it's never gone over 1GB usage that I've seen - so I figured the swap partition was never being utilized. Maybe it is after all?

    This particular machine was built with a specific purpose in mind, and the SSD was a requirement. But since I've re-purposed it for the Supercomputer week, I may go ahead and throw a regular hard drive on it till the 9th...just to be safe.

  24. #24
    Xtreme crazy bastid
    Join Date
    Apr 2007
    Location
    On mah murder-sickle!
    Posts
    5,878
    If you have an old one laying around just partition a bit of it as swap and use that instead of having swap on the SSD. If it doesn't stop, put the whole BOINC folder on the old drive.

    [SIGPIC][/SIGPIC]

  25. #25
    Xtreme Cruncher
    Join Date
    Jan 2009
    Location
    Nashville
    Posts
    4,162
    Use vmstat 2 100 to watch swap file activity. The 2 is delay or refresh rate in seconds and the 100 is repeat. Increase 100 for longer monitoring and lesser for shorter. in the swap column si is swap in and so swap out.

    All my machines are AMD and I have never had much luck with lm-sensors. All I ever use it for now is to see if temps rise or drop.
    Last edited by PoppaGeek; 10-28-2010 at 06:45 PM.

Page 1 of 24 123411 ... LastLast

Bookmarks

Bookmarks

Posting Permissions

  • You may not post new threads
  • You may not post replies
  • You may not post attachments
  • You may not edit your posts
  •