Page 1 of 5 1234 ... LastLast
Results 1 to 25 of 123

Thread: Dual 120 Heatercore

  1. #1
    Xtreme Enthusiast
    Join Date
    Jan 2003
    Location
    USA
    Posts
    733

    Dual 120 Heatercore

    For some time, I have been using 1971 Caprice heatercores when I wanted to use 2-4 120mm fans for some serious cooling power. The problems with that core (barbed fittings that are a royal pain to get out and odd shaped holes punched into the top tank) led me to search for a different core.

    After scanning through tons of heatercore specs, I decided to give the heatercore for the 1977 Pontiac Bonneville (with a/c) a test run if the price was right. A quick call to autozone confirmed that it was a heatercore that they normally stock and with a great pricetag of $17.99 this one looked like a sure bet for replacing my caprice cores for future mods.

    Quick run down of the specs:
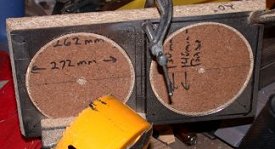
    10-3/4" X 5-5/8" X 2" w/o the tanks
    about 12-1/2" X 5-5/8 X 2" with the tanks

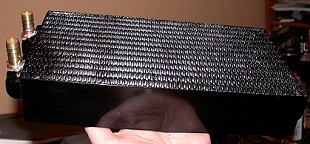
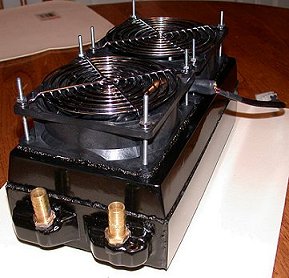
    to put the size into perspective, this is the '77 Bonneville core with 2 120mm fans laying on top of it:


    Almost perfect.

    On to other good points of this core...
    One of the best things about this core are the holes in the tanks for the fittings. They are not odd shaped oval bastages like the ones that are punched into some cores. Instead, they are almost perfectly round and their size makes the switch over to barbed fittings much easier than you would expect.

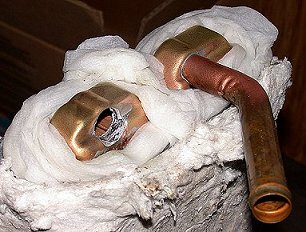
    Pic of the top tank with the factory tubes:

    ^nice round holes -- that are the same size.

    As I mentioned earlier, the caprice cores that I had been using started causing problems as the tubes were barbed -- they are almost locked into the tanks and it is very hard to get them out without cutting, drilling and some torch work -- when they are gone, they leave nasty oval punchouts that are a PITA to seal up properly. Due to the barbs on the factory tubes, if you try to heat them up and yank them straight out, it will tear the brass on the tanks - another headache. I halfway expected the tubes on the 77 Bonneville to be barbed like those on the caprice cores but this is not the case -- a little torch work and some vise grips gets them out cleanly.


    ^1st fitting came out cleanly with just a little solder residue left.
    For those that have never taken a torch to one of the heatercores: you have to be careful with where you apply the heat. The top tank is held on with nothing but solder. If you overheat the tank, that sucker will come right off and it is very hard to get it back on without leaks.
    To avoid overheating, I 1st filled the heatercore with cool water. Then I wrapped most of the top tank in soaking wet paper towels (check the above pic). Just to make sure I had everything covered, I then wrapped the core area with a insulating plumber's wrap -- several water soaked paper towels would work in place of the wrap.

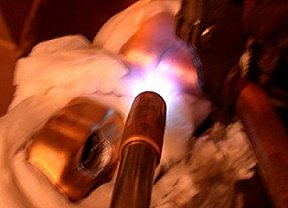
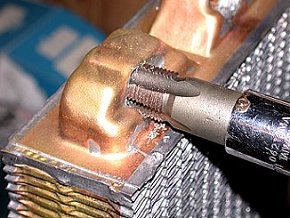
    Once you have the tank protected from excessive heat, apply heat with the torch directly to the tube where it enters the tank -- like this:

    ^If you look in the right hand side of the (fuzzy) pic, you can see a vise grip locked onto the tube. Once the solder starts to melt, try moving the vise grip side to side a little - once all of the solder becomes liquid, a bit of side to side action and a straight pull with the vise grip will pull the tube out cleanly.

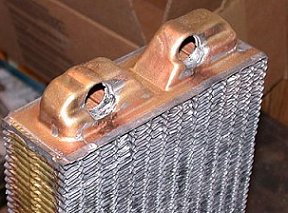
    both tubes out with no probs:


    on to the really nice bonus you get with this core -- the pre-drilled holes are perfect in size for a 3/8" npt tap. If you buy 3/8" npt x 1/2" barbed fittings, this is a piece of cake. Just thread the existing holes like so:


    Then screw in the barbed fittings. To make sure there are no leaks whatsoever, you can add some JB Weld to the threads and then let it dry or use the torch a little more and silver solder the fittings in place.

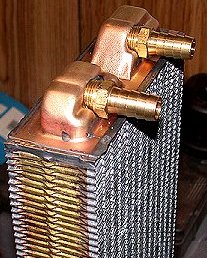
    before sealing the fittings in place it looks like this:


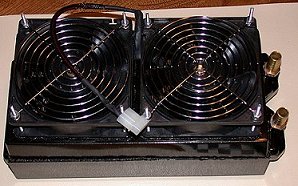
    I will try to cover making a shroud for this core soon:

    the one pictured above is still a work in progress but it should be finished soon.
    Last edited by Weapon; 08-29-2007 at 08:22 PM.
    Counting bodies like sheep to the rhythm of the war drums.
    go to sleep
    go to sleep
    go back to sleep.

    carpe noctem.

  2. #2
    Xtreme Enthusiast
    Join Date
    Aug 2003
    Location
    Chicago InsaneTek.com
    Posts
    845
    Great guide!!

  3. #3
    Xtreme Member
    Join Date
    Feb 2003
    Posts
    219
    Wow. Great post. You should put that up at some more forums if you haven't already. A lot of people could benefit from it.

  4. #4
    Xtreme Relic
    Join Date
    Jun 2002
    Location
    Hilton Head, S.C.
    Posts
    5,240
    Originally posted by pelikan
    Wow. Great post. You should put that up at some more forums if you haven't already. A lot of people could benefit from it.
    The whole idea is to tell the people at other forums to come here for the best information and guides like this.
    Great job and a good find!
    It will be my next core for sure. :thumbsup:
    I hate to advocate drugs, alcohol, violence, or insanity to anyone, but they've always worked for me.
    Hunter S. Thompson (1939 - 2005)

  5. #5
    Xtreme Enthusiast
    Join Date
    Jan 2003
    Location
    USA
    Posts
    733
    thanks.

    the one I am working on now is a n. bridge block + pelt cold plate for the NF7...it might work on other nf2 mobos but I havent checked them yet.

    more to follow.
    Counting bodies like sheep to the rhythm of the war drums.
    go to sleep
    go to sleep
    go back to sleep.

    carpe noctem.

  6. #6
    Xtreme Enthusiast
    Join Date
    Jan 2003
    Location
    USA
    Posts
    733
    a little more tweakage for the bonneville core...

    if you look at the pic, you can see that the fittings are screwed in and they are ready to be soldered...but the ones that are in place have been modded a little to prevent any flow restrictions.
    On the far tank, one of the 3/8"npt x 1/2" barbed fittings in its original form is setting on top of the tank to demonstrate the possible problem -- when it is screwed all the way into the tank, it would be damn close to the back wall of the tank -- in between the tanks you can see the section of thread that was cut off a la dremel high speed cutoff wheel.

    I just threaded the fittings in as far as they would go, marked em with a sharpie (sharpie mark still readily apparent on the threads of the fitting that is screwed into the 1st tank) and then cut them off leaving 3-4 full threads before the sharpie mark. That gives me a little more clearance and no concerns about overly restriction water flow.

    hopefully, all of that made sense -- havent had any coffee yet.
    Last edited by Weapon; 08-29-2007 at 08:23 PM.
    Counting bodies like sheep to the rhythm of the war drums.
    go to sleep
    go to sleep
    go back to sleep.

    carpe noctem.

  7. #7
    Xtreme Member
    Join Date
    Nov 2003
    Location
    New Jersey
    Posts
    160
    not really enough meat on the top of tank you might want to use 1/2 tube to a sweat 1/2 to 3/8 npt much safer than trying to tap into the thin top tank.

  8. #8
    Xtreme Member
    Join Date
    Nov 2003
    Location
    New Jersey
    Posts
    160
    My core lays horizontal at the top of case and had to reroute hose barbs so hoses would not kink from hitting top of powersupply.
    Nice work weapon..
    Attached Thumbnails Attached Thumbnails Click image for larger version. 

Name:	computer case 1 006_edited.jpg 
Views:	5930 
Size:	27.2 KB 
ID:	6944  
    Last edited by NitroRat; 12-28-2003 at 12:22 PM.

  9. #9
    Xtreme Member
    Join Date
    Apr 2003
    Location
    Portugal
    Posts
    126
    nice job, and really nice heatercore!
    Conroe E6600 @ 4712.8MHz on VapoLS (+6ºC )
    Asus P5B Deluxe wi-fi edition
    2x1GB CellShock 8000 CL4 @ 1144MHz 4-4-4-12 2.35v
    StockCooled X800GTO with XT bios mod (Sapphire X1900XTX DEAD!)
    Enermax Liberty 620W
    Western Digital 250GB 16MB 7200 SATA2
    Lian-Li PC60

    3Dmark01: http://service.futuremark.com/compare?2k1=8959998

  10. #10
    Xtreme Enthusiast
    Join Date
    Jan 2003
    Location
    USA
    Posts
    733
    Originally posted by NitroRat
    not really enough meat on the top of tank you might want to use 1/2 tube to a sweat 1/2 to 3/8 npt much safer than trying to tap into the thin top tank.
    I pretty much just use the admittedly de minimus threads for holding the fittings in place until they are soldered. I use Harris' Stay Brite #8 and due to the way the top tank is made I have about a 1/3" of surface area underneath the exposed threads which makes a decent solder pad. I put a nice layer of solder between the exposed threads and the tank and then I put a solder shoulder around the threads where they enter the tank. After I did the first one like this, I let it cool and then tried to torque the fittings by hand -- they feel very, very solid.

    Harris Stay Brite #8 melts at 430 F & is liquid at 535 F so there are no real probs with using it on the tank. The good part is it is rated at 15,000psi for joints and 11,000psi otherwise.

    side note: #8 is great for loose fittings as it will not flow thru them. It makes an excellent filler for cracks as well. good stuff.

    I have made a chevette heatercore with extensions somewhat like the ones on your core. Going with solid copper is a great way to work around space problems in cases. Sooner or later, I am going to build an entire loop out of copper.
    Last edited by Weapon; 12-30-2003 at 07:12 AM.
    Counting bodies like sheep to the rhythm of the war drums.
    go to sleep
    go to sleep
    go back to sleep.

    carpe noctem.

  11. #11
    Xtreme Member
    Join Date
    Nov 2003
    Location
    New Jersey
    Posts
    160
    Yea I was going to hard tube the whole lot but got a new case and geting ready to jump off the tec wagon and go all out with dual compressors one for cpu and one for gpu . Have case and one compressor and searching for a deal for the other compressor and some condensors.
    Attached Thumbnails Attached Thumbnails Click image for larger version. 

Name:	computer case 1 027a.jpg 
Views:	5819 
Size:	17.8 KB 
ID:	6960  

  12. #12
    Xtreme Member
    Join Date
    Nov 2003
    Location
    New Jersey
    Posts
    160
    another one.
    Attached Thumbnails Attached Thumbnails Click image for larger version. 

Name:	computer case 1 044.jpg 
Views:	5850 
Size:	16.6 KB 
ID:	6961  

  13. #13
    I am Xtreme
    Join Date
    Dec 2003
    Location
    Omaha, NE
    Posts
    368
    Damn ythat heatercore is huge

    Great job looking great and nice guide will deffinantly do well as a sticky!! WOOT!!!
    Thermaltake Xaser VI Case
    ASUS P7P55 Motherboard
    Intel i7 870
    AMD 4870X2
    8 gigs of OCZ Fatal1ty DDR3
    CoolIt Boreas 12 TEC CPU cooler
    Coolermaster UCP-1100W PSU


    Quote Originally Posted by {GOD}Raptor22
    I find it exceedingly humorous how you sit here and continue to play keyboard warrior even though you know you are wrong.

  14. #14
    Xtreme Member
    Join Date
    Sep 2002
    Location
    Melbourne, Australia
    Posts
    172
    wow **stares at Nitro Rats case**

    Nitro rat what case is that, it looks awesome and its pretty much exactly what i want. tell me abit about it if u dont mind. brand, price, dimentions(sp??).

    i am one very jealous man right now lol

  15. #15
    Xtreme Member
    Join Date
    Nov 2003
    Location
    New Jersey
    Posts
    160
    brand -dunno but it is and old at style server case so i will be modding it to an atx style and its 11.5 in X 24.5 in X 17.5 in, nice and wide . And ready for this cost.......$20, nice.....
    its about 10 years old bought it from a local comp repair place near me. Compressor cost .....Freebie......

  16. #16
    Xtreme Member
    Join Date
    Nov 2003
    Location
    New Jersey
    Posts
    160
    opened up
    Attached Thumbnails Attached Thumbnails Click image for larger version. 

Name:	computer case 1 038.jpg 
Views:	5681 
Size:	20.8 KB 
ID:	6997  

  17. #17
    Xtreme Enthusiast
    Join Date
    Jan 2003
    Location
    USA
    Posts
    733
    ^^nice case - I am still in the middle of revamping my case for the phase change system that I built. *i foresee another thread in the near future*

    anyway, minor update on the '77 core project...

    I cut 2 side plates out of weld steel and silver soldered them to the sides of the core to get rid of the wavy sided look.

    then I decided to give it a minor facelift with some black metallic paint.

    pic of the current progress:

    the fittings need a little cleanup as they still have a lot of masking tape residue on them but that is easy enough to fix with a rag and a little WD40.

    hopefully, I will get enough time to finish the shroud this weekend.
    Last edited by Weapon; 08-29-2007 at 08:23 PM.
    Counting bodies like sheep to the rhythm of the war drums.
    go to sleep
    go to sleep
    go back to sleep.

    carpe noctem.

  18. #18
    Xtreme Member
    Join Date
    Nov 2003
    Location
    New Jersey
    Posts
    160
    nice touch looks like it goes fast, and damn sexy...

  19. #19
    Xtreme Enthusiast
    Join Date
    Aug 2003
    Location
    Hertfordshire, UK
    Posts
    798
    As usual Weap, mate, fantastic job. You most certainly got a flare to write them guides !

    With all the material you accumulated by now you should be starting on writing a 'lil book on the subject

    How's your shim patenting going on, btw?
    Stock is never good enough!

    M E D U S A

  20. #20
    Xtreme Enthusiast
    Join Date
    Jan 2003
    Location
    USA
    Posts
    733
    Originally posted by Jabo
    As usual Weap, mate, fantastic job. You most certainly got a flare to write them guides !

    With all the material you accumulated by now you should be starting on writing a 'lil book on the subject

    How's your shim patenting going on, btw?
    thanks jabo. I just finished and mounted the shroud and I am very pleased with the final results. I would snap a pic and post it but I told ardawg that I would be over to finish up his two room H2O cooling system. so I will post up some pics later.

    the 77 bonneville core has got to be the easiest changeover I have done...and I have done a bunch.

    anyway, the shim/heatspreader is moving along nicely - I am still testing different versions - the copper ones are showing almost the same performance as the pure silver ones at a fraction of the cost. with copper 110, I should be able to put them into a very reasonable price range for the performance increase.
    their performance, be it the silver or the copper, seems to depend on the particular CPU a little. One CPU got about a 1C gain in cooling where some others have seen over a 5C gain in cooling performance.

    the patent office is slower than I expected at this time of year - the minute I get the word, they are in production - I wrote the patent to cover the design more than the material so I think I have all of the bases covered...
    Last edited by Weapon; 04-11-2004 at 07:15 PM.
    Counting bodies like sheep to the rhythm of the war drums.
    go to sleep
    go to sleep
    go back to sleep.

    carpe noctem.

  21. #21
    Xtreme Addict
    Join Date
    Nov 2003
    Location
    Br!ban3 / Aus / State: St0n3d
    Posts
    1,452
    Damn thats a nice heatercore, beats my Camry heatercore

    Nice guide also.

    Ripping it up on old technology
    i4memory.com

  22. #22
    Xtreme Enthusiast
    Join Date
    Jan 2003
    Location
    USA
    Posts
    733
    here are some of the pics of the finished '77 core with the shroud I built and a couple of 120mm fans in place:


    it has gaskets between the shroud and the core and gaskets between the fans and the shroud to make sure there is no air leakage. the gaskets are made from vapco cork tape (basically the same stuff that chipcon calls "sealstring" in the prommie kits).
    thin neoprene gaskets or the like also would have worked but i had a lot of cork tape left over from my last phase change build.
    I have discovered a million uses for cork tape where computer modding is involved -- great stuff to have around.

    anyway, the shroud is divided into a top compartment and a bottom compartment so the air from each 120 is forced thru one half of the core -- it also has a minor "t" coming out of the divider that runs partially up the middle of the underside of the shroud to further force the airflow through all sections of the core...I can't figure out wth I did with the pics of the underside of the shroud but I will find them sooner or later...

    it is fairly hard to tell in the pics, but the paint on the shroud and the core match up almost perfectly -- the angle makes them look like slightly different shades because of the metallic in the paint. when they are viewed from the same angle, they match.

    anyway, I took a lot of pics of the whole shroud making process -- I will get them organized into a coherent how-to on shroud making when I get a little extra time.

    edit: I just setup the '77 core in my cooling system in place of the caprice core that was in the loop. it seems to get at least 1-2C better cooling out of the new heatercore -- not that there is any real surprise there -- the '77 HC is a bit larger than the caprice core that I was using and I suspect I am getting a little better flow with the slightly shortened fittings I used on this one.
    Last edited by Weapon; 08-29-2007 at 08:24 PM.
    Counting bodies like sheep to the rhythm of the war drums.
    go to sleep
    go to sleep
    go back to sleep.

    carpe noctem.

  23. #23
    Xtreme Addict
    Join Date
    Nov 2003
    Location
    Br!ban3 / Aus / State: St0n3d
    Posts
    1,452
    Whoa very nice, dude. How long did it take you?

    Ripping it up on old technology
    i4memory.com

  24. #24
    Xtreme Relic
    Join Date
    Jun 2002
    Location
    Hilton Head, S.C.
    Posts
    5,240
    Weapon,
    Very nice job as usual. I'm looking forward to the shroud info as I have the same setup minus the shroud and need to build one.
    I hate to advocate drugs, alcohol, violence, or insanity to anyone, but they've always worked for me.
    Hunter S. Thompson (1939 - 2005)

  25. #25
    Xtreme Enthusiast
    Join Date
    Jan 2003
    Location
    USA
    Posts
    733
    Originally posted by kommando
    Whoa very nice, dude. How long did it take you?
    thanks. the whole project from start to finish with the core and shroud was a couple of weekends but I worked on a lot of other mods that I had laying around at the same time.

    the shroud itself took about 2 days of here and there time but a good deal of that is waiting for epoxy to dry, paint to dry, etc.
    the actual work time isn't that much. not really sure how much as there was quite a bit of beer drinking involved in the whole process.

    side note: the shroud pictured above is not the metal topped one that is in the first post - I ran out of the weld steel that I was using for that and switched to plexi as I always seem to have a ton of that stuff around in 1/4" and 1/8" thicknesses. with the right adhesive, the 1/4" is very strong and it allows some flexibility with shaping and sanding as can be seen on the somewhat rounded corners and edges.

    for that matter, the 1/8" plexi is pretty tough if the right adhesives are used on the seams.

    the metal one is still on the bench -- I will probably go back and finish it just for the hell of it.

    Originally posted by TheDude
    Weapon,
    Very nice job as usual. I'm looking forward to the shroud info as I have the same setup minus the shroud and need to build one.
    thanks again.
    I will try to get all of the shroud info up this week. It might be the weekend before I can really get to it though as my job is set to go insane this week - being an attorney blows sometimes.
    On the bright side, it looks like I will have MLK day off so that should give me enough time to finish up the shroud section of the how-to.

    I discovered a few new tricks in making this one that takes some of the exact cutting science out of the shroud making but that still produces a very solid (and nice looking) shroud. I should go to the autoparts store more often...they have all kinds of things that can make life easier. glazing and spot putty comes to mind....

    edit: pic of another little project that is in the works:

    I got tired of plexi-reserviors and the thought of corrosion ran me away from aluminum ones so I decided to braze up a a solid copper reservior.
    it still needs some minor design changes and a bunch of aesthetic touching up (like some smoothing here and there a nice coat of black metallic paint) but the basics are there.

    the top and/or bottom plate can act as a mount -- I am working on adapters for 80mm and 120mm hole spacing so it can bracket onto existing fan mounting locations. more to follow.
    Last edited by Weapon; 08-29-2007 at 08:25 PM.
    Counting bodies like sheep to the rhythm of the war drums.
    go to sleep
    go to sleep
    go back to sleep.

    carpe noctem.

Page 1 of 5 1234 ... LastLast

Bookmarks

Bookmarks

Posting Permissions

  • You may not post new threads
  • You may not post replies
  • You may not post attachments
  • You may not edit your posts
  •