Results 1 to 14 of 14

Thread: Problems with EK HD 5850 backplate & 780i SB waterblock + my WC loops

  1. #1
    Registered User
    Join Date
    Mar 2010
    Posts
    50

    Problems with EK HD 5850 backplate & 780i SB waterblock + my WC loops

    Hey all,

    Thanks for the great site and info. I have been lurking for a while now as I refresh my WC setup. I recently upgraded my case from a Smilodon to a Corsair 800D and have decided that I'd take this time to also refresh my system and WC'ing. My old water cooling setup was definitely a "beginner's loop" and used an Exos-2 w/mostly Koolance blocks. Have learned a lot since then, and am ready to take things up a notch or two.

    I upgraded my 8800GT with an XFX Radeon HD 5850 XXX Edition card, and of course had to get a full coverage block for it. I also made a couple other minor upgrades, the best of which was getting an SSD for the OS HDD (wow), but much of the hardware remains the same (at least for now...). I consider it a "refresh" build...

    I have decided to go with 2 loops since I now have plenty of room, and enough blocks now to warrant 2 loops (CPU, NB, SB, Mosfet, VGA). Most of it will be internal, but the 2nd RAD & Res/pump will have to be mounted to the back of the case because I have already run out of room (at least without making significant modifications)... Here is a pic & list of equipment so far, along w/the proposed loop configs:


    Loop 1:
    Res1 = EK Multioption 250 w/Anticyclone
    Rad1 = Swiftech MCR320 w/6 Scythe Slipstream SY1225SL12SH push/pull
    Pump1 = Swiftech MCP655 w/EK D5 Top
    SB = EK 790i Southbridge Block
    CPU = Koolance CPU-340
    Mosfet = Koolance MVR-40

    Loop 2:
    Res2 = XSPC DDC Res Top
    Rad2 = Black Ice SR1 140mm Low Flow w/Noctua NF-P14FLX & Corsair 140mm
    Pump2 = Swiftech MCP355
    NB = Danger Den 780i NB Block
    VGA = EK FC-5850 w/RAM Backplate

    Misc:
    Fill Port = Danger Den Black Aluminum
    Tubing = Feser Black 1/2" ID 3/4" OD, Tygon R3400 7/16" ID 9/16" OD, Koolance Orange 1/2" ID 5/8" OD
    Pump Bracket = (UN)Designs Infinite DDC Pump Bracket, Vertical Version
    Control = T-Balancer BigNG, MiniNG, Analog Sensor Hub
    Flow Meters = 2 x Koolance INS-FM17
    Temp Sensors = 2 x Koolance SEN-AP006G
    Display = iMon VFD 5.25"
    Fittings = various Enzotech, Bitspower, & Koolance

    Hardware (partial):
    Motherboard = eVGA 780i
    CPU = Core2Quad Q9550
    RAM = Corsair Dominator 1066
    Video Card = XFX Radeon HD 5850 "XXX Edition"
    Case = Corsair Obsidian 800D
    PSU = ABS Tagan 900W
    Sound = Creative X-Fi Fatal1ty Professional Edition
    OS HDD = OCZ Colossus 256GB SSD
    SATA/SAS RAID = JMicron JMB363, Highpoint RocketRAID 2642 (not worth the $$! The $30 JMicron controller is better)

    I still haven't figured out where to put the temp sensor for loop 2, and the flow meters for both loops. Any suggestions/recommendations are much appreciated.

    And now for my issues:

    The EK 780i Southbridge block uses a thumb nut to tighten the block to the board, along with a 12mm long screw. Problem is, when tightened it is much longer than the motherboard tray spacers that the board sits on! I'm surprised nobody has mentioned this issue in the past, but I haven't been able to find any info on this problem elsewhere... Here is a pic:


    The case motherboard tray standoff screws are approximately the same height as going from the bottom of the motherboard to the bottom of the thumb nut in the above pic... so I suppose I can file the screw length down so the screw ends at the bottom of the nut rather than going through the nut and down another 5mm or so... but perhaps I'm mounting it wrong somehow? Here are the EK instructions which I followed closely:

    http://81.90.180.2/ekwaterblocks/shop/EK-IM/EK-IM-3830046991317.pdf

    And a pic of my motherboard with the block installed:


    Let me know if anyone has experienced this or similar issues and if there is a better solution out there... I'm not looking forward to having to remount the block... much appreciated!

    The 2nd EK block issue I'm having is with the HD 58X0 backplate that goes with their 58X0 block. Again I followed the instructions to a T:

    Block install:
    http://81.90.180.2/ekwaterblocks/sho...1109835104.pdf

    Backplate install:
    http://81.90.180.2/ekwaterblocks/sho...1109855027.pdf

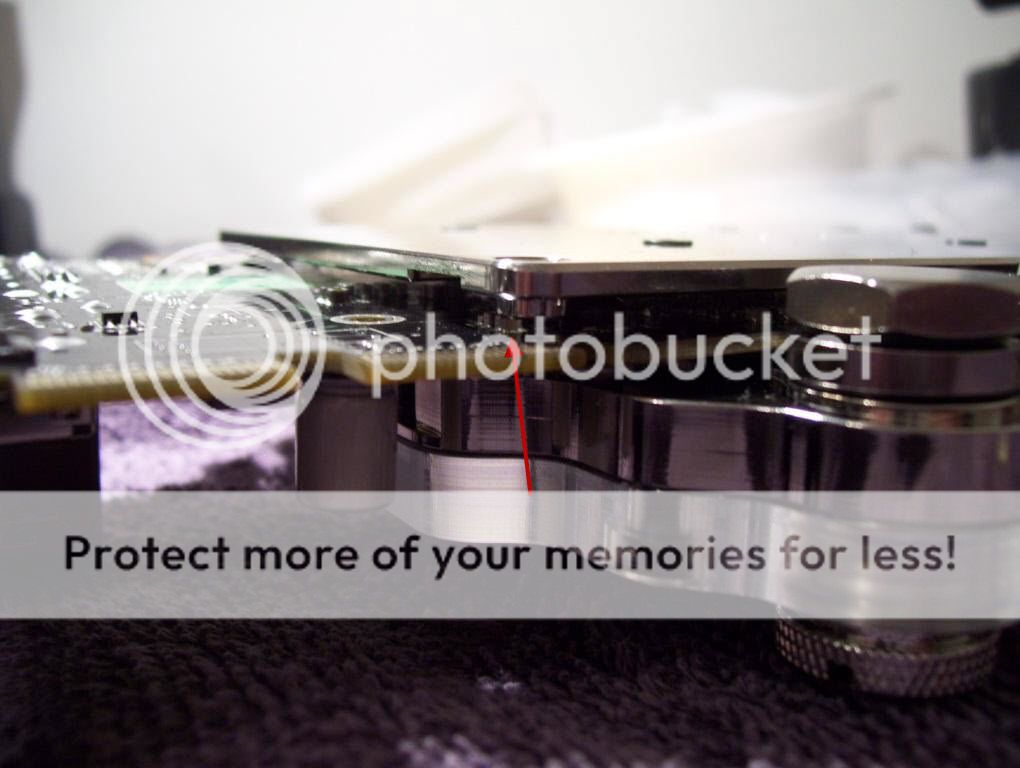
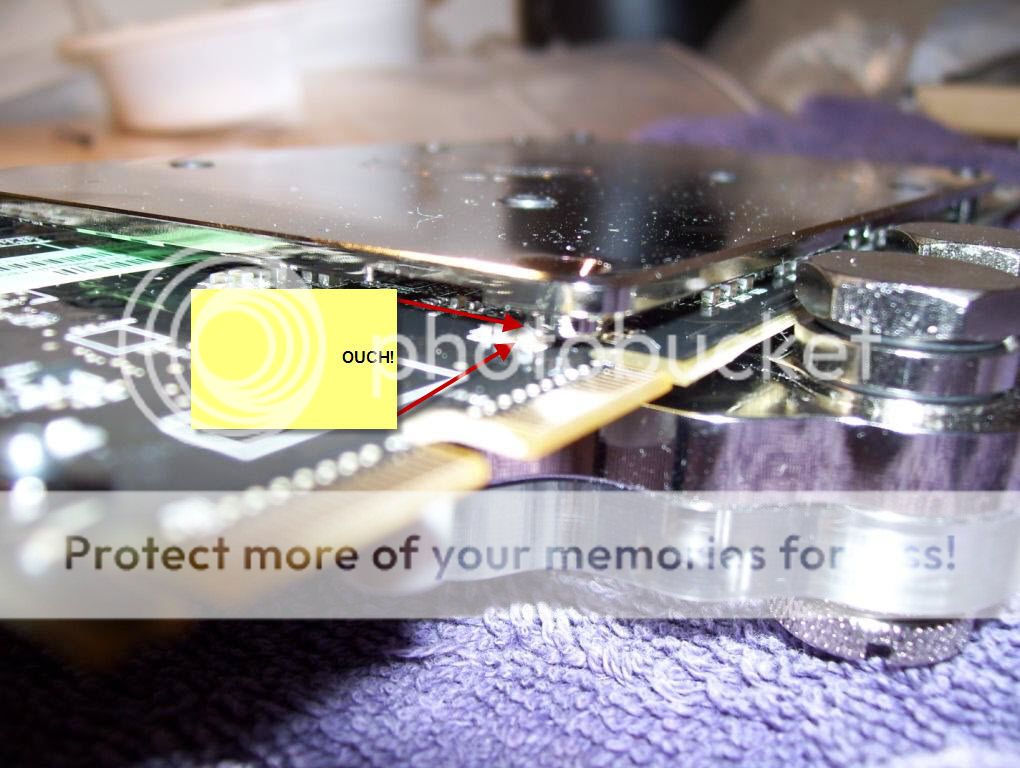
    It clearly shows for the 5850 to leave the one screw out. However, there is a small chip on the back of the 5850 PCB that this screw hole is pressing up against, and very hard too:


    I own the XFX "XXX" version of the 5850 which is supposed to be a reference PCB design, simply factory overclocked. I didn't notice this issue at first, until I saw that the backplate was actually bending when the screws were tightened!

    Again, I suppose I could file down this one recessed screw hole, but am surprised I haven't heard of others with the same issue. I am sure the backplate is screwed in properly - there really isn't any way to screw it in incorrectly - it just wouldn't work.

    If anyone has any ideas on these two issues, it would be greatly appreciated... thanks!!
    Last edited by lonkny; 03-24-2010 at 03:27 PM. Reason: Making title more descriptive

  2. #2
    Xtreme Addict
    Join Date
    Mar 2005
    Location
    Slovenia - EU
    Posts
    1,139
    Hi!

    Please un tighten the SB screw so the screw is leveled with the thumb nut.
    Regarding the 5850/5870 backplate we already found this problem and informed all resellers about this problem that this backplate is compatible without modifications only for 5870 radeons. We have now, since 2 months already fixed versions that fits on both 5850/5870.
    However if you cut or dremel off that standoff you not have problems any more.
    Quote Originally Posted by creidiki
    EKs are like waterblock pr0n

  3. #3
    Xtreme Addict
    Join Date
    Nov 2009
    Location
    Netherlands
    Posts
    1,884
    So the new backplates are compatible with both the 5850 and the 5870? That's good to know .

  4. #4
    Registered User
    Join Date
    Mar 2010
    Posts
    50
    Quote Originally Posted by Eddy_EK View Post
    Hi!

    Please un tighten the SB screw so the screw is leveled with the thumb nut.
    Regarding the 5850/5870 backplate we already found this problem and informed all resellers about this problem that this backplate is compatible without modifications only for 5870 radeons. We have now, since 2 months already fixed versions that fits on both 5850/5870.
    However if you cut or dremel off that standoff you not have problems any more.
    Thanks Eddy. Can I contact EK Support to have them send me an updated backplate that will work for the 5850? Please let me know if this would be possible - thanks.

    With regard to the southbridge block - loosening it that much is not possible as the block would not even have firm contact with the chip at that point. Surely there is a better solution?

  5. #5
    L-l-look at you, hacker.
    Join Date
    Jun 2007
    Location
    Perth, Western Australia
    Posts
    4,644
    Re the SB waterblock, are you sure you've installed it right? At least in my experience with EK chipset blocks, the spring and nut assembly usually goes on the opposite side of the motherboard, with the head of the screw on the backside of the mobo PCB.
    Rig specs
    CPU: i7 5960X Mobo: Asus X99 Deluxe RAM: 4x4GB G.Skill DDR4-2400 CAS-15 VGA: 2x eVGA GTX680 Superclock PSU: Corsair AX1200

    Foundational Falsehoods of Creationism


  6. #6
    Registered User
    Join Date
    Mar 2010
    Posts
    50
    Thanks for the response... according to their instructions the screw & spring are on the top and the nut is on the bottom:

    http://81.90.180.2/ekwaterblocks/shop/EK-IM/EK-IM-3830046991317.pdf


    Or am I reading it wrong?

  7. #7
    L-l-look at you, hacker.
    Join Date
    Jun 2007
    Location
    Perth, Western Australia
    Posts
    4,644
    I'm reading this on a Blackberry, so viewing .pdf's is out. I'm just saying that in my experience, EK blocks are usually designed with the spring and nut on the top side of the mobo - although I could be completely wrong
    Rig specs
    CPU: i7 5960X Mobo: Asus X99 Deluxe RAM: 4x4GB G.Skill DDR4-2400 CAS-15 VGA: 2x eVGA GTX680 Superclock PSU: Corsair AX1200

    Foundational Falsehoods of Creationism


  8. #8
    Xtreme Addict
    Join Date
    Mar 2005
    Location
    Slovenia - EU
    Posts
    1,139
    Quote Originally Posted by lonkny View Post
    Thanks Eddy. Can I contact EK Support to have them send me an updated backplate that will work for the 5850? Please let me know if this would be possible - thanks.

    With regard to the southbridge block - loosening it that much is not possible as the block would not even have firm contact with the chip at that point. Surely there is a better solution?
    Hi,

    You should contact where you bought it. If you bought it directly from us then ok. But I would to suggest you to dremel or pile off that standoff and backplate will work perfectly.
    Quote Originally Posted by creidiki
    EKs are like waterblock pr0n

  9. #9
    Xtreme Member
    Join Date
    Sep 2009
    Location
    Broken Arrow, OK
    Posts
    283
    Quote Originally Posted by lonkny View Post
    Thanks for the response... according to their instructions the screw & spring are on the top and the nut is on the bottom:

    http://81.90.180.2/ekwaterblocks/shop/EK-IM/EK-IM-3830046991317.pdf


    Or am I reading it wrong?
    The instruction are for a 790i block, not 780i block. I would flip it around and have the thumb nut on top as mentioned above. Use a washer if you have to for a proper landing for the nut if needed.

  10. #10
    Registered User
    Join Date
    Mar 2010
    Posts
    50
    Thanks - I ended up shaving the length of the screw down a bit, because putting the thumb nut on top will not be an option as it will get in the way of the video card... as it is, the video card almost touches the block and misses it by about 2mm! Thanks all for the help... between the backplate & this screw, the Makita grinding block is getting a workout tonight!

  11. #11
    Registered User
    Join Date
    Mar 2010
    Posts
    50
    OK so I used a grinding block on a Makita drill and was able to grind down both the screw for the SB block as well as the standoff screw hole on the 58X0 backplate until it was as flat as the rest of the backplate. It's hard to see in the pic below, but the backplate is not touching the chip anymore, but just _barely_... it was still so close that I put a small piece of very thin thermal adhesive on the backplate just in case there was ever the slightest contact... I think it should be OK now...


    Will post pics of my WC setup once things get moving... thanks again for all your help.

  12. #12
    Xtreme Member
    Join Date
    Nov 2009
    Posts
    127
    You mentioned that you will be using scythe slipstream fans on the top rad... Thats a big no no. They are sleeve bearing fans and will eventually burn out when mounted horizontally. This is true for all sleeve bearing fans, not just the slipstreams. Just somthing to be aware of when choosing fans for the top rad.
    I'm Ron Burgundy?

    Rackmounted Liquid FTW!!!!
    i7 920 D0 @ 4.41GHz w/ Swiftech Apogee XT
    Gigabyte X58A-UD7
    6Gb G.Skill Trident 3 x 2Gb DDR3-2000 9-9-9-24
    2x HD5850 Xfire - 1000MHz core, 1250MHz RAM
    w/ EK full cover waterblock
    Laing D5 vario / EK X-TOP rev. 2
    2x XSPC RX360 rad w/ 6 x Scythe GT 1850rpm
    3 x Seagate 7200.11 160Gb in RAID-0
    Samsung Spinpoint F3 1Tb
    Corsair HX-850 Modular PSU
    M-Audio ProFire 2626
    Antec 4U Rackmount Case

  13. #13
    Registered User
    Join Date
    Mar 2010
    Posts
    50
    Thanks - I wasn't really looking forward to using them anyway as I know there are better fans out there, so this just gives me the reason to upgrade... Any suggestions for the top rad fans?

  14. #14
    Xtreme Member
    Join Date
    Sep 2009
    Location
    Broken Arrow, OK
    Posts
    283
    Quote Originally Posted by R3alsp33dy0ne View Post
    Thats a big no no. They are sleeve bearing fans and will eventually burn out when mounted horizontally. This is true for all sleeve bearing fans, not just the slipstreams. Just somthing to be aware of when choosing fans for the top rad.
    Big time over-generalization. I have run the same Yate Loon sleeve fans horizontally in a top mounted rad for 2 years straight. No issues.

Tags for this Thread

Bookmarks

Bookmarks

Posting Permissions

  • You may not post new threads
  • You may not post replies
  • You may not post attachments
  • You may not edit your posts
  •