Page 1 of 18 123411 ... LastLast
Results 1 to 25 of 449

Thread: **** PHINIX NANO TOWER **** Smallest and most powerful mITX rig !!!

  1. #1
    Xtreme Member
    Join Date
    Dec 2008
    Location
    Scotland, Glasgow
    Posts
    436

    **** Phinix Nano Tower **** ... First Update !!!

    Ladies and Gentlemen

    for the second time, welcome to my project log!
    After my first scratch - build - Phinix Cube - I decided to start new little adventure, little enough to call it NANO

    First plan was to case-mod Lian Li A05 case, I'm sure some of you saw introduction to this project, but after some heavy thinking I decided to scratch build again I just didn't feel like modding case, when so many projects have been done with it already. You can find so many beautiful builds, I didn't feel like I could bring any new fresh ideas to this case. I felt I have to do something extraordinary, something better than we all have seen already, something that will open everyone's mouths and drop their jaws on the floor

    Right now Nano Tower is in the first stage - planning and gathering materials and hardware.
    I will update it every time I make a next step. Right now, short introduction...


    As you could already noticed from my previous build I'm always trying to use smallest dimensions I can get, to create great performance unit without any sacrifices on power and abilities. What I want to make is a case that its base will be smallest as possible, so it won't take a lot of space on my desk. To do that I would have to make it a bit taller, so that is why I decided to build tower-shaped case. Is it going to be tall? Tall just enough to take the longest graphic card on market. Engineering sample of dual chip ATI 5970 had ~34cm, so anything like that monster must go in my case.. just in case I win a lottery and buy one
    Also I want to cool it with water. Baaah... not one loop, but two! Yep, why not! One loop for CPU, one for GPU, so these two elements won't make any influence on temps of each other, adding more heat into the loop. After reading so many good reviews of that Corsair H50 cooler I decided to get one for my new i5. What about GPU? having in mind that it's not out yet, I can predict that triple radiator will be enough for dual chip graphic card.

    I built my Cube from acrylic, now its time for aluminium!

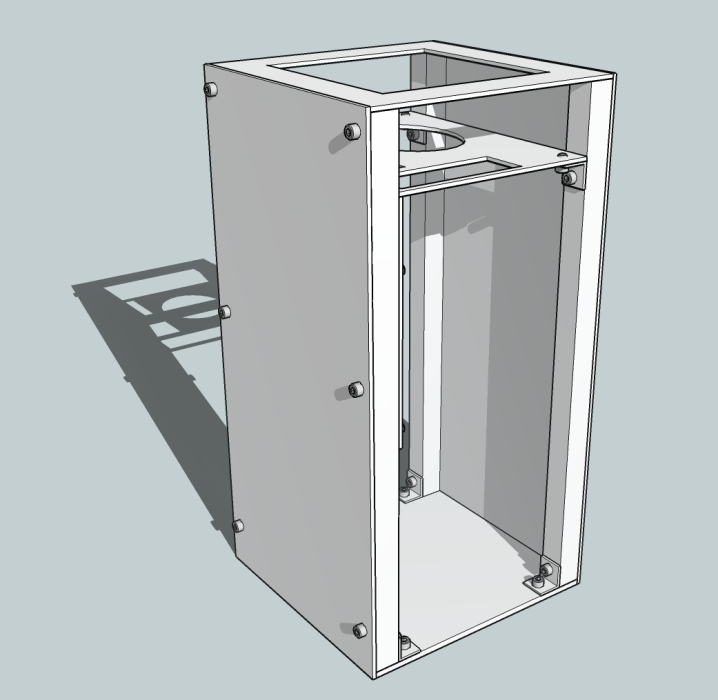
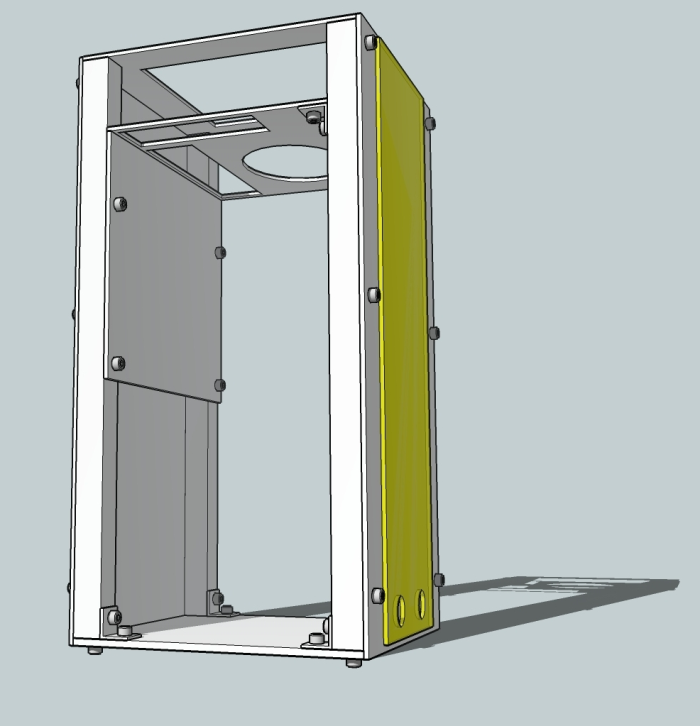
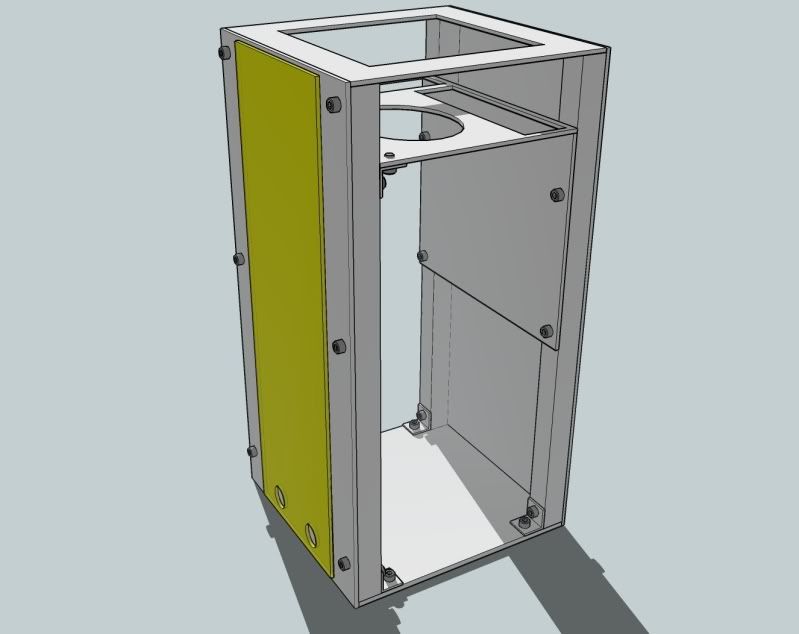
    So, it will have small base, 20x20cm, it will be tall - main aluminium structure rods have 40cm. Tall, smooth tower - this kind of shape will look really good and a bit "mysterious"! Don't you think?

    Now, to make it more difficult for myself, apart of longest card and i5, two loops of water cooling, internal, I will squeeze in two SSD drives in RAID0, one 2.5"HDD and one slim dvd drive. What else? Full size ATX PSU, 750W modular.
    I think that will make it difficult enough to get your attention

    So, here it is, main idea, general plans and hardware that will be used to create Nano-Tower:

    Main ideas :

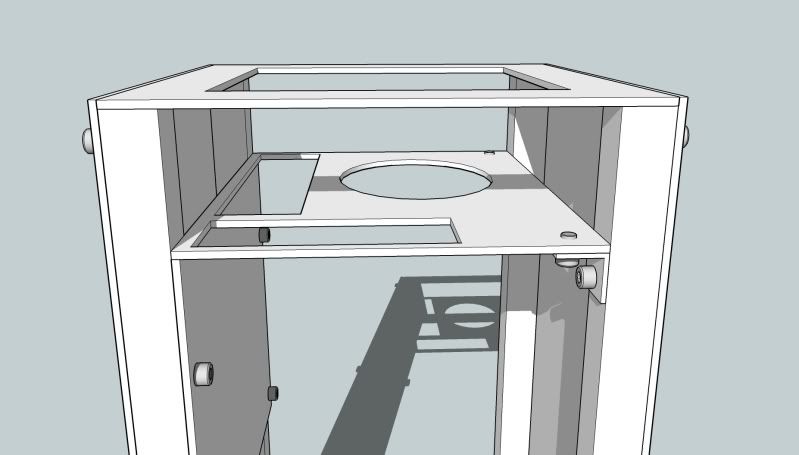
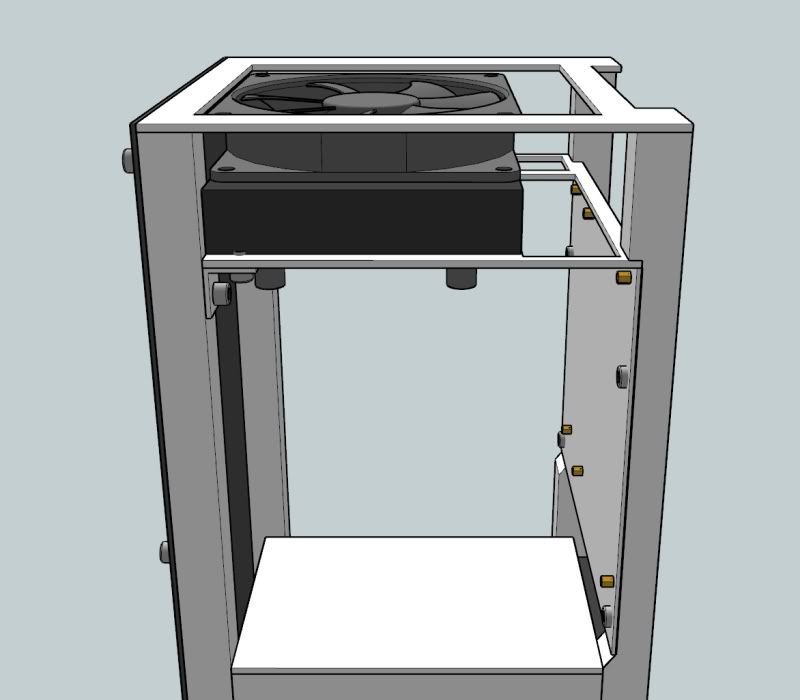
    • install motherboard in vertical position, so I/O panel will be on top
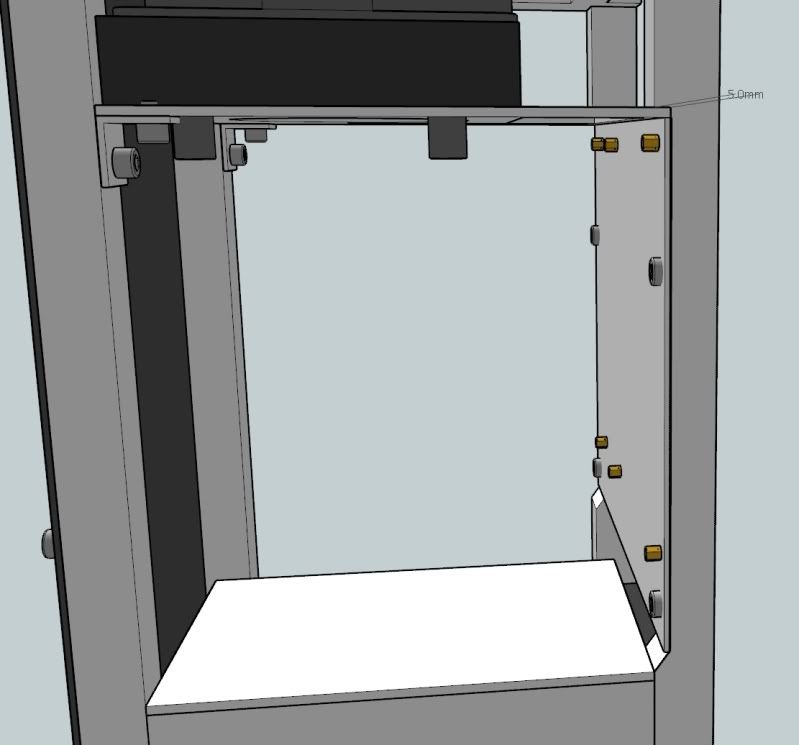
    • water cooling system installation, two loops, one for CPU (Corsair H50), one for GPU
    • vertical PSU installation, power cable will go outside through the bottom panel
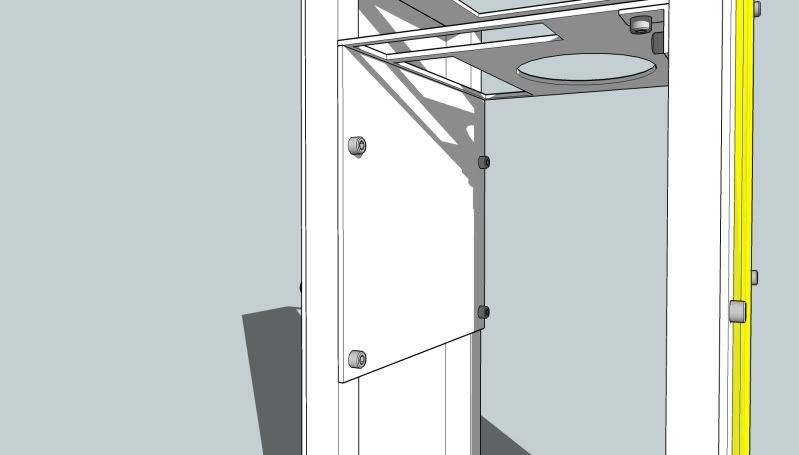
    • laser cut window installation on the left and right panel
    • fabricate mesh-radiator grill for top of the case a'la TJ-07 (clean mesh)
    • some nice laser-cut front panel
    • lighting system installation


    Hardware:
    • i5 750 watercooled
    • DFI MI P55-T36 mITX motherboard - first and most powerful mITX mobo on market !!!
    • new generation graphic card (also watercooled, right now I got GTX295, but waiting for Fermi )
    • 4GB dual channel DDR3 CRUCIAL Ballistix Tracer memory !!!
    • 2x SSD RAID0 as OS drive
    • 1x 2.5" HDD as games drive
    • 750W Modular PSU


    Water cooling system:

    • Corsair H50 watercooling kit for CPU
    • EK 4.0 pump + combo reservoir
    • triple EK-CoolStream RAD XT (360) radiator for GPU loop
    • GPU water block
    • Bitspower silver compression fittings
    • Feser tubing (yellow)
    • 3x 120mm YateLoon SL slim fans for triple radiator
    • Akasa Apache fan to use on H50


    Additional - EXTRA stuff:

    • Switches and fan controller to control all lights and fans.
    • leds to light it all up
    • yellow acrylic.. a lot...


    Project color scheme : black and yellow!


    My NanoTower Project is sponsored by:

    DFI


    Check this out here.


    CRUCIAL


    Check this out here.


    MNPCTECH


    Check this out here.


    EK Water Blocks


    EK gave me huge discount on their products so I ordered these - check this out here


    PHENOPTIX


    Ben from Phenoptix is sponsoring all lightning equipment in this project!


    BITSPOWER


    Vincent from Bitspower will sponsor all amazing Bitspower goodies!


    *** AQUATUNING ***


    Aquatuning will sponsor quick release fittings sets for my water cooling loop !!!


    *** ANTEC ***


    Antec will support my project with their fantastic TruePower New TP-750W Modular PSU !!!


    So.. have fun with me once again and... STAY TUNED !!!

    PHINIX
    Last edited by phinix_mike; 08-15-2010 at 07:23 AM. Reason: new update...
    rig ::: i5 2500K :: GTX780 :: 250GB + 128GB 840 PRO :: Gigabyte Z77 mATX :: 4GB Ballistix :: Hazro 27" :::
    input devices ::: Topre Realforce 45g TKL :: QFR w/browns :: Zowie EC2 Evo :::
    modding ::: ?PHINIX CUBE? ::: "PHINIX NANO TOWER" ::: "PHINIX AURORA" ::: "PHINIX CHIMERA" :::
    star citizen :::
    ARBITER: Origin Jumpworks 325A LTI

  2. #2
    color red illidan's Avatar
    Join Date
    Mar 2005
    Posts
    1,485
    wow... this is gonna be awesome

    subd here

  3. #3
    Xtreme Addict
    Join Date
    Feb 2007
    Posts
    1,674
    good luck. If anything like your previous projects, this will be a nice one.

  4. #4
    Xtreme Member
    Join Date
    Dec 2008
    Location
    Scotland, Glasgow
    Posts
    436
    Thanks guys! I hope you gonna like it!
    Ordered some aluminium for main structure.
    Bill from MNPCTECH sent me a lot of goodies, all should be here soon, so there will be a lot of work and fun
    rig ::: i5 2500K :: GTX780 :: 250GB + 128GB 840 PRO :: Gigabyte Z77 mATX :: 4GB Ballistix :: Hazro 27" :::
    input devices ::: Topre Realforce 45g TKL :: QFR w/browns :: Zowie EC2 Evo :::
    modding ::: ?PHINIX CUBE? ::: "PHINIX NANO TOWER" ::: "PHINIX AURORA" ::: "PHINIX CHIMERA" :::
    star citizen :::
    ARBITER: Origin Jumpworks 325A LTI

  5. #5
    Xtreme Enthusiast
    Join Date
    Aug 2007
    Location
    Sweden
    Posts
    722
    I'm going to keep on eye on this build =)
    Loonym...You are missed.

    The element of one

    Breathe me in
    Breathe me in

    I disbelieve in separation. I close my eyes to see you.
    This is for you, everything I am. This is for you, take it from me.
    I, I disbelieve separation. I close my eyes
    there's no escaping me
    This is for you, everything I am. This is for you, take it from me.
    In your heart in your soul. I perceive rejuvenation

    Breathe me in. I am forever. Deep within I am eternal.

    I will return to you. I am with you always. I will never turn away from you.

  6. #6
    Moderator
    Join Date
    Aug 2007
    Location
    Back and forth between Florida and Maine
    Posts
    4,097
    Can't wait to see what you come up with, Mike

  7. #7
    Xtreme Enthusiast
    Join Date
    Jul 2009
    Location
    Perth Australia
    Posts
    651
    Looks like this will be an interesting build, I am looking forward to seeing your sketchup plans.

    Let the fun begin

  8. #8
    Xtreme Enthusiast
    Join Date
    Jan 2009
    Location
    Moscow, Russia
    Posts
    685
    interesting! subd
    Worklog: Project Black Copper
    Lian Li PC-P80 | Thermochill PA140.3 | Noiseblocker fans | mdpc-x stuff

  9. #9
    Xtreme Member
    Join Date
    Dec 2008
    Location
    Scotland, Glasgow
    Posts
    436
    OK. I picked up my first package. It was heavy! And I thought aluminium is a light metal...:8
    Before I add photos this first update will contain first sketchups.
    So here it is...


    FIRST UPDATE

    These are the first sketchups of the main frame. As I said before (wrote) main frame of my nanoTOWER has 400mm of height (well, main rods actually). With bottom panel which is 5mm and top one, 3mm, it has 408mm of height. Base of the case has dimension of 200x200mm.
    Here it is - main aluminium structure of The nanoTOWER !!! :eeek:


    OK, I'm gonna comment on few of them.
    Here you can see the most important part.. The mobo tray. It is made of 2mm aluminium sheets, size 20x17cm.


    Here you can see L shape aluminium support for middle-top panel.
    It will be installed just above the mobo and will keep CPU cooler on top of it. That is why there is and big 120mm round hole for fan.


    ...and this is that middle-top panel...


    Here's the support for bottom panel. Of course it will be also screwed in from the bottom. To make it look more light, I may use some low profile head screws...


    Here's a rear of the structure. Right now it shows the rear 2mm panel and 3mm acrylic "under-radiator" sheet - it will be a small decoration touch for radiator mount.


    ...that is why we have those holes here - that's the holes where the tubing will go through the rear panel to the inside. Yes, triple radiator will be installed on rear of the case. More details about it will be presented later...


    So, that's the whole thing for right now... Looks nice. Right now I can only say that this aluminium structure is tough as hell, I didn't imagine it will be so stable and strong! When took that 3mm panel in my hands I was a little shocked! Not even mentioning that 5mm bottom one... ...and those square rods! WOW!.... It will be hell of a case!!!

    I hope you like it!
    rig ::: i5 2500K :: GTX780 :: 250GB + 128GB 840 PRO :: Gigabyte Z77 mATX :: 4GB Ballistix :: Hazro 27" :::
    input devices ::: Topre Realforce 45g TKL :: QFR w/browns :: Zowie EC2 Evo :::
    modding ::: ?PHINIX CUBE? ::: "PHINIX NANO TOWER" ::: "PHINIX AURORA" ::: "PHINIX CHIMERA" :::
    star citizen :::
    ARBITER: Origin Jumpworks 325A LTI

  10. #10
    Registered User
    Join Date
    Sep 2009
    Posts
    14
    i like it very nice!

  11. #11
    Xtreme Member
    Join Date
    Dec 2008
    Location
    Scotland, Glasgow
    Posts
    436
    Thanks Matt!

    Well, I wanted to work on it this weekend, received my aluminum yesterday (7kg of it) but unfortunately they cut main bottom panel in wrong size. They said that they cut with -/+ 2mm tolerance, but I got panel 3mm less than it shoul be. Saw I'm sending it back today, and will get it next week. But I will do some work anyway, rest of the panels dont look that bad. Anyway, update coming up on Sunday I think
    rig ::: i5 2500K :: GTX780 :: 250GB + 128GB 840 PRO :: Gigabyte Z77 mATX :: 4GB Ballistix :: Hazro 27" :::
    input devices ::: Topre Realforce 45g TKL :: QFR w/browns :: Zowie EC2 Evo :::
    modding ::: ?PHINIX CUBE? ::: "PHINIX NANO TOWER" ::: "PHINIX AURORA" ::: "PHINIX CHIMERA" :::
    star citizen :::
    ARBITER: Origin Jumpworks 325A LTI

  12. #12
    Xtreme Enthusiast
    Join Date
    Jan 2009
    Location
    Moscow, Russia
    Posts
    685
    wow, looks very nice, keep that thing up
    Worklog: Project Black Copper
    Lian Li PC-P80 | Thermochill PA140.3 | Noiseblocker fans | mdpc-x stuff

  13. #13
    Xtreme Enthusiast
    Join Date
    Jul 2009
    Location
    Perth Australia
    Posts
    651
    Mike I like your sketchup design, however as you are going to be putting the rad on the outside.
    Why not just make the case 60 oddmm bigger so you can mount it inside to give you cleaner lines.
    I just feel that if you are going to all the effort to build a case for it, it would look more professional and less just tacked on.
    Plus the extra foot print size would not be that much bigger.

    Are the square corner posts going to be made from 2mm extruded ali.

    As you can't get your hand down inside to put a nut on the back of a bolt.
    So you are left with one other option, self taping screws.
    Thats fine as long as you drill the holes the right size in the 2mm extruded ali. You need a drill bit the same size as the shank of the screw.
    The shank/shaft is the bit that the thread is wound around.
    When you look at a screw next you will see what I mean.
    The real challange is, that most small screws have very fine threads, like .5mm or less and the threads of the screws are stronger than the aluminium.
    By forcing the screw into the hole you will be cutting a thread in the 2mm extruded ali.
    As there is only 2mm of thread to screw into, by over tighting or just by removing and replacing the screw a few times, it's really easy to strip the thread out.
    Your only options then are to use bigger screws or re-drill new holes near by and that usually makes the job look second rate.

    To avoid all of this crap, the easiest way around it would be to measure the inside diameter of the 2mm extruded ali.
    Onced armed with this info, go to your local hardware supplier that sells wood and try to find some that fits inside the square ali extrusion.
    Or get some timber dressed to the size you need.

    It doesn't nead to be a perfect fit, althuo the closer the better, in saying that, most of the time it will only be screwed down to one edge anyhow.
    This will give you heaps of material to screw into, you could also screw your top and bottom plates into it as well.
    Now you will be able to use counter sunk screws to give you a smooth flush look.

    Looking forward to your next update.

  14. #14
    Xtreme Member
    Join Date
    Dec 2008
    Location
    Scotland, Glasgow
    Posts
    436
    OK, I'm not sure what screws are you talking about (the one on the bottom?). Also, not sure what do you mean by 2mm extruded alu posts. Do you mean those rods, bars? They full, not alu-profiles. They are fully alu, heavy as hell

    Now, radiator outside. As I mentioned it will be 35mm thin radiator, not 60mm PA or Feser. That will look very nice on the back of the case. I will do the same thing that Bill did with one of his MNPCTECH mods:

    Last edited by phinix_mike; 11-13-2009 at 03:56 PM.
    rig ::: i5 2500K :: GTX780 :: 250GB + 128GB 840 PRO :: Gigabyte Z77 mATX :: 4GB Ballistix :: Hazro 27" :::
    input devices ::: Topre Realforce 45g TKL :: QFR w/browns :: Zowie EC2 Evo :::
    modding ::: ?PHINIX CUBE? ::: "PHINIX NANO TOWER" ::: "PHINIX AURORA" ::: "PHINIX CHIMERA" :::
    star citizen :::
    ARBITER: Origin Jumpworks 325A LTI

  15. #15
    Xtreme Enthusiast
    Join Date
    Jul 2009
    Location
    Perth Australia
    Posts
    651
    OK, so the four square uprights are solid alu, what works.

  16. #16
    Xtreme Addict
    Join Date
    Jan 2007
    Location
    Michigan
    Posts
    1,785
    What about wire management in this case?
    Current: AMD Threadripper 1950X @ 4.2GHz / EK Supremacy/ 360 EK Rad, EK-DBAY D5 PWM, 32GB G.Skill 3000MHz DDR4, AMD Vega 64 Wave, Samsung nVME SSDs
    Prior Build: Core i7 7700K @ 4.9GHz / Apogee XT/120.2 Magicool rad, 16GB G.Skill 3000MHz DDR4, AMD Saphire rx580 8GB, Samsung 850 Pro SSD

    Intel 4.5GHz LinX Stable Club

    Crunch with us, the XS WCG team

  17. #17
    Xtreme Member
    Join Date
    Dec 2008
    Location
    Scotland, Glasgow
    Posts
    436
    Quote Originally Posted by Vinas View Post
    What about wire management in this case?
    What do you mean what about it?
    You want to know where the cables will go?
    You will have to wait for it a bit longer
    rig ::: i5 2500K :: GTX780 :: 250GB + 128GB 840 PRO :: Gigabyte Z77 mATX :: 4GB Ballistix :: Hazro 27" :::
    input devices ::: Topre Realforce 45g TKL :: QFR w/browns :: Zowie EC2 Evo :::
    modding ::: ?PHINIX CUBE? ::: "PHINIX NANO TOWER" ::: "PHINIX AURORA" ::: "PHINIX CHIMERA" :::
    star citizen :::
    ARBITER: Origin Jumpworks 325A LTI

  18. #18
    Xtreme Member
    Join Date
    Jul 2009
    Location
    Lansing,MI
    Posts
    272
    This is going to be good, one of the kind build, keep up the good work.

  19. #19
    Xtreme Member
    Join Date
    Dec 2008
    Location
    Scotland, Glasgow
    Posts
    436
    Quote Originally Posted by Kanzy View Post
    This is going to be good, one of the kind build, keep up the good work.
    Thank you for kind words!

    Just a small heads-up for upcoming update - I worked a bit on main frame structure last weekend. That was actually my first time working with aluminium and have to say - cutting and shaping 3mm aluminium sheet is hell
    Bottom 5mm alu panel is coming to me, company I ordered from sent me a replacement, so this weekend I will be drilling rods and screwing all together, hopefuly we will see main frame this Sunday...
    Also I made some small modifications to mobo tray placement - to make some more space for top cpu cooling radiator I had to push mobo a bit "deeper". That move ended up cutting 5mm of front rods thickness. Well, sketchup will show it better then words...


    Here you can see how the mobo tray went 5mm deeper with the middle panel. That change gave me some more space for mobo I/O panel "upstairs" between H50 radiator.

    rig ::: i5 2500K :: GTX780 :: 250GB + 128GB 840 PRO :: Gigabyte Z77 mATX :: 4GB Ballistix :: Hazro 27" :::
    input devices ::: Topre Realforce 45g TKL :: QFR w/browns :: Zowie EC2 Evo :::
    modding ::: ?PHINIX CUBE? ::: "PHINIX NANO TOWER" ::: "PHINIX AURORA" ::: "PHINIX CHIMERA" :::
    star citizen :::
    ARBITER: Origin Jumpworks 325A LTI

  20. #20
    Xtreme Enthusiast
    Join Date
    Jul 2009
    Location
    Perth Australia
    Posts
    651
    So Am I right, your going to recess the motherboard into the solid square corner posts by 5mm.
    Is that right?

  21. #21
    Xtreme Member
    Join Date
    Dec 2008
    Location
    Scotland, Glasgow
    Posts
    436
    Quote Originally Posted by kgtiger View Post
    So Am I right, your going to recess the motherboard into the solid square corner posts by 5mm.
    Is that right?
    Yes my friend, to gain some more space fro I/O panel in upper level I have to push mobo tray a bit deeper. 5mm is perfect - not too much to weaken the rod, but enough for mobo
    rig ::: i5 2500K :: GTX780 :: 250GB + 128GB 840 PRO :: Gigabyte Z77 mATX :: 4GB Ballistix :: Hazro 27" :::
    input devices ::: Topre Realforce 45g TKL :: QFR w/browns :: Zowie EC2 Evo :::
    modding ::: ?PHINIX CUBE? ::: "PHINIX NANO TOWER" ::: "PHINIX AURORA" ::: "PHINIX CHIMERA" :::
    star citizen :::
    ARBITER: Origin Jumpworks 325A LTI

  22. #22
    Xtreme Enthusiast
    Join Date
    Jul 2009
    Location
    Perth Australia
    Posts
    651
    If you haven't already cut out that 5mm section, then I would suggest using a jigsaw.
    Try clamping 2 or more of those square bars together to give the jigsaw foot some stability when cutting.
    Also as ali is soft, you can use blades with bigger teeth.

    Looking forward to your next update there mate.

  23. #23
    Xtreme Member
    Join Date
    Dec 2008
    Location
    Scotland, Glasgow
    Posts
    436
    Quote Originally Posted by kgtiger View Post
    If you haven't already cut out that 5mm section, then I would suggest using a jigsaw.
    Try clamping 2 or more of those square bars together to give the jigsaw foot some stability when cutting.
    Also as ali is soft, you can use blades with bigger teeth.

    Looking forward to your next update there mate.
    thanks, its gonna be hard, cause its 20mm thick, but will try it.
    I thought I was going to drill 3-4mm hole on its side forst, then file it down, but will try my jigsaw first, like you suggesting...
    I'm this close to buy scroll saw
    rig ::: i5 2500K :: GTX780 :: 250GB + 128GB 840 PRO :: Gigabyte Z77 mATX :: 4GB Ballistix :: Hazro 27" :::
    input devices ::: Topre Realforce 45g TKL :: QFR w/browns :: Zowie EC2 Evo :::
    modding ::: ?PHINIX CUBE? ::: "PHINIX NANO TOWER" ::: "PHINIX AURORA" ::: "PHINIX CHIMERA" :::
    star citizen :::
    ARBITER: Origin Jumpworks 325A LTI

  24. #24
    Xtreme Enthusiast
    Join Date
    Jul 2009
    Location
    Perth Australia
    Posts
    651
    Drilling lots of holes and and then filling the wast out of first one will be just dam hard work, the second one will push you over the edge.

    A Scroll saw will make like work of this.
    Just make sure you can either bolt or clamp an adjustable fence on the scroll saws bed, that way you will get dead straight cuts.

    A jigsaw and some blads made to cut aluminium with the uses of coolant/ even just soapy water will work, just give the foot of the jigsaw something more than 20mm to sit on.

    Good luck mate, may the modders force be with you.

  25. #25
    Xtreme Member
    Join Date
    Dec 2008
    Location
    Scotland, Glasgow
    Posts
    436
    Quote Originally Posted by kgtiger View Post
    Drilling lots of holes and and then filling the wast out of first one will be just dam hard work, the second one will push you over the edge.

    A Scroll saw will make like work of this.
    Just make sure you can either bolt or clamp an adjustable fence on the scroll saws bed, that way you will get dead straight cuts.

    A jigsaw and some blads made to cut aluminium with the uses of coolant/ even just soapy water will work, just give the foot of the jigsaw something more than 20mm to sit on.

    Good luck mate, may the modders force be with you.
    I will go with jigsaw then, but I'm worried how its gonna go. See, when I was cutting 3mm alu sheet it jumped every 10 seconds - maybe blade is used? I don't know but it took me good 20 minutes to cut few lines... I hope it won't jump and stop when cutting 20mm thick rod
    rig ::: i5 2500K :: GTX780 :: 250GB + 128GB 840 PRO :: Gigabyte Z77 mATX :: 4GB Ballistix :: Hazro 27" :::
    input devices ::: Topre Realforce 45g TKL :: QFR w/browns :: Zowie EC2 Evo :::
    modding ::: ?PHINIX CUBE? ::: "PHINIX NANO TOWER" ::: "PHINIX AURORA" ::: "PHINIX CHIMERA" :::
    star citizen :::
    ARBITER: Origin Jumpworks 325A LTI

Page 1 of 18 123411 ... LastLast

Bookmarks

Bookmarks

Posting Permissions

  • You may not post new threads
  • You may not post replies
  • You may not post attachments
  • You may not edit your posts
  •