

Anyone tested this improvement yet? Results? (Besides from Vapor)


Anyone tested this improvement yet? Results? (Besides from Vapor)
Project TJ07 WeeMaan edition in progress...
i7 920 @ 4,4ghz, P6T Deluxe, Corsair Dominator 6Gb, HD5870, OCZ Vertex 60gb + Samsung F1 1tb
Heatkiller copper, EK 5870, Thermochill 120.4, DDC 3.2
Nah, your performace will be fine.. theres isnt some "huge" difference between how is it mounted or where..Originally Posted by Jonni Nitro

i7 930 D0 - 4,2 GHz + Megashadow
3x4GB Crucial 1600MHz CL8
Foxconn Bloodrage rev. 1.1 - P09
MSI HAWK N760
Crucial M500 240GB SSD
SeaGate ES.2 1TB + 1TB External SeaGate
Corsair HX 850W (its GOLD man!)
ASUS STX + Sennheiser HD 555 (tape mod)
Old-new camera so some new pics will be there.. My Flickr My 500px.com My Tumblr
A little less messy way of Vapor modding Heatkillers
If you have a used fan vibration gasket (as on picture for a 92mm fan) cut the side off
and tape it on a smooth surgace (I used a 2mm rubber pad). This ensures the entire
surface of the silicon pad is of the same hight ...about 1mm
Then put the silicon gel (I use the same as for sealing kitchen sinks, bathtubes
...100% neutral silicone) on the rubber pad and spread it with a triangle
ruller to get a
smooth surface. Put it away for a day or two for silicone to dry.
The next step is to draw a template. Put it on a plain paper, and then cut it
out. The paper will stick to the silicone, so no need for any additional taping.
You can cut this out with a carpenter knife or other sharp tools
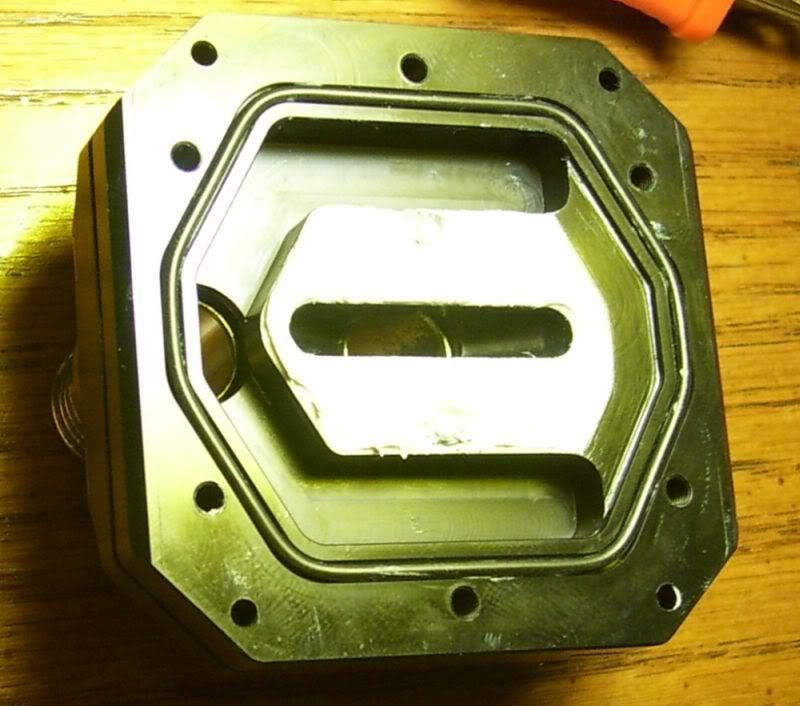
This is how it looks on a LC top. Also this can be easily removed when
you take the block apart.
Hope it helps you.
AsRock Z68 Extreme3 Gen3 / i5 2500k / 8 GB Corsair Vengeance / Sapphire HD6850 / Crucial M4 64 + Samsung F3 500GB + F1 640GB / Corsair HX750 / CPU / GPU H2O / Sharkoon Seraphim rev.ATX
Awesome way of doing the mod there!
Just brainstorming with your idea
AsRock Z68 Extreme3 Gen3 / i5 2500k / 8 GB Corsair Vengeance / Sapphire HD6850 / Crucial M4 64 + Samsung F3 500GB + F1 640GB / Corsair HX750 / CPU / GPU H2O / Sharkoon Seraphim rev.ATX
Minor update on the HK silicone mod:
After letting it sit for a few days I took the block apart and found the
following:
- the silicon gasket is compressed to about 0.2mm (screws fully tightened)
- the 1st and the last channel is blocked by silicone ...this would result in no
or very little flow in these two chanells ...this might not occour in LT/Cu
block as it has very narrow channels (51 for LT/Cu vs. 34 for LC)
- at the ends of the top the silicone is very very compressed and might tear off
I then removed the silicone gasket and assembled the block as per default. With
screws fully tightened the top sits on the chanells ...I tried to insert a piece of
paper (~0.1mm thick) between the top and base and could not do it (not at the
center or at the sides ...the center of the top has a small bulge) .
NOTE: the above applies for the LC block, the silicone mod might affect the
LT/Cu block differently.
AsRock Z68 Extreme3 Gen3 / i5 2500k / 8 GB Corsair Vengeance / Sapphire HD6850 / Crucial M4 64 + Samsung F3 500GB + F1 640GB / Corsair HX750 / CPU / GPU H2O / Sharkoon Seraphim rev.ATX
Great review!!!even got me to buy one

I was thinking the same thing, I'm going to try the opposite side with silicone. It makes sense since the problem to begin with is that o-ring being to small between the top block and diverter plate. I just siliconed the top block around and on top of the o-ring. Not sure how I can test this, but if it stops the dingling sound the diverter plate makes when I shake it I'll be happy.
Anyone test with a CU block? I remember when I got mine new, I could shake it and hear the plate chinging around. I dont feel very good about the silicone caulk, but a nice o ring or even a cured silicone gasket cut to shape would be nice.
i have the CU nickel plated. i thought about putting a bigger o-ring in there, but was afraid that it would be hard to keep the shape trying to fit it in a smaller groove. good idea a flat gasket might work. if it were possible a thicker diverter plate with original o-ring might be the best option.
Finally got around to doing the silicone mod to mine. What with my mobo being out on RMA, there's plenty of time to let the silicone cure before reinstalling. I wound up trying a slightly different approach, just applying the silicone to the top only (o-ring is underneath still). I made sure to uncover the impingement plate location pins and clean up the inlet with q-tips. The silicone is about as thick as the location pins are above the surface. Got it pretty smooth using a pocket screwdriver. I'll give a couple of days before trying to reassemble.
System: Core I7 920 @ 4200MHz 1.45vCORE 1.35VTT 1.2vIOH // EVGA x58 Classified E760 // 6GB Dominator GT 1866 @ 1688 6-7-6-18 1T 1.65V // Intel X25 80GB // PCP&C 750W Silencer
Cooling: Heatkiller 3.0 LT CPU block // 655 Pump // GTX360 Radiator
Sound: X-FI Titanium HD --> Marantz 2265 --> JBL 4311WXA's
Display: GTX480 // Sony GDM-FW900
holy batman necro!
oh, c'mon now. It's only 11 months old.
System: Core I7 920 @ 4200MHz 1.45vCORE 1.35VTT 1.2vIOH // EVGA x58 Classified E760 // 6GB Dominator GT 1866 @ 1688 6-7-6-18 1T 1.65V // Intel X25 80GB // PCP&C 750W Silencer
Cooling: Heatkiller 3.0 LT CPU block // 655 Pump // GTX360 Radiator
Sound: X-FI Titanium HD --> Marantz 2265 --> JBL 4311WXA's
Display: GTX480 // Sony GDM-FW900
Which means you dragged it up from page 114 = dead topic.
The top 3-4 (maybe 5) pages I can understand, but not page 114.
To all would be Necros, If the topic is more than a month old, please let them rest in peace.
Circles SucQ!
If your annoyed by sigs telling you to put things in your sig, then put this in your sig
Bribery won't work on me...just say NO to AT!!!
Hmm, most probably thread got found via search .. and is it really better to make new one instead of posting in prehistoric one?


 Reply With Quote


Bookmarks