Page 1 of 7 1234 ... LastLast
Results 1 to 25 of 174

Thread: Custom Wood Case IV- Antique Zenith Radio Build

  1. #1
    Xtreme Addict
    Join Date
    Feb 2005
    Location
    Tennessee
    Posts
    1,171

    Custom Wood Case IV- Antique Zenith Radio Build - 24Nov2010

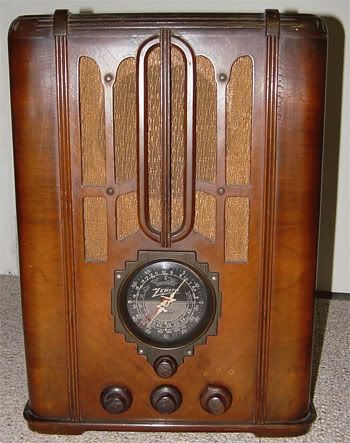
    1930s Zenith 5-s-29

    Here is a list of links that will take you directly to the threads where I have posted pictures in case you want to skip straight to the pics.

    http://www.xtremesystems.org/forums/...8&postcount=22
    http://www.xtremesystems.org/forums/...0&postcount=27
    http://www.xtremesystems.org/forums/...1&postcount=32
    http://www.xtremesystems.org/forums/...4&postcount=49
    http://www.xtremesystems.org/forums/...3&postcount=61
    http://www.xtremesystems.org/forums/...8&postcount=65
    http://www.xtremesystems.org/forums/...8&postcount=88
    http://www.xtremesystems.org/forums/...&postcount=102
    http://www.xtremesystems.org/forums/...&postcount=107
    http://www.xtremesystems.org/forums/...&postcount=114

    Completed Pics
    http://www.xtremesystems.org/forums/...&postcount=159


    Introduction

    As I enjoy the design and building process, I find myself again working on another custom wood case design. A few years ago, I became so disgruntled with cases not designed for watercooling that I decided to make my own case. Since I like to work with wood, this material was my natural choice. This case is my 4th custom case build.

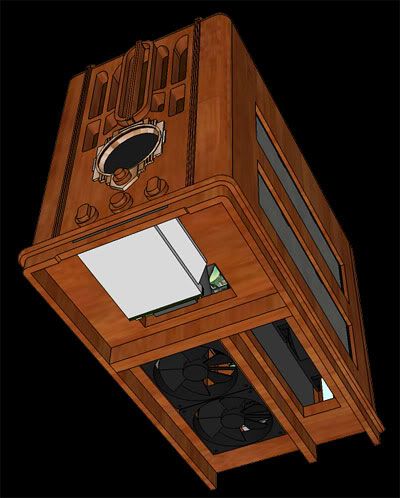
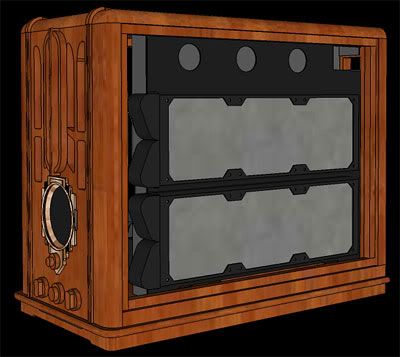
    There was a time in particular during the early 20th century when for several decades there was an emphasis on aesthetic quality and workmanship in furniture made for the home. This extended to the central electronic device of the era, namely the radio. My last case I modeled after many of the furniture and architectural designs of the early 20th century with the idea of building a custom watercooled case that would have fit the time period had it been built then.

    For this build, I wanted to take things one step further by designing this case directly after a particular model of antique radio. Many radio collectors frequently collect radios built during the 1920s and 1930s because of their stylish appearances. I am not a radio collector in any way, but I do have an appreciation for the styling of many of these radios.

    My plan is to build a performance minded system with a regular ATX MB with mid-sized tower dimensions. I want to reuse my current parts since they are only about 6 months old, and I currently don't want to spend the money yet on an I7 setup. I considered changing to a micro ATX MB, but given the proportions of the radios that I have researched, using a micro ATX MB offers me no real benefit as far as size goes.

    I spent a lot of time researching and looking around at literally hundreds of antique radio pictures online. Many radios do not have a shape that can reasonably be replicated for use as a computer due to the space and placement constraints of components. It is also necessary to find really good pictures of a radio in order to be able to build a case after it. There are a number of radios that I could build after and like, but there simply aren't enough detailed photos of them to come up with a fairly accurate design.

    MODELING

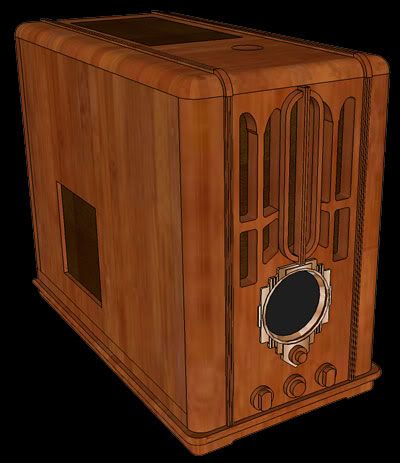
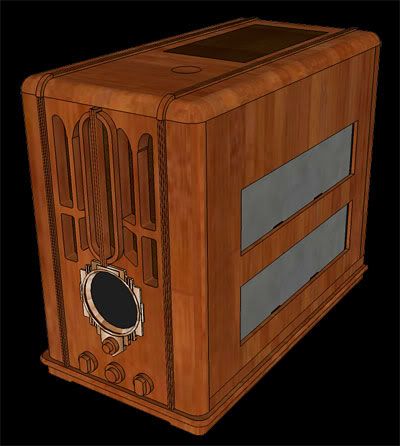
    I have spent the last two months almost every day working in Sketchup modeling to the tune of probably 200+ hours (fortunately I have a lot of down time at work where I can use my laptop). This includes time I spent modeling several of the Bitspower rotary fittings
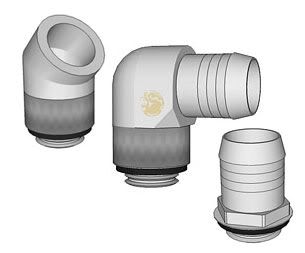


    which have been posted on the Sketchup Components Collection website. I was dealing a couple of pretty tight areas and wanted to have the fittings modeled to get an exact placement of components. I messed with every combination of placement using triple radiators I could think of.
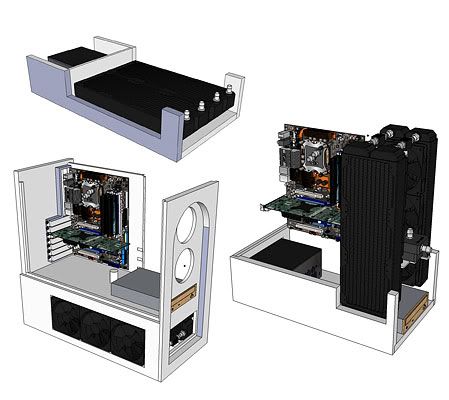


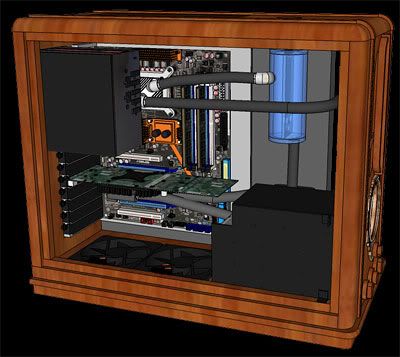
    I prefer using dual triple rads as I like a system to be as quiet as possible as well as being future proof. I also wanted the dimensions of this build to be smaller than my current case due to the way that it fits inside of my desk.

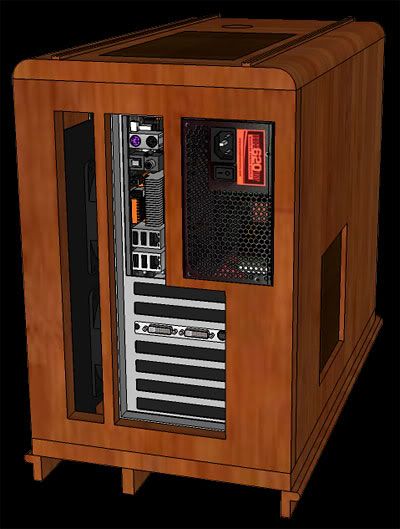
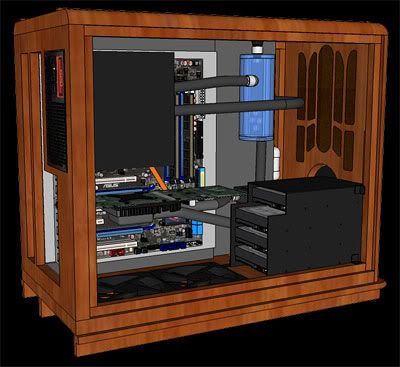
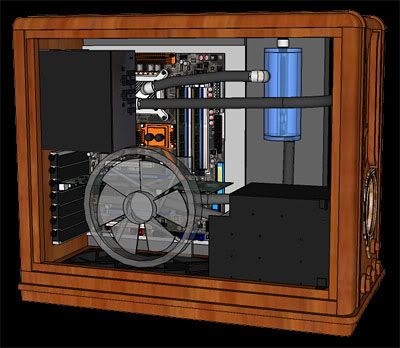
    I spent a lot of time hashing out the placement of each component and the loop order of the setup down to every last detail I could think of. For example, I designed at least 5 different hard drive mounts alone. I do not like T-lines. I designed and redesigned the res to make it easily accessible for filling with the pump directly beneath it for good water supply to the pump. I have never spent anywhere near the amount of time designing a setup as I have this one.

    DESIGN OPTIONS

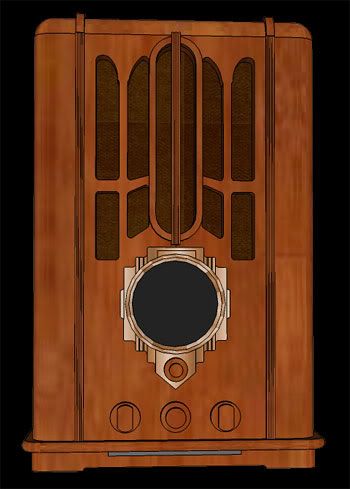
    The first radio design that I settled on was a 1935 Grunow 650 Tombstone radio.
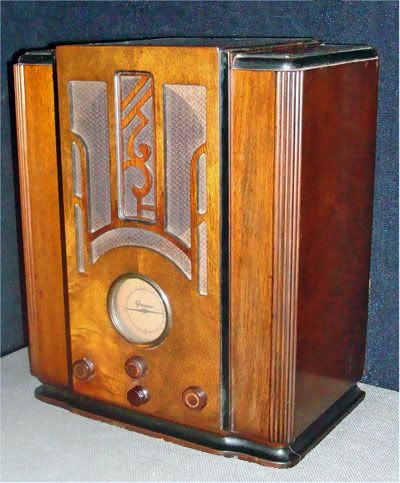


    The dimensions and size fit what I was looking for. This model would require quite a bit of time and detailed routing due to the design. I completely modeled a design for this radio, and may build this in the future. However, in researching some more, I ran across the 1934-36 Zenith 5-S-29.


    My daughter really likes the look of this radio (she likes the Grunow as well), which was one vote for sure in its favor, but I also found that I could get a replica radio dial, dial glass, escutcheon (dial bezel), and knobs for it. Since the Grunow wasn't as popular of a radio, parts are not available, so I drew the radio dial from a picture, would have to make my own knobs, and would have to make my own escutcheon (dial bezel). Buying the replica parts is costing me about $120, but it will add a very genuine look and feel to the case. My consultation team (wife and daughter) think that I should build them both, and I am entertaining the idea in the back of my mind. For the moment however I am just working on the Zenith design.
    Last edited by voigts; 11-24-2010 at 07:01 AM.

  2. #2
    Xtreme Addict
    Join Date
    Feb 2005
    Location
    Tennessee
    Posts
    1,171
    SKETCHUP


    Sketchup is such a wonderful tool for projects like this. Every part can be placed to scale, exactly measured, and dimensions drawn and printed. I export full dimension views, resize them in Photoshop, and print them out.


    This gives me working blueprints to build from.

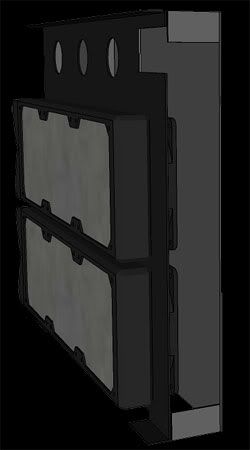
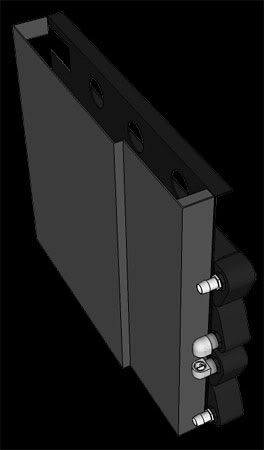
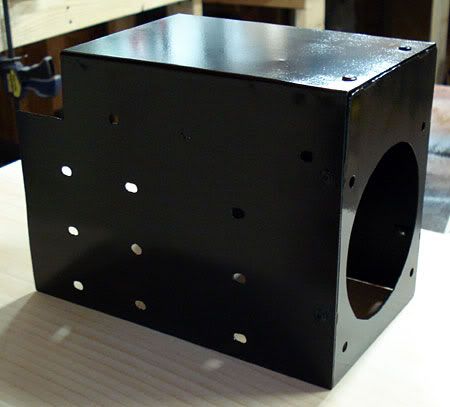
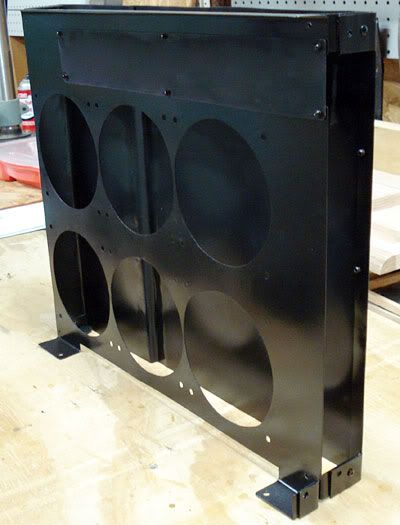
    I had a brainstorm yesterday about how the airflow for the rads will go. I made some changes to my original design and am going to make a metal divider that the MB tray will mount to so that the rads will pull in ourside air and vent it out of the top and back. This way the rads get fresh air, and the rad air will be isolated from the case airflow.


    THE BUILD BEGINS

    Two weeks ago I started cutting out the pieces for the Zenith. I am using all Oak for the case. Oak is such a wonderful wood to work with. Having built other cases first out of Pine and more recently out of Poplar, I find the Oak to be the best to work with.

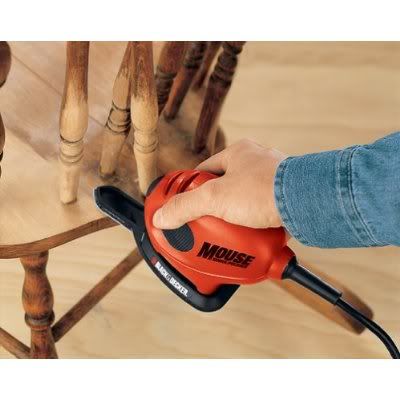
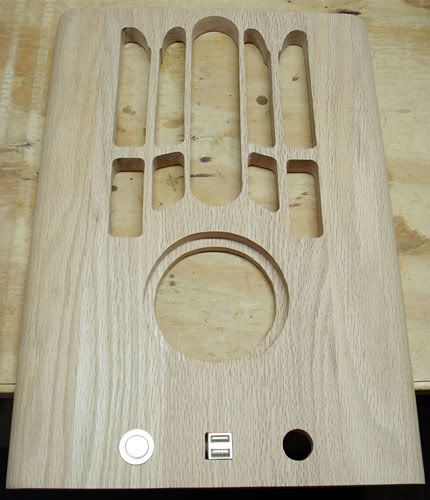
    I drew the front grill cutout on the front piece, and spent several hours sanding and cleaning up the cutout areas. This is what you get for being picky. A dremel and a mouse sander are my friends here.


    I also cut out the other pieces using a scrollsaw. A scrollsaw works much better than trying to use a jigsaw as jigsaw blades bend and make for angled cuts whereas the scrollsaw holds both ends of the blade.

    I made a mount for the PSU out of 1/8” smoked brown acrylic as well as mount for the bottom fans.

  3. #3
    Xtreme Addict
    Join Date
    Feb 2005
    Location
    Tennessee
    Posts
    1,171
    RADIATORS MOUNT

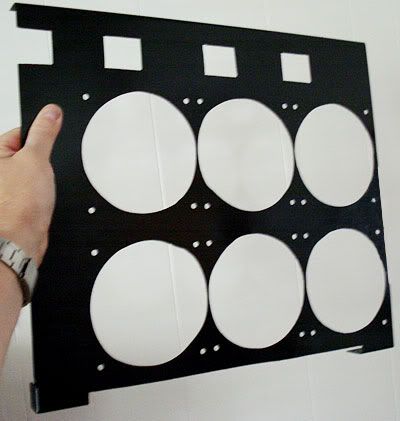
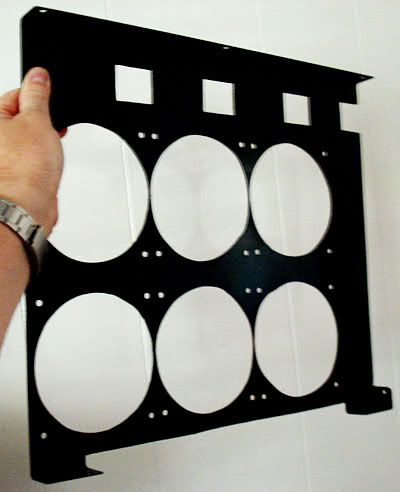
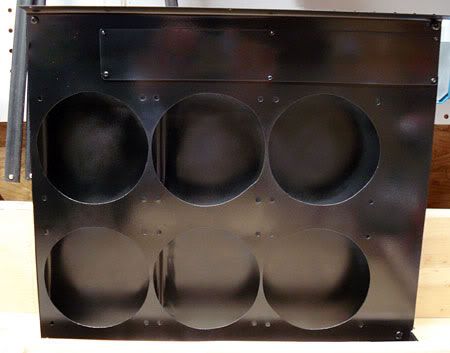
    When I made the radiator mount a week ago, it was a real pain in the neck. My plan is to use 18 gauge sheet metal, but my hole saw bit didn't want to cut through it. It must not be bi-metal. I ordered a new bi-metal bit off of Ebay, but didn't want to wait on it to come in before building this. I worked on a mount using 1/8” acrylic, but it just wasn't sturdy enough for me. So I went back with a jigsaw and hand cut all of the fan holes. I don't plan on doing that again. It worked well enough, but having bits of hot metal beat you in the arms is no fun.


    ALL PARTS SO FAR

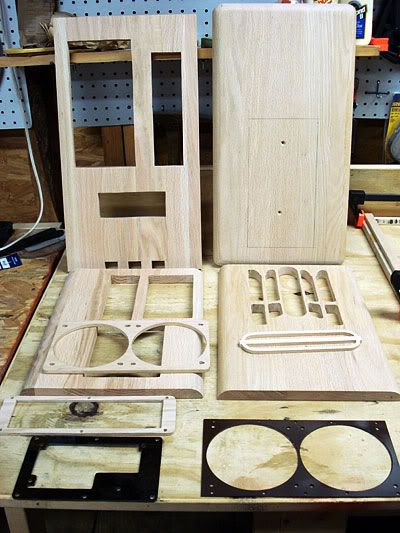
    Here is a pic of all of the parts that I have cutout. I am almost done cutting them out. I still have to cut out for the escutcheon and knobs in the front and the air vent in the top.


    I ordered the replica knobs, escutcheon (brass bezel for the dial), replica dial, grill cloth, and glass dial cover. The guy at the antique shop I ordered from goofed up my order twice, so I am waiting still for one of the knobs which I won't get in until next week.

    ESCUTCHEON

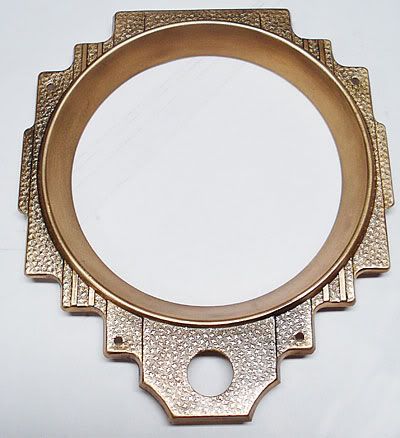
    The escutcheon was painted with some nasty yellowish paint. I should have taken a before picture of this. It looked really nasty. Go figure why anyone would take brass and paint it! I stripped it a couple of days ago, got all of the tarnish off, buffed it with a dremel, and gave it 3 coats of spray laquer to keep it from tarnishing. Here is the result.


    BASE

    I started assembling the base trim pieces. I cut and used dowel rods on the middle support piece, and glued and screwed in two corner pieces for the front to side connections.


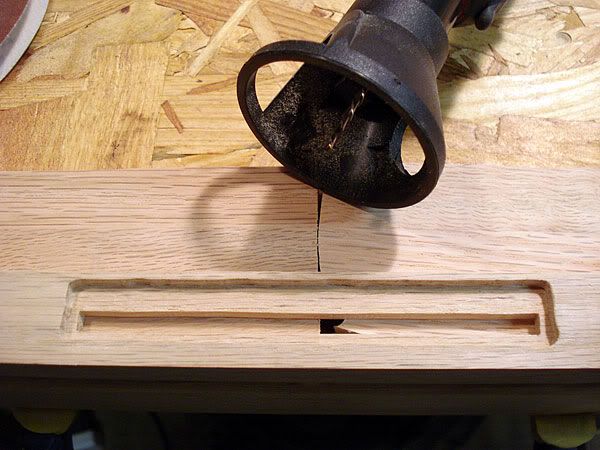
    For the DVD, the way I modeled it is to have a slot loading DVD just under the trim lip. I cut out the slot for the drive, and used my Black and Decker Dremel clone to cut out an inset on the backside where the DVD sits so that will be only 3/16" from the front edge.


    Next I plan on cutting out the hole and an inset for the escutcheon, dial, and dial glass, and I have to cut out the hole in the top for the air vent as well as in the back piece.

  4. #4
    Xtreme Member
    Join Date
    Mar 2009
    Posts
    278
    Lol i thought u were going to just gut a old radio but to totally build a replica is very impressive.

  5. #5
    Registered User
    Join Date
    Dec 2008
    Location
    Porto Alegre - RS - Brazil
    Posts
    48
    I have to agree, its impressive.

  6. #6
    Xtreme Member
    Join Date
    Oct 2008
    Location
    NY
    Posts
    405
    I really like the look of old radios. I can't wait to see more progress. Great idea!

    heat
    TJ07-Ultra 1200W-E8400-Rampage Formula-4870-4gb G.skill-74gb Raptor-500gb Seagate-Windows 7

    Apogee GTZ-XSPC Razor-DDC3.2 w/ XSPC top-PA120.3-MCR220-EK 250 res

  7. #7
    V3 Xeons coming soon!
    Join Date
    Nov 2005
    Location
    New Hampshire
    Posts
    36,363
    subscribed..
    Crunch with us, the XS WCG team
    The XS WCG team needs your support.
    A good project with good goals.
    Come join us,get that warm fuzzy feeling that you've done something good for mankind.

    Quote Originally Posted by Frisch View Post
    If you have lost faith in humanity, then hold a newborn in your hands.

  8. #8
    Xtreme Addict
    Join Date
    Oct 2006
    Location
    England, UK
    Posts
    1,838
    Gonna be interesting. I dont like wood but i do admire ppls skills with tools to craft such pieces of work. You could put a speaker at the front too.

  9. #9
    Xtreme Addict
    Join Date
    May 2004
    Posts
    1,755
    Awesome
    Crosshair IV Formula
    Phenom II X4 955 @ 3.7G
    6950~>6970 @ 900/1300
    4 x 2G Ballistix 1333 CL6
    C300 64G
    Corsair TX 850W
    CM HAF 932

  10. #10
    Xtreme Member
    Join Date
    Aug 2008
    Location
    Bath, UK
    Posts
    116
    Looks amazing so far, can't wait to see how this turns out

    "Which way is up?" Water cooled Lian Li v1000 worklog

    Current Aircooled Rig: e6600 @ 3.375Ghz - EVGA 780i - EVGA 8800GTX - 4Gb Ballistix tracer @ 4-4-4-12 - Xfi Fatal1ty - 300Gb Velociraptor - 1Tb Samsung F1 - 1KW Zalman PSU

  11. #11
    Xtreme Enthusiast
    Join Date
    Feb 2009
    Location
    Carson City, NV
    Posts
    947
    I think you need some vacuum tubes in there, not just for show, but maybe some properly working ones. Turns out there's an entire series of tubes that are designed to work off a 12v source (originally for car stereos before transistors took off). PM me if you want more details
    i7 2600k, 8GB 1866Mhz DDR3, GTX560 Ti, Gigabyte Z68XP-UD4, CM Cosmos 1000 Case, and some green crap everywhere.
    Quote Originally Posted by Alexandr0s View Post
    So you're saying I could use my own pee as coolant?

  12. #12
    Xtreme Addict
    Join Date
    Feb 2005
    Location
    Tennessee
    Posts
    1,171
    Quote Originally Posted by Scubar View Post
    Gonna be interesting. I dont like wood but i do admire ppls skills with tools to craft such pieces of work. You could put a speaker at the front too.
    Quote Originally Posted by defect9 View Post
    I think you need some vacuum tubes in there, not just for show, but maybe some properly working ones. Turns out there's an entire series of tubes that are designed to work off a 12v source (originally for car stereos before transistors took off). PM me if you want more details
    Thank you for the suggestions, but when it comes to the internals, I am going to keep them computer centered entirely. Even if I put a speaker, tubes, etc. in there, it still internally is going to look like a computer regardless. There is a point at which you have decide how far you are going to go, and I don't want to clutter up the internals with unneeded stuff.

    Quote Originally Posted by spotswood View Post
    This is going to be good....grabs popcorn...F5...F5....F5....
    I got a good laugh out of that comment Spotswood.

  13. #13
    I am Xtreme
    Join Date
    Feb 2007
    Posts
    5,413
    i love all the pre-planning. Now if you just learn to work in Solidworks and buy a CnC router and lathe
    "Thing is, I no longer consider you a member but, rather a parasite...one that should be expunged."

  14. #14
    Xtreme Enthusiast
    Join Date
    Jan 2008
    Location
    Vancouver, Canada
    Posts
    612
    I too love all the pre-planning.

    Man, I'm really looking forward to the eye-candy that's going to accompany this worklog!

  15. #15
    Moderator
    Join Date
    Aug 2007
    Location
    Back and forth between Florida and Maine
    Posts
    4,097
    I really, really, really love the work that you do voights. This looks fantastic, and can't wait for more.

  16. #16
    Xtreme Member
    Join Date
    Jan 2008
    Posts
    224
    Nice stuff! Allow me to give a little constructive criticism, even though I don't know much about woodworking.

    I've absolutely loved the front design of every wood case I've seen from you (and the top of your previous one), but the side panels (and back panel to some extent, but you can only do so much there) seem to just be holes for fans/rads. How did the old radios/wood electronics of that era deal with cooling? Not sure how much you've looked into that area, but the side panels just don't seem to be up to the same uberness as the rest of the case.

    Also, props to the mobo tray/radiator mount idea. I assume it won't be a very removable tray once the rads are installed, but with proper internal structure supports, I could be wrong. Are the row of holes parallel to and above the rads the only air exhaust for the radiator air chamber? I'm unsure how you're sealing the bottom. Regardless, I imagine a few really quiet, small RPM fans mounted parallel to the case floor to help move air towards the row of exhaust holes above the radiators would really help airflow for the radiators. What's the mm depth of that air chamber? You can get a few or a whole row of fans as small as 40mm or even try a crossflow fan.

    On a side note, ever thought about just mounting the rads on the bottom of the case? Designs of that area loved molding on the bottom and it seems the extra interior volume right above the floor the case is on would provide a good intake for the radiator's air.
    Last edited by liguhy; 05-25-2009 at 10:18 PM.


    __________________________________________________
    Last edited by liguhy; Today at 1/2 second ago. Reason: You can always edit your writing more...and I'm anal-retentive.

  17. #17
    I am Xtreme
    Join Date
    Jun 2007
    Location
    Imperial Palace, UDE of Pitatopia
    Posts
    8,396
    Another epic voigts wood build.
    Circles SucQ!

    If your annoyed by sigs telling you to put things in your sig, then put this in your sig

    Bribery won't work on me...just say NO to AT!!!

  18. #18
    Xtreme Member
    Join Date
    Jan 2009
    Location
    Tasmania, Australia
    Posts
    168
    This is going to be one eye catching build.
    ~ Core i7 920 @ 4.00 ~ Gigabyte EX58-Extreme ~ Patriot Viper Series DDR3 6GB 1600 ~ Gigabyte GTX 260 SLi ~ Swiftech Apogee XT ~

  19. #19
    Xtreme Addict
    Join Date
    Mar 2008
    Location
    Minnesota
    Posts
    1,653
    Nothing like the smell of warm varnish when you load up the Folding@Home clients
    i5 2500K @ 4.9GHz+ 8GB G-Skill RipJaws DDR3-2000 @1600Mhz CAS 6 Asus P8P67 Pro CrossFire 6970's @ 950/1450
    Xeon X5677 @ 4.5Ghz 6GB G-Skill RipJaws DDR3-2000 @1600Mhz CAS 7 Gigabyte EX58-UD5 4870x2
    i7-880 @ 4.2Ghz+ (still playing) 4GB G-Skill RipJaws DDR3-2000 @2300Mhz CAS 9 Asus Maximus III Formula MSI Hawk 5770

  20. #20
    Xtreme Addict
    Join Date
    Feb 2005
    Location
    Tennessee
    Posts
    1,171
    Thanks for all of the positive feedback so far.

    Quote Originally Posted by DarthBeavis View Post
    i love all the pre-planning. Now if you just learn to work in Solidworks and buy a CnC router and lathe
    That's not even a fair suggestion! Actually I looked around quite a bit at CnC routers, and so far all I can do is lust. Unfortunately I don't have a few extra thousand dollars laying around waiting for something to spend it on. That would be just too sweet.

    Quote Originally Posted by liguhy View Post
    Nice stuff! Allow me to give a little constructive criticism, even though I don't know much about woodworking.

    I've absolutely loved the front design of every wood case I've seen from you (and the top of your previous one), but the side panels (and back panel to some extent, but you can only do so much there) seem to just be holes for fans/rads. How did the old radios/wood electronics of that era deal with cooling? Not sure how much you've looked into that area, but the side panels just don't seem to be up to the same uberness as the rest of the case.

    Also, props to the mobo tray/radiator mount idea. I assume it won't be a very removable tray once the rads are installed, but with proper internal structure supports, I could be wrong. Are the row of holes parallel to and above the rads the only air exhaust for the radiator air chamber? I'm unsure how you're sealing the bottom. Regardless, I imagine a few really quiet, small RPM fans mounted parallel to the case floor to help move air towards the row of exhaust holes above the radiators would really help airflow for the radiators. What's the mm depth of that air chamber? You can get a few or a whole row of fans as small as 40mm or even try a crossflow fan.

    On a side note, ever thought about just mounting the rads on the bottom of the case? Designs of that area loved molding on the bottom and it seems the extra interior volume right above the floor the case is on would provide a good intake for the radiator's air.
    If you don't "know much about woodworking," then what do you call your awesome case? An intelligent mistake?

    I more than welcome constructive criticism. As for how radios handled cooling, they simply were all open in the back. That obviously is not going to be a real option here given the need to have side panel access and the mounting of the MB and PCI back panel.

    None of the Tombstone era radios have any kind of side ornamentation at all. The front panels were decorative, but the sides were all plain with no holes whatsoever. Just the backs were open.

    I wrestled with what to do with the side panels since I needed airflow both for the rads and MB. I did consider putting the rads on the bottom both vertically and horizontally next to each other. If mounted horizontally, the case would have to be over 1' wide, which doesn't work when using 1'x12' which is actually 3/4" x 11 1/4". Oak, poplar, and the like aren't readily available any wider. If mounted vertically, the case would end up being too tall to fit in my desk. The deal my wife has with me is that I can make whatever I want, but it has to "look nice" and fit within the desk. Given the desk/room arrangement, it really does need to fit inside of the desk. After considering all of the options, I landed on the current rad placement as being the best option.

    As for the side panels, I actually think that very plain sides are in keeping with the designs of the radios of that time period more so than having some kind of decorative trim would.

    As for the rad air chamber, I am looking at 1 7/8" (47.6mm) for the internal depth for most of it and 1 7/16" (36.5mm) for the front part. I have to indent some of the front to allow enough room for the pump between the hard drive rack and the air chamber. Since the fans will be pulling air in, I'm not that worried about airflow. I think that the area on top and the slot in the back should be enough to let warmed rad air to exhaust. I also have an open slot in the bottom beneath the rads. I think natural convection should be enough.

  21. #21
    Xtreme Addict
    Join Date
    Feb 2005
    Location
    Tennessee
    Posts
    1,171
    Time for an update. I have been steadily working away at this for anywhere from 4-6 hours or so in the mornings after getting home from work (night shift). I am very pleased so far with how this is turning out in relation to my Sketchup models and plan.

    Front Escutcheon Mount

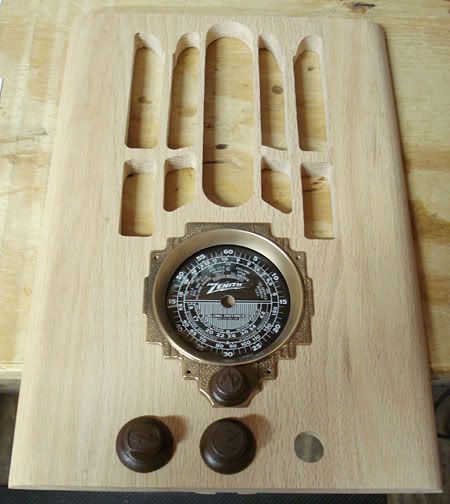
    I wanted an easy way to mount the dial and dial glass. The dial and glass are 3 7/8” dia. The inside circle of the escutcheon is 3 3/8”. So I came up with the hole in a hole idea. The one problem was how to cut this. The only rabbit bit that I have is a 3/8” depth cutting bit. So what I did was to first cut out with my scrollsaw a 3 1/8” hole. I then used the router with rabbit bit to cut out the 3 7/8” hole 3/8' deep, which is the depth of the escutcheon, dial, and dial glass. I then recut the 3 1/8” hole to be 3 3/8” with the scrollsaw. This way, the dial and dial glass just set down inside of the hole under the escutcheon. I'll probably put a piece of clear acrylic behind the hole to mount LEDs into, and to mount a fake radio needles which I have yet to make. A power switch is also in place so you can see where it goes.


    Here is a pic with the escutcheon, dial, dial glass, and 3 of the knobs placed where they will go. I am still waiting on the 4th knob from the guy who messed up my order.


    Front USB Ports

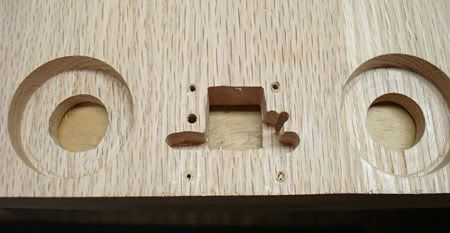
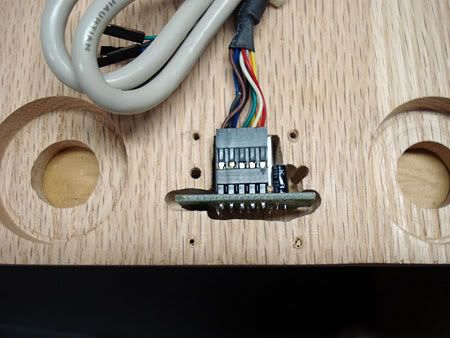
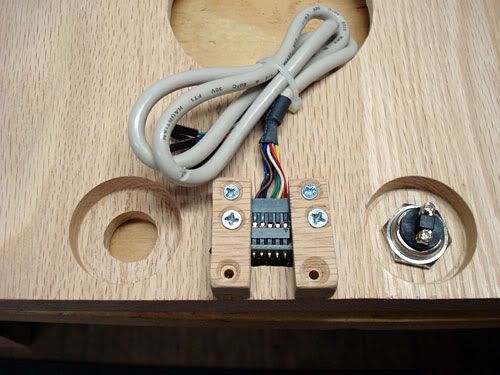
    I bought a USB/Firewire card from Directron. Not wanting or needing the firewire, I dremeled out the solder leads and cut off the part of the card with the firewire jack. I cut the initial 5/8' square hole with the scrollsaw, and then used the Dremel to ream out the area to be cut out for the card to fit flush with the front. I also cut notches in two small pieces of wood to hold the card in place.


    Hard Drives Mount

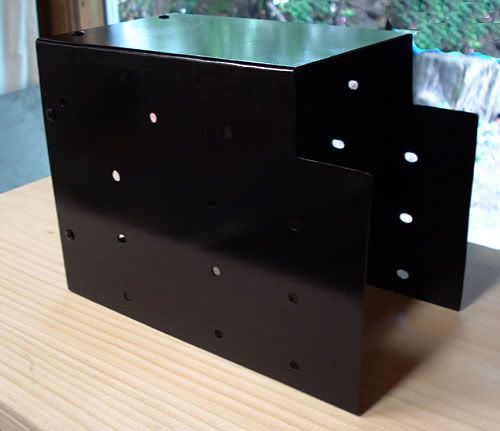
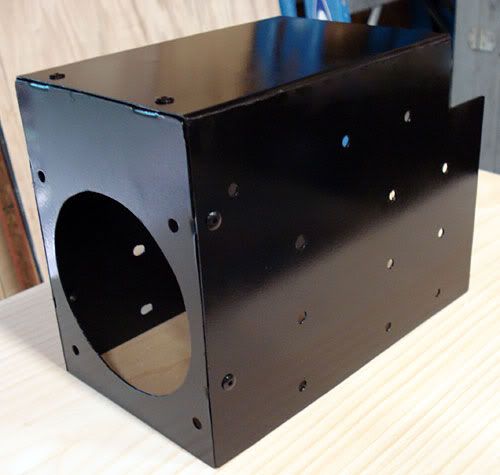
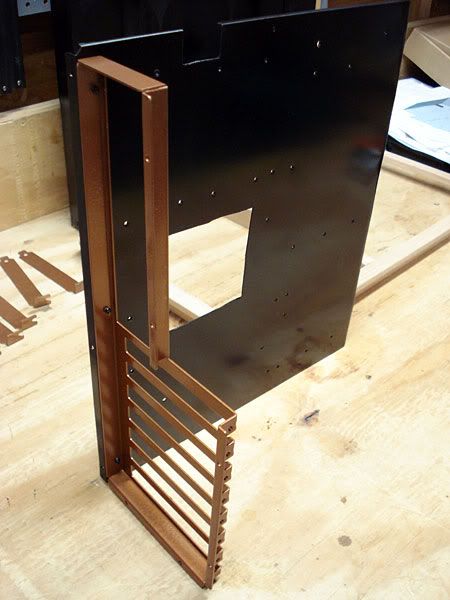
    I finished the mount for the hard drives. I made a template from clear acrylic to mark the holes for the hard drive screws onto the metal. The back piece for the 92mm fan has tabs that I riveted into the sides and top to hold everything in place. This piece took me the better part of one morning. I don't have a metal brake so I'm bending everything by hand with clamps and a metal L square with the help of a hammer.


    MB Tray

    I trimmed the MB tray that I got from Performance-Pcs. The L shape on the edges was 1/4”, but I didn't want that much, so I cut the edges down to < 1/8”. I also cut out under the CPU area for a bit of airflow. I painted the back panel in hammered copper along with the PCI slot covers, and riveted it back together.


    Air Chamber Shroud and Rads Mount

    I spent a good bit of time messing with this shroud. Since it wasn't originally a part of the design as I added it only a few days ago, I hadn't really thought through the tabs I would need on the rads mount to attach to the shroud. So I had to cut and rivet tabs to the rads mount so that the shroud and rads mount screw together easily for stability, but also so that the rads mount can easily be removed if needed. I also had to mount a piece to cover what were going to be wiring holes in the rad mounts piece because if I left them, then air would shoot back into the case. Bending the air shroud by hand was a real pain. I got a piece of 18 gauge aluminum for this. The hard part was getting the 3/8” bend in the middle to allow room for the pump to mount between the shroud and the hard drives mount. I will have a bending brake if I do this again!


    Next on the list are the dial needles which I think I'm going to cut out of acrylic and paint, and the reservoir. Then I plan on starting drilling the dowel rod holes and gluing her together. I may also still thin out the area behind the front grill to be only 3/8” thick instead of the current full 3/4” thick as I think that will look more original. I also have to decide on the stain color, which currently I think is going to be walnut.

    I should probably post more detail of exactly how I'm doing everything, but I find myself wrapped up in getting things done and before I know it, I've got something completed before I take pics.

    This weekend we are going camping, so more will be coming next week sometime.

  22. #22
    Xtreme Member
    Join Date
    Jan 2008
    Posts
    224
    Nice work so far. What's gonna be your color/stain/veneer scheme?

    Quote Originally Posted by voigts View Post
    If you don't "know much about woodworking," then what do you call your awesome case? An intelligent mistake?
    Oh, FYI, I didn't make that Sangaku case.
    I just hang with a lot of interior architects/product designers, someone was researching Japanese design for his own case mod, and he and referred to this in a preliminary ideas critique. Ended up not building it because our workshop didn't have the joinery tools needed to accurately build according to Japanese traditions. I sure wish I had the skills/time to such a thing - who knows, maybe when I'm older and whatnot I will be at a point to do that.

    Quote Originally Posted by voigts View Post
    I wrestled with what to do with the side panels since I needed airflow both for the rads and MB. I did consider putting the rads on the bottom both vertically and horizontally next to each other. If mounted horizontally, the case would have to be over 1' wide, which doesn't work when using 1'x12' which is actually 3/4" x 11 1/4". Oak, poplar, and the like aren't readily available any wider. If mounted vertically, the case would end up being too tall to fit in my desk. The deal my wife has with me is that I can make whatever I want, but it has to "look nice" and fit within the desk. Given the desk/room arrangement, it really does need to fit inside of the desk. After considering all of the options, I landed on the current rad placement as being the best option.
    Really? You can't get oak, popular, etc wider than 1 foot? If mounted on the bottom with some trim to provide intake space, you wouldn't need solid wood, as most of the area of the bottom would be radiator. Get what I'm picturing? Either way your system is very cool and will be great for future builds as well.

    Quote Originally Posted by voigts View Post
    As for the side panels, I actually think that very plain sides are in keeping with the designs of the radios of that time period more so than having some kind of decorative trim would.
    What about spray painting these fan grills (they can come in squares as well) to match the color of the wood. Seems they would be less obtrusive than wood-made ones, as long as the color get's matched.


    __________________________________________________
    Last edited by liguhy; Today at 1/2 second ago. Reason: You can always edit your writing more...and I'm anal-retentive.

  23. #23
    Xtreme Member
    Join Date
    Mar 2006
    Location
    Macedonia, Greece
    Posts
    112
    Voigts this is a classy work,
    Intel Core i7 980X @ 4.53 GHz 6C-12T / Gigabyte GA-EX58-UD4P / CORSAIR CMG6GX3M3A1866C7 / Ati Radeon Sapphire 5870 1GB DDR5 / CORSAIR CMFSSD-128GBG2D / LG CH08LS10 / Creative X-FI Titanium Fatality /Corsair CMPSU-850HXEU PSU (850W) / Silverstone Temjin SST-TJ07B Case / SAMSUNG SYNCMASTER P2350

    Watercool HK CPU LGA1366 Rev. 3.0 LT / DD-CPX-Pro 12V Pump / Swiftech MCR320 360mm / EK-Multioption RES 250 Rev.2 - EK-ANTI-Cyclone / Scythe S-FLEX Fan SFF21G.

    ENZOTECH SCW1 vs APOGEE GT

  24. #24
    Moderator
    Join Date
    Aug 2007
    Location
    Back and forth between Florida and Maine
    Posts
    4,097
    Voigts - Thank you for posting the details on how you are putting all the internals together. This is very interesting, even for someone who will never be able to tackle such a product. The woodworking for the front panel is wonderful.

  25. #25
    Xtreme Addict
    Join Date
    Feb 2005
    Location
    Tennessee
    Posts
    1,171
    Quote Originally Posted by liguhy View Post
    Nice work so far. What's gonna be your color/stain/veneer scheme?

    Oh, FYI, I didn't make that Sangaku case.

    Really? You can't get oak, popular, etc wider than 1 foot? If mounted on the bottom with some trim to provide intake space, you wouldn't need solid wood, as most of the area of the bottom would be radiator. Get what I'm picturing? Either way your system is very cool and will be great for future builds as well.


    What about spray painting these fan grills (they can come in squares as well) to match the color of the wood. Seems they would be less obtrusive than wood-made ones, as long as the color get's matched.
    I'm looking at using a walnut stain. The only colors that I can find that the radio originally came in are walnut, a very red cherry color, and black.

    I must have misunderstood. I thought the Sangaku was your doing.

    The widest easily available wood is 1" x 12", which actually measures 3/4" x 11 1/4". It is a lot easier to me to just use solid wood and not have to worry about trimming out the sides with solid wood to avoid plywood edges. I also don't really want to go any wider so that it fits in my desk with enough space around the sides for airflow.

    At this point I am just thinking of leaving the radiator intake area on the side completely open. I'm hesitant to use grills on the rads as most of them restrict airflow. The ones you linked to however wouldn't work for me as my rads will be pulling air in from outside of the case. I may take a look around and see if there is any acceptable metal grill material that would do.

Page 1 of 7 1234 ... LastLast

Bookmarks

Bookmarks

Posting Permissions

  • You may not post new threads
  • You may not post replies
  • You may not post attachments
  • You may not edit your posts
  •