Page 1 of 3 123 LastLast
Results 1 to 25 of 55

Thread: Xtreme Phase Change Insulation Guide

  1. #1
    Administrator
    Join Date
    Nov 2007
    Location
    Stockton, CA
    Posts
    3,568

    Xtreme Phase Change Insulation Guide

    Prepping a motherboard for Phase Change Cooling.

    What I will show here is what I do basically for bench and 24/7 use. There are as many different ways to do this as there are benchers tho.

    The main thing I like to keep in consideration is ease of clean up in case you need to do a RMA, so I prefer to keep things as clean as possible. I no longer use nail polish or grease anymore. Some might prefer the added security of grease and nail polish tho. Now depending on where you live and what types of condensation you get you very well might want to add grease and nail polish to your setup, so that is up to you. You will see that I use Blue Shop Towel in several places to help wick up any moisture that may form.

    When I am using a bench setup I use the F1 mountings to mount the Evaps with, this gives me flexibility to switch out to LN2 if I decided to. But for 24/7 use inside a case I use different mounts.

    What you see here is what I have done and used for some time now. When I ran my QX9770 on a 790i Ultra with Phase 24/7 mounted inside a TJ07 this setup stayed dry and did not give me any issues what so ever.

    You can modify what I do here to whatever you decide to do to fit whatever mods or other case considerations you please. So do not take what I have shown as the only way to do things.

    Everything I show here I was inspired by loc.o and his first post about using art eraser on LN2 setups. He gave me great inspiration on this He does a great job on his setup and deserves full credit for his skill in prepping a board for LN2. I have just copied his techniques and adapted it to a Phase setup.
    http://www.xtremesystems.org/forums/...d.php?t=201916

    Also please keep in mind that depending on where you live you might have different condensation issues so adjust whatever you need to do to keep your equipment dry.

    So let’s get started

    I will start off with the Classified Motherboard for this and show the basic steps I take in prepping it for Phase Change Cooling. This is also how I prep just about any motherboard for the bench or 24/7 use.

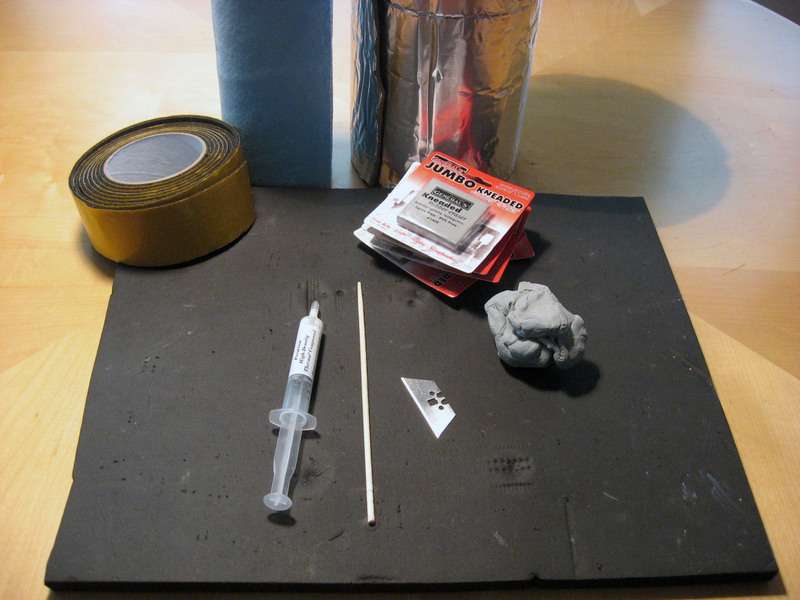
    Here is the basic list of materials I use for this.
    Art Eraser, Frost King & Blue Shop Towels.


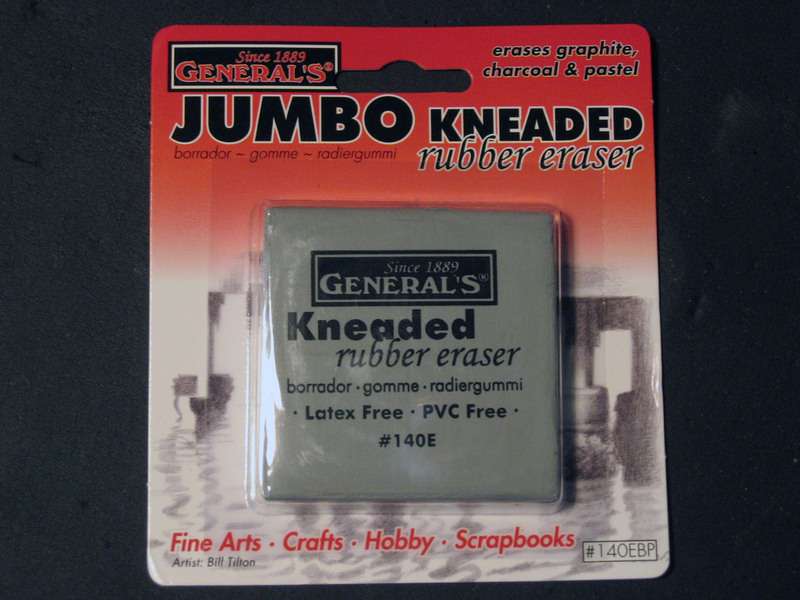
    This is the brand of eraser I use. I usually get 8-10 of these to have extra on hand. You should only need 4-5 or so depending on motherboard etc.


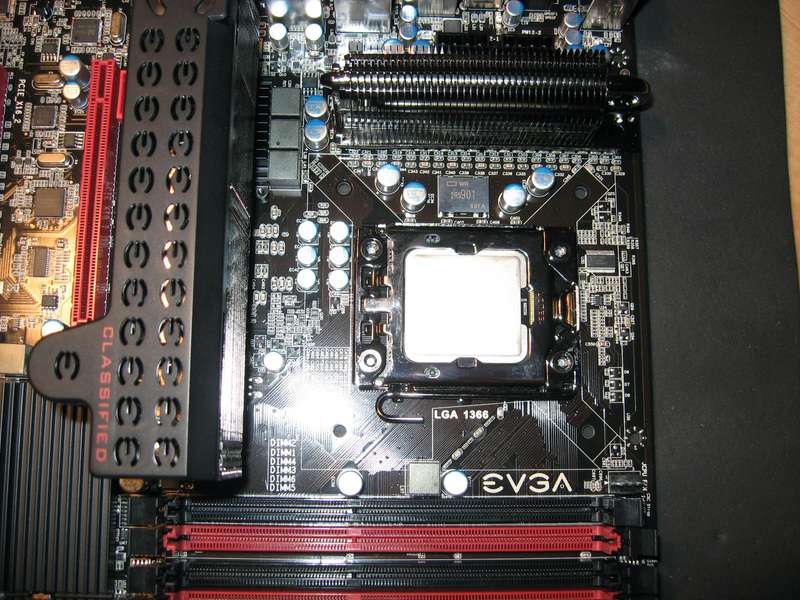
    Here is the bare Classified CPU area that I will be working on and prepping for Phase Cooling on the bench. The 965XE has been installed.


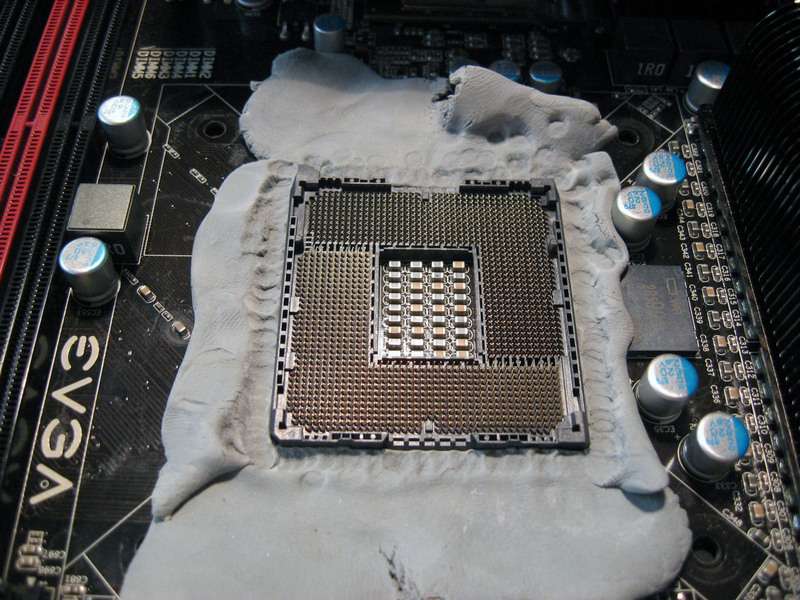
    I will start by adding art eraser to the area I show in the pic.

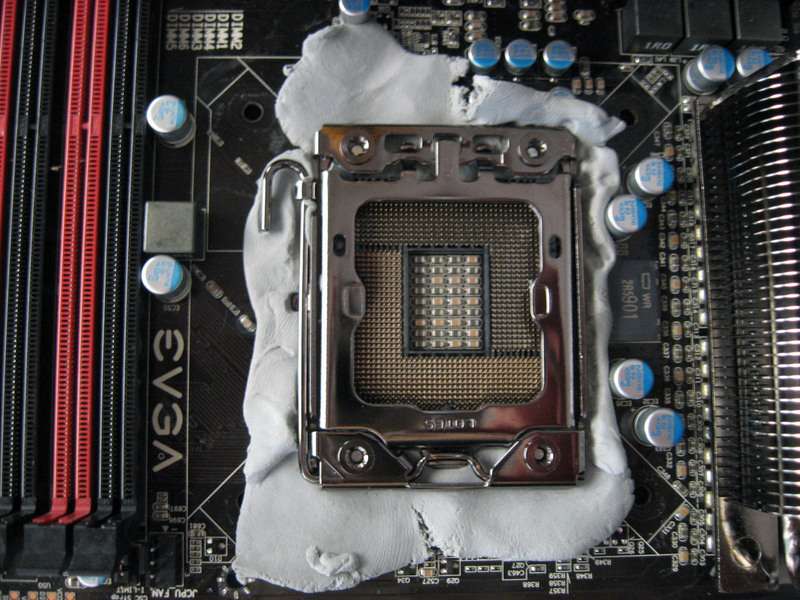
    Taking the big chunk of art eraser I have and putting it in the micro wave for 20 seconds to soften it up and make it easier to apply to the board. I tear off small chucks and start filling in areas of the board. I used a wooden chop stick to help push the eraser into small area around caps and other places to be sure that I had a good seal around all items. The idea here is to not leave any air pockets and form a nice seal to keep out any air. Depending on the motherboard you may need to push the eraser inbetween caps and what not that are close to the CPU.

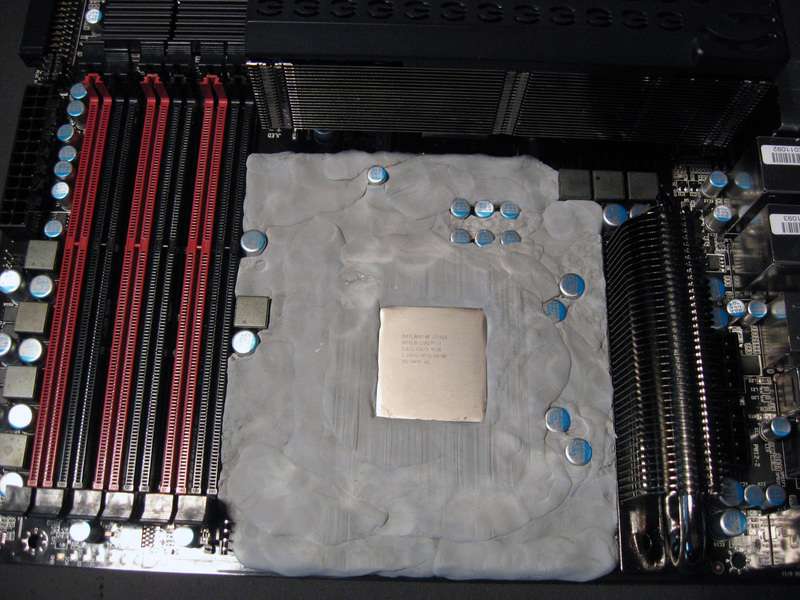
    I filled the area up to the top of the CPU socket, then taking small chucks and flatten it up I layered the eraser right up to the top of the CPU, filling in all the areas around the top of the socket to seal it all in nice and tight.

    This is what it looked like all finished up.


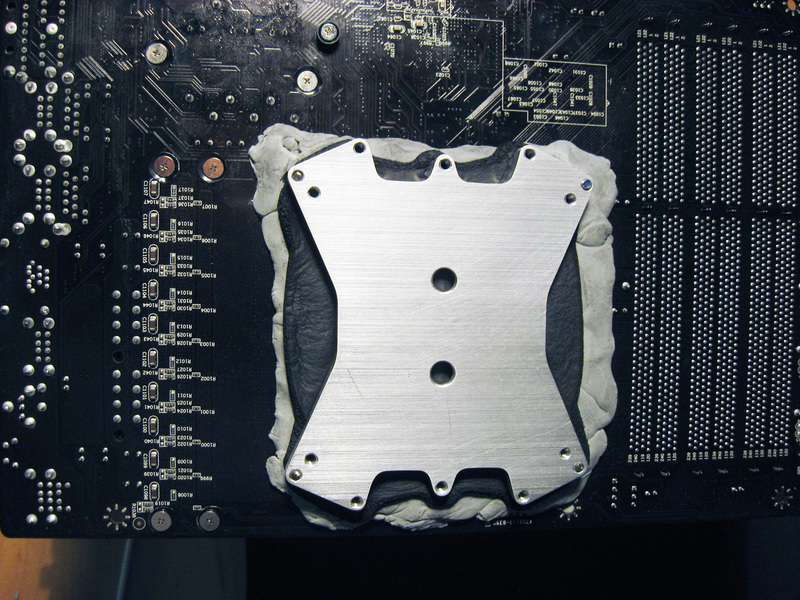
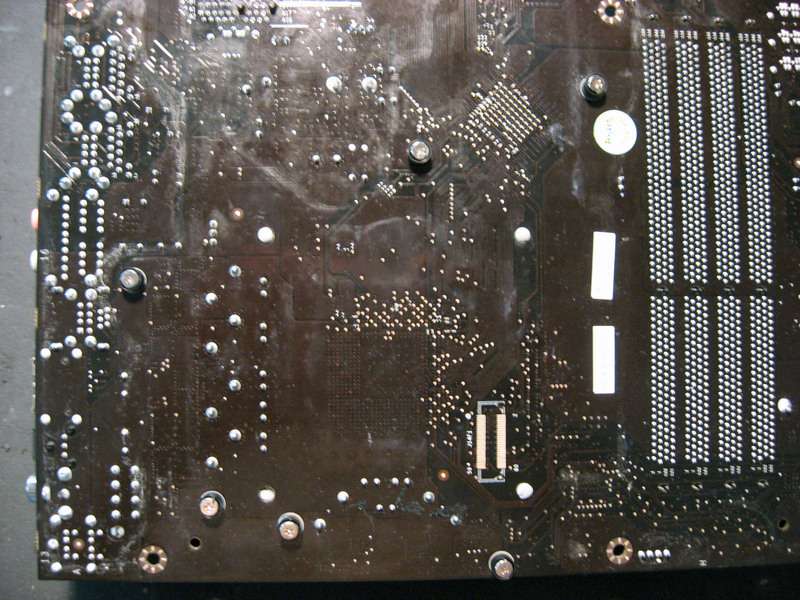
    Now let’s take a look at the back side. As you can see there is that metal plate on the back which I will fill in the center hole with art eraser.


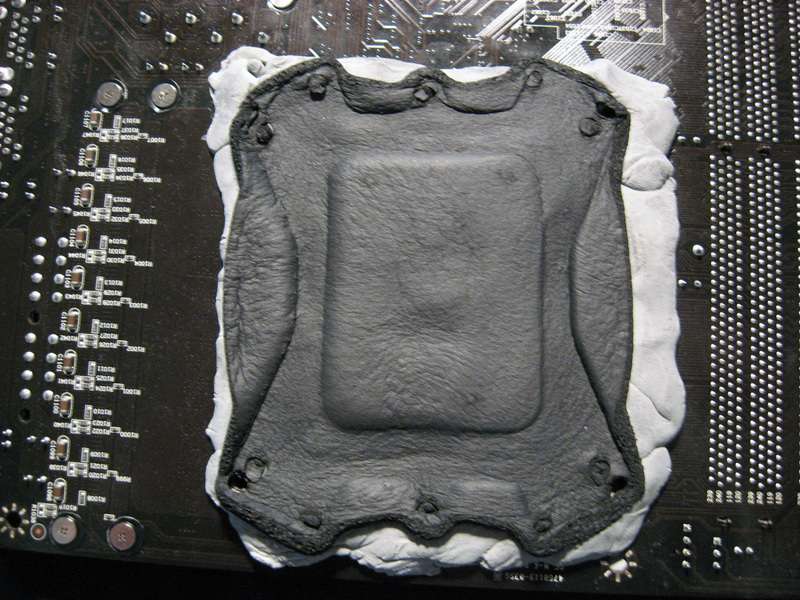
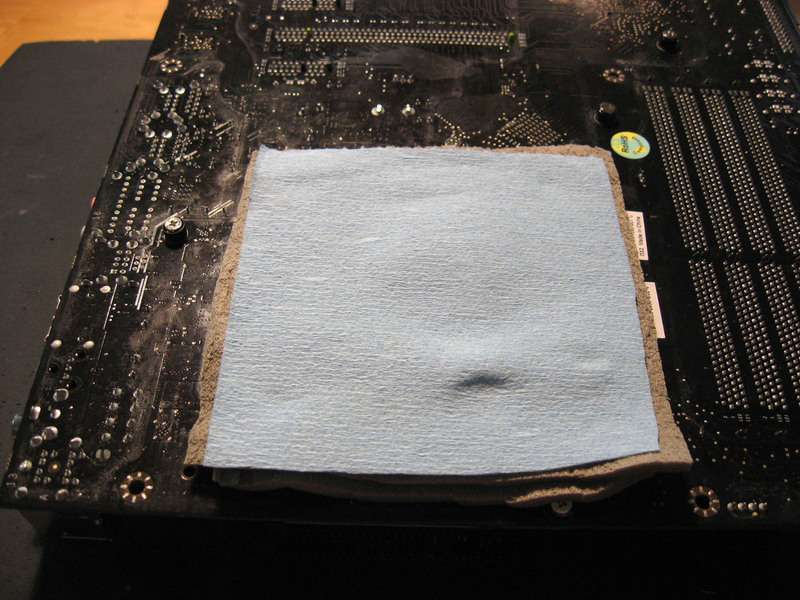
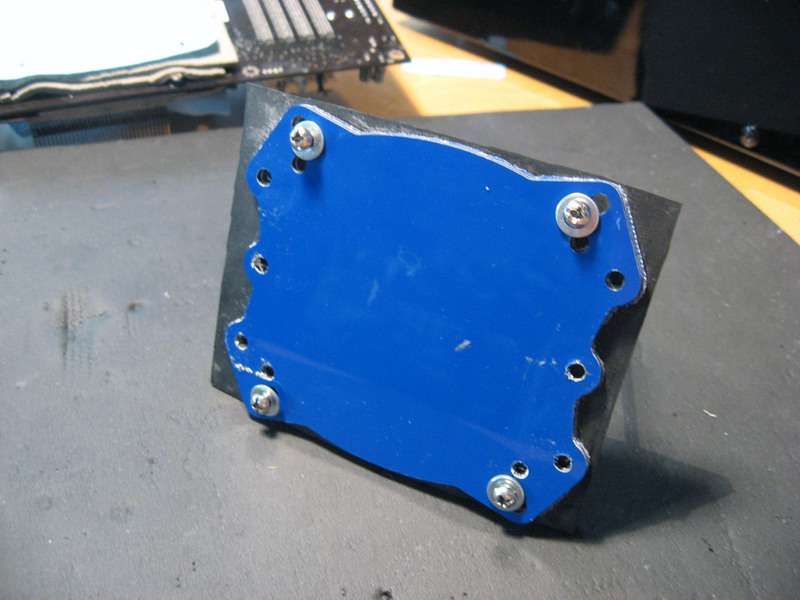
    And I had a whole layer all ready to fit onto the back from the other X58 setup, so I just applied that whole thing. The black foam on the back kind of stuck to that patch of eraser so I kept it all in one piece. It looks fuggy but fits very well.
    This patch has seen a lot of use as time has gone on and seen better days LOL. I used this very same patch at GOOC 2009 and it held just fine after 8+ hours of LN2 benching. It may not look pretty but it works just fine.


    Using the wooden chop stick I punched some holes through all the eraser for the mounting screws.


    As I often setup my bench so I can switch out to LN2 I will use the F1 mountings for all this.
    The back plate, I know kind of fuggy looking. With this same setup on the other X58 and a bunch of LN2 runs this back side held very well with no problems.


    And the mounting screws installed.


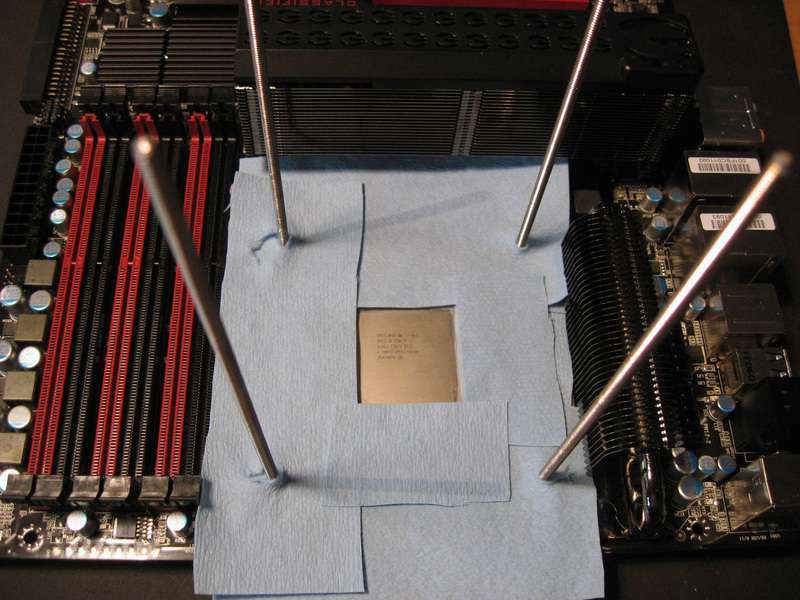
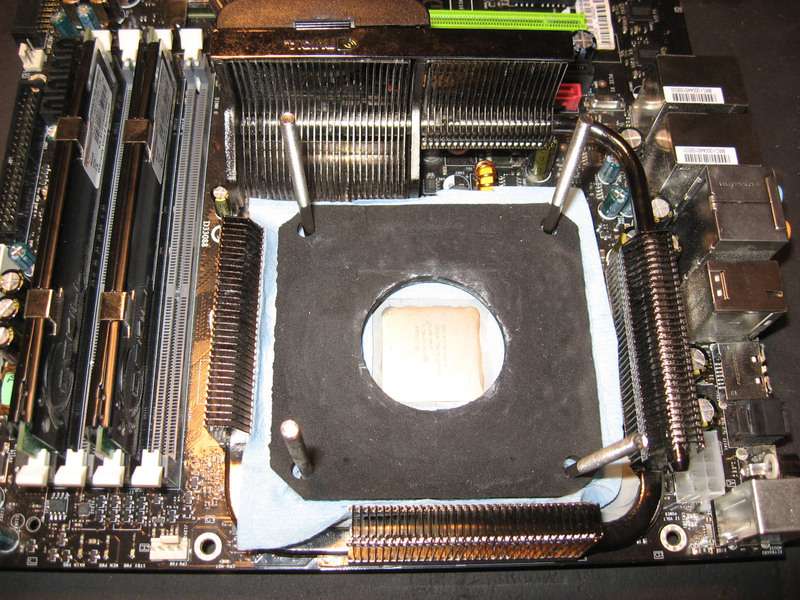
    I laid two layers of shop towels around the mounting areas. This will help wick up any moisture that may form durning use.


    And now the foam gasket installed. I have lots of pieces of this stuff, all used at one time or another.


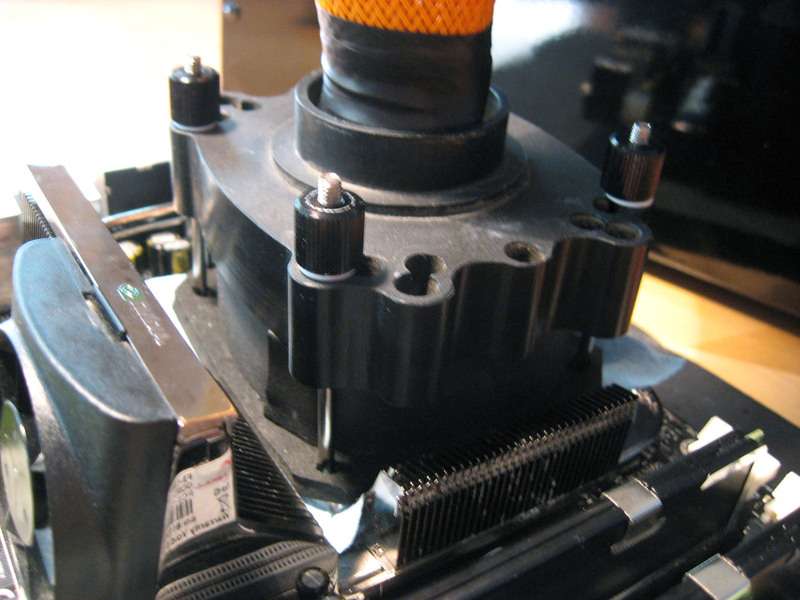
    Ok lets mount that Evap !
    Be careful here to not screw down the mounting screws really hard, this can cause issues with warpping the motherboard to much. You only really need to screw the mountings down for a good firm contact and pressure. If you need remove the mountings and check to be sure your TIM has good contact.

    I use Ceramique for TIM and make a small pea shapped ball of TIM in the center of the CPU.
    Some like to spread it all around or use larger amounts of TIM, apply the TIM as you normally would and things should work fine.


    Here we go with the 9800gx2's and ARC-1231ML installed


    Another option would be to take off the CPU hold down clamp assembly, that way there would be no metal plate on the back side. I would then do something like I show next.

    Just a word of warning when doing this. Be very careful when working around the socket, the pins can be damaged very easly !

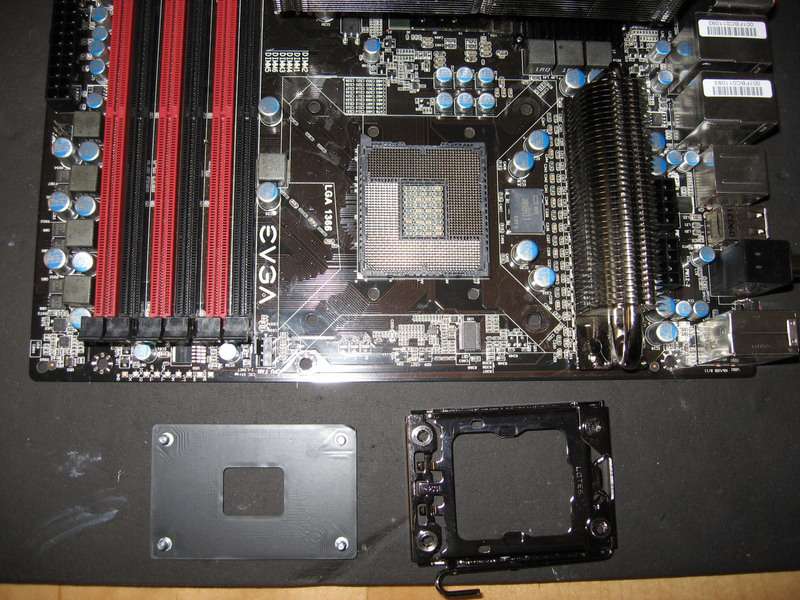
    Here is the Classified with it's CPU hold down assembly removed. Use an allen wrench and unscrew the 4 screws on the top, they will not fall out as there is a screw socket on the ends of each screw. At this point I would install the CPU to protect the socket pins, I would do so in these pictures but all my CPU's are in use atm


    Next take a thin layer of the eraser and apply all around the socket, I use the wooden chop stick to push the eraser in real tight and help make the layer thin.


    I also screwed back the CPU hold down assembly and would finish up like I did in the beginning.


    Ok how would I do this for mounting inside a case for 24/7 use.
    I would prep the top side of the motherboard just like I did above, but do the back side a bit different.

    So here is the back side of a 790i Ultra


    I add 2 layers of Frost King and a layer of Blue Shop Towel


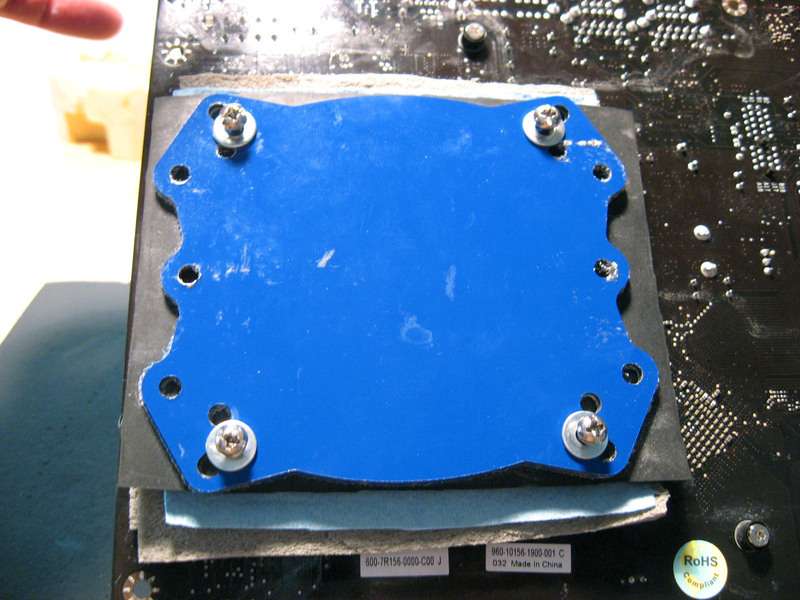
    Here I have a piece of neoprene and a back plate with screws going through to complete the back side mounting.
    I would also like to add here that the blue back plate may not even be needed if you don't have one. Just get some large washers and use those instead. If you use too small of washer for that it could pull through the neoprene. When I was benching P4's and other older CPU's my back plates where in use on other setups I skipped the neoprene all together. I just used two layers of Frost King, mounting screws and wide plastic washers and it worked just fine.


    And the screws going through the motherboard with the back plate assemble all installed.


    Let’s take a look at the Evap and see how the clam shell is installed. There are many different Evap Clam Shells, or at least a few that I have seen. The one I use here is pretty common for the socket 775 CPU’s. There are different shells out there but they basically work the same.

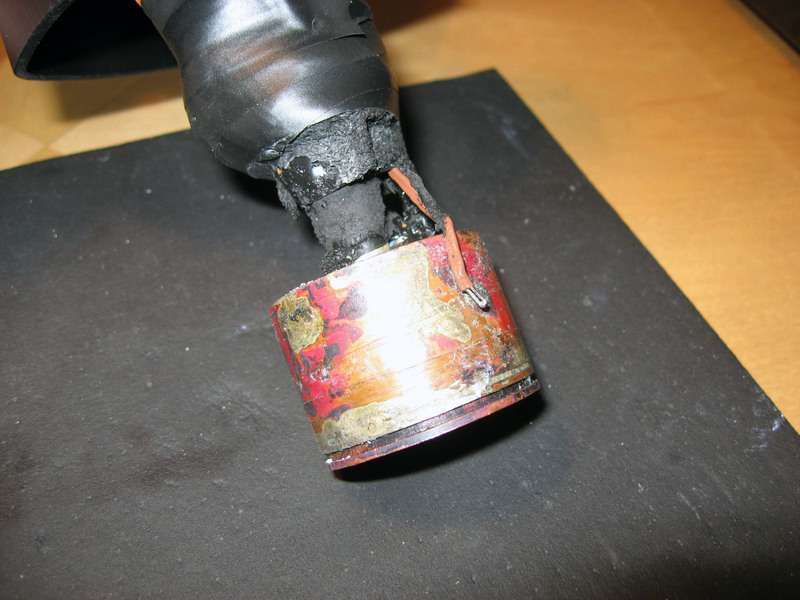
    Here we have bare Evap from my Chilly1 Phase unit.
    Notice the temp probe is not fixed in place. I would not drill a hole into the Evap to mount the temp probe.


    I use black electrical tape to hold the temp probe next to the Evap.


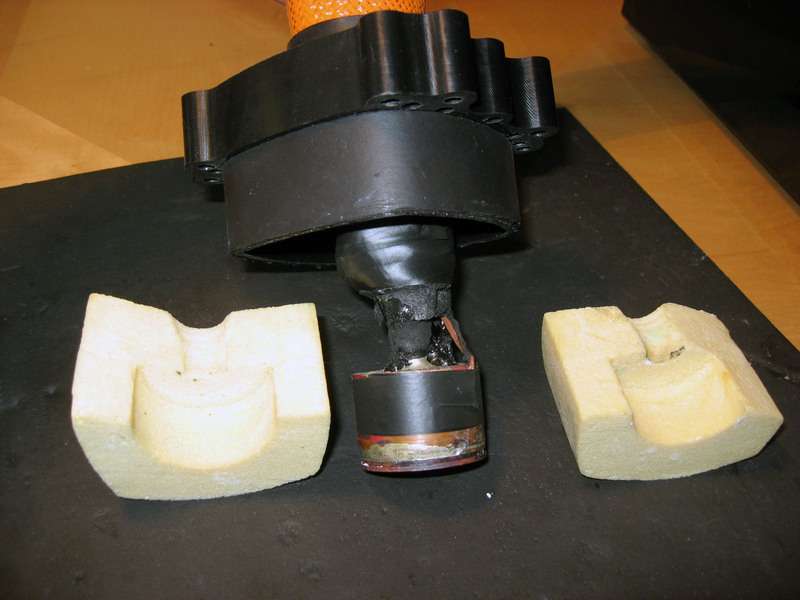
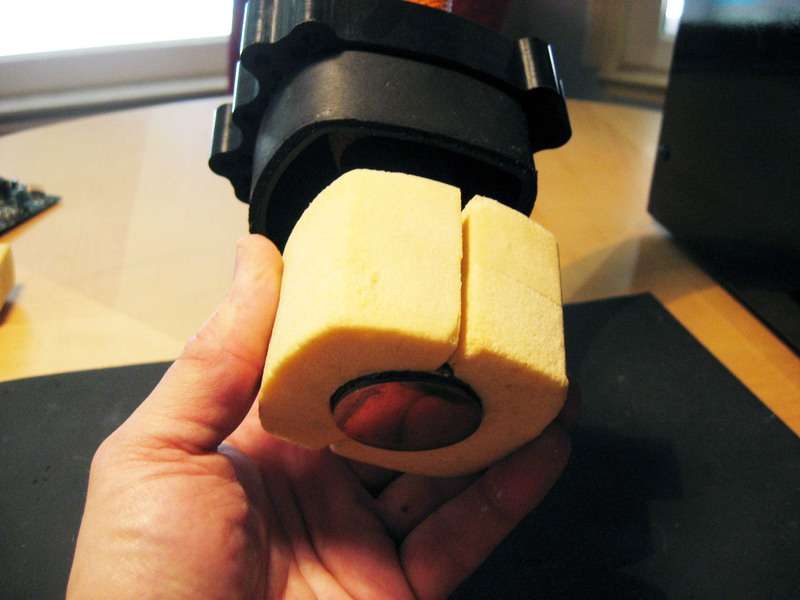
    Next slide the Clam Shell to the back position and place the two halves of the Evap insulation blocks in place.


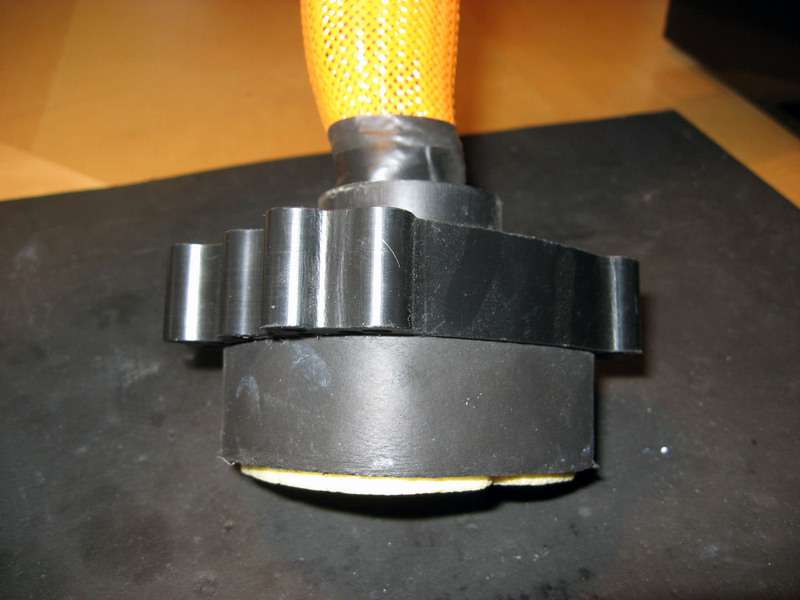
    Then just slide the outer Evap Clam Shell over the insulation and your done. It should be a tight fit. I do not use a O-Ring at all as the Clam Shell fits pretty tight and does not move.


    Note: The first few times I ran my Phase unit mounted inside my TJ07 and closed up for 24/7 use I would get condensation around the bottom area of the outer Clam Shell. So I wrapped Armaflex tape around this area and that solved this problem.

    The 790i has been all prepped and ready to mount the Evap.


    And here it is all mounted down.


    Well there you go, I hope that some found it helpful. Don't be afraid to try different things to achive what ever you want to do with your build. Some of you guys who do builds with high quality like Murder Mods can clean this up a lot. Back when I first started doing Phase I used to send a great deal of time making sure everything was just right, but my builds just don't seem to stay that way for long as I am always changing stuff around.

    Cascade users can pretty much do the same as I have shown above, they do get much colder than a SS Phase and might need to add extra insulation, use grease and nail polish. Someday when I have a Cascade I will update this

  2. #2
    Xtreme Enthusiast
    Join Date
    Jul 2008
    Location
    Prestonsburg, KY
    Posts
    545
    Thanks for posting buckeye That's way more detail than I go into for dice, but I might have to now that summer is here to protect for the extra condensation threat.


  3. #3
    Xtreme Mentor
    Join Date
    Feb 2007
    Location
    Victoria, British Colombia
    Posts
    2,677
    great thread!!!
    mentally confused and prone to wandering

  4. #4
    Xtreme Enthusiast
    Join Date
    Jun 2008
    Location
    Chandler, AZ
    Posts
    573
    solid
    #1
    Pentium D805 @ 3.4Ghz on GA-945P-S3
    2Gb OCZ Gold 800 with XP Professional SP3
    Ati X1800XT
    550W Antec TruPower in Antec Sonata II
    #2
    Core 2 Quad Q9550 on GA-EP45-UD3P
    4Gb Corsair Dominator 1066 with Vista Ultimate SP1
    Asus 4850 TOP
    750W PC Power & Cooling in ????


    There is not enough electrical oulets in my room.
    Best TF2 Quote:
    "tomtom92 : wtf the enemy has a base IN our base"

  5. #5
    Registered User
    Join Date
    May 2009
    Location
    Midwest
    Posts
    2
    Fantastic write-up Buckeye!

    [p]

    Question, are you not a believer in dielectric grease in the pin area?

  6. #6
    Registered User
    Join Date
    Aug 2008
    Location
    Norway
    Posts
    14
    Very thorough and well written. Clean and efficient insulation guide that should suffice for most CPU benching.

    Thanks Buckeye

  7. #7
    Administrator
    Join Date
    Nov 2007
    Location
    Stockton, CA
    Posts
    3,568
    Quote Originally Posted by [p]wnzor View Post
    Fantastic write-up Buckeye!

    [p]

    Question, are you not a believer in dielectric grease in the pin area?
    Thanks for the input everyone

    I do not use grease in the socket anymore, to much of a mess and a pain to clean out if a RMA is needed.

  8. #8
    Xtreme Addict
    Join Date
    Dec 2004
    Location
    Southern California
    Posts
    1,218
    awesome stuff man
    i9-10900k@5.3ghz//MSI MEG z490 Unify//32GB Gskill TridentZ b.die@DDR4666//RTX 2080ti(+150/+700) kingpin bios//Samsung 970 Pro//Corsair AX1200i
    Custom Loop: Dual DDCs->Dual EK XE360 w/GT's -> HK IV CPU -> HK IV GPU ->EK X3 Res controlled by Aquaero 6

  9. #9
    Xtreme Member
    Join Date
    Sep 2008
    Posts
    326
    wow very nice guide buddy... VERY NICELY DONE!!! great help for anyone just getting into sub ambient cooling
    This is my signature, there are many like it but this one is mine..


  10. #10
    Xtreme Member
    Join Date
    Apr 2006
    Location
    NY
    Posts
    137

  11. #11
    Registered User
    Join Date
    Mar 2009
    Location
    Switzerland
    Posts
    25
    awesome guide buckeye. I have 2 classified's and im thinking about investing in a phase unit to start my sub zero adventure. I have one question, do you use ever dielectric grease inside the cpu socket? ive been doing some research on sub zero cooling and it seems like a lot of people use dielectric grease inside the cpu socket. Is it a good idea for beginners or is good insulation enough as you dont mention it above? i dont really want to put grease all over my beautiful new motherboard.

  12. #12
    Administrator
    Join Date
    Nov 2007
    Location
    Stockton, CA
    Posts
    3,568
    Quote Originally Posted by Mr_Orange742 View Post
    do you use ever dielectric grease inside the cpu socket?
    Thanks Mr_Orange

    I do not use grease anymore, as where I live its not really needed. Everything stays nice and dry pretty much.

    Some say for a 24/7 rig you should, and other use it for deep LN2 sessions.
    There is a way to do this that is pretty much different for every bencher.

    If you live in a area that has very high humidity I might say yes use grease.

    If I may suggest, doing a test setup first and see how things roll out. If it looks like you are getting heavy condensation and feel more confortable using grease than go for it.

    I might add here that even on my Cascade grease is not really needed. But others like KingPin who run LN2 24/7 HAHA might want to use it

  13. #13
    -100c Club
    Join Date
    Jun 2005
    Location
    Slovenia, Europe
    Posts
    2,283
    Advice for you, mr. Buckeye: Never wrap your electrical tape tightly around the insulation. If you do that, you compress the chamber pockets within the closed-cell insulation matrix and therefore ruin the insulation. It's better to be left alone, more 'spongy' and tight.

    Just my 2 cents!

    Best Regards,
    Niko

  14. #14
    Administrator
    Join Date
    Nov 2007
    Location
    Stockton, CA
    Posts
    3,568
    Quote Originally Posted by tiborrr View Post
    Advice for you, mr. Buckeye: Never wrap your electrical tape tightly around the insulation. If you do that, you compress the chamber pockets within the closed-cell insulation matrix and therefore ruin the insulation. It's better to be left alone, more 'spongy' and tight.

    Just my 2 cents!

    Best Regards,
    Niko
    Good point. Thanks Niko !
    Sometimes I do get a bit carried away with the tape

  15. #15
    Registered User
    Join Date
    Mar 2009
    Location
    Switzerland
    Posts
    25
    thanks for the advice. I was planning on testing which ever unit i get (haven't decided which one yet) on my foxconn bloodrage first since its expendable and my classifieds are not. I live in switzerland and to be honest i have no idea what kind of humidity level we have here, id guess medium. I think ill have to be brave and try it without and if there is too much condensation ill use grease. I take it there is no way to clean out the grease in a cpu socket if i ever needed to RMA one?

  16. #16
    Xtreme Addict
    Join Date
    Jul 2007
    Location
    Arizona - USA
    Posts
    2,200
    Nice sticky and good job on the thread Buck!
    //RETIRED-o00o--°(_)°--o00o-OVERCLOCKER//


  17. #17
    Administrator
    Join Date
    Nov 2007
    Location
    Stockton, CA
    Posts
    3,568
    Thanks

    Cleaning grease out is a huge pain to me, I did it one time and said never again.

    Use Acetone to clean out the grease and a can of compressed air to blow the stuff out. Then I use Q-Tips to clean around the edges and what not, but not in the socket ! LOL

    Others who have done that a lot can please add in here what they do.

  18. #18
    Xtreme Addict
    Join Date
    Jul 2007
    Location
    Arizona - USA
    Posts
    2,200
    Quote Originally Posted by Buckeye View Post
    Thanks

    Cleaning grease out is a huge pain to me, I did it one time and said never again.

    Use Acetone to clean out the grease and a can of compressed air to blow the stuff out. Then I use Q-Tips to clean around the edges and what not, but not in the socket ! LOL

    Others who have done that a lot can please add in here what they do.
    That's exactly what I do and really isn't a pain at all, the Acetone makes the grease a little solid so the compressed air blows the stuff away. Top it off cleaning inside the socket with q-tips and a little contact cleaner then your good. But DO NOT TOUCH THE CPU PINS that will make a huge ball of cotton that is a pain to remove
    //RETIRED-o00o--°(_)°--o00o-OVERCLOCKER//


  19. #19
    Registered User
    Join Date
    Mar 2009
    Location
    Switzerland
    Posts
    25
    thanks again. i really hope i can avoid the grease.

  20. #20
    Xtreme Member
    Join Date
    Oct 2008
    Location
    Leeds UK
    Posts
    186
    thanks for that dude!
    just to be absolutely clear though, what/how do i need to insulate for 24/7 single stage use? and what happens if i get condensation?

    thanks
    Nick

  21. #21
    I am Xtreme
    Join Date
    Dec 2003
    Location
    Omaha, NE
    Posts
    368
    I also add a heating pad behind the socket, whether I do LN2 or phase. Think it helps with 24/7 also. I would never touch dielectric grease again. That stuff is soooooooooo horrible. Get's everywhere and on everything. Really nice writeup. Great job on it! Also I know a lot of people fill the first memory slot with eraser also. With LN2 that is necessary as it gets frosted up pretty but, single stages will be fine I guess but with a powerful cascade it may frost it. Can anyone confirm?
    Thermaltake Xaser VI Case
    ASUS P7P55 Motherboard
    Intel i7 870
    AMD 4870X2
    8 gigs of OCZ Fatal1ty DDR3
    CoolIt Boreas 12 TEC CPU cooler
    Coolermaster UCP-1100W PSU


    Quote Originally Posted by {GOD}Raptor22
    I find it exceedingly humorous how you sit here and continue to play keyboard warrior even though you know you are wrong.

  22. #22
    Administrator
    Join Date
    Nov 2007
    Location
    Stockton, CA
    Posts
    3,568
    Quote Originally Posted by biglipzit View Post
    Also I know a lot of people fill the first memory slot with eraser also. With LN2 that is necessary as it gets frosted up pretty but, single stages will be fine I guess but with a powerful cascade it may frost it. Can anyone confirm?
    I think its pretty dependent on the area you live on how much frost you get. I ran my AMD system and max LN2 temps for over 3 hours and had very little frost, same with Core I7 setups. I guess where I live I am lucky.

  23. #23
    Diablo 3! Who's Excited?
    Join Date
    May 2005
    Location
    Boulder, Colorado
    Posts
    9,412
    I pack the memory slots on my AMD Phenom II LN2 setups with vaseline as the first two slots always frost over. This isn't necessary on Core i7 or Core 2 setups as you aren't running at -196 Celsius for hours on end. I also live in Atlanta where the humidity is so high that I constantly mop puddles off the boards during bench sessions. Like Buckeye stated, it all depends where you live and the humidity levels.

  24. #24
    Registered User
    Join Date
    Mar 2007
    Location
    Sweden, Stockholm
    Posts
    10
    Thanks for this information. It was a nice thread for a noob like me who never have used sub zero cooling. I am planning on getting a "SS compressor cooler" for my CPU on the exact same hardware, (EVGA Classified and Core i7 965). It seems a lot better and easier to use "rubber eraser" instead of using sticky grease that messes up your motherboard.
    | Intel Core i7 965 EE (Batch: 3841A498) | EVGA X58 Classified E759 | Corsair Dominator GT 6GB PC16000 | XFX GeForce GTX285 | Samsung 1TB HDD | Corsair TX750W |

  25. #25
    Registered User
    Join Date
    Feb 2009
    Posts
    4
    When the rubber eraser gets to the ice cold temps does it not
    become fragile or brittle?

Page 1 of 3 123 LastLast

Bookmarks

Bookmarks

Posting Permissions

  • You may not post new threads
  • You may not post replies
  • You may not post attachments
  • You may not edit your posts
  •