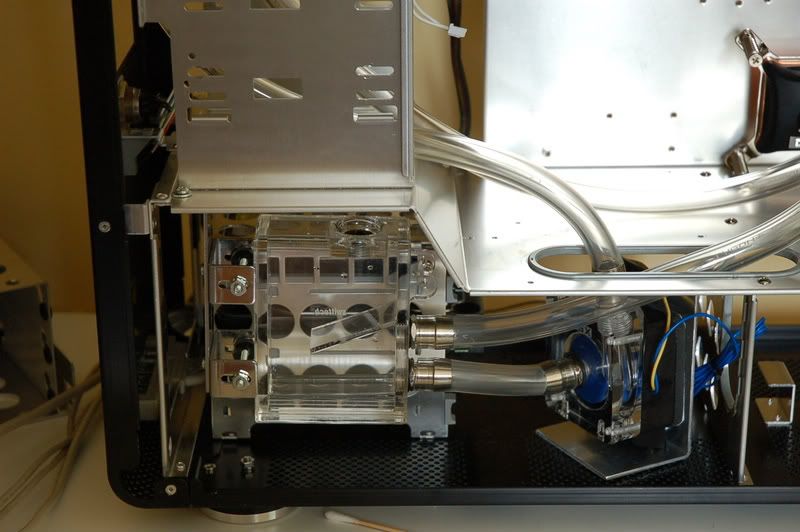
Page 2 of 6 FirstFirst 12345 ... LastLast
Results 26 to 50 of 140

Thread: Project: LucentTide - V1000 LC Build

  1. #26
    Xtreme Enthusiast
    Join Date
    May 2008
    Location
    VA
    Posts
    500
    Quote Originally Posted by septim View Post
    a very clean desk you have there. i envy that...

    nice sleeving, how long a roll did you buy, my guest its more than 50ft, hehehe...
    ty.

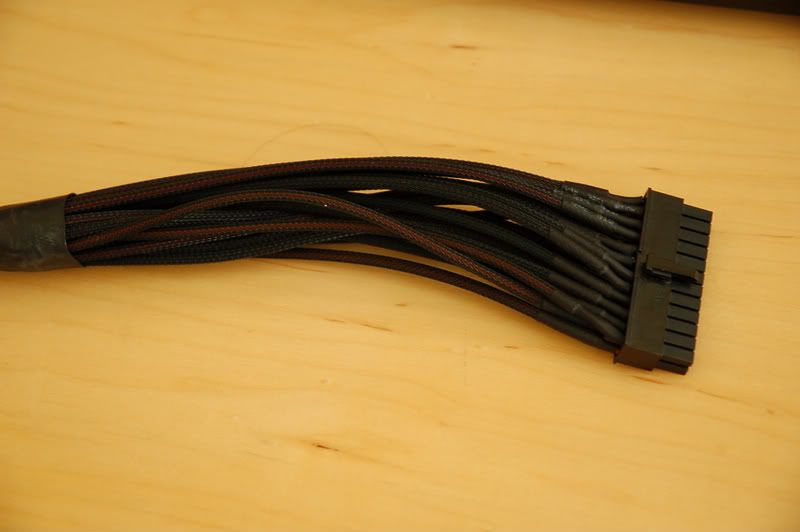
    well i bought 50ft of 1/8" for sleeving 2 ATX extenders (a good amt left over), and the crappy crappy sleeving kit, that had 10ft of 1/8", 1/4", and 5ft of 1/2" and 1".

    the heatshrink that came withe kit was 9mm, 20mm, and 25mm... the poor quality 9mm doesnt shrink well over 1/8" X_X. I used 1/8" shrink on the atx extender

  2. #27
    Xtreme Addict
    Join Date
    Aug 2007
    Location
    C:\Philippines\TPC
    Posts
    1,526
    damn wish i was good at sleeving...really having a hard time doing the 20+4 pin cable

    lyl, you should get that case windowed...it be too bad not to see your work without opening the panel

  3. #28
    Xtreme Enthusiast
    Join Date
    May 2008
    Location
    VA
    Posts
    500
    Quote Originally Posted by emoners View Post
    damn wish i was good at sleeving...really having a hard time doing the 20+4 pin cable

    lyl, you should get that case windowed...it be too bad not to see your work without opening the panel
    Yeah, i plan on cutting a window for it. I am trying to find a way to get a cleaner cut than my dremel at the moment. But if all else fails... ill chop 'er up

  4. #29
    Xtreme Member
    Join Date
    Nov 2007
    Location
    Poland
    Posts
    247
    I had that same idea nice job
    ~~~~~~~~water ed ~~~~~~~~~~
    Sry 4 my english
    http://galeriawc.pl

  5. #30
    Never go full retard
    Join Date
    Feb 2008
    Location
    Vegas
    Posts
    3,984
    Quote Originally Posted by septim View Post
    nice. more pics please...

    skinnee thats a hard drive bay, can be found on PPCs' Lian Li Section...
    also available 3slot 4 hard drives EX-34N...
    Quote Originally Posted by lyl View Post
    As septim said its a HDD bay for 5.25 slots. Takes up 2 bays, holds 3 hard drives.

    Heres where i got mine
    http://www.frozencpu.com/products/61...oling_Kit.html
    Thanks!

  6. #31
    Banned
    Join Date
    Jun 2006
    Location
    in a Red Rage D....
    Posts
    3,839
    clean cut window, drill pilot hole, enlarge with dremel till a metal hacksaw 24teeth fits it, hacksaw away to other pilot hole, then file em smooth and attach plexi window via several botton head/acorn head screws&nuts... admire!...

  7. #32
    Xtreme Enthusiast
    Join Date
    May 2008
    Location
    VA
    Posts
    500

    Lightbulb Update 4

    Good news is the HDD (EX-23N) expansion bay came in (pics below)

    Bad news is... I really jumped the gun on buying it because I realized a (very very obvious) way to mount the hard drives.

    I'll explain the rest w/ pics+captions:


    my order (ATX connectors are for my sleeved extender)


    unboxing


    sorry for the nasty flash

    my initial concern with the EX-23N is that it was going to be too long for my likings


    i was right -- i dont really like how it sticks out into the center of the case. I am going for a really clean look here.


    But it matches perfectly with the rest of the mesh.


    OK, heres the easier method i realized WHILE trying out the EX23. Just turn the one of the original HDD cages 90 degrees....
    Note: the EX23 helps keep the hose on the outlet of the pump from kinking; kinda neat


    DUH
    Im thinkin a nice piece of alum between the res and the cage will give a really clean look


    I dont completely regret ordering it... I bet i can do something nice with just the front piece of the bay. Here it could cover up the PSU and wires coming out of it ^^ Just an idea, but i like...

    =======================================

    Ok so i have 2 ways i could potentially mount my drives, not too sure which way im going to take. Most likely going to use the original cage, and 'stealth' it with some pieces of aluminum.

    Gimmy some feedback XS!
    Last edited by lyl; 06-13-2008 at 02:01 PM.

  8. #33
    Xtreme Enthusiast
    Join Date
    May 2008
    Location
    VA
    Posts
    500
    different camera for the rest of the build


  9. #34
    Xtreme Member
    Join Date
    Mar 2008
    Location
    Finland
    Posts
    250
    Subscribed. Nice work.
    Not into xtreme builds anymore, just like to keep things silent.
    Asus P6T Deluxe V2 - Intel i7 920 3.6 GHz - 6 Gb 1800 MHz DDR3 - AMD HD5850

  10. #35
    Registered User
    Join Date
    Nov 2007
    Location
    Guatemala
    Posts
    22
    excellet work with that sleeving... I guess you spend a lot of time doing that, wich size of cable sleeve did you use?

    thanks and sorry for my english
    Intel Core 2 Quad Q6600 @ 3.2 24/7
    Asus P5K-E WiFi/AP
    XFX GeForce 8800 GT Extreme
    2GB DDR2 Corsair Dominator 1066MHz
    400GB Seagate Barracuda + WD 320GB // Samsung SH-S203N SATA2
    Corsair TX750W
    Dell E248WFP 24"
    Artic Cooling Freezer 7 Pro
    Lian Li PC-V2000 PlusII // Logitech G15 New // Ergo 525

  11. #36
    Xtreme Enthusiast
    Join Date
    May 2008
    Location
    VA
    Posts
    500
    I used 1/8" sleeving w/ 1/8" shrink. The shrink was a bit small, and i had to stretch it bit to get it on.

    Its not extremely time consuming, you'd be surprised. I suggest cutting all sleeving/shrink beforehand.

  12. #37
    Xtreme Enthusiast
    Join Date
    May 2008
    Location
    VA
    Posts
    500

    hot off the soldering iron

    before


    comparison


    after


    resistors are 10k ohm, 1/4W

  13. #38
    Xtreme Member
    Join Date
    Sep 2007
    Location
    NYC
    Posts
    294
    Quote Originally Posted by lyl View Post
    Sorry, i didnt take a bunch of pics during the process as i planned, I didnt have my camera at the time

    I cut the top with a Dremel and Reinforced Cutting Disks (dont skimp out on the disks... other cutting disks will break very often -- ie. flying shrapnel). I used about 2 disks total (none broke, just got too small to use)

    I used the template provided with the AC Ryan Radgrill.

    The cutting was fairly easy, mostly due to the soft nature of aluminum. Cutting ON the lines of the template, otherwise youll be able to see edge of your cut when the grill is installed. As everyone says, go slow, let the dremel do the work. Dont apply too much pressure either.

    My method for cutting a line was to lightly cut into the metal for the wholbre length of the cut, then going over it multiple time until i completely cut through. Dont try to get your dremel through the metal, then move it down the line. Youll loose a lot of control of your cut, and not to mention break a lot of disks and put a ton of stress on your Dremel.

    Also, i cant stress this enough, make sure the holes on the rad fit the ones on the rad grill before using the radgrill's template for screw holes! I made this mistake, and realized that 4 (one fan's worth) of holes were about 1mm too far away. I had already drilled the holes in the case, and had to enlarge them. (not a biggy because they are covered by the grill anyway).

    Hope this helps
    im actually also cutting my top panel right now (also aluminum) using a dremel and the reinforced cutting wheel. except it's taking me ages.. what rpm did you run at when cutting? maybe im not putting enough force. at this rate ill be done by tomorrow morning..

    PRIMARY
    2600k | ASUS MIVE B3 | 4x4GB GSkill Ripjaws DDR3 1600MHz | Ultra X3 1600W | GTX 580 3GB TRI SLI | OCZ Vertex 3 240GB | Dell U3011 Surround | Win 7 x64 | Thermaltake Level 10 GT

    STORAGE
    Q8200 | MSI P7NGM | 2x2GB GSkill DDR2 800MHz | Rosewill RD400-2-SB 400W | 4x WD Caviar Black 1TB (RAID 5) | Ubuntu 11.04 | Antec Mini P180

  14. #39
    Xtreme Member
    Join Date
    Oct 2002
    Location
    Florida
    Posts
    485
    [QUOTE=lyl;3061528]different camera for the rest of the build


    i did all my sleeving on the molex and sata connectors but i cant for the life of me get the pins out of the 24pin atx connector.. i have the sunbeam tool kit which includes tools just like you showed earlier but i cant get them out..

    any tips on how you got the pins ouf of the 24pin atx connector??

    thanks
    CCC
    Win7 64 Ultimate
    i7 930 - 4200mhz 24/7 - Dtek v2
    ASUS P6X58D-E
    2 x MSI 6970's xfire
    3 x 2gb G-Skill 2000mhz
    Samsung 27" LCD
    SilverStone ZM1200w psu
    2 x 300gb WD Velociraptors Raid 0, 4TB storage
    PS3-used mostly for bluray and media server

  15. #40
    Xtreme Enthusiast
    Join Date
    May 2008
    Location
    VA
    Posts
    500
    Quote Originally Posted by fadetoblack View Post
    im actually also cutting my top panel right now (also aluminum) using a dremel and the reinforced cutting wheel. except it's taking me ages.. what rpm did you run at when cutting? maybe im not putting enough force. at this rate ill be done by tomorrow morning..
    i would run around 7-9. shouldnt take too long to get through the metal...

    Quote Originally Posted by CCC View Post
    i did all my sleeving on the molex and sata connectors but i cant for the life of me get the pins out of the 24pin atx connector.. i have the sunbeam tool kit which includes tools just like you showed earlier but i cant get them out..

    any tips on how you got the pins ouf of the 24pin atx connector??

    thanks
    CCC
    oh man.. i was so confused when i first tried this too. the tool you want to use looks like the bottom one in this pic.


    ok, so from the front of the connector, get both of the tool's tips between the edges of the metal pin and plastic housing. give it a little push, youll feel the pin move back... almost a click.
    make sure one of the tips isnt inside the pin.

    youll see when you get the pins out, that you are just folding two 'wings' on the pin that prevent it from coming out the back.

    try googling it, there are probably some good guides/pics


    Build news:
    Rheobus finished! PC is up and running. pics soon
    Last edited by lyl; 06-15-2008 at 01:00 PM.

  16. #41
    Xtreme Member
    Join Date
    Mar 2008
    Location
    Galicia _ Spain
    Posts
    207
    Very nice Sleeving!!

    regards!!


    My WaterCooling project [Cosmos S ''Black Edition'']

  17. #42
    I am Xtreme
    Join Date
    Jun 2007
    Location
    Imperial Palace, UDE of Pitatopia
    Posts
    8,396
    Quote Originally Posted by fadetoblack View Post
    im actually also cutting my top panel right now (also aluminum) using a dremel and the reinforced cutting wheel. except it's taking me ages.. what rpm did you run at when cutting? maybe im not putting enough force. at this rate ill be done by tomorrow morning..
    Full RPM's, don't apply any pressure, let the wheel do the cutting.
    Circles SucQ!

    If your annoyed by sigs telling you to put things in your sig, then put this in your sig

    Bribery won't work on me...just say NO to AT!!!

  18. #43
    Xtreme Enthusiast
    Join Date
    May 2008
    Location
    VA
    Posts
    500
    Here are some pics of me making the rheobus faceplate.

    LED holes need some touching up. Ill post better pics of the finished project when i'm satisfied w/ it.


    and a few more pics of the loop. (lighting is 1 white CCL)


    getting a new PSU, so dont mind the random wires

  19. #44
    Banned
    Join Date
    Apr 2008
    Location
    Perth, Western Australia.... mate
    Posts
    740
    im sure there is a good reason for it, but why did you solder resisters in?

  20. #45
    Xtreme Enthusiast
    Join Date
    May 2008
    Location
    VA
    Posts
    500
    Quote Originally Posted by b@llz0r View Post
    im sure there is a good reason for it, but why did you solder resisters in?
    to dim the LED's. they were WAY too bright (it hurt to look at them).

    I just wanted a color indication that a channel was on... not a spotlight!

  21. #46
    Xtreme Addict
    Join Date
    Aug 2007
    Location
    C:\Philippines\TPC
    Posts
    1,526
    Quote Originally Posted by lyl View Post
    getting a new PSU, so dont mind the random wires
    so does that mean you have to re-do the sleeving?

  22. #47
    Xtreme Enthusiast
    Join Date
    May 2008
    Location
    VA
    Posts
    500
    Quote Originally Posted by emoners View Post
    so does that mean you have to re-do the sleeving?
    Nope, none of the sleeving i've done so far was to the PSU...

    Ill probably be getting a Corsair 620HX which has nice looking all black cables+connectors

    Pic here: http://c1.neweggimages.com/NeweggIma...139-002-09.jpg

  23. #48
    Xtreme Member
    Join Date
    Jul 2007
    Location
    Swansea,Wales,Uk
    Posts
    101
    any ideas how the front logo (e.g. the rebranded logo on your pc) comes out ? im in a similar situation where i want to replace it with a blanking plate and drill holes to match the rest of the holes on the front of the case

  24. #49
    Xtreme Enthusiast
    Join Date
    May 2008
    Location
    VA
    Posts
    500
    ive seen it done, but i am not sure the best way to get the thing off without

  25. #50
    Xtreme Enthusiast
    Join Date
    May 2008
    Location
    VA
    Posts
    500
    4870!


    Last edited by lyl; 06-28-2008 at 09:25 AM.
    [ Lian-Li V1000B // EP45-UD3P // E8400 // HD4870 ]
    [ W/C by EK, MIPS, D-tek, Bitspower, Swiftech, XSPC]
    [ Project LucentTide - WORKLOG! ]

Page 2 of 6 FirstFirst 12345 ... LastLast

Tags for this Thread

Bookmarks

Bookmarks

Posting Permissions

  • You may not post new threads
  • You may not post replies
  • You may not post attachments
  • You may not edit your posts
  •