Page 4 of 8 FirstFirst 1234567 ... LastLast
Results 76 to 100 of 184

Thread: Project: RainMaker (PC-343B w/ Horizontal Mobo and Triple Loops)

  1. #76
    Registered User
    Join Date
    Dec 2007
    Location
    SW London, UK
    Posts
    19
    Quote Originally Posted by ladderman
    ... I’m already thinking about my next venture in to liquidcooling, and just like climbing mountains the next one has to be more of a challenge than the one before. I think ultimately the route I need to go down is building my own custom case, because that way you can have total control of the build instead of being constrained by the limitation of manufactured cases
    .
    I'm still buying tools for my project case build. Just received the Autocad software to design it. Have long list of suppliers of various materials, and a friend who can design electronic circuits in his sleep.

    Quote Originally Posted by ladderman
    Look at the cost of a top quality case like the TJ07 or your 343B, what’s the first thing we need to do with it, strip it down and start hacking bits off that give us problems. Are we mad or what lol. If I’m honest I thinks I get more enjoyment out of building PCs than using them....
    The first PC I ever owned was a self built PC with an Intel 486 4Mhz CPU and 512Kb of RAM. DOS O/S. I have custom built over 600 PC's/servers since, and for the first time am planning to custom build a very different type of an xtreme rig. I'm currently on a very steep learning curve to understand all the various cooling techniques including Thermoacoustics, Thermoelectric, Advance Heatpipes and refrigeration technology.

    This forum and in particular threads like this one, has highlighted just how important it is to plan and triple checking your measurements.

  2. #77
    Xtreme Member
    Join Date
    Feb 2008
    Location
    Michigan
    Posts
    173
    Quote Originally Posted by NysoO View Post
    Time is important of course, but if it is your hobby, you cant blame time for not living out your hobby, at least thats my opinion .
    But, I can blame my status as a stay at home dad to FOUR kids 6 and under!

    But, i do a little at a time.....

    breezyjr

  3. #78
    Xtreme Member
    Join Date
    Sep 2005
    Location
    Los Angeles, CA
    Posts
    284
    I can relate with regard to buying parts sight unseeing and ending up with quite a few spare parts after all said and done. Like you, I ended up spending quite a bit on parts that didn't workout. They are now collecting dust.

    Time wasn't really on my side at the time I build mine. I only had about 3 months timeframe as I had a LAN Party to attend and everyone were anticipating to see my new build. Needless to say, I managed to throw all the pieces of hardware into the 343 and it turned out nicely.

    However, regardless if I had more time or not, I don't think I'd be able to do what you're doing now. I certainly don't have all the skillsets you have. So you, my friend, with your 343 build, it is and will be beyond leaps and bounds of mine or any other builds I've seen. Keep up the great work. I can hardly wait to see the final result.


    Quote Originally Posted by virtualrain View Post
    It turns out I didn't get time to post some more pics tonight but should have time tomorrow.

    Some additional comments...

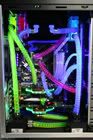
    In regards to attention to detail, thanks... this is my main hobby these days and so it's as much about the journey as the destination. The consequence of this is that by taking several months my electronics were nearly obsolete by the time I was finished. The good thing is that this case and the core cooling setup should last for several future PC builds.

    In terms of money, it is excessive by some standards, but perhaps more practical than you might think. What annoys me the most about this hobby is that you have to buy most parts sight unseen over the internet based on a picture or two and when you are doing a seriously custom job with a lot of planning you end up making assumptions about parts size, fitment, and compatibility that simply don't pan out. I don't know how much money I wasted on brackets, fans, shrouds, modding parts, etc that I ultimately couldn't use or didn't want to use once I had the parts in hand. With shipping costs what they are, it's not always practical to return stuff you don't want/need either. Sadly, I could probably build another entire rig with spare parts I have lying around from this one. That's where most of the money is wasted in my opinion.

    This case is expensive as everyone knows, and the accessories are steeply priced as well, but things like nickel plating, powder coating, sleeving for cables, and modders mesh to hide unwanted things, are really insignificant and well worth it.

    One last thought on the the cost... perhaps the most expensive part of custom computer building is the investment in tools. I have a very modest tool set compared to some folks around here (i.e. I don't have a machine shop!) but the right tools can make a project like this so much simpler... but those tools can add up quicker than a pair of SLI graphics cards.

    By my calculations, without the cost of tools factored in or my time... just the parts, materials, and outsourced plating/coating, I spent about $5K which is not much more than a high-end Vodoo or Alienware rig would cost and it's a lot more satisfying (albeit frustrating at times) than ordering a rig from a catalog.

    Some specific questions...

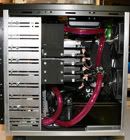
    IanY, I simply put the res cap upside down in the drill press vice and drilled a 7/64" hole in the center of the cap and then tapped it to #8-32 and used a #8-32 x1/4" cap screw with a rubber washer to seal the hole. Bleeding it is then a simple matter of bleeding as much out of the loop using the big main cap off and then working with just the bleed screw out and using the syringe to purge the last remaining air with more coolant. As I said, it does take about 10 rounds of this nonsense to purge all the air but once done, there's not a single bubble of air in the loop. PPC's sells spare caps for these tanks and you may want to get a spare in case you screw one up. I had one crack on me after about a month of being in service... probably the result of the drill/tap over time... the crack was so small it was hard to detect and wasn't really causing a leak but I discovered it because I was getting small amounts of air in my loop from somewhere.

    SiGfever, the temp probes I'm using are from Innovatek... http://www.highspeedpc.com/Merchant2...de=FanTempFlow


    My Complete System Specs and High Rez Pics Here.

  4. #79
    Tyler Durden
    Join Date
    Oct 2003
    Location
    Massachusetts, USA
    Posts
    5,623
    Seriously dude....this is awesome! Your attention to detail and overall stylistic taste entailed in this build is just a sight to marvel at. You certainly have my attention.
    Formerly XIP, now just P.

  5. #80
    Xtreme Addict
    Join Date
    Jul 2006
    Location
    Vancouver, BC
    Posts
    2,061
    Hey, thanks again for the positive comments.

    I'll post some pics of the final product next week.

    To answer some recent questions...

    - The PSU's are rated to 500W and I'm not sure about their overall quality but I haven't had a failure and they seem to work just fine. I have thermal probes on the big heat sinks of the PSU's and they never exceed 33deg.

    - Someone asked if you could mount a PA120.3 across the back where I put a PA120.2 and the answer is... absolutely. This case can obviously house three 120.3's with the configuration I have if you want to sacrifice all front drive bays.

    - Someone also suggested that if you weren't using compression fittings you could use some heat shrink with the braided sleeving over the tubbing to prevent fraying and that's absolutely true... In fact, I considered that until I realized that the compression fittings did an excellent job all on their own. But if you are using standard barbs, you might find that normal worm clamps will work great too and blend into the look of the braided sleeving.

  6. #81
    Xtreme Member
    Join Date
    Oct 2006
    Location
    Sweden
    Posts
    496
    Quote Originally Posted by Breezyjr View Post
    But, I can blame my status as a stay at home dad to FOUR kids 6 and under!

    But, i do a little at a time.....

    breezyjr
    Hah, man, congratulations
    Just give them some candy and they'll leave you alone

  7. #82
    Moderator
    Join Date
    Aug 2007
    Location
    Back and forth between Florida and Maine
    Posts
    4,097
    Such a creative and well-executed project! Modding for the horizontal motherboard mounting is a great idea, but as others have said, takes some real skill to accomplish in such a professional looking manner. I am continuously blown away by the 343B builds here.

  8. #83
    Xtreme Addict
    Join Date
    Oct 2004
    Location
    London UK
    Posts
    1,392
    They just get better and better here. One of the most meticulous builds I have encountered. Congratulations on your effort sir!
    ******************************************
    Respec'
    System:Bunch of crappy overclocked PC's that cost an arm and a leg


  9. #84
    Xtreme Enthusiast
    Join Date
    May 2007
    Location
    Sweden
    Posts
    793
    Quote Originally Posted by virtualrain View Post
    More Build Pics...

    Could you list what part number those mcmaster reducers were? The ones that you ultimately used to fit in the PA's??
    They say the definition of madness is doing the same thing and expecting a different result.
    Howlin' Pelle Almqvist

    Project Log Completed: all internal v1000

  10. #85
    Xtreme Enthusiast
    Join Date
    May 2006
    Posts
    675
    Threads like these make me want to spend soooo much money....

    Nice job!
    Core2Duo E6600 @ 3.0 - Load @ 32c°| Gigabyte P35 DS3P | 2gb Crucial Ballistix Pc2-8500| eVGA 8800GTX| X-fi Fatal1ty | OCZ GameXStream 600w | Custom Watercooled | Custom-built Case


    Dtek Fuzion | DD Maze4 Acetal | Swiftech MCR-320 | DD D5


    3dMark01 3dMark05 3dMark06 Aq3 SuperPi


    Quote Originally Posted by Movieman View Post
    I don't beleive in passive cooling.

  11. #86
    Banned
    Join Date
    Mar 2007
    Location
    French Quarter of Grinchville
    Posts
    2,853
    The McMaster reducer is 4860K657. I own a set myself and it's one of the best.

  12. #87
    Xtreme Enthusiast
    Join Date
    May 2007
    Location
    Sweden
    Posts
    793
    Quote Originally Posted by Xilikon View Post
    The McMaster reducer is 4860K657. I own a set myself and it's one of the best.
    so i don't get confused with language, the number you listed is what I would get to fit bitspower fittings (for example) to a PA120.X?? Just double checking because when I look back at the pic Silverphoenix calls one a 'reducer' and the other a 'coupling', but they both look the same to me. .
    Last edited by LogAn'sRun; 02-20-2008 at 01:40 PM. Reason: spelling
    They say the definition of madness is doing the same thing and expecting a different result.
    Howlin' Pelle Almqvist

    Project Log Completed: all internal v1000

  13. #88
    Banned
    Join Date
    Mar 2007
    Location
    French Quarter of Grinchville
    Posts
    2,853
    Yes, it's the one. The BitsPower fitting use G1/4" and the Thermochill radiators has a G3/8" threading so you need a reducer to get from G3/8" to G1/4".

  14. #89
    Xtreme Addict
    Join Date
    Feb 2008
    Location
    Denmark / Aarhus
    Posts
    1,036
    A bit off topic, is the motherboard tray easy to remove? I am getting a pc343 soon, but I just understood that it wasn't removable?
    Desktop I5-3570k, 8GB Ram, GTX 560, Silverstone TJ08-E, Crucial M4 128GB, 750W Silver Power, ASUS P8Z77-M
    Laptop ThinkPad W520 2720QM /2 x 4 GB ram / Quadro 1000M / Crucial M4 128GB + 500Gb Hdd / FHD Screen / Intel WiFi Link 6300 AGN WLAN / 9 Cell Battery
    Laptop 2 New Macbook Pro Retina / i7 QuadCore / 650 GT / 16GB Ram / 512 GB SSD
    Server: Athlon II X4 640, ASROCK K10N78, 8GB Ram, LSI MegaRaid 8 port, 64GB Vertex 1, 5 x 1 TB WD Raid6, 3 x 3TB Seagate Raid5

  15. #90
    Xtreme Addict
    Join Date
    Jul 2006
    Location
    Vancouver, BC
    Posts
    2,061
    Quote Originally Posted by Xilikon View Post
    The McMaster reducer is 4860K657. I own a set myself and it's one of the best.
    This is correct. My nomenclature in the pic is a bit different from McMaster... what I called a reducer, they call a bushing. The coupler's (called nipples by Mcmaster) are part # 4860K605 if anyone's interested.

    @MechOz, the stock motherboard tray is held in by several rivets... Just drill into the rivet head with a drill bit that's a bit larger than the rivet core (you should be able to gauge the size of the rivet core from the non finished side) and the rivets should just drop out and the tray should be free.

    I'll try to post some more pics of the finished product later tonight.
    Last edited by virtualrain; 02-20-2008 at 06:30 PM.

  16. #91
    I am Xtreme
    Join Date
    Jul 2007
    Location
    The Sacred birth place of Watercooling
    Posts
    4,689
    WOOOOHOOO MORE PICS!!! can't wait
    Quote Originally Posted by skinnee View Post
    No, I think he had a date tonight...

    He and his EK Supreme are out for a night on the town!

  17. #92
    Xtreme Enthusiast
    Join Date
    May 2007
    Location
    Sweden
    Posts
    793
    Quote Originally Posted by virtualrain View Post
    This is correct. My nomenclature in the pic is a bit different from McMaster... what I called a reducer, they call a bushing. The coupler's (called nipples by Mcmaster) are part # 4860K605 if anyone's interested.

    OK, Can we simplify this just a little. . .(i'm slow sometimes) I get what the reducer is for (ie. to screw into my rad giving me the option to use the thousand varieties of barbs/fittings that are out there like EK/DD/D-tek), but what do you connect with a coupler/nipple?


    Quote Originally Posted by virtualrain View Post
    I'll try to post some more pics of the finished product later tonight.
    WOOT!!!!!


    EDIT: Thanks for the response VR, like I said, I'm a little slow and mise the fine print occasionaly. . .
    Last edited by LogAn'sRun; 02-20-2008 at 11:11 PM.
    They say the definition of madness is doing the same thing and expecting a different result.
    Howlin' Pelle Almqvist

    Project Log Completed: all internal v1000

  18. #93
    Xtreme Addict
    Join Date
    Jul 2006
    Location
    Vancouver, BC
    Posts
    2,061
    Quote Originally Posted by LogAn'sRun View Post
    OK, Can we simplify this just a little. . .(i'm slow sometimes) I get what the reducer is for (ie. to screw into my rad giving me the option to use the thousand varieties of barbs/fittings that are out there like EK/DD/D-tek), but what do you connect with a coupler/nipple?
    As the comment in the picture states, the coupler/nipple was used to connect the pump directly to the rad.

  19. #94
    Xtreme Enthusiast
    Join Date
    Feb 2007
    Posts
    790
    The attention to detail in this build is amazing.

    Also, in the words of my friend who I linked this build to:
    "Rich ass bastard"
    Quote Originally Posted by dengyong View Post
    Started life as a FTW and ended up as a WTF.

  20. #95
    Xtreme Addict
    Join Date
    Jul 2006
    Location
    Vancouver, BC
    Posts
    2,061
    Quote Originally Posted by YugenM View Post
    The attention to detail in this build is amazing.

    Also, in the words of my friend who I linked this build to:
    "Rich ass bastard"
    Thanks Yugen... I still think your tape and sock build is one for the ages!

  21. #96
    Xtreme Addict
    Join Date
    Jul 2006
    Location
    Vancouver, BC
    Posts
    2,061
    Updated!... I added some more pics in Post #3 of the build before I added SLI and the PhysX card.

    I'll try to post some pics of the current build with these items and the panels on in the very near future.
    Last edited by virtualrain; 02-20-2008 at 11:51 PM.

  22. #97
    Banned
    Join Date
    Jun 2006
    Location
    in a Red Rage D....
    Posts
    3,839
    yes updates!!!

  23. #98
    Banned
    Join Date
    Mar 2007
    Location
    French Quarter of Grinchville
    Posts
    2,853
    It looks very lovely

  24. #99
    Xtreme Member
    Join Date
    Feb 2008
    Location
    Michigan
    Posts
    173
    Where did you get the braided lines? That's an awesome idea I've always wanted to try....
    I'm guessing, but are you using all high pressure hydraulic lines and fittings?

    Still the most amazing build I've seen so far! I hope mine can be 10% as nice!

    later,
    breezyjr

  25. #100
    Xtreme Cruncher
    Join Date
    Oct 2006
    Location
    Copenhagen, Denmark
    Posts
    495
    Woah, that's, woah, and the, holy shi, oh my god, there's a, *jawdrop*.
    That's seriously Sexy, I try to confide the use of that word to women, but really, damn.

    Love the case, love the colors, love the sleeving job, and the choice in components, you're my new hero mate.

    And you've got a PhysX card, with a waterblock on it. I'm in dire need of a new father, feel like adopting a kid?

    If there was a hall of fame of wicked cases, you'd be in there, and out on the other side.

    CM Stacker 810 w/ Yate Loons | Enermax Infiniti 650W
    ASUS P5K Deluxe | Corsair XMS2 PC2-6400 2x2GB
    Intel Core 2 Quad Q6600 | Thermalright Ultra-120 eXtreme
    BFG Geforce 8800GTS 640MB | ASUS Ageia PhysX P1 128MB
    Logitech G15 | Logitech G5

Page 4 of 8 FirstFirst 1234567 ... LastLast

Bookmarks

Bookmarks

Posting Permissions

  • You may not post new threads
  • You may not post replies
  • You may not post attachments
  • You may not edit your posts
  •