Page 1 of 4 1234 LastLast
Results 1 to 25 of 82

Thread: Motherboard preperation and installation using a LN2/DI unit the clean and easy way

  1. #1

    Motherboard preperation and installation using a LN2/DI unit the clean and easy way

    Here is another guide on how I prepare and insulate my motherboards when installing a ln2/di unit. Obviously there are many ways this can be done, some more involved than others. It doesn't have to be overdone, messy, or complicated. Some key things to remember are to isolate and seal off the socket area from outside air both on the top and bottom of the motherboard. Here is how I do it...clean and easy and I can't remeber the last time I have had a mobo die on me due to socket condensation, so most importantly THIS WORKS!

    To start you will need these materials:
    Pipe wrap insulation with the foil (lowes or home depot), round tube installation 1/2 inch 3/4 inch, scissors and a sharp blade, clear nail polish, "shop rags" or other heavy duty paper towel, and some thermal interface material (I like ceramique the best)


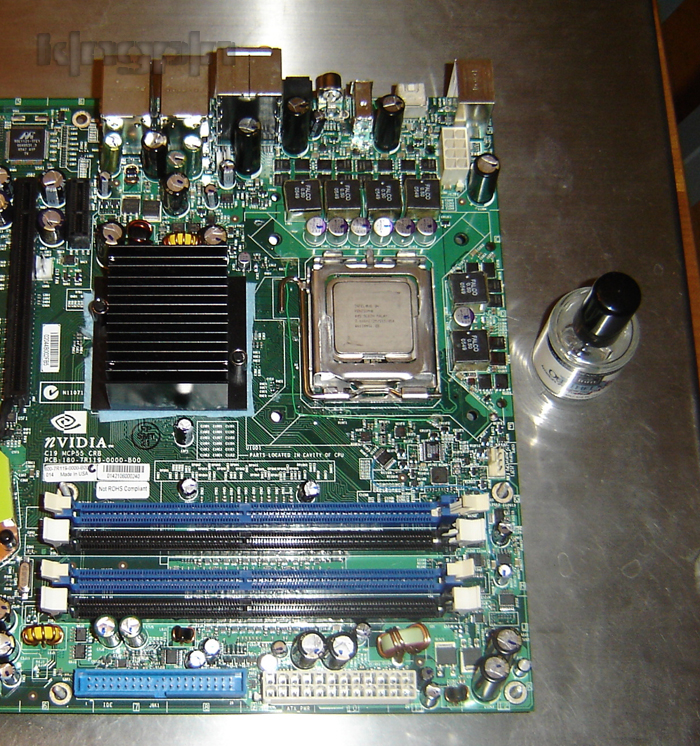
    Now take your motherboard and apply the clear nail polish to all surface mount components all around the socket area, both top and bottom of the mobo. I marked off the bottom pic to give a good idea of the size of the area that needs to be considered for this. I will be using a 590sli lga775 board for this example:


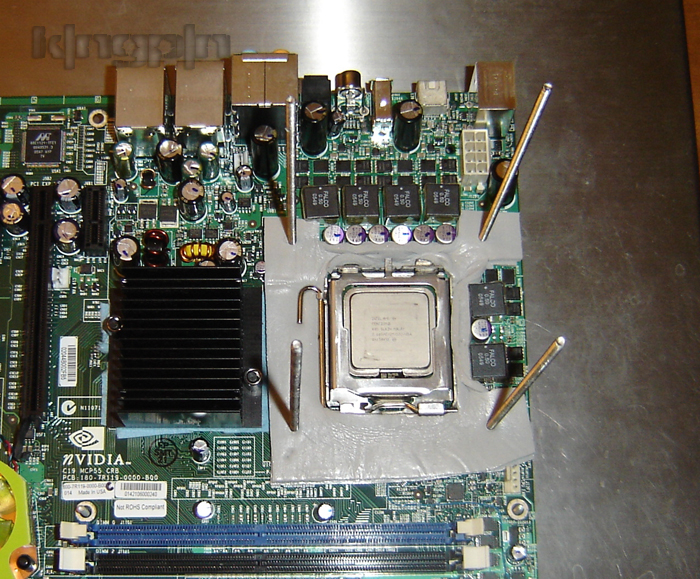
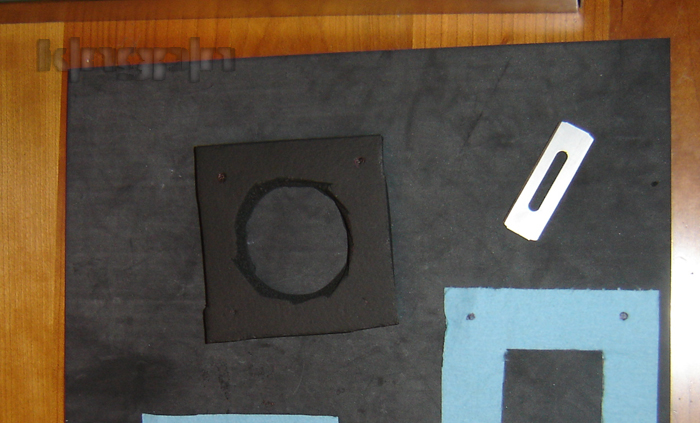
    While your waiting for the polish to dry, take your foil pipe wrap and cut out 2 gasket pads which will be used to seal off air from coming into the socket between surface mount componenets around the socket. You will make 2 indentical gaskets and stick them on top of each other, then stick them down and use a small thin tool to push the double gasket down in between the caps, inductors, and socket like in the second pic here:


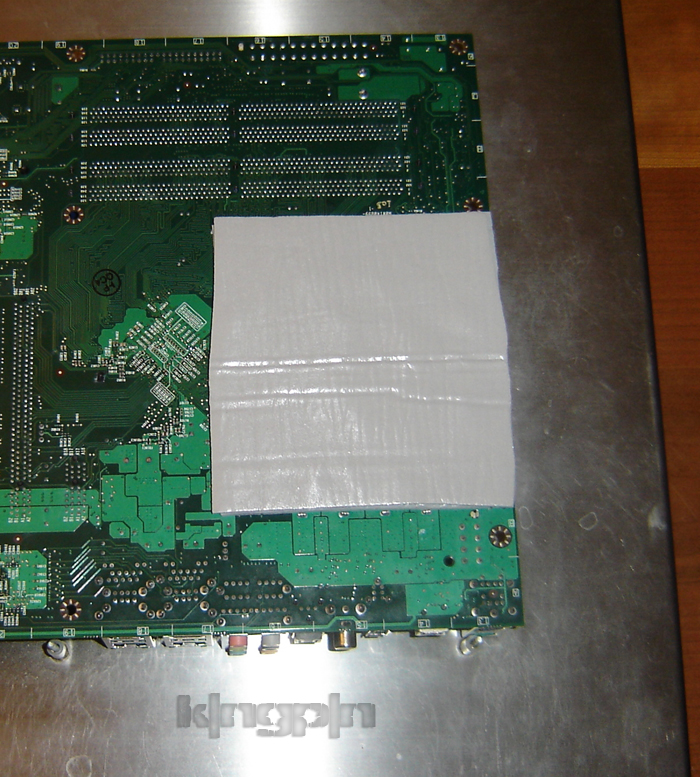
    Do the same for the bottom of the mobo making 2 pieces and sticking them together, then sticking them on the backside of the mobo:


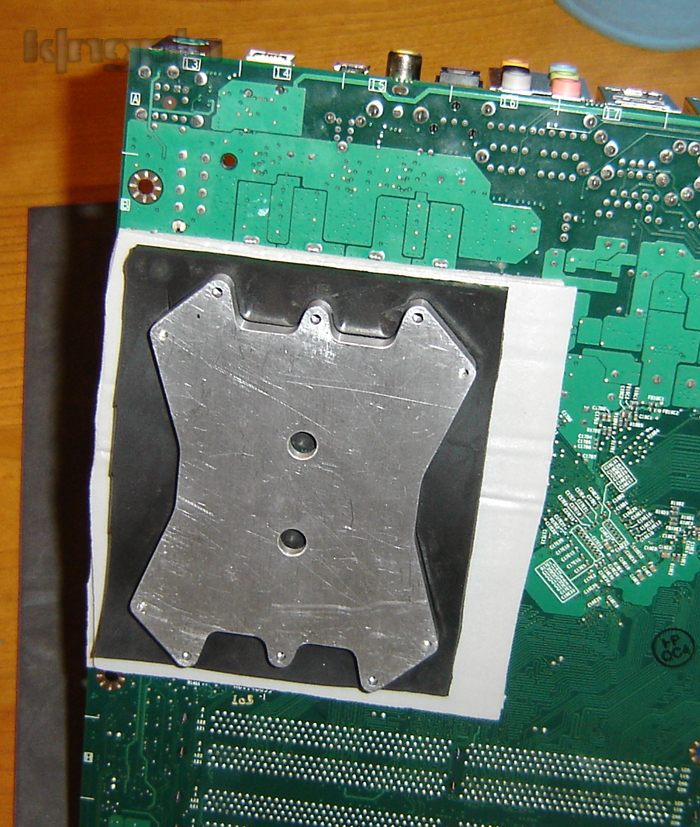
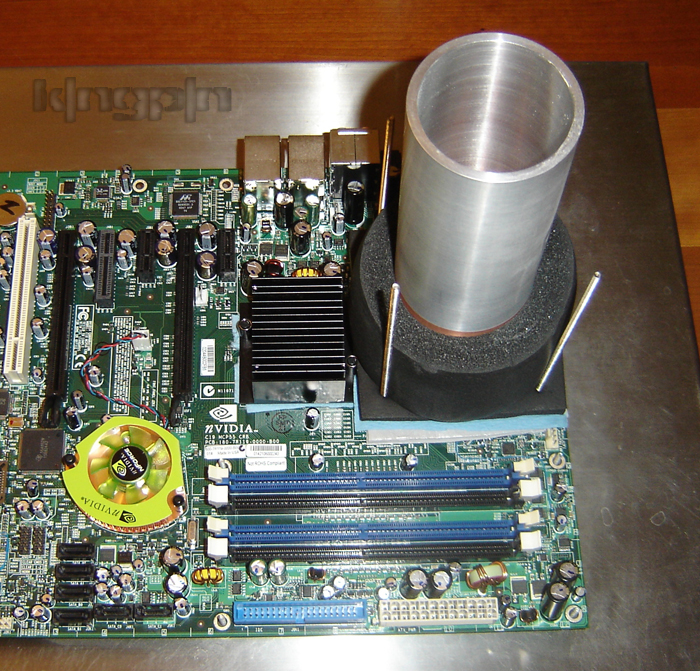
    Now depending on what cpu unit you are using the next few steps may vary slightly, but will still be just about the same procedure for mounting most units. Take your backplate and install the support rods for the container as well as the insulating piece of rubber that will seal off the backside socket area and prevent the aluminum plate from shorting out the mobo:


    Now slide it through the mobo from the bottom and flip the mobo over to finish the installation:


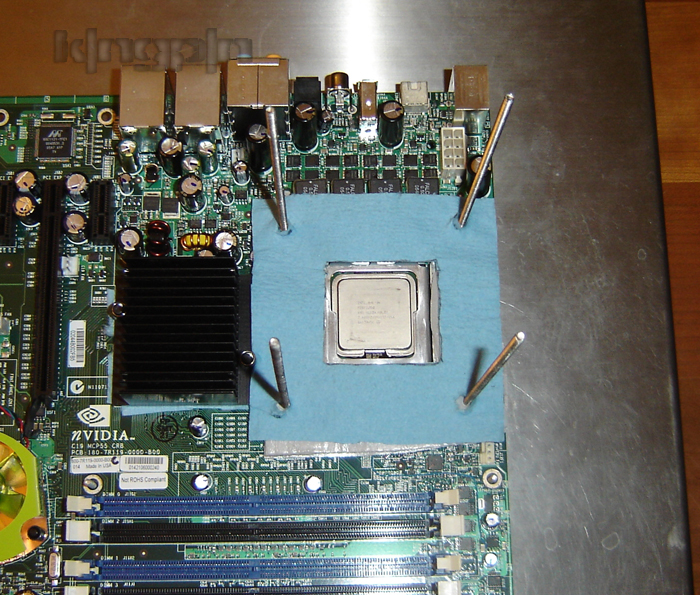
    Now we will make 2 more socket gaskets out of the shop rags that will catch and absorb any drips or moisture that might occur around the cpu if there is air getting through somewhere that you can't see. Stack them and slide them down the rods. These shop towels or any other heavy duty paper towel should be on every benchers shelf. They are excellent at wicking away moisture when it arises. I use them every time I bench in various ways:
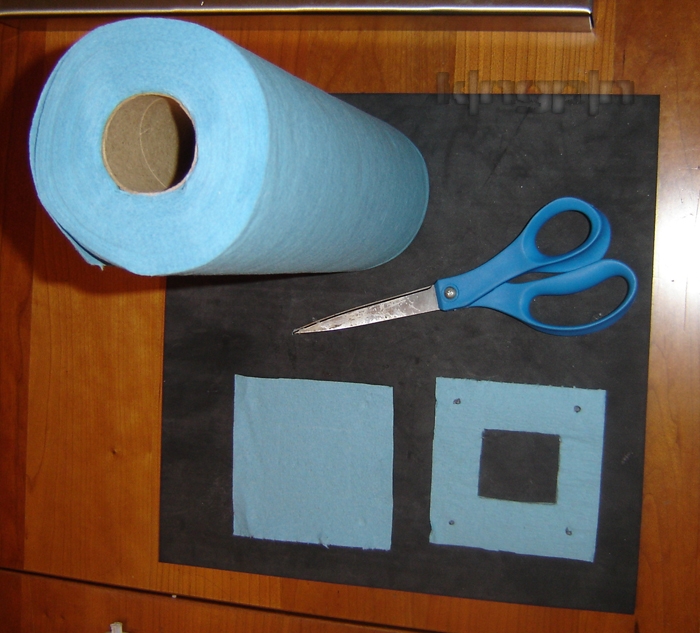


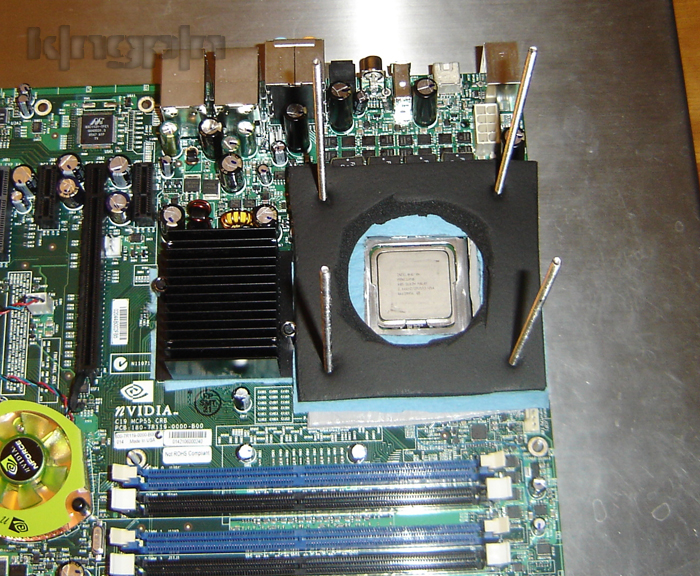
    Now we will make the main foam gasket that will surround the socket. Use the 1/2 sheet foam insulation for this step and center the hole for the unit right over the socket and just make sure the hole doesn't exceed the diameter of you cpu unit as we want to minimize any air space:


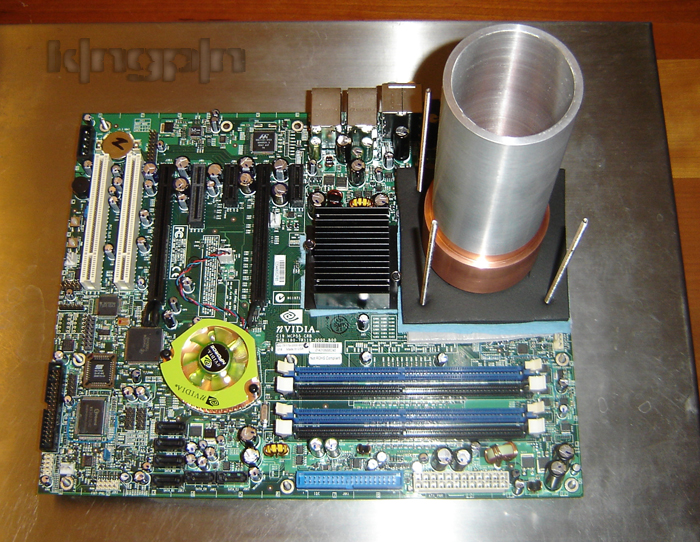
    Time to install your cpu unit finally. Cover the speader of the chip with your tim of choice, and set your cpu container down on the center of the chip:


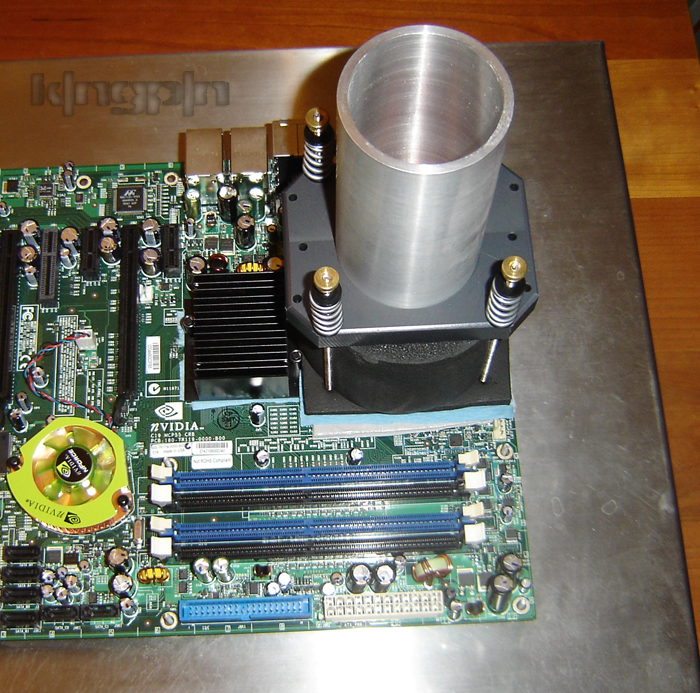
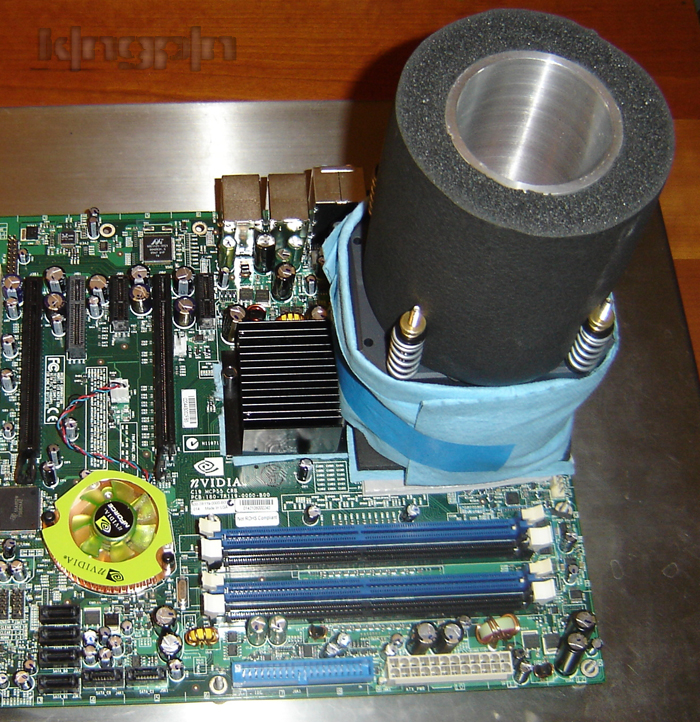
    Now take your round pipe insulation that hopefully matches the outer diameter of your unit, and cut the lower piece that will go under the cpu holddown bracket. Make it oversized vertically, so when you slide the holdown bracket on top, it squeezes it down and compesses the foam down on the mobo as to seal off the socket area fom airflow:


    Now slide down your hold down bracket and install the mounting hardware accordingly. In this case put down your shoulder spacers, then springs, top shoulder spacers, and finally thumbnuts:


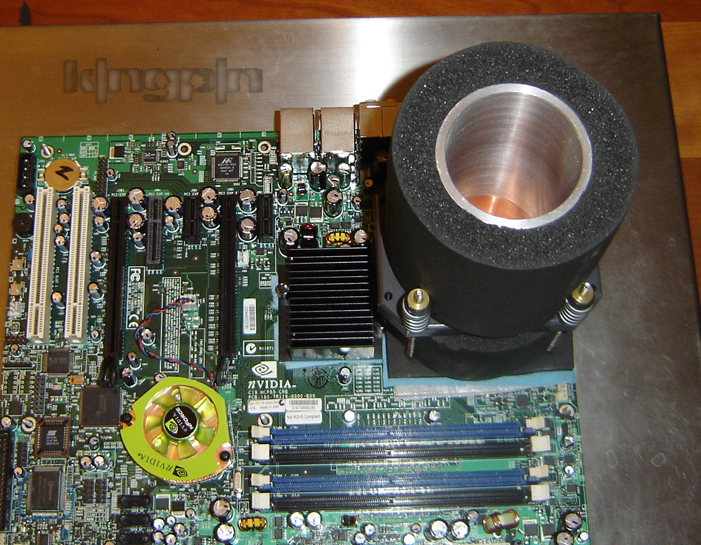
    Almost ready to bench now . Crank down the bracket nice and tight, add your top piece of insulation and your ready to go:


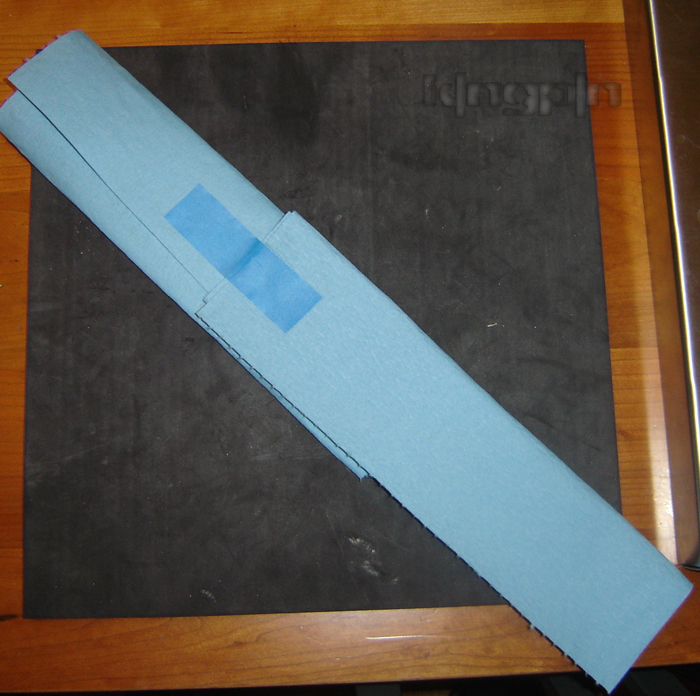
    As a final step I will take some paper towel and fold it for a wrap that goes around the lower insulation under the hold down. It willl "catch" any run-off or condensation that forms on the hold down or outer insulation and prevent it from ever reaching the mobo:


    Happy benching

  2. #2
    XIP
    Join Date
    Nov 2004
    Location
    NYC
    Posts
    5,523
    Perfect Thanks for info KP.

  3. #3
    Admin
    Join Date
    Dec 2003
    Location
    Hillsboro, OR
    Posts
    5,225
    Wonderful guide again. I'm surprised you used no sort of grease in the socket, that paper towel is an interesting touch too. So clean and easy, no wonder you can churn out the benchies at lightning speed.

  4. #4
    Registered User
    Join Date
    Jun 2006
    Location
    Venezuela
    Posts
    65
    Great Guide Thanks a lot

  5. #5
    Xtreme Addict
    Join Date
    Nov 2005
    Location
    The Netherlands
    Posts
    2,018

    Another gr8 guide

  6. #6
    Quote Originally Posted by Gautam
    Wonderful guide again. I'm surprised you used no sort of grease in the socket, that paper towel is an interesting touch too. So clean and easy, no wonder you can churn out the benchies at lightning speed.
    thanx man . I used to use grease in the socket, but it made the sockets all nasty on AMD sockets. Honestly if you seal off the socket area right, it's totally undeeded. Maybe every once in awhile it's not a bad idea to wipe a little dielectric grease on the contact points of the cpu to prevent corrosion from heavy benching.
    Those shop towels are big to me Gautam , I wont bench without them usually. One great thing about them is after they suck up moisture, they dry fairly quick so you can re-use them over and over. They have saved some hardware and prolonged benching runs no doubt.

  7. #7
    Registered User
    Join Date
    Jun 2006
    Location
    Venezuela
    Posts
    65
    have you tested some "rubber" towels the absorb a lot i think it can be perfectly use as insulation, the absorb so much i can go to the pool i can dry myself whit a A4 paper sise towel

  8. #8
    Xtreme 3D Team
    Join Date
    Jan 2006
    Location
    Canada
    Posts
    579
    Nice guide!

    This guide will help me make a couple steps a bit cleaner from the way I used to do it.

  9. #9
    I am Xtreme
    Join Date
    Aug 2003
    Posts
    7,825
    Basically how I insulate minus the towels Nice job Vince, never thought to put the pot on before slipping the insulation down. Would make getting good contact much easier!

    Gautam you and your damn grease, I never used it until LGA775 where you scared the hell out of me and convinced me to use it, completely un needed on DI/ln2 unless you can't get an air tight seal.
    Phenom II 940 BE / ASUS M4A79 / HD5770 Crossfire
    3770mhz CPU 2600mhz NB | DDR1040 5-5-5-15 | 900/1250

  10. #10
    XIP
    Join Date
    Nov 2004
    Location
    NYC
    Posts
    5,523
    Heat inside the socket will prevent any moisture. Condensation starts when system powered off or run with default vcore....I think.

  11. #11
    -100c Club Member
    Join Date
    Dec 2004
    Location
    Europe
    Posts
    1,796
    Really nice issulation guide.

    Regards
    ------------------------------------------------------------------------------------------------------------------------------------------------
    My Work: LittleDevil's SS Cases, LittleDevil's SS Worklog, LD CPU-R1 Dice/LN² Pots, LD GFX-R1 Dice/LN² Pots,
    LittleDevil LD PC-V10, LittleDevil's K-Type Temp Display, |EMAIL: ldphasechange@gmail.com

    LD PC-V8 Watercooling Cases:
    LINK

    LD PC-V8 ATX/HPTX Watercoolig PC case with 10 expansion slots: LINK NEW!
    -------------------------------------------------------------------------------------------------------------
    www.ldcooling.com

    Find US on Facebook

  12. #12
    Admin
    Join Date
    Dec 2003
    Location
    Hillsboro, OR
    Posts
    5,225
    Quote Originally Posted by afireinside
    Gautam you and your damn grease, I never used it until LGA775 where you scared the hell out of me and convinced me to use it, completely un needed on DI/ln2 unless you can't get an air tight seal.
    I'm a pansy, is that what you wanted to hear?

  13. #13
    I am Xtreme
    Join Date
    Jan 2005
    Posts
    4,714
    Great guide KP
    Where courage, motivation and ignorance meet, a persistent idiot awakens.

  14. #14
    Xtreme 3D Team
    Join Date
    Jan 2006
    Location
    Canada
    Posts
    579
    I have a couple of questions for KP and anyone else thats uses the foil pipe wrap foam shown in the pictures. Do you guys insulate the motherboard once and then just leave it insulated? or do you guys take if off when your done the session?

    I am asking because I went out and bought a pack from home depot and tried it out. It worked great, no condensation problems but when I went to remove it, it was giving me a hard time and would mostly split/tare in half with the sticky side and some foam left on the motherboard. I still haven't removed all of it, it takes time.

    So I was thinking you guys just leave it on and never experienced the difficulties of removing it.

  15. #15
    I am Xtreme
    Join Date
    Aug 2003
    Posts
    7,825
    I leave it until I sell the board. It does stick, very bad if you use armaflex. The kind kingpin uses looks like "frostking" or something from homedepot. That comes off easily until you press it down really hard.
    Phenom II 940 BE / ASUS M4A79 / HD5770 Crossfire
    3770mhz CPU 2600mhz NB | DDR1040 5-5-5-15 | 900/1250

  16. #16
    Quote Originally Posted by MTP04
    I have a couple of questions for KP and anyone else thats uses the foil pipe wrap foam shown in the pictures. Do you guys insulate the motherboard once and then just leave it insulated? or do you guys take if off when your done the session?

    I am asking because I went out and bought a pack from home depot and tried it out. It worked great, no condensation problems but when I went to remove it, it was giving me a hard time and would mostly split/tare in half with the sticky side and some foam left on the motherboard. I still haven't removed all of it, it takes time.

    So I was thinking you guys just leave it on and never experienced the difficulties of removing it.
    Yes it is Frostking. It comes in a bag. One thing with this stuff is that almost every roll I have bought had more or less adhesive on it. It will vary from bag to bag. I have some right now that is really sticky, and tears if you dont remove it carefully. With some rolls it just pops off cleanly.

    There are really two diff ways you can make and use the Grey double layer gasket that goes around the cpu socket. You can stack them one on top of the other with sticky sides down, so the lower-most layer will stick all around the socket. This will give you the best protection because it will seal off the surface of the motherboard around the socket, but like you said if the mobo isn't a permanent bencher, you have to take the foam off when your done to put it back in your case or whatever. On my perm benching boards I jsut leave it on and neve take it off like AFI said. Once you get that good seal, theres no point in removing it and taking the polish off with it.
    What I will do in a situation where I am testing a motherboard that isn't a permanent bencher is instead take the two foam gaskets grey gaskets made from the foil wrap, and stick them sticky side together to make a 2-layer gasket pad which wont have adhesive on either side. Put it into position and push it between teh socket and components like with other. Just make sure that you have some good compression going on with the lower round insulation piece under the bracket to squeeze off the socket area and you should still be cool as far as condesation is concerned. Then when your done benching and you break down the whole cpu unit assembly, the socket gasket will just pop off clean. Sticky side down will always give you the best seal and protection, but non sticky side down works good and is cleaner for removing it afterwards.

  17. #17
    Xtreme 3D Team
    Join Date
    Jan 2006
    Location
    Canada
    Posts
    579
    Quote Originally Posted by afireinside
    I leave it until I sell the board. It does stick, very bad if you use armaflex. The kind kingpin uses looks like "frostking" or something from homedepot. That comes off easily until you press it down really hard.

    Quote Originally Posted by k|ngp|n
    Yes it is Frostking. It comes in a bag. One thing with this stuff is that almost every roll I have bought had more or less adhesive on it. It will vary from bag to bag. I have some right now that is really sticky, and tears if you dont remove it carefully. With some rolls it just pops off cleanly.

    There are really two diff ways you can make and use the Grey double layer gasket that goes around the cpu socket. You can stack them one on top of the other with sticky sides down, so the lower-most layer will stick all around the socket. This will give you the best protection because it will seal off the surface of the motherboard around the socket, but like you said if the mobo isn't a permanent bencher, you have to take the foam off when your done to put it back in your case or whatever. On my perm benching boards I jsut leave it on and neve take it off like AFI said. Once you get that good seal, theres no point in removing it and taking the polish off with it.
    What I will do in a situation where I am testing a motherboard that isn't a permanent bencher is instead take the two foam gaskets grey gaskets made from the foil wrap, and stick them sticky side together to make a 2-layer gasket pad which wont have adhesive on either side. Put it into position and push it between teh socket and components like with other. Just make sure that you have some good compression going on with the lower round insulation piece under the bracket to squeeze off the socket area and you should still be cool as far as condesation is concerned. Then when your done benching and you break down the whole cpu unit assembly, the socket gasket will just pop off clean. Sticky side down will always give you the best seal and protection, but non sticky side down works good and is cleaner for removing it afterwards.

    Thanks for the replies.

    Okay makes sense now. Next time I will just put the adhesive sides together and avoid the messy cleanup. I do get a good amount of compression from the hold down bracket so I should be okay. The stuff I used before was similar to the armflex pipe insulation but its in sheets and has a adhesive side that holds well enough to seal it during benching and still comes off clean and easy once removing it unless I pull it off too quickly then only some adhesive stays but can be cleaned with isopro alcohol.

    I forgot to ask my second question in my previous post.

    Do you guys use a template or cut the insulation by eye that goes around the cpu, caps etc etc?

  18. #18
    Quote Originally Posted by MTP04
    Do you guys use a template or cut the insulation by eye that goes around the cpu, caps etc etc?
    I usually use foil pieces laying around from used pieces of wrap to make impressions of the socket area. You could do it by eye, but using the impression will be probably be more precise and get you a nearly perfect fit.
    Plus, you can save the foil gasket templates for future gaskets when yours wear out, tear, or get misplaced. They don't last forever and will start to loose their firmness and ability to keep out air after mounting and dismounting a million times. I have a box full of gasket templates for every socket/mobo I ever benched with a container... as well as vga gaskets.

  19. #19
    Also, the paper towels may seem like an unorthodox or silly step , but believe me they work very, very well. See for yourself and try it out for a good long hard bench sesssion at -120c, then when your done break down the cpu unit assembly, and check for wet spots on the towel gasket to see how good your socket air seal was. Any moisture that comes in contact with the towel will be trapped there. Some times I will find a small wet ring in the towel just around the cpu ihs. It never goes below there though. Without the towel down there to trap it, it could creep along side the socket and get under there causing a variety of problems and possibily a dead board.

  20. #20
    Xtreme 3D Team
    Join Date
    Jan 2006
    Location
    Canada
    Posts
    579
    Thanks for the reply KP, good information!

    I'll try things a little different next time around.

  21. #21
    Xtreme Addict
    Join Date
    Sep 2003
    Location
    Edinburgh - UK
    Posts
    1,334


    Dose anyone know what the equivalent of this stuff is in the UK. I'm having a REAL hard time trying to find a suitable replacement, as all I have is sticky backed neoprene and its not that pliable so air pockets can form easily

    I believe it is a Frostking product, but which one?

  22. #22
    Xtreme Member
    Join Date
    Oct 2004
    Posts
    101
    I think it is this one
    http://www.frostking.com/pipeinsulation.php
    PIPE WRAP KITS
    Simple, effective way to insulate pipes of all diameters. Ideal for over wrapping electric heat cables. Consists of 1/2" thick fiberglass plus plastic vapor barrier. (Aluminum foil/plastic foam combination also available).

  23. #23
    Xtreme Member
    Join Date
    Feb 2006
    Location
    Portugal
    Posts
    427
    Someone can tell me the "real" name of these?


    []s

  24. #24
    -_-
    Join Date
    Sep 2006
    Location
    ATLanta, Ga.
    Posts
    516
    @Kingpin


    Where did you get your round tubing insulation that you send with your Evo kits?
    I have been to the "big box" stores and even a plumbing Dist. center and a Heating/Air Dist. center and nobody has it.....

  25. #25
    xtreme energy
    Join Date
    Oct 2004
    Location
    Europe, Latvia
    Posts
    4,145
    What kind of plumbing center is that? How are they going to insulate water pipes?
    ...

Page 1 of 4 1234 LastLast

Bookmarks

Bookmarks

Posting Permissions

  • You may not post new threads
  • You may not post replies
  • You may not post attachments
  • You may not edit your posts
  •