Page 5 of 11 FirstFirst ... 2345678 ... LastLast
Results 101 to 125 of 252

Thread: Sense and Sensibility [A Build Log]

  1. #101
    Xtreme Addict
    Join Date
    Jun 2007
    Location
    Melbourne, Australia
    Posts
    1,478
    Mt Buller '08


    I've been at the snow this last weekend, or what was left of it anyway. Myself and a group of friends decided last-minute to pack the cars and head to Mt Buller for a Sunday/Monday overnighter. We traveled up on the Sunday afternoon, spent the evening at a ski resort in Mansfield; drinking beer and champagne and sitting around in the spa just chatting. The next morning we got up early, and after a buffet brekky we drove up the mountain and hit the slopes! Because it is now springtime down here, there's not as much snow as during the peak season, but still plenty enough to have a day's worth of skiing/boarding. Enjoy the pics!

    Two of my crazy mates, Nick (left) and Pete (right). We had just finished cooking ourselves dinner.


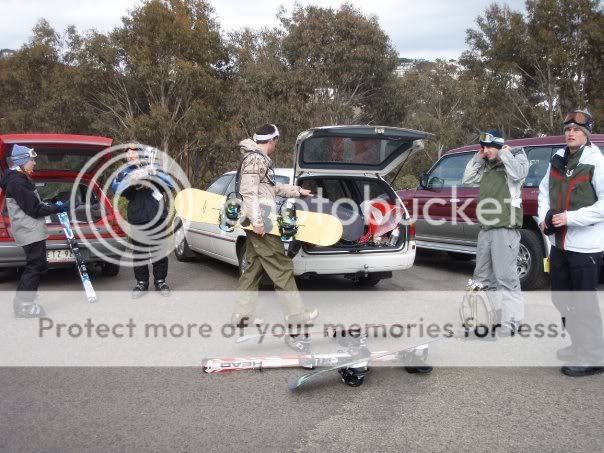
    Unloading the cars up on the mountain. We parked in the day carkpark and caught the shuttle bus up to the village. I'm adjusting my headgear, second from the right.


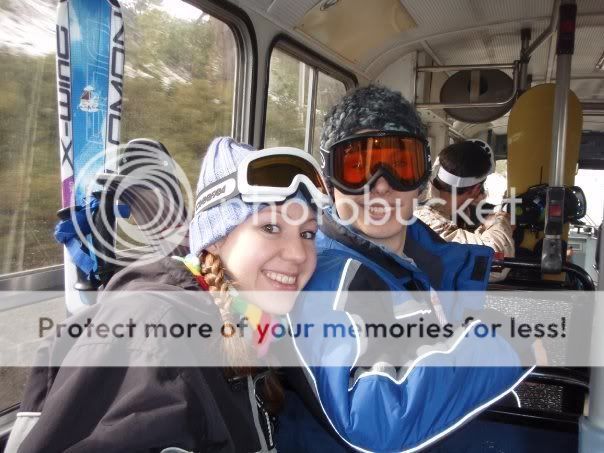
    Ben and his fiance Karina on the bus


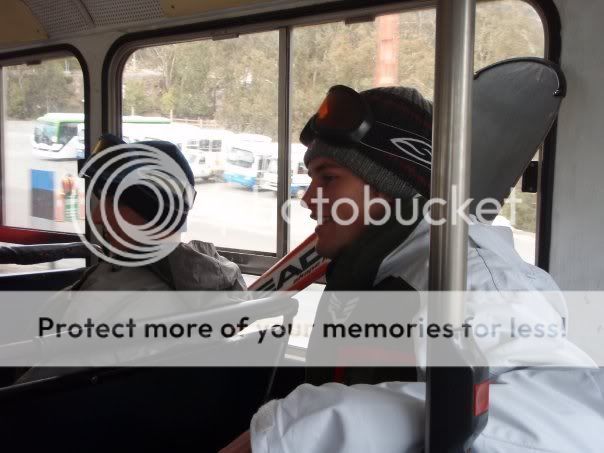
    Pete and myself (left) on the bus


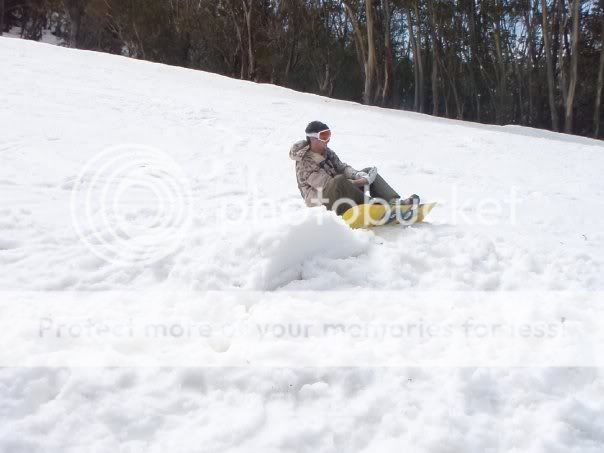
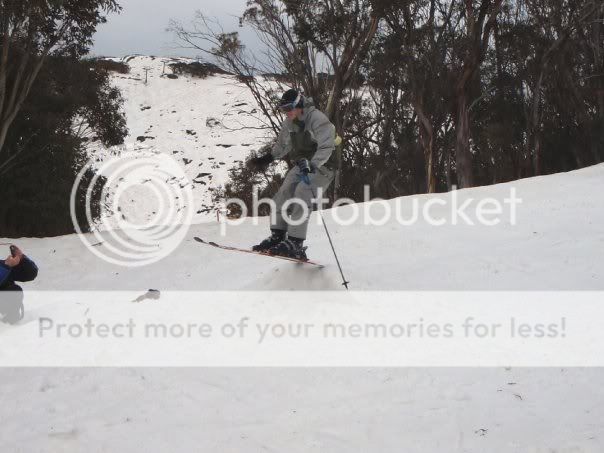
    Why do i always have to wait for the slow boarders!? Skiing FTW!


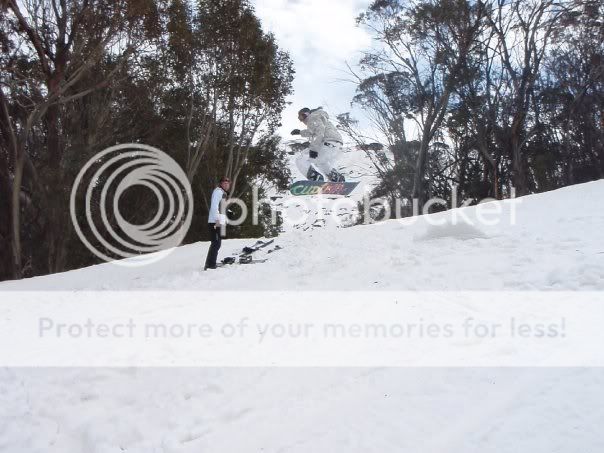
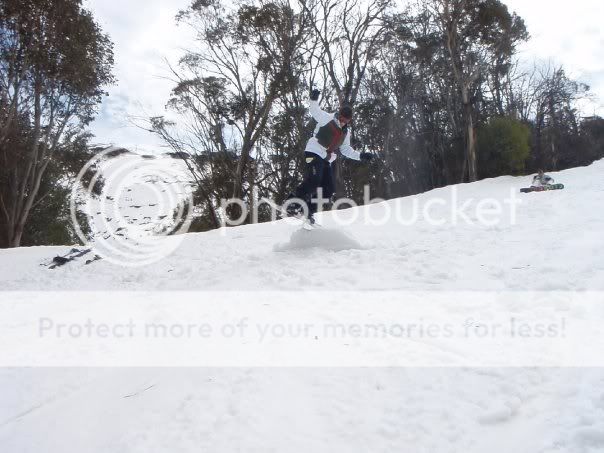
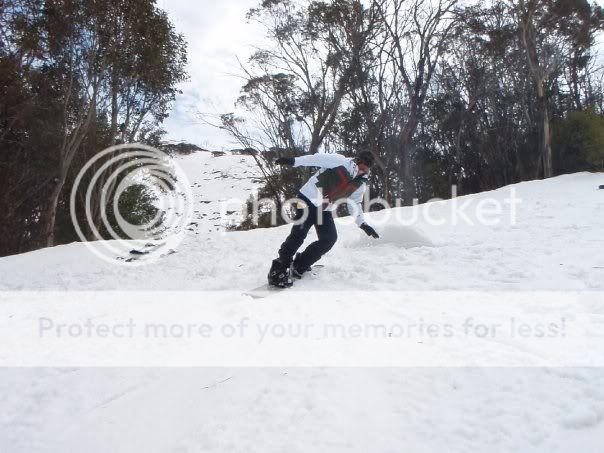
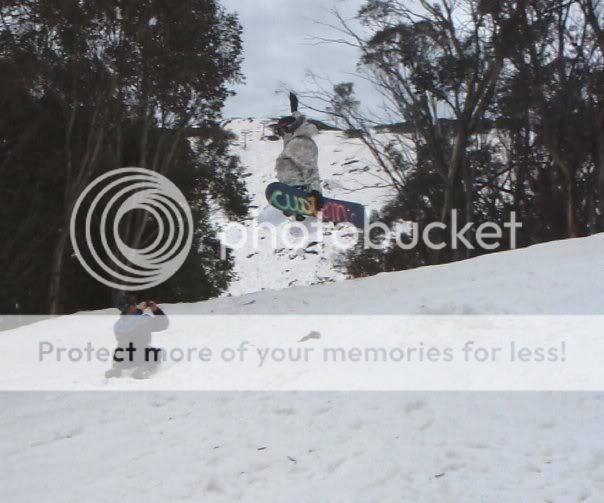
    We spent a good portion of the day building and using a jump on one of the quieter runs. Here's some pics of the craziness:


    It's only a little one, c'mon we're all noobs (except Steve, pics soon!)


    Pete was quite happy just to watch at the start.


    Nick however, got straight into it!


    Steve got some good air too

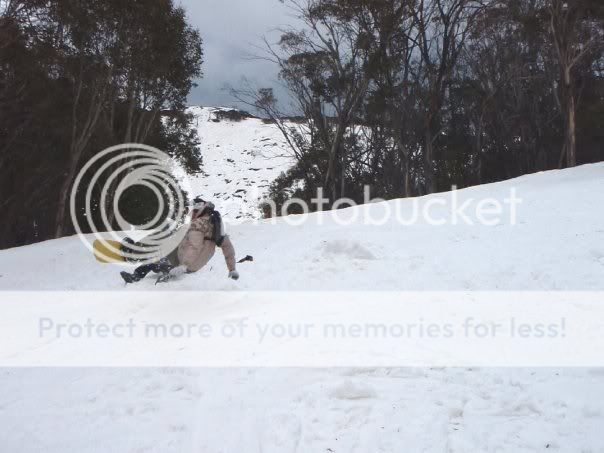
    Pete says "that looks piss easy, i can do that!"...

    We'll see Pete

    Good start


    Starting to look bad


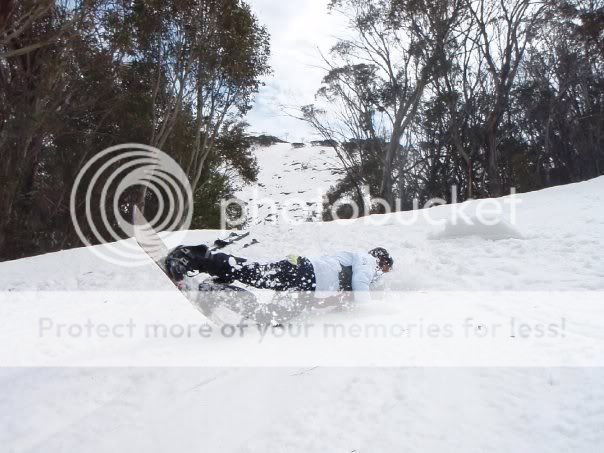
    Oh dear, what happened Pete!?


    It's ok, he's all good.


    Nick had a real bad jump towards the end, he was pretty sore after this one!


    Me having a go. I'm not much of an aerial skiier


    Probably Steve's best grab!


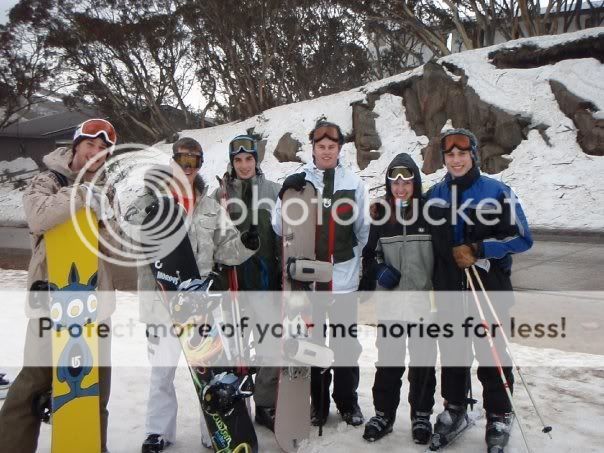
    And one last happy snap of the group before we left. I'm third from the left, in between Steve and Pete.


    All up it was a ripper weekend. The company, the food, the snow, it was all awesome. Man, i need to find some hobbies that aren't so expensive!!

    *****
    Last edited by twwen2; 09-24-2008 at 08:53 PM.

  2. #102
    Xtreme Addict
    Join Date
    Aug 2004
    Location
    Minneapolis, MN
    Posts
    2,187
    Nothing beats a good ski trip. Nice pictures!!

    It should be an interesting week if you keep posting.

  3. #103
    Xtreme Enthusiast
    Join Date
    Sep 2007
    Location
    Sydney - Australia
    Posts
    515
    nice work Twwen2 - weird about the stock cooler though...

    wish I had the time (and money) to go to the snow....oh well maybe next year.

  4. #104
    Xtreme Addict
    Join Date
    Jun 2007
    Location
    Melbourne, Australia
    Posts
    1,478
    Fan wire soldering: Burnt fingers and other fun stuff!


    This has been done before, but i thought i'd show how i went about it. The pictures speak for themselves, but essentially all i did was to snip the last connector off, solder it to the middle fan's wire, then snip that connector off and solder to the end wire.

    That was very badly worded, so just look at the pictures.

    The first cut


    The second cut


    First join complete


    All finished. Notice that i forgot to shrink one of the wires before i soldered it. I have to get my hands on some black electrical tape to clean it up.


    The EK backplate i've been waiting on has finally arrived, so the real work has finally begun. Thanks for reading and i promise more very sonn!

    *****

  5. #105
    Xtreme Enthusiast
    Join Date
    Sep 2007
    Location
    Sydney - Australia
    Posts
    515
    for update - nice work and looking forward to pics of it coming together.

  6. #106
    Xtreme Addict
    Join Date
    Aug 2004
    Location
    Minneapolis, MN
    Posts
    2,187
    Nice!! Can you take more pictures of the tubing please? Oh, and a quick review of it? I'm interested in it, but just unsure at this point. Thanks

  7. #107
    Xtreme Enthusiast
    Join Date
    Jul 2008
    Location
    kibbler the nibbler
    Posts
    984
    Perfect!! Thanks for the soldering/splicing pics. I had a general idea how to do it, but your step by step photos really help. Now I know the sequence to put sleeving here, shrink here, then solder, then sleeve, etc.

    How did you strip the fan wires in the middle like this??
    Last edited by Kibbler; 09-25-2008 at 07:51 PM.

  8. #108
    Xtreme Addict
    Join Date
    Jun 2007
    Location
    Melbourne, Australia
    Posts
    1,478
    Quote Originally Posted by Kibbler View Post
    Perfect!! Thanks for the soldering/splicing pics. I had a general idea how to do it, but your step by step photos really help. Now I know the sequence to put sleeving here, shrink here, then solder, then sleeve, etc.

    How did you strip the fan wires in the middle like this??
    Yeah that was a PITA. I used the wire stripper to cut the insulation at each end, then used a razor blade to remove the insulation in between the two cuts. It was a bit fiddly but it seemed to work.

  9. #109
    Xtreme Addict
    Join Date
    Jun 2007
    Location
    Melbourne, Australia
    Posts
    1,478
    Quote Originally Posted by BlueAqua View Post
    Nice!! Can you take more pictures of the tubing please? Oh, and a quick review of it? I'm interested in it, but just unsure at this point. Thanks
    Sure thing. My first impressions are:
    - looks great, especially under UV.
    - is quite stiff. others may disagree, but it's definitely much stiffer than the masterkleer and Pro-LRT that i also own.

    Quote Originally Posted by RealRedRaider View Post
    Great Work...

    I sure do wish we had mountains in Texas, oh well, that's why God made Coloado, so Texans would have a place to ski...
    I wish we had bigger mountains. Buller is good for a day or two, but it's not big enough for a weeklong stay. Look out NZ next year!

  10. #110
    Xtreme Enthusiast
    Join Date
    Jul 2008
    Location
    kibbler the nibbler
    Posts
    984
    Quote Originally Posted by twwen2 View Post
    Yeah that was a PITA. I used the wire stripper to cut the insulation at each end, then used a razor blade to remove the insulation in between the two cuts. It was a bit fiddly but it seemed to work.
    Thanks man, I'll give it a shot.

  11. #111
    Xtreme Addict
    Join Date
    Jun 2007
    Location
    Melbourne, Australia
    Posts
    1,478
    Fans and more Sleeving


    The Lian Li V350 has 3 internal fans, two intake 120mm and one exhaust 80mm. They are black ball-bearing, fast and loud. Naturally they must be swapped out for something more appropriate!

    The new fans are these:
    http://www.performance-pcs.com/catal...ducts_id=24114
    They have orange UV-reactive blades and 4 white LEDs in the corners. They fit in great with the "orange and black" theme.

    Here's my trusty workbench with everything laid out
    http://www.performance-pcs.com/catal...ducts_id=24114

    We'll start with the stock 80mm fan


    And it's classy replacement


    Another arty-farty shot. Sorry these are so pretty, i just couldn't resist.


    About to be attached with a trick sound dampener


    Then i got to work on the 120mm fans. They are held in a cage of sorts, the pictures make things pretty clear i hope.


    Just the final shots now:


    I decided to sleeve the internal case wiring. I used a combination of Techflex PET in 1/4" and 3/8".

    Ugly bare wiring:


    Much better!


    And the bigger front-panel connectors:


    Everything back in the case


    Next up I get to work on the HD4870. Think EK full-cover goodness. Yummmmmm....

    *****
    Last edited by twwen2; 09-25-2008 at 10:13 PM.

  12. #112
    Banned
    Join Date
    Apr 2008
    Location
    Brisbane, Australia
    Posts
    3,601
    Great job on the sleeving. It's something I'm not a fan of lol but your effort makes me want to do the same.

  13. #113
    Xtreme Cruncher
    Join Date
    Aug 2007
    Location
    Perth, Western Australia
    Posts
    1,343
    Awesome work twenn2! Looking forward to more pics and progress! Might get some more work done on my case this weekend seeing as we have a long weekend in WA.

    emu

  14. #114
    Banned
    Join Date
    Aug 2007
    Location
    C:\Philippines\TPC
    Posts
    1,525
    nice work twwen2! picking up some pointers from you...

  15. #115
    Xtreme Enthusiast
    Join Date
    Jul 2008
    Location
    kibbler the nibbler
    Posts
    984
    I've been lusting after some blingy fans like those xigmateks (or noiseblocker/gelid/nanoxia) for a while now, which doesn't make ANY sense since I already have brand new S-Flex's. You're not helping... Are there any performance tests for these newer fans?

  16. #116
    Xtreme Member
    Join Date
    Aug 2008
    Location
    Melbourne, Victoria, Australia
    Posts
    150
    Good work twwen2! It's looking good, the fans will make a nice addition! I sleeved most of my ugly cables today. Still not to happy on my case. I'm having a look at some full towers.
    Keep giving the fans more of what they want! More updates! Are you showing the problematic case design photos?
    twwen2 convo:

    Brenton(switch8): "what's the assignment like? Is it hard or just big?"
    Tom(twwen2): "both long and hard"
    Tom(twwen2): "omg that sounded so dodgy! LOL"

    [Project Switch Box] My Build Log.


  17. #117
    Xtreme Addict
    Join Date
    Jun 2007
    Location
    Melbourne, Australia
    Posts
    1,478
    Quote Originally Posted by MomijiTMO View Post
    Great job on the sleeving. It's something I'm not a fan of lol but your effort makes me want to do the same.
    Yeah it's a PITA but definately worth it IMO.

    Quote Originally Posted by emuexport View Post
    Awesome work twenn2! Looking forward to more pics and progress! Might get some more work done on my case this weekend seeing as we have a long weekend in WA.

    emu
    Long weekends FTW! I've got a week off now but i'll be away, so no updates after tonight.

    Quote Originally Posted by emoners View Post
    nice work twwen2! picking up some pointers from you...
    Cheers, glad i can help out

    Quote Originally Posted by Kibbler View Post
    I've been lusting after some blingy fans like those xigmateks (or noiseblocker/gelid/nanoxia) for a while now, which doesn't make ANY sense since I already have brand new S-Flex's. You're not helping... Are there any performance tests for these newer fans?
    Sorry bro, i couldn't resist myself. They're orange, which fits the build theme perfect. Malik has been using them too, they look great under UV. I've no idea what the fans perform like, i've got S-Flex F's on my rad and they're great. The orange ones will only serve as in-case airflow, so as long as i can't hear them on the controller i don't really care how they perform.

    Quote Originally Posted by switch8 View Post
    Good work twwen2! It's looking good, the fans will make a nice addition! I sleeved most of my ugly cables today. Still not to happy on my case. I'm having a look at some full towers.
    Keep giving the fans more of what they want! More updates! Are you showing the problematic case design photos?
    Good job on the sleeving, i'll have to check it out sometime soon. More updates incoming!

    Yes i have been having some serious problems with the case, but i've managed to push on and have found solutions to everything so far. Pics up shortly!

  18. #118
    Xtreme Member
    Join Date
    Aug 2008
    Location
    Singapore
    Posts
    404
    wonderful update!
    nice sleeve job... and those fans are awesome
    btw, how noisy/silent are those?

  19. #119
    Xtreme Addict
    Join Date
    Jun 2007
    Location
    Melbourne, Australia
    Posts
    1,478
    Parts underwater, well not quite yet...


    A few evenings ago i felt compelled to tackle the GPU.
    Most people comment in their logs that taking the graphics card(s) apart is the scariest thing they have to do, i can testify to that! Usually the GPU is the most expensive part in the build, so it makes for nervous times.

    Now i've taken a few stock coolers off in my time, but none as large and heavy as this one. I'm pleased to say it went well.


    Stock card


    All screws taken out and cooler removed


    EK full-cover block installed. Sorry i was concentrating so hard on the removal and installation of the block i forgot to take any other pics of the process. But most people are familiar with the deal, and the end pics are nice too.


    Ok, as you can see, the card is still gonna take up two slots in the mobo tray thanks to the double-width PCI bracket. But i need all four available slots, so the bracket must go. But what can i replace it with...?

    Koolance to the rescue!!!

    Yep, that's right, koolance make a single-slot bracket for Radeon cards. It's actually for the x1900 series, but ATi haven't changed their DVI port arrangement since.


    The old and new brackets


    New bracket installed

    Walla!

    I decided to install my CPU and NB blocks while i was in the mood...


    I almost couldn't get the Supreme on. With the EK backplate installed under the mobo, the screws weren't quite long enough to allow me to screw the top nuts down. However i persevered, and after much cussing and pain i got them all on:


    Here's one of my favourite pics so far:


    Now in my jubilation i whacked the GPU into the mobo and went to slide it into the case to take some happy snaps, and to my dismay i found this:


    Yep, that's right. Your eyes do not deceive you. The GPU block is too tall to slide the mobo tray in. DAAMIT!

    "oh well", i hear you say, "you'll just have to install the card once the tray is in the case." Unfortunately it's not that simple. The internal HDD cage is the same height as the offending bar, and so card won't actually ever fit int the case!

    So in my desperation last night, i decided to do some Xtremely noob case modding. Hey, everyone has to start somewhere!

    First to go was the HDD cage. Removing that involved drilling out the rivets that attach it to the case frame.


    Then i grabbed my trusty hacksaw and attacked the frame:


    Now the card will slide in nicely


    Unfortunately removing part of the frame has weakened the structural integrity of the case, but i found that once the mobo tray was installed with its thumbscrews it held together nicely. It's wasn't gonna fall apart or anything, but i could tell the frame was a little weaker. I'm not really worried about it, it's not like i'll be sitting on the case anytime soon...!


    Here's a few more shots of the mobo & GPU inside the case. The pictures demonstrate just how much room i have to work with.


    Here's a good side-on perspective


    And a few more arty shots:


    That's it for tonight folks. I'm quite pleased with my progress so far, and am almost ready to install everything and plumb the tubing runs etc. Unfortunately for you guys, i'm going away with my family this next week, and so there will be no more updates until Friday at the earliest. Sorry for the delay, but one must live a family life too

    Thanks once again for reading, i hope you guys are still enjoying the log.

    Cheers
    Tom

  20. #120
    Registered User
    Join Date
    Aug 2006
    Posts
    5,855
    Awww... you should have sawed off the video card rather than the beautiful case

    Don't you hate it when stuff is made for the lowest common denominator instead of compatibility with the high end stuff? lol

  21. #121
    Banned
    Join Date
    Aug 2007
    Location
    C:\Philippines\TPC
    Posts
    1,525
    looking good bro! too bad you had to hack a piece of the lili case

  22. #122
    Xtreme Member
    Join Date
    Mar 2008
    Location
    Finland
    Posts
    250
    I think I'll go for this case in my next build, and this log surely has given me some great perspective!
    Not into xtreme builds anymore, just like to keep things silent.
    Asus P6T Deluxe V2 - Intel i7 920 3.6 GHz - 6 Gb 1800 MHz DDR3 - AMD HD5850

  23. #123
    Xtreme Enthusiast
    Join Date
    Sep 2007
    Location
    Sydney - Australia
    Posts
    515
    Nice work

    Looking forward to some more updates when you get back

  24. #124
    Banned
    Join Date
    Apr 2008
    Location
    Brisbane, Australia
    Posts
    3,601
    Nice job! Yeah once you start cutting the crossbeams, you begin to realise how light and easy to damage aluminium is. =X

    Taking off the mammoth GT200 heatsink took me some time. It was hard to get the top and bottom to actually split. A flathead screwdriver was my saviour =D.

  25. #125
    Xtreme Addict
    Join Date
    Jun 2007
    Location
    Melbourne, Australia
    Posts
    1,478
    Quote Originally Posted by IanY View Post
    Awww... you should have sawed off the video card rather than the beautiful case
    Never!!! R3 would have had to shoot me

    Quote Originally Posted by emoners View Post
    looking good bro! too bad you had to hack a piece of the lili case
    Yeah i'm actually a bit dissapointed with the case. Don't get me wrong, it's simply beautiful, well built (quality wise) and did i say beautiful?

    There's just been one too many times where i've found my self saying "FFS, what the hell were Lian Li thinking when they designed this part or that part..."

    Quote Originally Posted by Lagaaja View Post
    I think I'll go for this case in my next build, and this log surely has given me some great perspective!
    Sweet, i look forward to seeing it.

    Quote Originally Posted by Dangals View Post
    Nice work

    Looking forward to some more updates when you get back
    Me too! Sorry everyone for the weeks delay, i'm so close the finish line was in sight...

    Quote Originally Posted by MomijiTMO View Post
    Nice job! Yeah once you start cutting the crossbeams, you begin to realise how light and easy to damage aluminium is. =X

    Taking off the mammoth GT200 heatsink took me some time. It was hard to get the top and bottom to actually split. A flathead screwdriver was my saviour =D.
    Yeah alu is fragile, but nice to work with because it's so soft.

    And lastly i'm honoured to have the stamp of approval from R3. I thought you might like my choice of waterblocks lol

Page 5 of 11 FirstFirst ... 2345678 ... LastLast

Bookmarks

Bookmarks

Posting Permissions

  • You may not post new threads
  • You may not post replies
  • You may not post attachments
  • You may not edit your posts
  •